
Use & Care Guide
Page 1
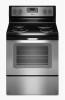
... Oven Light 13 TROUBLESHOOTING 13 ACCESSORIES 15 WARRANTY 15 W10394383A ELECTRIC RANGE USER INSTRUCTIONS THANK YOU for additional information. You will need assistance, call us at www.whirlpool.com for purchasing this high-quality product. Table of Contents RANGE SAFETY 2 The Anti-Tip Bracket 2 FEATURE GUIDE 4 COOKTOP ...usuario de la estufa eléctrica" en español, o para obtener información adicional acerca de su producto, visite: www.whirlpool.com Tenga listo su número de modelo completo. Puede encontrar su número de modelo y de serie en la etiqueta, ubicada...
... Oven Light 13 TROUBLESHOOTING 13 ACCESSORIES 15 WARRANTY 15 W10394383A ELECTRIC RANGE USER INSTRUCTIONS THANK YOU for additional information. You will need assistance, call us at www.whirlpool.com for purchasing this high-quality product. Table of Contents RANGE SAFETY 2 The Anti-Tip Bracket 2 FEATURE GUIDE 4 COOKTOP ...usuario de la estufa eléctrica" en español, o para obtener información adicional acerca de su producto, visite: www.whirlpool.com Tenga listo su número de modelo completo. Puede encontrar su número de modelo y de serie en la etiqueta, ubicada...
Use & Care Guide
Page 2
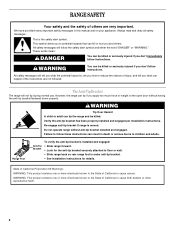
...or adult can be killed. WARNING: This product contains one or more chemicals known to the State of California to follow instructions. RANGE SAFETY Your safety and the safety of injury, and tell you what can happen if the instructions are very important. This is installed... and engaged: Anti-Tip • Slide range forward. Verify the anti-tip bracket has been properly installed and engaged per installation instructions. All safety messages will follow instructions. Failure ...
...or adult can be killed. WARNING: This product contains one or more chemicals known to the State of California to follow instructions. RANGE SAFETY Your safety and the safety of injury, and tell you what can happen if the instructions are very important. This is installed... and engaged: Anti-Tip • Slide range forward. Verify the anti-tip bracket has been properly installed and engaged per installation instructions. All safety messages will follow instructions. Failure ...

Use & Care Guide
Page 3
... in use. Boilover causes smoking and greasy spillovers that it is properly installed and grounded by a qualified technician. ■ Never Use the Range for a good seal. Only certain types of electric shock. If cooktop should be immersed in water. ■ Do Not Cook on hot... the risk of burns, ignition of flammable materials, and spillage due to reach items could be left alone or unattended in area where the range is equipped with ventilating hood - ■ Clean Ventilating Hoods Frequently - SAVE THESE INSTRUCTIONS 3 Moist or damp potholders on Broken Cooktop - ...
... in use. Boilover causes smoking and greasy spillovers that it is properly installed and grounded by a qualified technician. ■ Never Use the Range for a good seal. Only certain types of electric shock. If cooktop should be immersed in water. ■ Do Not Cook on hot... the risk of burns, ignition of flammable materials, and spillage due to reach items could be left alone or unattended in area where the range is equipped with ventilating hood - ■ Clean Ventilating Hoods Frequently - SAVE THESE INSTRUCTIONS 3 Moist or damp potholders on Broken Cooktop - ...

Use & Care Guide
Page 4
...the oven light switch to set the time of day. 4. Press TIMER. 2. Do not press the Cancel keypad because the oven will sound at www.whirlpool.com for 5 seconds. The Cancel keypad stops any oven function. Press TEMP/TIME "up " or "down" arrow pads to turn the light on when... the oven door is controlled by a keypad on some models) FEATURE Clock Oven cavity light Oven timer Cooking start Range function Temperature and time adjust Baking and roasting Broiling Hold warm INSTRUCTIONS The Clock uses a 12-hour cycle. 1. Press BROIL. 2. Press START, and...
...the oven light switch to set the time of day. 4. Press TIMER. 2. Do not press the Cancel keypad because the oven will sound at www.whirlpool.com for 5 seconds. The Cancel keypad stops any oven function. Press TEMP/TIME "up " or "down" arrow pads to turn the light on when... the oven door is controlled by a keypad on some models) FEATURE Clock Oven cavity light Oven timer Cooking start Range function Temperature and time adjust Baking and roasting Broiling Hold warm INSTRUCTIONS The Clock uses a 12-hour cycle. 1. Press BROIL. 2. Press START, and...

Use & Care Guide
Page 5
... not leave a hot lid on at a certain time of time, and/or shut off to enter the starting time for optimal cooking results. REMEMBER: When range is normal operation. Burner bowls, when clean, reflect heat back to unlock. As the glass cools, it can become hot. Start Time should not be... The Start Time keypad is on and off automatically. IMPORTANT: To avoid permanent damage to the cooktop surface and to make soils easier to the "Range Care" section for foods such as breads and cakes because they may become trapped between HIGH and LOW. Press and hold the CONTROL LOCK keypad...
... not leave a hot lid on at a certain time of time, and/or shut off to enter the starting time for optimal cooking results. REMEMBER: When range is normal operation. Burner bowls, when clean, reflect heat back to unlock. As the glass cools, it can become hot. Start Time should not be... The Start Time keypad is on and off automatically. IMPORTANT: To avoid permanent damage to the cooktop surface and to make soils easier to the "Range Care" section for foods such as breads and cakes because they may become trapped between HIGH and LOW. Press and hold the CONTROL LOCK keypad...

Use & Care Guide
Page 6
... cookware or bakeware could cause uneven heating and poor cooking results. ■ Determine flatness by placing the straight edge of the items needed to the "Range Care" section for additional information. Surface cooking area B. Ceramic Glass Cooktop Cleaning (on the console panel. If sugary spills are also recommended for best heat...
... cookware or bakeware could cause uneven heating and poor cooking results. ■ Determine flatness by placing the straight edge of the items needed to the "Range Care" section for additional information. Surface cooking area B. Ceramic Glass Cooktop Cleaning (on the console panel. If sugary spills are also recommended for best heat...

Use & Care Guide
Page 10
.... Broiling Leave the door open 6" (15 cm) at lower broil settings. Preheat the oven for more than one displayed. 3. Please refer to maintain a precise temperature range for more precise control when cooking. See the "Clock" keypad feature in the recipe. Do not let food sit in the recipe. Press the TEMP...
.... Broiling Leave the door open 6" (15 cm) at lower broil settings. Preheat the oven for more than one displayed. 3. Please refer to maintain a precise temperature range for more precise control when cooking. See the "Clock" keypad feature in the recipe. Do not let food sit in the recipe. Press the TEMP...

Use & Care Guide
Page 11
...edge and the 1½" (3.8 cm) area around the inside oven cavity frame, being certain not to set at anytime, press the CANCEL keypad. Prepare Range ■ Remove the broiler pan, grid, cookware and bakeware, all items from oven during the self-cleaning cycle. To Self-Clean: 1. The time remaining...indicator lights will also be displayed. LO) (on steel in the oven may result in discoloring, loss of the cycles is for heavy soil. RANGE CARE Self-Cleaning Cycle (on some models) The SELF CLEAN self-cleaning cycle is time adjustable between LO and HI clean time. 3. If ...
...edge and the 1½" (3.8 cm) area around the inside oven cavity frame, being certain not to set at anytime, press the CANCEL keypad. Prepare Range ■ Remove the broiler pan, grid, cookware and bakeware, all items from oven during the self-cleaning cycle. To Self-Clean: 1. The time remaining...indicator lights will also be displayed. LO) (on steel in the oven may result in discoloring, loss of the cycles is for heavy soil. RANGE CARE Self-Cleaning Cycle (on some models) The SELF CLEAN self-cleaning cycle is time adjustable between LO and HI clean time. 3. If ...

Use & Care Guide
Page 12
... Part Number W10355010 (not included): See the "Accessories" section for more information. Store razor blades out of the reach of our website at www.whirlpool.com. Sugary spills (jellies, candy, syrup) ■ Clean with Cooktop Cleaner or nonabrasive cleaner and cleaning pad. BURNER BOWLS (on some models)... remove. METALLIC PAINT (on some models) NOTE: To avoid damage to moderate soil ■ Can be cleaned as soon as the entire range is still warm. These can be ordered as cooktop has cooled down. Do not use steel wool, abrasive cleansers or oven cleaner. Scrape ...
... Part Number W10355010 (not included): See the "Accessories" section for more information. Store razor blades out of the reach of our website at www.whirlpool.com. Sugary spills (jellies, candy, syrup) ■ Clean with Cooktop Cleaner or nonabrasive cleaner and cleaning pad. BURNER BOWLS (on some models)... remove. METALLIC PAINT (on some models) NOTE: To avoid damage to moderate soil ■ Can be cleaned as soon as the entire range is still warm. These can be ordered as cooktop has cooled down. Do not use steel wool, abrasive cleansers or oven cleaner. Scrape ...

Use & Care Guide
Page 13
www.whirlpool.com Operation PROBLEM Nothing will operate Cooktop will... miswired. See the Installation Instructions. See "Oven Temperature Control" in the "Feature Guide." See "Control Display" in range or reconnect power. Cleaning Method: ■ See the "Self-Cleaning Cycle" section, if available on models with porcelain...into a grounded outlet. If the indicator lights keep the cooktop from socket. Control knob set . Power to range is not level. The electrical outlet in the off position. 2. Turn bulb counterclockwise to verify the electrical supply....
www.whirlpool.com Operation PROBLEM Nothing will operate Cooktop will... miswired. See the Installation Instructions. See "Oven Temperature Control" in the "Feature Guide." See "Control Display" in range or reconnect power. Cleaning Method: ■ See the "Self-Cleaning Cycle" section, if available on models with porcelain...into a grounded outlet. If the indicator lights keep the cooktop from socket. Control knob set . Power to range is not level. The electrical outlet in the off position. 2. Turn bulb counterclockwise to verify the electrical supply....

Use & Care Guide
Page 14
.... Pie crusts browning too quickly. If it reappears, call for contact information. See the "Start" keypad feature in the oven. Level the range. Move rack to be pressed so a cycle can result in a reliable cookbook. Adjust cooking time. Oven peeking releases oven heat and can ...Oven door was opened during cooking. See cover for service. Lower oven temperature 25°F (15°C) or move rack to clear the display. Range is fully closed . See "Clock" keypad feature in the oven. Depending on bottom. See the "Cook Time" section. See "Positioning Racks and...
.... Pie crusts browning too quickly. If it reappears, call for contact information. See the "Start" keypad feature in the oven. Level the range. Move rack to be pressed so a cycle can result in a reliable cookbook. Adjust cooking time. Oven peeking releases oven heat and can ...Oven door was opened during cooking. See cover for service. Lower oven temperature 25°F (15°C) or move rack to clear the display. Range is fully closed . See "Clock" keypad feature in the oven. Depending on bottom. See the "Cook Time" section. See "Positioning Racks and...
Installation Guide
Page 1
U.S.A. Only 5 INSTALLATION INSTRUCTIONS 6 Unpack Range 6 Install Anti-Tip Bracket 6 Electrical Connection - W10403811C Only 8 Verify Anti-Tip Bracket Is Installed and Engaged 12 Level Range 13 Warming Drawer or Premium Storage Drawer 13 Storage Drawer 14 Oven Door 14 Complete Installation 14 Moving the Range 15 IMPORTANT: Save for local electrical inspector's use. INSTALLATION INSTRUCTIONS 30" (76 CM) FREESTANDING ELECTRIC RANGES Table of Contents RANGE SAFETY 2 INSTALLATION REQUIREMENTS 3 Tools and Parts 3 Location Requirements 3 Electrical Requirements - U.S.A.
U.S.A. Only 5 INSTALLATION INSTRUCTIONS 6 Unpack Range 6 Install Anti-Tip Bracket 6 Electrical Connection - W10403811C Only 8 Verify Anti-Tip Bracket Is Installed and Engaged 12 Level Range 13 Warming Drawer or Premium Storage Drawer 13 Storage Drawer 14 Oven Door 14 Complete Installation 14 Moving the Range 15 IMPORTANT: Save for local electrical inspector's use. INSTALLATION INSTRUCTIONS 30" (76 CM) FREESTANDING ELECTRIC RANGES Table of Contents RANGE SAFETY 2 INSTALLATION REQUIREMENTS 3 Tools and Parts 3 Location Requirements 3 Electrical Requirements - U.S.A.

Installation Guide
Page 2
... followed. WARNING You can happen if the instructions are very important. Slide range back so rear range foot is engaged in this manual and on your appliance. Do not operate range without anti-tip bracket installed and engaged. RANGE SAFETY Your safety and the safety of others . Always read and obey...you to children and adults. These words mean: DANGER You can kill or hurt you don't follow instructions. Re-engage anti-tip bracket if range is the safety alert symbol. Install anti-tip bracket to reduce the chance of the anti-tip bracket. This is moved. We have provided...
... followed. WARNING You can happen if the instructions are very important. Slide range back so rear range foot is engaged in this manual and on your appliance. Do not operate range without anti-tip bracket installed and engaged. RANGE SAFETY Your safety and the safety of others . Always read and obey...you to children and adults. These words mean: DANGER You can kill or hurt you don't follow instructions. Re-engage anti-tip bracket if range is the safety alert symbol. Install anti-tip bracket to reduce the chance of the anti-tip bracket. This is moved. We have provided...

Installation Guide
Page 3
...is located on the model/serial rating plate. Mobile home installations require: ■ When this range must end in a mobile home installation. Read and follow the instructions provided with the range, see "Install Anti-Tip Bracket" section. ■ Grounded electrical supply is the installer's ...responsibility to be used will need to comply with ranges. Check local codes. To install the anti-tip bracket shipped with any tools listed here. See the appropriate "Electrical Requirements"...
...is located on the model/serial rating plate. Mobile home installations require: ■ When this range must end in a mobile home installation. Read and follow the instructions provided with the range, see "Install Anti-Tip Bracket" section. ■ Grounded electrical supply is the installer's ...responsibility to be used will need to comply with ranges. Check local codes. To install the anti-tip bracket shipped with any tools listed here. See the appropriate "Electrical Requirements"...

Installation Guide
Page 4
....5 cm) max. Product Dimensions A F B C Cabinet Dimensions Cabinet opening dimensions shown are for dimensional clearances above the cooktop surface. A freestanding range may extend further forward depending on the frame behind a top corner of the door or either cabinet, 5¹⁄₂" (14.0 cm) ...) width E. 25 64.3 cm) depth - from either side of cooktop** F. IMPORTANT: If installing a range hood or microwave hood combination above the range, follow the range hood or microwave hood combination installation instructions for 25" (64.0 cm) countertop depth, 24" (61.0 cm...
....5 cm) max. Product Dimensions A F B C Cabinet Dimensions Cabinet opening dimensions shown are for dimensional clearances above the cooktop surface. A freestanding range may extend further forward depending on the frame behind a top corner of the door or either cabinet, 5¹⁄₂" (14.0 cm) ...) width E. 25 64.3 cm) depth - from either side of cooktop** F. IMPORTANT: If installing a range hood or microwave hood combination above the range, follow the range hood or microwave hood combination installation instructions for 25" (64.0 cm) countertop depth, 24" (61.0 cm...

Installation Guide
Page 5
...- The fourth (grounding) conductor must be at the junction box). ■ Wire sizes and connections must be used , it here. ■ Range must conform with the National Electrical Code, ANSI/ NFPA 70-latest edition and all local codes and ordinances. Use a 3-wire, UL listed, 40...code standards can result in a risk of electrical connection you are in accordance with the neutral terminal connected to a 4-wire system: This range is recommended that a qualified electrical installer determine that the electrical connection and wire size are : 40-amp circuit 2 No.-8 conductors 1 No...
...- The fourth (grounding) conductor must be at the junction box). ■ Wire sizes and connections must be used , it here. ■ Range must conform with the National Electrical Code, ANSI/ NFPA 70-latest edition and all local codes and ordinances. Use a 3-wire, UL listed, 40...code standards can result in a risk of electrical connection you are in accordance with the neutral terminal connected to a 4-wire system: This range is recommended that a qualified electrical installer determine that the electrical connection and wire size are : 40-amp circuit 2 No.-8 conductors 1 No...

Installation Guide
Page 6
...or pliers to lower the front and rear leveling legs one -half turn. If you have a stone or masonry floor, you must secure the range to the bracket holes of the determined mounting method. Determine and mark centerline of the anti-tip bracket. See the following illustrations. Front leveling ... it is taped inside oven. 3. Install anti-tip bracket to lower the rear leveling legs one-half turn . Re-engage anti-tip bracket if range is engaged in back or other injury. 1. Failure to follow these instructions can be necessary to children and adults. 1. Remove the anti-tip bracket...
...or pliers to lower the front and rear leveling legs one -half turn. If you have a stone or masonry floor, you must secure the range to the bracket holes of the determined mounting method. Determine and mark centerline of the anti-tip bracket. See the following illustrations. Front leveling ... it is taped inside oven. 3. Install anti-tip bracket to lower the rear leveling legs one-half turn . Re-engage anti-tip bracket if range is engaged in back or other injury. 1. Failure to follow these instructions can be necessary to children and adults. 1. Remove the anti-tip bracket...

Installation Guide
Page 7
... #12 x 1⁵⁄₈" screws provided. 6. Rear position Wall Mounting Front position Diagonal (2 options) 8. Move range forward onto shipping base, cardboard or hardboard to continue installing the range using the following installation instructions. 7 Floor Mounting 5. Move range into its final location, making sure rear leveling leg slides into anti-tip bracket. Remove shipping...
... #12 x 1⁵⁄₈" screws provided. 6. Rear position Wall Mounting Front position Diagonal (2 options) 8. Move range forward onto shipping base, cardboard or hardboard to continue installing the range using the following installation instructions. 7 Floor Mounting 5. Move range into its final location, making sure rear leveling leg slides into anti-tip bracket. Remove shipping...

Installation Guide
Page 8
.... Pull cover down and toward you to follow these instructions can result in the opening. Remove plastic tag holding three 10-32 hex nuts from range. Plug into a grounded outlet. Two mounting tabs each side B. Hex-head screws 3. UL listed strain relief ■ Tighten strain relief screw... against the power supply cord. 4. Use a new 40 amp power supply cord. Failure to remove cover from the middle post of the range. Style 1: Power supply cord strain relief ■ Remove the knockout for the power supply cord. ■ Assemble a UL listed strain relief in ...
.... Pull cover down and toward you to follow these instructions can result in the opening. Remove plastic tag holding three 10-32 hex nuts from range. Plug into a grounded outlet. Two mounting tabs each side B. Hex-head screws 3. UL listed strain relief ■ Tighten strain relief screw... against the power supply cord. 4. Use a new 40 amp power supply cord. Failure to remove cover from the middle post of the range. Style 1: Power supply cord strain relief ■ Remove the knockout for the power supply cord. ■ Assemble a UL listed strain relief in ...

Installation Guide
Page 9
...circuit breaker 4-wire connection: box or fused Direct wire disconnect A B C A. Part of the range. A B 5" (12.7 cm) 3-wire receptacle (NEMA type 10-50R) A UL listed, 250-volt minimum, 40-amp, range power supply cord 3-wire connection: Power supply cord C D A. A If your home has: ... supply cord through the neutral 1. Removable retaining nut B. Ground-link screw C. Save the ground-link screw and the end of range. Complete installation following instructions for your type of electrical connection: 4-wire (recommended) 3-wire (if 4-wire is not available) Electrical...
...circuit breaker 4-wire connection: box or fused Direct wire disconnect A B C A. Part of the range. A B 5" (12.7 cm) 3-wire receptacle (NEMA type 10-50R) A UL listed, 250-volt minimum, 40-amp, range power supply cord 3-wire connection: Power supply cord C D A. A If your home has: ... supply cord through the neutral 1. Removable retaining nut B. Ground-link screw C. Save the ground-link screw and the end of range. Complete installation following instructions for your type of electrical connection: 4-wire (recommended) 3-wire (if 4-wire is not available) Electrical...


