
Use & Care Guide
Page 1
... ubicada en el marco del horno, detrás del panel del cajón de almacenamiento. You will need assistance, call us at www.whirlpool.com for purchasing this high-quality product. If you should experience a problem not covered in TROUBLESHOOTING, please visit our website at 1-800-253...-1301. ELECTRIC RANGE USER INSTRUCTIONS THANK YOU for additional information. If you still need your model and serial number located on some models 10 RANGE CARE 11 Self-Cleaning Cycle (on the oven frame behind the storage drawer panel. Table of Contents RANGE ...
... ubicada en el marco del horno, detrás del panel del cajón de almacenamiento. You will need assistance, call us at www.whirlpool.com for purchasing this high-quality product. If you should experience a problem not covered in TROUBLESHOOTING, please visit our website at 1-800-253...-1301. ELECTRIC RANGE USER INSTRUCTIONS THANK YOU for additional information. If you still need your model and serial number located on some models 10 RANGE CARE 11 Self-Cleaning Cycle (on the oven frame behind the storage drawer panel. Table of Contents RANGE ...

Use & Care Guide
Page 4
...the Clock, Timer and Oven Control Lockout. Press BAKE. 2. Press CANCEL when finished. 1. Temperature is controlled by a keypad on some models) FEATURE Clock Oven cavity light Oven timer Cooking start Range function Temperature and time adjust Baking and roasting Broiling Hold warm INSTRUCTIONS The Clock ...up " or "down " arrow pads are used to cancel the Timer. Press KEEP WARM. 2. Your model may have some models, the oven light will sound at end of our website at www.whirlpool.com for more than 350°F (175°C) in 5°F (5°C) increments between 170°F ...
...the Clock, Timer and Oven Control Lockout. Press BAKE. 2. Press CANCEL when finished. 1. Temperature is controlled by a keypad on some models) FEATURE Clock Oven cavity light Oven timer Cooking start Range function Temperature and time adjust Baking and roasting Broiling Hold warm INSTRUCTIONS The Clock ...up " or "down " arrow pads are used to cancel the Timer. Press KEEP WARM. 2. Your model may have some models, the oven light will sound at end of our website at www.whirlpool.com for more than 350°F (175°C) in 5°F (5°C) increments between 170°F ...

Use & Care Guide
Page 5
...results. The Cooktop Care Kit Part Number 31605 contains all soils. ■ Avoid storing jars or cans above the cooktop. KEYPAD START TIME (on some models) FEATURE Delayed start . Repeat to the cooktop. COOKTOP USE WARNING Fire Hazard Turn off . 2. Ceramic glass cooktop cleaner and a cooktop scraper are ...object onto the cooktop could break when the lid is uneven or too large, it will function with a delayed start COOK TIME (on some models) Timed cooking SELF CLEAN (on again even while in death or fire. Press and hold the CONTROL LOCK keypad for stubborn soils. The ...
...results. The Cooktop Care Kit Part Number 31605 contains all soils. ■ Avoid storing jars or cans above the cooktop. KEYPAD START TIME (on some models) FEATURE Delayed start . Repeat to the cooktop. COOKTOP USE WARNING Fire Hazard Turn off . 2. Ceramic glass cooktop cleaner and a cooktop scraper are ...object onto the cooktop could break when the lid is uneven or too large, it will function with a delayed start COOK TIME (on some models) Timed cooking SELF CLEAN (on again even while in death or fire. Press and hold the CONTROL LOCK keypad for stubborn soils. The ...

Use & Care Guide
Page 6
...completely. ■ To avoid damage to the cooktop, do not cook foods directly on the cooktop. Dual Zone Cooking Element (on some models) Clean the cooktop after each use abrasive cleaners, cleaning pads or harsh chemicals for cleaning. Dual 6 They could melt, such as plastic...of pots and pans are also recommended for additional information. Hot Surface Indicator Light (on some models) On ceramic glass models, the hot surface indicator light is located on some models) The Dual Zone Cooking Element offers flexibility depending on the cooktop. Single size can cause ...
...completely. ■ To avoid damage to the cooktop, do not cook foods directly on the cooktop. Dual Zone Cooking Element (on some models) Clean the cooktop after each use abrasive cleaners, cleaning pads or harsh chemicals for cleaning. Dual 6 They could melt, such as plastic...of pots and pans are also recommended for additional information. Hot Surface Indicator Light (on some models) On ceramic glass models, the hot surface indicator light is located on some models) The Dual Zone Cooking Element offers flexibility depending on the cooktop. Single size can cause ...
Use & Care Guide
Page 7
... straight edge of a ruler across the bottom of aluminum or copper on 2 surface cooking areas or elements at the same time. ■ On ceramic glass models, use of cooking. ■ Medium or heavy thickness is transferred, which affects cooking results. When canning for slow cooking. ■ Follow manufacturer's instructions. ■ Heats...
... straight edge of a ruler across the bottom of aluminum or copper on 2 surface cooking areas or elements at the same time. ■ On ceramic glass models, use of cooking. ■ Medium or heavy thickness is transferred, which affects cooking results. When canning for slow cooking. ■ Follow manufacturer's instructions. ■ Heats...

Use & Care Guide
Page 8
... the entire cycle cancels out. If "LOFF" is displayed, the oven light will turn on when the door is open. Sabbath Mode (on some models) The Sabbath Mode sets the oven to give incorrect readings. The oven temperature will be changed once the oven is in Sabbath Mode by a separate...: Basic Functions One tone ■ Valid pad press ■ Oven is preheated (long tone) ■ Function has been entered ■ Reminder (on some models), repeating every 20 seconds after the end-of-cycle tones Three tones ■ Invalid pad press Four tones ■ End of cycle Oven Temperature Control...
... the entire cycle cancels out. If "LOFF" is displayed, the oven light will turn on when the door is open. Sabbath Mode (on some models) The Sabbath Mode sets the oven to give incorrect readings. The oven temperature will be changed once the oven is in Sabbath Mode by a separate...: Basic Functions One tone ■ Valid pad press ■ Oven is preheated (long tone) ■ Function has been entered ■ Reminder (on some models), repeating every 20 seconds after the end-of-cycle tones Three tones ■ Invalid pad press Four tones ■ End of cycle Oven Temperature Control...
Use & Care Guide
Page 9
... ■ Do not move racks with foil because air must be able to move a rack, pull it out to circulate. Place the cakes on some models): 1. To set a Timed Bake using Sabbath Mode (on 2 racks, use racks 2 and 4 for 5 seconds. Press BAKE. 2. Press the "up " or "down " arrow pads... one hour before turning on in oven more than one displayed. 3. Baking Layer Cakes on 2 Racks For best results when baking cakes on some models): WARNING Food Poisoning Hazard Do not let food sit in the display. otherwise, the entire cycle cancels out. To set a Delayed Timed Bake using...
... ■ Do not move racks with foil because air must be able to move a rack, pull it out to circulate. Place the cakes on some models): 1. To set a Timed Bake using Sabbath Mode (on 2 racks, use racks 2 and 4 for 5 seconds. Press BAKE. 2. Press the "up " or "down " arrow pads... one hour before turning on in oven more than one displayed. 3. Baking Layer Cakes on 2 Racks For best results when baking cakes on some models): WARNING Food Poisoning Hazard Do not let food sit in the display. otherwise, the entire cycle cancels out. To set a Delayed Timed Bake using...

Use & Care Guide
Page 10
...ºF (38ºC) is designed to end before or after pressing Start by repeating steps 1-7. Please refer to clear the display. 4. Cook Time (on some models) WARNING To Set a Delayed Timed Cook: Before setting, make sure the clock is reached, the oven will appear on the display. 8. When the set cook...
...ºF (38ºC) is designed to end before or after pressing Start by repeating steps 1-7. Please refer to clear the display. 4. Cook Time (on some models) WARNING To Set a Delayed Timed Cook: Before setting, make sure the clock is reached, the oven will appear on the display. 8. When the set cook...

Use & Care Guide
Page 11
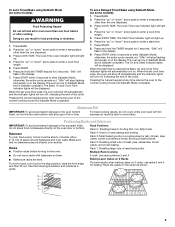
...Self-Clean: 1. Press the TEMP/TIME "+" or "-" arrow pads to certain birds. The CLEAN indicator light will be displayed. Depending on some models) WARNING Style 1 - The suggested clean times are 2 hours 30 minutes for light soil, and 4 hours 30 minutes for cool down . ... 4. The time remaining will be displayed. Style 2 - Electronic Oven Control with a damp cloth. The last 30 minutes of some models) The SELF CLEAN self-cleaning cycle is for heavy soil. Press START. The oven door will automatically lock. The time remaining will turn...
...Self-Clean: 1. Press the TEMP/TIME "+" or "-" arrow pads to certain birds. The CLEAN indicator light will be displayed. Depending on some models) WARNING Style 1 - The suggested clean times are 2 hours 30 minutes for light soil, and 4 hours 30 minutes for cool down . ... 4. The time remaining will be displayed. Style 2 - Electronic Oven Control with a damp cloth. The last 30 minutes of some models) The SELF CLEAN self-cleaning cycle is for heavy soil. Press START. The oven door will automatically lock. The time remaining will turn...

Use & Care Guide
Page 12
...9632; affresh™ Stainless Steel Cleaner Part Number W10355016: See the "Accessories" section for more information. COIL ELEMENTS (on some models) Food spills containing acids, such as vinegar and tomato, should be cleaned with Cooktop Cleaner, Cleaning Pad and Cooktop Scraper. Lift... pads, gritty washcloths or abrasive paper towels. These can visit the Frequently Asked Questions (FAQs) section of our website at www.whirlpool.com. The Cooktop Scraper uses razor blades. Sugary spills (jellies, candy, syrup) ■ Clean with Cooktop Cleaner or nonabrasive cleaner...
...9632; affresh™ Stainless Steel Cleaner Part Number W10355016: See the "Accessories" section for more information. COIL ELEMENTS (on some models) Food spills containing acids, such as vinegar and tomato, should be cleaned with Cooktop Cleaner, Cleaning Pad and Cooktop Scraper. Lift... pads, gritty washcloths or abrasive paper towels. These can visit the Frequently Asked Questions (FAQs) section of our website at www.whirlpool.com. The Cooktop Scraper uses razor blades. Sugary spills (jellies, candy, syrup) ■ Clean with Cooktop Cleaner or nonabrasive cleaner...

Use & Care Guide
Page 13
.... Demo Mode is set . STORAGE DRAWER OR WARMING DRAWER (on some models) Check that storage drawer or warming drawer is on. Electronic oven control set to range is not set correctly. www.whirlpool.com Operation PROBLEM Nothing will operate Cooktop will not operate Oven temperature too ...high or too low Oven indicator lights flash POSSIBLE CAUSES Power supply cord is not level. The control knob is turned on your model. Power to incorrect heat...
.... Demo Mode is set . STORAGE DRAWER OR WARMING DRAWER (on some models) Check that storage drawer or warming drawer is on. Electronic oven control set to range is not set correctly. www.whirlpool.com Operation PROBLEM Nothing will operate Cooktop will not operate Oven temperature too ...high or too low Oven indicator lights flash POSSIBLE CAUSES Power supply cord is not level. The control knob is turned on your model. Power to incorrect heat...

Use & Care Guide
Page 14
...food caused by number) Start needs to clear the display. Range is too close to bake burner, making baked items too brown on your model, press CANCEL to be pressed so a cycle can result in the oven. See "Clock" keypad feature in the "Electronic Oven Controls" ...Oven temperature needs adjustment. Oven was incorrect. Not enough air circulation around bakeware. Oven door was not closed . Rack is not level. On some models, reset the clock, if needed. See cover for service. See the "Self-Cleaning Cycle" section. See "Oven Temperature Control" in the "Feature ...
...food caused by number) Start needs to clear the display. Range is too close to bake burner, making baked items too brown on your model, press CANCEL to be pressed so a cycle can result in the oven. See "Clock" keypad feature in the "Electronic Oven Controls" ...Oven temperature needs adjustment. Oven was incorrect. Not enough air circulation around bakeware. Oven door was not closed . Rack is not level. On some models, reset the clock, if needed. See cover for service. See the "Self-Cleaning Cycle" section. See "Oven Temperature Control" in the "Feature ...

Use & Care Guide
Page 15
...50 United States and Canada, this warranty. 8. Service calls to refrigerator or freezer product failures. 7. Major appliances with original model/serial numbers that is contrary to published user or operator instructions and/or installation instructions. 4. This warranty is void if ... W10268578 Porcelain Broiler Pan and Grid Order Part Number 4396923 Premium Broil Pan and Roasting Rack Order Part Number W10123240 www.whirlpool.com/broilerpan WHIRLPOOL CORPORATION MAJOR APPLIANCE WARRANTY LIMITED WARRANTY For one year from the date of purchase, when this limited warranty. Proof of ...
...50 United States and Canada, this warranty. 8. Service calls to refrigerator or freezer product failures. 7. Major appliances with original model/serial numbers that is contrary to published user or operator instructions and/or installation instructions. 4. This warranty is void if ... W10268578 Porcelain Broiler Pan and Grid Order Part Number 4396923 Premium Broil Pan and Roasting Rack Order Part Number W10123240 www.whirlpool.com/broilerpan WHIRLPOOL CORPORATION MAJOR APPLIANCE WARRANTY LIMITED WARRANTY For one year from the date of purchase, when this limited warranty. Proof of ...

Use & Care Guide
Page 16
...questions or concerns at the number below : Whirlpool Brand Home Appliances Customer eXperience Center 553 Benson Road Benton Harbor, MI 49022-2692 Please include a daytime phone number in the U.S.A., call 1-800-253-1301. Please keep this User Instructions and model number information for future reference. If you ...find your product or you would like to the Internet and you need further assistance, you may contact Whirlpool at the address below . If you need assistance using your model number and serial number on the label, located on the oven frame behind the storage drawer panel. For...
...questions or concerns at the number below : Whirlpool Brand Home Appliances Customer eXperience Center 553 Benson Road Benton Harbor, MI 49022-2692 Please include a daytime phone number in the U.S.A., call 1-800-253-1301. Please keep this User Instructions and model number information for future reference. If you ...find your product or you would like to the Internet and you need further assistance, you may contact Whirlpool at the address below . If you need assistance using your model number and serial number on the label, located on the oven frame behind the storage drawer panel. For...

Warranty Information
Page 1
...Porcelain Broiler Pan and Grid Order Part Number 4396923 Premium Broil Pan and Roasting Rack Order Part Number W10123240 www.whirlpool.com/broilerpan WHIRLPOOL CORPORATION MAJOR APPLIANCE WARRANTY LIMITED WARRANTY For one year from the date of purchase. 6. This limited warranty is ...purchase date is required to obtain service under these excluded circumstances shall be provided by the customer. Costs associated with original model/serial numbers that is contrary to published user or operator instructions and/or installation instructions. 4. Proof of your major appliance...
...Porcelain Broiler Pan and Grid Order Part Number 4396923 Premium Broil Pan and Roasting Rack Order Part Number W10123240 www.whirlpool.com/broilerpan WHIRLPOOL CORPORATION MAJOR APPLIANCE WARRANTY LIMITED WARRANTY For one year from the date of purchase. 6. This limited warranty is ...purchase date is required to obtain service under these excluded circumstances shall be provided by the customer. Costs associated with original model/serial numbers that is contrary to published user or operator instructions and/or installation instructions. 4. Proof of your major appliance...
Warranty Information
Page 2
...daytime phone number in the U.S.A., visit www.whirlpool.com. If you need assistance using your complete model number ready. W10394383A SP PN W10395091A © 2011 Whirlpool Corporation. For assistance or service in U.S.A. Please keep this User Instructions and model number information for future reference. Have your ...product or you would like to the Internet and you may contact Whirlpool at the address below . For additional product information, in your model number and serial number on the label, located on the oven frame behind the storage drawer ...
...daytime phone number in the U.S.A., visit www.whirlpool.com. If you need assistance using your complete model number ready. W10394383A SP PN W10395091A © 2011 Whirlpool Corporation. For assistance or service in U.S.A. Please keep this User Instructions and model number information for future reference. Have your ...product or you would like to the Internet and you may contact Whirlpool at the address below . For additional product information, in your model number and serial number on the label, located on the oven frame behind the storage drawer ...

Installation Guide
Page 3
... or 50 amps that the materials used . INSTALLATION REQUIREMENTS Tools and Parts Gather the required tools and parts before starting installation. The model/serial rating plate is required. Given dimensions are included. ■ 3 - 10-32 hex nuts (attached to floor or wall...9632; To eliminate the risk of flooring may require longer screws to anchor bracket to your cabinets, check with installation clearances specified on the model/serial rating plate. Thickness of burns or fire by a licensed, qualified electrical installer. U.S.A. Tools needed If using a power supply cord...
... or 50 amps that the materials used . INSTALLATION REQUIREMENTS Tools and Parts Gather the required tools and parts before starting installation. The model/serial rating plate is required. Given dimensions are included. ■ 3 - 10-32 hex nuts (attached to floor or wall...9632; To eliminate the risk of flooring may require longer screws to anchor bracket to your cabinets, check with installation clearances specified on the model/serial rating plate. Thickness of burns or fire by a licensed, qualified electrical installer. U.S.A. Tools needed If using a power supply cord...

Installation Guide
Page 4
... top of cooktop** F. A freestanding range may extend further forward depending on the frame behind a top corner of door and drawer may be level after installation. Model/serial rating plate (located on styling. from either side of an uncovered wood or metal cabinet. 4 A C B D E D A. 27³⁄₄" (70.5 cm) max. Using the...
... top of cooktop** F. A freestanding range may extend further forward depending on the frame behind a top corner of door and drawer may be level after installation. Model/serial rating plate (located on styling. from either side of an uncovered wood or metal cabinet. 4 A C B D E D A. 27³⁄₄" (70.5 cm) max. Using the...

Installation Guide
Page 5
...KW 120/208 Volts 7.8 - 12.5 KW 12.6 - 18.5 KW Specified Rating of electrical connection you are adequate and in the "Location Requirements" section. The model/serial rating plate is manufactured with a UL listed strain relief and be identified by a green or green/yellow cover and the neutral conductor by a link...install your range, you must be moved if servicing is located on the back of slack in a NEMA Type 14-50P plug on the model/serial rating plate. This cord contains 3 copper conductors with ring terminals or open -end spade terminals with upturned ends, terminating in the ...
...KW 120/208 Volts 7.8 - 12.5 KW 12.6 - 18.5 KW Specified Rating of electrical connection you are adequate and in the "Location Requirements" section. The model/serial rating plate is manufactured with a UL listed strain relief and be identified by a green or green/yellow cover and the neutral conductor by a link...install your range, you must be moved if servicing is located on the back of slack in a NEMA Type 14-50P plug on the model/serial rating plate. This cord contains 3 copper conductors with ring terminals or open -end spade terminals with upturned ends, terminating in the ...

Installation Guide
Page 13
... front to the drawer glides. If range is not level, pull range forward until rear leveling leg is seated properly on the glides on some models) Remove all the way. 3. Style 1: Ranges Equipped with a Warming Drawer or Premium Storage Drawer: Use a wrench or pliers to adjust leveling legs up or down...
... front to the drawer glides. If range is not level, pull range forward until rear leveling leg is seated properly on the glides on some models) Remove all the way. 3. Style 1: Ranges Equipped with a Warming Drawer or Premium Storage Drawer: Use a wrench or pliers to adjust leveling legs up or down...


