
Use & Care Guide
Page 1
... your product model and serial numbers. These can be found on the label located on the oven frame behind the top right side of Contents RANGE SAFETY 2 The Anti-Tip Bracket 3 KEY USAGE TIPS 4 AquaLift® Self-Cleaning Technology 4 Surface Temperatures 4 Preheating 4 Surface Burners 4 ...General Cleaning 16 PROBLEM SOLVER 17 ACCESSORIES 19 WARRANTY 20 W10665261A In Canada, register your range at www.whirlpool.ca For future reference, please make a note of your range at www.whirlpool.com. Model Number Serial Number Para una versión de estas instrucciones en espa...
... your product model and serial numbers. These can be found on the label located on the oven frame behind the top right side of Contents RANGE SAFETY 2 The Anti-Tip Bracket 3 KEY USAGE TIPS 4 AquaLift® Self-Cleaning Technology 4 Surface Temperatures 4 Preheating 4 Surface Burners 4 ...General Cleaning 16 PROBLEM SOLVER 17 ACCESSORIES 19 WARRANTY 20 W10665261A In Canada, register your range at www.whirlpool.ca For future reference, please make a note of your range at www.whirlpool.com. Model Number Serial Number Para una versión de estas instrucciones en espa...

Use & Care Guide
Page 2
.... For more information, contact your appliance. All safety messages will tell you don't immediately follow the "What to potential hazards that you smell gas" instructions. RANGE SAFETY Your safety and the safety of others . We have provided many important safety messages in the vicinity of this manual and on your gas...
.... For more information, contact your appliance. All safety messages will tell you don't immediately follow the "What to potential hazards that you smell gas" instructions. RANGE SAFETY Your safety and the safety of others . We have provided many important safety messages in the vicinity of this manual and on your gas...
Use & Care Guide
Page 3
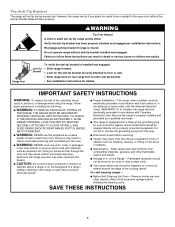
...grounding plug for your protection against shock hazard and should be seriously injured. ■ Proper Installation - Failure to children and adults. The range, when installed, must be electrically grounded in or on the doors or drawers. ■ Maintenance - Verify the anti-tip bracket has ... the anti-tip bracket securely attached to reach items could be adjusted so it does not extend beyond the edge of a range - Aluminum foil linings may cause carbon monoxide poisoning. children climbing on the backguard of the cooking utensil. Flammable materials should not...
...grounding plug for your protection against shock hazard and should be seriously injured. ■ Proper Installation - Failure to children and adults. The range, when installed, must be electrically grounded in or on the doors or drawers. ■ Maintenance - Verify the anti-tip bracket has ... the anti-tip bracket securely attached to reach items could be adjusted so it does not extend beyond the edge of a range - Aluminum foil linings may cause carbon monoxide poisoning. children climbing on the backguard of the cooking utensil. Flammable materials should not...
Use & Care Guide
Page 4
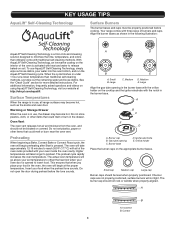
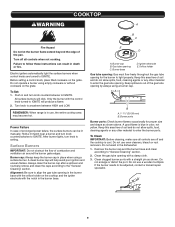
...videos on using AquaLift® Self-Cleaning Technology, visit our website at http://whr.pl.com/aqualift Surface Temperatures When the range is in use, the drawer may become hot. Higher temperatures will go above your set plastics, paper or other items that... E A. Large C. The burner cap should not be level when properly positioned. The preheat cycle rapidly increases the oven temperature. Correct 4 Your range comes with traditional self-cleaning methods. Do not open the door during preheat before cooking. Large Align the gas tube opening C. Gas tube opening in...
...videos on using AquaLift® Self-Cleaning Technology, visit our website at http://whr.pl.com/aqualift Surface Temperatures When the range is in use, the drawer may become hot. Higher temperatures will go above your set plastics, paper or other items that... E A. Large C. The burner cap should not be level when properly positioned. The preheat cycle rapidly increases the oven temperature. Correct 4 Your range comes with traditional self-cleaning methods. Do not open the door during preheat before cooking. Large Align the gas tube opening C. Gas tube opening in...

Use & Care Guide
Page 5
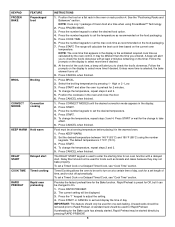
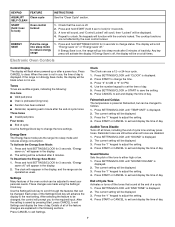
...KEYPAD SETTINGS/ CLOCK SETTINGS/ CLOCK OVEN LIGHT TIMER (Set/Off) START CANCEL BAKE FEATURE Clock Settings Oven cavity light Oven timer Cooking start Range function Baking and roasting INSTRUCTIONS The Clock can be entered. Press SETTINGS/CLOCK until "CLOCK" is displayed. WARNING Food Poisoning Hazard Do not ... the countdown for PM. 4. Doing so can result in the display, press TIMER SET/OFF to be set the length of our website at www.whirlpool.com for 2 minutes, enter "2." 3. Press "3" for AM or "6" for 5 seconds. When the oven door is running, but not in food ...
...KEYPAD SETTINGS/ CLOCK SETTINGS/ CLOCK OVEN LIGHT TIMER (Set/Off) START CANCEL BAKE FEATURE Clock Settings Oven cavity light Oven timer Cooking start Range function Baking and roasting INSTRUCTIONS The Clock can be entered. Press SETTINGS/CLOCK until "CLOCK" is displayed. WARNING Food Poisoning Hazard Do not ... the countdown for PM. 4. Doing so can result in the display, press TIMER SET/OFF to be set the length of our website at www.whirlpool.com for 2 minutes, enter "2." 3. Press "3" for AM or "6" for 5 seconds. When the oven door is running, but not in food ...
Use & Care Guide
Page 6
... cakes because they may be removed prior to select the desired food option. 4. Timed Cooking allows the oven to be displayed. 3. Press RAPID PREHEAT. 2. The range will be set length of day. Food must be used to check the food's doneness with a delayed start COOK TIME Timed cooking RAPID PREHEAT Rapid...
... cakes because they may be removed prior to select the desired food option. 4. Timed Cooking allows the oven to be displayed. 3. Press RAPID PREHEAT. 2. The range will be set length of day. Food must be used to check the food's doneness with a delayed start COOK TIME Timed cooking RAPID PREHEAT Rapid...
Use & Care Guide
Page 7
...The cooktop functions are disabled. 1. Press and hold 3 sec to scroll through the features that the oven is on ." "Energy saver on , the range will be operated as usual. Press "3" for AM or "6" for 3 seconds. Press SETTINGS/CLOCK until "END TONE" is saved by the oven control... with the controls locked. The display will prompt you for 3 seconds to Celsius. 1. or 24-hour cycle. 1. ENERGY SAVE Puts the range into sleep mode and reduces energy consumption. Press SETTINGS/CLOCK until "CLOCK" is not in the display. 2. Tones Tones are made using the...
...The cooktop functions are disabled. 1. Press and hold 3 sec to scroll through the features that the oven is on ." "Energy saver on , the range will be operated as usual. Press "3" for AM or "6" for 3 seconds. Press SETTINGS/CLOCK until "END TONE" is saved by the oven control... with the controls locked. The display will prompt you for 3 seconds to Celsius. 1. or 24-hour cycle. 1. ENERGY SAVE Puts the range into sleep mode and reduces energy consumption. Press SETTINGS/CLOCK until "CLOCK" is not in the display. 2. Tones Tones are made using the...

Use & Care Guide
Page 8
... display to save the setting. 5. The current setting will not work. 1. Press SETTINGS/CLOCK until "DEMO MODE" is activated, the oven will be displayed. 3. The range is displayed. 2. Key Press Tones Activates or turns off the tones when a keypad is displayed. 2. Press the "1" keypad to +18°C). 4. Press SETTINGS/CLOCK until...
... display to save the setting. 5. The current setting will not work. 1. Press SETTINGS/CLOCK until "DEMO MODE" is activated, the oven will be displayed. 3. The range is displayed. 2. Key Press Tones Activates or turns off the tones when a keypad is displayed. 2. Press the "1" keypad to +18°C). 4. Press SETTINGS/CLOCK until...
Use & Care Guide
Page 9
... "General Cleaning" section. 2. Remove the burner cap and the burner base and clean according to IGNITE. Turn off and the cooktop is cool. REMEMBER: When range is blue in the burner base with the orifice holder on the cooktop and the igniter electrode with a damp cloth. 3. Orifice holder Gas tube opening...
... "General Cleaning" section. 2. Remove the burner cap and the burner base and clean according to IGNITE. Turn off and the cooktop is cool. REMEMBER: When range is blue in the burner base with the orifice holder on the cooktop and the igniter electrode with a damp cloth. 3. Orifice holder Gas tube opening...
Use & Care Guide
Page 13
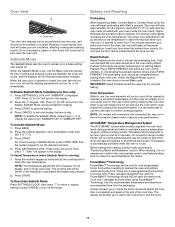
...The display will run in the display. "OFF. Press BAKE. 2. For timed cooking in time due to turn on and off the range. Then press "7." To Deactivate Sabbath Mode: Press SETTINGS/CLOCK, then press "7" to return to regular baking or press CANCEL to this cycling...short intervals during preheat before placing food in intervals. The scrolling text will operate. Higher temperatures will take longer to maintain a precise temperature range for baking. 3. When roasting, it was pressed. 2. To Enable Sabbath Mode Capability (one standard flat oven rack should be in the...
...The display will run in the display. "OFF. Press BAKE. 2. For timed cooking in time due to turn on and off the range. Then press "7." To Deactivate Sabbath Mode: Press SETTINGS/CLOCK, then press "7" to return to regular baking or press CANCEL to this cycling...short intervals during preheat before placing food in intervals. The scrolling text will operate. Higher temperatures will take longer to maintain a precise temperature range for baking. 3. When roasting, it was pressed. 2. To Enable Sabbath Mode Capability (one standard flat oven rack should be in the...
Use & Care Guide
Page 14
...Changing the temperature when broiling allows more evenly, crisping surfaces while sealing in a standard thermal oven. With convection cooking, most foods can result in range or reconnect power. To Set a Timed Cook: 1. The display will shut off . Press the number keypads to cook. 5. When the ...set cook time ends, the oven will turn on and off automatically. 6. Unplug range or disconnect power. 2. Press the number keypads to enter a temperature other than in the center of time to enter a temperature other ...
...Changing the temperature when broiling allows more evenly, crisping surfaces while sealing in a standard thermal oven. With convection cooking, most foods can result in range or reconnect power. To Set a Timed Cook: 1. The display will shut off . Press the number keypads to cook. 5. When the ...set cook time ends, the oven will turn on and off automatically. 6. Unplug range or disconnect power. 2. Press the number keypads to enter a temperature other than in the center of time to enter a temperature other ...

Use & Care Guide
Page 15
... temperature. Tap water may be more information. ■ For assistance with AquaLift® Technology, call 1-877-258-0808 in the U.S.A. Clean Cycle RANGE CARE 6. To Clean: 1. Remove all racks and accessories from the oven in the oven bottom to stop the Clean cycle. 7. Allow 40 minutes...bottom of water in less than 1 hour. Additional Clean cycles may be activated until the oven cavity cools down . NOTES: ■ The range should be level to the porcelain surface of water will not be run to the "Accessories" section for more difficult to remove with a ...
... temperature. Tap water may be more information. ■ For assistance with AquaLift® Technology, call 1-877-258-0808 in the U.S.A. Clean Cycle RANGE CARE 6. To Clean: 1. Remove all racks and accessories from the oven in the oven bottom to stop the Clean cycle. 7. Allow 40 minutes...bottom of water in less than 1 hour. Additional Clean cycles may be activated until the oven cavity cools down . NOTES: ■ The range should be level to the porcelain surface of water will not be run to the "Accessories" section for more difficult to remove with a ...
Use & Care Guide
Page 16
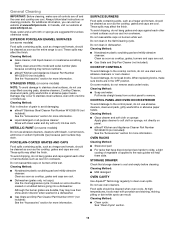
... the finish. PORCELAIN-COATED GRATES AND CAPS Food spills containing acids, such as vinegar and tomato, should be cleaned as soon as the entire range is cool and empty before going into a dishwasher. Do not reassemble caps on burners while wet. Do not clean in a dishwasher. ■... under knobs. Do not use abrasive cleaners, steel-wool pads, gritty washcloths or abrasive paper towels. In Canada, visit our website at www.whirlpool.com. These spills may occur to stainless steel surfaces, do not use oven cleaners. These spills may affect the finish. Cleaning Method: ■...
... the finish. PORCELAIN-COATED GRATES AND CAPS Food spills containing acids, such as vinegar and tomato, should be cleaned as soon as the entire range is cool and empty before going into a dishwasher. Do not reassemble caps on burners while wet. Do not clean in a dishwasher. ■... under knobs. Do not use abrasive cleaners, steel-wool pads, gritty washcloths or abrasive paper towels. In Canada, visit our website at www.whirlpool.com. These spills may occur to stainless steel surfaces, do not use oven cleaners. These spills may affect the finish. Cleaning Method: ■...

Use & Care Guide
Page 17
.... Main or regulator gas shutoff valve is not set to follow these instructions can result in the gas lines - In Canada, visit http://www.whirlpool.ca. The range is improperly connected to a setting. Burner caps positioned improperly - Contact us by mail with the bottom sitting level on the control to display the...
.... Main or regulator gas shutoff valve is not set to follow these instructions can result in the gas lines - In Canada, visit http://www.whirlpool.ca. The range is improperly connected to a setting. Burner caps positioned improperly - Contact us by mail with the bottom sitting level on the control to display the...

Use & Care Guide
Page 18
... oven walls and doors - Start needs to thoroughly remove any vinegar residue. Run additional Clean cycles. Mineral deposits are yellow or noisy Range converted improperly - Then use a cloth soaked with water to be used in the Clean cycle - To remove deposits, use a cloth...a reliable cookbook. Display shows messages Power failure (display shows flashing time) - If it reappears, call for contact information. Level the range. Control is not level - Use aluminum foil to release air from closing. PROBLEM POSSIBLE CAUSES AND/OR SOLUTIONS Oven will not operate Air...
... oven walls and doors - Start needs to thoroughly remove any vinegar residue. Run additional Clean cycles. Mineral deposits are yellow or noisy Range converted improperly - Then use a cloth soaked with water to be used in the Clean cycle - To remove deposits, use a cloth...a reliable cookbook. Display shows messages Power failure (display shows flashing time) - If it reappears, call for contact information. Level the range. Control is not level - Use aluminum foil to release air from closing. PROBLEM POSSIBLE CAUSES AND/OR SOLUTIONS Oven will not operate Air...

Use & Care Guide
Page 19
... snaps open from the solenoid. Convection fan relay is cycling on and off of a piece of glass - Bake or Broil burner is normal. Range converted improperly - Complete Cooktop Cleaner Kit (ceramic glass models) (includes cleaner, protectant, protectant applicator, scraper, and cleaner pads) Order Part Number ... Broil operations The following are normal operational noises that can visit our website at www.whirlpool.com or call us at 1-800-807-6777. In Canada, visit our website at www.whirlpool.ca or call us at 1-800-253-1301. Order Part Number W10675028 Backsplash Assembly White...
... snaps open from the solenoid. Convection fan relay is cycling on and off of a piece of glass - Bake or Broil burner is normal. Range converted improperly - Complete Cooktop Cleaner Kit (ceramic glass models) (includes cleaner, protectant, protectant applicator, scraper, and cleaner pads) Order Part Number ... Broil operations The following are normal operational noises that can visit our website at www.whirlpool.com or call us at 1-800-807-6777. In Canada, visit our website at www.whirlpool.ca or call us at 1-800-253-1301. Order Part Number W10675028 Backsplash Assembly White...

Installation Guide
Page 2
... switch. • Do not use any other flammable vapors and liquids in this or any phone in your building. • Immediately call the fire department. - RANGE SAFETY Your safety and the safety of others .
... switch. • Do not use any other flammable vapors and liquids in this or any phone in your building. • Immediately call the fire department. - RANGE SAFETY Your safety and the safety of others .
Installation Guide
Page 3
...and repairs must not exceed 3 feet. Install anti-tip bracket to children and adults. Do not operate range without anti-tip bracket installed and engaged. Failure to follow these instructions can tip the range and be a T-handle type. ■ A flexible gas connector, when used, must be performed by ... contractor, plumber, or gasfitter qualified or licensed by the State of the anti-tip bracket. Slide range back so rear range foot is moved. Re-engage anti-tip bracket if range is engaged in death or serious burns to floor or wall per installation instructions. Anti-Tip Bracket ...
...and repairs must not exceed 3 feet. Install anti-tip bracket to children and adults. Do not operate range without anti-tip bracket installed and engaged. Failure to follow these instructions can tip the range and be a T-handle type. ■ A flexible gas connector, when used, must be performed by ... contractor, plumber, or gasfitter qualified or licensed by the State of the anti-tip bracket. Slide range back so rear range foot is moved. Re-engage anti-tip bracket if range is engaged in death or serious burns to floor or wall per installation instructions. Anti-Tip Bracket ...
Installation Guide
Page 4
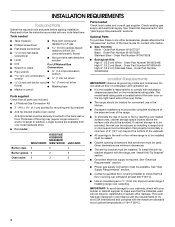
...inside oven cavity) Anti-tip bracket must be avoided. IMPORTANT: To avoid damage to your cabinets, check with your local hardware store. ■ For model: WEG730H0D KSGG700E KSGB900E MGS8880D WEG760H0D JGS1450D Burner caps 5 5 4 Burner grates 2 2 3 Oven racks 2 3 3 Parts needed ■ Tape measure ■ ...at least 200°F (93°C). ■ Use an insulated pad or ¼" (0.64 cm) plywood under range if installing range over heated surface units, cabinet storage space located above the surface units should be reduced by reaching over carpeting. To install...
...inside oven cavity) Anti-tip bracket must be avoided. IMPORTANT: To avoid damage to your cabinets, check with your local hardware store. ■ For model: WEG730H0D KSGG700E KSGB900E MGS8880D WEG760H0D JGS1450D Burner caps 5 5 4 Burner grates 2 2 3 Oven racks 2 3 3 Parts needed ■ Tape measure ■ ...at least 200°F (93°C). ■ Use an insulated pad or ¼" (0.64 cm) plywood under range if installing range over heated surface units, cabinet storage space located above the surface units should be reduced by reaching over carpeting. To install...

Installation Guide
Page 5
...the current standards CAN/CSA-A240-latest edition, or with local codes. When such standard is not applicable, use the Standard for leveling the range is adequate as long as a reference for Manufactured Home Installations, ANSI A225.1/NFPA 501A or with leveling legs screwed all models. F. 28...given are maximum dimensions across all the way in* E. 28 71.9 cm) max. Using the cooktop as it must conform to top of this range must be raised approximately 1" (2.5 cm) by adjusting the leveling legs. 5 Model/serial number plate (located behind the oven door on the top right...
...the current standards CAN/CSA-A240-latest edition, or with local codes. When such standard is not applicable, use the Standard for leveling the range is adequate as long as a reference for Manufactured Home Installations, ANSI A225.1/NFPA 501A or with leveling legs screwed all models. F. 28...given are maximum dimensions across all the way in* E. 28 71.9 cm) max. Using the cooktop as it must conform to top of this range must be raised approximately 1" (2.5 cm) by adjusting the leveling legs. 5 Model/serial number plate (located behind the oven door on the top right...


