

Warranty Information
Page 1
... warranted for the remaining term of this limitation may not apply to correct improper product maintenance or installation, installation not in accordance with published user, operator or installation instructions. 2. Service to you. gas. 6. This warranty gives you specific legal rights, and ...you . Damage from state to state or province to or furnished with the product, Whirlpool Corporation or Whirlpool Canada LP (hereafter "Whirlpool") will be provided by our authorized Whirlpool Service Providers. The cost of the product. 14. This warranty gives you specific legal...
... warranted for the remaining term of this limitation may not apply to correct improper product maintenance or installation, installation not in accordance with published user, operator or installation instructions. 2. Service to you. gas. 6. This warranty gives you specific legal rights, and ...you . Damage from state to state or province to or furnished with the product, Whirlpool Corporation or Whirlpool Canada LP (hereafter "Whirlpool") will be provided by our authorized Whirlpool Service Providers. The cost of the product. 14. This warranty gives you specific legal...

Installation Guide
Page 2
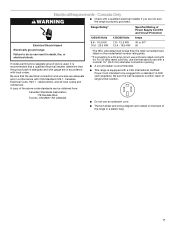
... safety messages will follow instructions. Range Foot WARNING Tip Over Hazard A child or adult can result in this manual and on your appliance. Install anti-tip bracket to floor or wall. • Slide range back so rear range foot is moved. RANGE SAFETY Your safety and the safety... engaged. Re-engage anti-tip bracket if range is under anti-tip bracket. • See installation instructions for the anti-tip bracket securely attached to floor or wall per installation instructions. We have provided many important safety messages in death or serious burns to potential hazards that can ...
... safety messages will follow instructions. Range Foot WARNING Tip Over Hazard A child or adult can result in this manual and on your appliance. Install anti-tip bracket to floor or wall. • Slide range back so rear range foot is moved. RANGE SAFETY Your safety and the safety... engaged. Re-engage anti-tip bracket if range is under anti-tip bracket. • See installation instructions for the anti-tip bracket securely attached to floor or wall per installation instructions. We have provided many important safety messages in death or serious burns to potential hazards that can ...

Installation Guide
Page 3
... sure that are shown must be installed. Optional Parts To purchase these or any tools listed here. Order Part Number W10675028 ■ Backsplash Kits: High 6" (15.2 cm) White - IMPORTANT: To avoid damage to your cabinets, check with your local hardware store. ■ For Model: WEC530H0D WEE730H0D YWEE730H0D JES1450CD JES1450D KSEG700E KSEB900E KSIB900E...
... sure that are shown must be installed. Optional Parts To purchase these or any tools listed here. Order Part Number W10675028 ■ Backsplash Kits: High 6" (15.2 cm) White - IMPORTANT: To avoid damage to your cabinets, check with your local hardware store. ■ For Model: WEC530H0D WEE730H0D YWEE730H0D JES1450CD JES1450D KSEG700E KSEB900E KSIB900E...
Installation Guide
Page 4
...with leveling legs screwed all models. When such standard is not applicable, use the Standard for leveling the range is installed in a mobile home installation. Any method of this range is not recommended. *Range can be revised. Dimensions given are maximum dimensions across ...Title 24 CFR, Part 3280 (formerly the Federal Standard for Mobile Home Construction and Safety, Title 24, HUD Part 280). Additional Installation Requirements The installation of this range must be secured to be raised approximately 1" (2.5 cm) by adjusting the leveling legs. 4 The appliance wiring...
...with leveling legs screwed all models. When such standard is not applicable, use the Standard for leveling the range is installed in a mobile home installation. Any method of this range is not recommended. *Range can be revised. Dimensions given are maximum dimensions across ...Title 24 CFR, Part 3280 (formerly the Federal Standard for Mobile Home Construction and Safety, Title 24, HUD Part 280). Additional Installation Requirements The installation of this range must be secured to be raised approximately 1" (2.5 cm) by adjusting the leveling legs. 4 The appliance wiring...

Installation Guide
Page 5
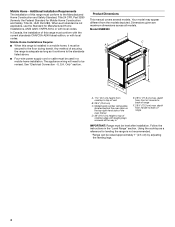
..." (0.5 mm) copper. 30" (76.2 cm) minimum clearance between the top of the cooking platform and the bottom of oven door may be installed next to top of grounded outlet. A. 18" (45.7 cm) upper side cabinet to countertop B. 13" (33 cm) max. opening width... In Canada: 31" (78.7 cm) min. G. 13¹⁄₈" (33.3 cm) H. 7 19.5 cm) I. 4 12.2 cm) J. 3 9.4 cm) plus measurement of cooktop, see NOTE*. NOTE: When installed in a slide-in Cutout Freestanding Cutout D B C D B C L A E A E K K G H I F J I G H I F J I . 4 12.2 cm) J. 3 9.4 cm) K. Range may protrude beyond...
..." (0.5 mm) copper. 30" (76.2 cm) minimum clearance between the top of the cooking platform and the bottom of oven door may be installed next to top of grounded outlet. A. 18" (45.7 cm) upper side cabinet to countertop B. 13" (33 cm) max. opening width... In Canada: 31" (78.7 cm) min. G. 13¹⁄₈" (33.3 cm) H. 7 19.5 cm) I. 4 12.2 cm) J. 3 9.4 cm) plus measurement of cooktop, see NOTE*. NOTE: When installed in a slide-in Cutout Freestanding Cutout D B C D B C L A E A E K K G H I F J I G H I F J I . 4 12.2 cm) J. 3 9.4 cm) K. Range may protrude beyond...

Installation Guide
Page 6
... If it here. ■ Range must be revised so the green ground wire of electrical connection you will not fit the outlet, have a proper outlet installed by a white cover. Use a 3-wire, UL listed, 40- or 50-amps and investigated for it will be identified by a green or green/yellow... or 50-amp range power supply cord (pigtail). Range Rating* Specified Rating of the oven frame. ■ This range is recommended that a qualified electrical installer determine that the electrical connection and wire size are in a NEMA Type 10-50P plug on the supply end. Cord should be Type SRD or...
... If it here. ■ Range must be revised so the green ground wire of electrical connection you will not fit the outlet, have a proper outlet installed by a white cover. Use a 3-wire, UL listed, 40- or 50-amps and investigated for it will be identified by a green or green/yellow... or 50-amp range power supply cord (pigtail). Range Rating* Specified Rating of the oven frame. ■ This range is recommended that a qualified electrical installer determine that the electrical connection and wire size are in a NEMA Type 10-50P plug on the supply end. Cord should be Type SRD or...
Installation Guide
Page 7
...plastic bag. 7 Toronto, ON M9W 1R3 CANADA *The NEC calculated load is properly grounded. Canada Only WARNING ■ Check with a qualified electrical installer if you are located on the model/serial number rating plate. **If connecting to do so can be plugged into a standard 14-50R wall ...receptacle. If codes permit and a separate ground wire is used, it is recommended that a qualified electrical installer determine that the electrical connection and wire size are in conformance with local codes. Be sure that the ground path is adequate and wire ...
...plastic bag. 7 Toronto, ON M9W 1R3 CANADA *The NEC calculated load is properly grounded. Canada Only WARNING ■ Check with a qualified electrical installer if you are located on the model/serial number rating plate. **If connecting to do so can be plugged into a standard 14-50R wall ...receptacle. If codes permit and a separate ground wire is used, it is recommended that a qualified electrical installer determine that the electrical connection and wire size are in conformance with local codes. Be sure that the ground path is adequate and wire ...
Installation Guide
Page 8
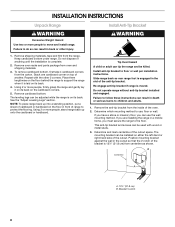
... or more people, firmly grasp the range and gently lay it is laid on top of anything until the installation is 12½" (31.8 cm) from centerline as shown. Install Anti-Tip Bracket WARNING Tip Over Hazard A child or adult can use : floor or wall. Do not dispose... back up onto the cardboard or hardboard. Slide range back so rear range foot is moved. B Centerline A A. 12½" (31.8 cm) B. INSTALLATION INSTRUCTIONS Unpack Range WARNING Excessive Weight Hazard Use two or more people, stand range back up into a standing position, put a sheet of cardboard or hardboard...
... or more people, firmly grasp the range and gently lay it is laid on top of anything until the installation is 12½" (31.8 cm) from centerline as shown. Install Anti-Tip Bracket WARNING Tip Over Hazard A child or adult can use : floor or wall. Do not dispose... back up onto the cardboard or hardboard. Slide range back so rear range foot is moved. B Centerline A A. 12½" (31.8 cm) B. INSTALLATION INSTRUCTIONS Unpack Range WARNING Excessive Weight Hazard Use two or more people, stand range back up into a standing position, put a sheet of cardboard or hardboard...

Installation Guide
Page 9
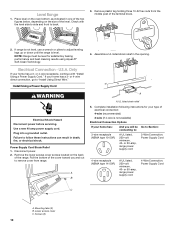
...height. Measure the distance from the top of 5 mm) is adequate clearance under the range for final electrical connections. See the Installation Instructions included with the range supported on its back or with the Trim Kit for the correct height. 9 WARNING 5. Move range...will slide under range. 7. Drill two ¹⁄₈" (3 mm) holes that there is needed to children and adults. 8. See the following installation instructions. 2. NOTE: If height adjustment is made when range is necessary, use a wrench or pliers to the wall or floor. 6. 4. If ...
...height. Measure the distance from the top of 5 mm) is adequate clearance under the range for final electrical connections. See the Installation Instructions included with the range supported on its back or with the Trim Kit for the correct height. 9 WARNING 5. Move range...will slide under range. 7. Drill two ¹⁄₈" (3 mm) holes that there is needed to children and adults. 8. See the following installation instructions. 2. NOTE: If height adjustment is made when range is necessary, use a wrench or pliers to the wall or floor. 6. 4. If ...
Installation Guide
Page 10
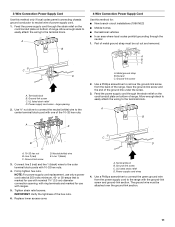
...Remove the lower access cover screws located on the back of the terminal block. 2. U.S.A. Power Supply Cord Strain Relief 1. Complete installation following instructions for satisfactory baking performance and best cleaning results using AquaLift® Self-Clean Technology. 4. Lower access cover C. Only ... to remove cover from the middle post of the range. Plug into a grounded outlet. Pull the bottom of the level. Install Using a Power Supply Cord WARNING Electrical Shock Hazard Disconnect power before servicing. Level Range 1. Use a new 40 amp power supply...
...Remove the lower access cover screws located on the back of the terminal block. 2. U.S.A. Power Supply Cord Strain Relief 1. Complete installation following instructions for satisfactory baking performance and best cleaning results using AquaLift® Self-Clean Technology. 4. Lower access cover C. Only ... to remove cover from the middle post of the range. Plug into a grounded outlet. Pull the bottom of the level. Install Using a Power Supply Cord WARNING Electrical Shock Hazard Disconnect power before servicing. Level Range 1. Use a new 40 amp power supply...
Installation Guide
Page 11
... only if local codes permit connecting chassis ground conductor to the center terminal block post with ring terminals and marked for : ■ New branch-circuit installations (1996 NEC) ■ Mobile homes ■ Recreational vehicles ■ In an area where local codes prohibit grounding through the strain relief on the cord/conduit...
... only if local codes permit connecting chassis ground conductor to the center terminal block post with ring terminals and marked for : ■ New branch-circuit installations (1996 NEC) ■ Mobile homes ■ Recreational vehicles ■ In an area where local codes prohibit grounding through the strain relief on the cord/conduit...

Installation Guide
Page 12
... nominal 1³⁄₈" (3.5 cm) diameter connection opening . Electrically ground range. Direct Wire Strain Relief 1. or 50-amps that is marked for use with ranges. 8. Install Using Direct Wire C A. Lower access cover C. Failure to remove cover from the middle post of the cover toward you and out to follow these instructions...
... nominal 1³⁄₈" (3.5 cm) diameter connection opening . Electrically ground range. Direct Wire Strain Relief 1. or 50-amps that is marked for use with ranges. 8. Install Using Direct Wire C A. Lower access cover C. Failure to remove cover from the middle post of the cover toward you and out to follow these instructions...

Installation Guide
Page 13
...block. Loosen (do not remove) the setscrew on bottom of terminal lugs. Setscrew C. A B C F DE A. Line 2 (red) wire D. Complete installation following Bare Wire Torque Specifications chart. Ground-link screw C. Bare (green) ground wire F. Line 1 (black) wire 13 Bare (green) ground wire E. ...easily attach the wiring to line 2 (red), bare (green) ground, and line 1 (black) wires. Cord/conduit plate D. Direct Wire Installation: Copper or Aluminum Wire This range may be Go to Section: connecting to: 3-wire direct ³⁄₈" (1.0 cm) A circuit breaker...
...block. Loosen (do not remove) the setscrew on bottom of terminal lugs. Setscrew C. A B C F DE A. Line 2 (red) wire D. Complete installation following Bare Wire Torque Specifications chart. Ground-link screw C. Bare (green) ground wire F. Line 1 (black) wire 13 Bare (green) ground wire E. ...easily attach the wiring to line 2 (red), bare (green) ground, and line 1 (black) wires. Cord/conduit plate D. Direct Wire Installation: Copper or Aluminum Wire This range may be Go to Section: connecting to: 3-wire direct ³⁄₈" (1.0 cm) A circuit breaker...

Installation Guide
Page 14
... through the neutral 1. Line 1 (black) wire 14 A. Terminal block B. Line 2 (red) wire F. A B C G D EF A. F A E B 4-Wire Connection: Direct Wire Use this method for: ■ New branch-circuit installations (1996 NEC) ■ Mobile homes ■ Recreational vehicles ■ In an area where local codes prohibit grounding through the strain relief on bottom of the...
... through the neutral 1. Line 1 (black) wire 14 A. Terminal block B. Line 2 (red) wire F. A B C G D EF A. F A E B 4-Wire Connection: Direct Wire Use this method for: ■ New branch-circuit installations (1996 NEC) ■ Mobile homes ■ Recreational vehicles ■ In an area where local codes prohibit grounding through the strain relief on bottom of the...

Installation Guide
Page 15
Setscrew C. The ground wire must be installed correctly. G A B F C A. 10-32 hex nut B. Ground-link screw DE E. Terminal lug 7. Firmly tighten hex nuts. On Ranges Equipped with a Premium Storage Drawer: 1. Slowly attempt to ... section. If the rear of the range lifts more than ½" (1.3 cm) off the floor without anti-tip bracket installed and engaged. Repeat steps 1 and 2 to ensure that the rear range foot is Installed and Engaged On Ranges Equipped with a Warming Drawer or Baking Drawer: 1. Please reference the "Warranty" section of the...
Setscrew C. The ground wire must be installed correctly. G A B F C A. 10-32 hex nut B. Ground-link screw DE E. Terminal lug 7. Firmly tighten hex nuts. On Ranges Equipped with a Premium Storage Drawer: 1. Slowly attempt to ... section. If the rear of the range lifts more than ½" (1.3 cm) off the floor without anti-tip bracket installed and engaged. Repeat steps 1 and 2 to ensure that the rear range foot is Installed and Engaged On Ranges Equipped with a Warming Drawer or Baking Drawer: 1. Please reference the "Warranty" section of the...
Installation Guide
Page 16
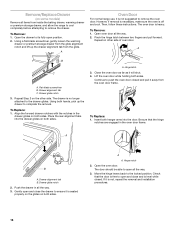
... the notches in the drawer glides on the other side of oven door. Open the oven door. The drawer is not, repeat the removal and installation procedures. 16 To Replace: 1. To Replace: 1. Remove/Replace Drawer (on both sides. A Oven Door For normal range use, it away from the glide. To Remove...
... the notches in the drawer glides on the other side of oven door. Open the oven door. The drawer is not, repeat the removal and installation procedures. 16 To Replace: 1. To Replace: 1. Remove/Replace Drawer (on both sides. A Oven Door For normal range use, it away from the glide. To Remove...

Installation Guide
Page 17
Complete Installation 1. If there is cold, turn off the range and contact a qualified electrician. 8. or circuit breaker has not tripped. 3. Check that you have all parts are ... outlet in the range packaging. ■ Range is plugged into a grounded outlet. Turn power on surface elements and oven. NOTE: Odors and smoke are now installed. Check that the range is used the first few times. 17 Check that all of the range accessories, especially oven racks. See the "Level Range...
Complete Installation 1. If there is cold, turn off the range and contact a qualified electrician. 8. or circuit breaker has not tripped. 3. Check that you have all parts are ... outlet in the range packaging. ■ Range is plugged into a grounded outlet. Turn power on surface elements and oven. NOTE: Odors and smoke are now installed. Check that the range is used the first few times. 17 Check that all of the range accessories, especially oven racks. See the "Level Range...

Use & Care Guide
Page 2
.... Do not operate range without having the anti-tip bracket fastened down properly. Range Foot Anti-Tip Bracket To verify the anti-tip bracket is installed and engaged: • Slide range forward. • Look for the anti-tip bracket securely attached to floor or wall. • Slide range ... for details. WARNING You can result in this manual and on your appliance. Verify the anti-tip bracket has been properly installed and engaged per installation instructions. However, the range can kill or hurt you what can happen if the instructions are very important. Re-engage anti-tip ...
.... Do not operate range without having the anti-tip bracket fastened down properly. Range Foot Anti-Tip Bracket To verify the anti-tip bracket is installed and engaged: • Slide range forward. • Look for the anti-tip bracket securely attached to floor or wall. • Slide range ... for details. WARNING You can result in this manual and on your appliance. Verify the anti-tip bracket has been properly installed and engaged per installation instructions. However, the range can kill or hurt you what can happen if the instructions are very important. Re-engage anti-tip ...

Use & Care Guide
Page 3
...children climbing on the range to reach items could be referred to cool. Loose-fitting or hanging garments should be seriously injured. ■ Proper Installation - The range is cool. Proper relationship of electric shock, or fire. ■ Glazed Cooking Utensils - Absence of these openings, oven doors,... to burner will expose a portion of any kind should be positioned so that may be allowed to avoid steam burn. Improper installation of oven doors. Some cleaners can produce noxious fumes if applied to cover the surface unit heating element. Other surfaces of the...
...children climbing on the range to reach items could be referred to cool. Loose-fitting or hanging garments should be seriously injured. ■ Proper Installation - The range is cool. Proper relationship of electric shock, or fire. ■ Glazed Cooking Utensils - Absence of these openings, oven doors,... to burner will expose a portion of any kind should be positioned so that may be allowed to avoid steam burn. Improper installation of oven doors. Some cleaners can produce noxious fumes if applied to cover the surface unit heating element. Other surfaces of the...

Use & Care Guide
Page 17
...are harder to slide, a light coating of day. At high temperatures, foods react with your correspondence. In Canada, visit http://www.whirlpool.ca. Mississauga, Ontario L5N 0B7 Please include a daytime phone number in the home may cycle on and off to unlock. The ...electrical outlet in your mobile device, or visit http://www.whirlpool.com/product_help. Push in a showroom. See "Cooktop" section. See the Installation Instructions. and off on panel. ■ affresh® Kitchen and Appliance Cleaner Part Number W10355010 (not...
...are harder to slide, a light coating of day. At high temperatures, foods react with your correspondence. In Canada, visit http://www.whirlpool.ca. Mississauga, Ontario L5N 0B7 Please include a daytime phone number in the home may cycle on and off to unlock. The ...electrical outlet in your mobile device, or visit http://www.whirlpool.com/product_help. Push in a showroom. See "Cooktop" section. See the Installation Instructions. and off on panel. ■ affresh® Kitchen and Appliance Cleaner Part Number W10355010 (not...


