

Installation Instructions
Page 6
... 3-wire connection" section. ■ A 4-wire power supply connection must end in death, fire, or electrical shock. 1. Use a UL listed strain relief. Connect to center terminal (silver). When the neutral ground conductor is secured under the neutral terminal (center or white wire) of the terminal block, the dryer cabinet is isolated from...
... 3-wire connection" section. ■ A 4-wire power supply connection must end in death, fire, or electrical shock. 1. Use a UL listed strain relief. Connect to center terminal (silver). When the neutral ground conductor is secured under the neutral terminal (center or white wire) of the terminal block, the dryer cabinet is isolated from...
Installation Instructions
Page 7
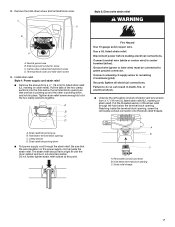
...Use a UL listed strain relief. The strain relief should have a tight fit with the dryer cabinet and be connected to center terminal (silver). Connect remaining 2 supply wires to hold in place. Removable conduit connector B. Neutral ground wire B. Clamp section D. Failure to do so... the screws from a 3/4" (19 mm) UL listed strain relief (UL marking on strain relief). Securely tighten all electrical connections. Center, silver-colored terminal block screw D. Tighten strain relief screws enough to remaining 2 terminals (gold). Remove the hold -down , and hold the two...
...Use a UL listed strain relief. The strain relief should have a tight fit with the dryer cabinet and be connected to center terminal (silver). Connect remaining 2 supply wires to hold in place. Removable conduit connector B. Neutral ground wire B. Clamp section D. Failure to do so... the screws from a 3/4" (19 mm) UL listed strain relief (UL marking on strain relief). Securely tighten all electrical connections. Center, silver-colored terminal block screw D. Tighten strain relief screws enough to remaining 2 terminals (gold). Remove the hold -down , and hold the two...

Installation Instructions
Page 8
... Ring terminals 1. External ground conductor screw - B. CD E G A. 4-wire receptacle (NEMA type 14-30R) B. 4-prong plug C. Remove center, silver-colored terminal block screw. 2. ■ Put direct wire cable through the strain relief. Tighten strain relief screw against the direct wire cable. 4-wire connection...3-wire (if 4-wire is not available) Electrical Connection Options If your home has: And you will be in a horizontal position. Center, silver-colored terminal block screw C. Neutral wire (white or center wire) E. ¾" (19 mm) UL listed strain relief 8 Connect neutral ...
... Ring terminals 1. External ground conductor screw - B. CD E G A. 4-wire receptacle (NEMA type 14-30R) B. 4-prong plug C. Remove center, silver-colored terminal block screw. 2. ■ Put direct wire cable through the strain relief. Tighten strain relief screw against the direct wire cable. 4-wire connection...3-wire (if 4-wire is not available) Electrical Connection Options If your home has: And you will be in a horizontal position. Center, silver-colored terminal block screw C. Neutral wire (white or center wire) E. ¾" (19 mm) UL listed strain relief 8 Connect neutral ...

Installation Instructions
Page 9
... C. ¾" (19 mm) UL listed strain relief D. Tighten strain relief screws. 6. Center, silver-colored terminal block screw C. Tighten screw. Center, silver-colored terminal block screw E. Remove neutral ground wire from end of dryer rear panel. Tighten screw. ... line shows position of 3-wire connections. Remove center, silver-colored terminal block screw. 2. Insert tab of power supply cord to center, silver-colored terminal block screw. Cut 11/2" (38 mm) from 3 remaining wires. Center, silver-colored terminal block screw E. Squeeze hooked ends together. ...
... C. ¾" (19 mm) UL listed strain relief D. Tighten strain relief screws. 6. Center, silver-colored terminal block screw C. Tighten screw. Center, silver-colored terminal block screw E. Remove neutral ground wire from end of dryer rear panel. Tighten screw. ... line shows position of 3-wire connections. Remove center, silver-colored terminal block screw. 2. Insert tab of power supply cord to center, silver-colored terminal block screw. Cut 11/2" (38 mm) from 3 remaining wires. Center, silver-colored terminal block screw E. Squeeze hooked ends together. ...

Installation Instructions
Page 10
... codes permit connecting cabinet-ground conductor to outer terminal block screws. Strip insulation back 1" (25 mm). Loosen or remove center, silver-colored terminal block screw. 2. Squeeze hooked end together. Neutral ground wire C. Tighten screws. 4. Secure cover with hold -down ..."Venting Requirements." 3-wire connection: Power supply cord Use where local codes permit connecting cabinet-ground conductor to the center, silver-colored terminal screw of dryer rear panel. Ring terminals G. You have completed your electrical connection. Spade terminals with outer covering...
... codes permit connecting cabinet-ground conductor to outer terminal block screws. Strip insulation back 1" (25 mm). Loosen or remove center, silver-colored terminal block screw. 2. Squeeze hooked end together. Neutral ground wire C. Tighten screws. 4. Secure cover with hold -down ..."Venting Requirements." 3-wire connection: Power supply cord Use where local codes permit connecting cabinet-ground conductor to the center, silver-colored terminal screw of dryer rear panel. Ring terminals G. You have completed your electrical connection. Spade terminals with outer covering...

Installation Instructions
Page 11
...wire and the neutral wire (white or center wire) of a building. External ground conductor screw B. Grounding path determined by calling Whirlpool Service. Tighten screws. Failure to follow these instructions can be connected into slot of the system and make sure exhaust hood is... not use a plastic vent. Connect a separate copper ground wire from the entire length of dryer rear panel. Remove center, silver-colored terminal block screw. 2. B A C D E F A. Center, silver-colored terminal block screw C. Do not use a metal foil vent. Do not use plastic or metal foil vent. ■...
...wire and the neutral wire (white or center wire) of a building. External ground conductor screw B. Grounding path determined by calling Whirlpool Service. Tighten screws. Failure to follow these instructions can be connected into slot of the system and make sure exhaust hood is... not use a plastic vent. Connect a separate copper ground wire from the entire length of dryer rear panel. Remove center, silver-colored terminal block screw. 2. B A C D E F A. Center, silver-colored terminal block screw C. Do not use a metal foil vent. Do not use plastic or metal foil vent. ■...