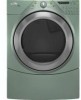
Owners Manual
Page 3
DRYER SAFETY Your safety and the safety of injury, and tell you what the potential hazard is the safety alert symbol. We have provided many important ...
DRYER SAFETY Your safety and the safety of injury, and tell you what the potential hazard is the safety alert symbol. We have provided many important ...
Owners Manual
Page 4
IMPORTANT: The gas installation must conform with local codes, or in the absence of this manual must be electrically grounded in the absence of all occupants. • Immediately call the fire department. - Follow the gas supplier's instructions. • If you cannot ... the gas supplier. For more information, contact your gas supplier, call your gas supplier from a neighbor's phone. The dryer must be detected by smell. do if you use any electrical switch; Installation and service must be followed to minimize the risk of fire or explosion, or to prevent property damage...
IMPORTANT: The gas installation must conform with local codes, or in the absence of this manual must be electrically grounded in the absence of all occupants. • Immediately call the fire department. - Follow the gas supplier's instructions. • If you cannot ... the gas supplier. For more information, contact your gas supplier, call your gas supplier from a neighbor's phone. The dryer must be detected by smell. do if you use any electrical switch; Installation and service must be followed to minimize the risk of fire or explosion, or to prevent property damage...

Owners Manual
Page 5
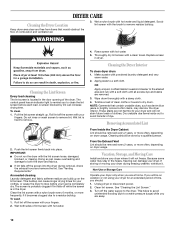
... a ball valve, it (including cooking oils). Failure to follow these instructions can result in death or fire. 5 WARNING DRYER USE WARNING Explosion Hazard Keep flammable materials and vapors, such as gasoline, away from dryer. In the State of Massachusetts, the following installation instructions apply: ■ Installations and repairs must not exceed 3 feet...
... a ball valve, it (including cooking oils). Failure to follow these instructions can result in death or fire. 5 WARNING DRYER USE WARNING Explosion Hazard Keep flammable materials and vapors, such as gasoline, away from dryer. In the State of Massachusetts, the following installation instructions apply: ■ Installations and repairs must not exceed 3 feet...

Owners Manual
Page 7
...*Reset time to ensure sanitization. Manual Preset Cycle Settings Manual Cycles Load Type Temperature Est. Tips for Getting the Best Performance from Your Steam Dryer ■ Results may vary depending on fabric. 100% cotton garments with wrinkle-free finish may yield better results than those without. 100%... clothes that have been starched. default time) which can change the actual time in the dryer too long. See Automatic Preset or Manual Preset Cycle Settings chart. Steam models Non-Steam models Cycle Control knob Automatic Cycles Automatic Cycles allow you to match the cycle to the...
...*Reset time to ensure sanitization. Manual Preset Cycle Settings Manual Cycles Load Type Temperature Est. Tips for Getting the Best Performance from Your Steam Dryer ■ Results may vary depending on fabric. 100% cotton garments with wrinkle-free finish may yield better results than those without. 100%... clothes that have been starched. default time) which can change the actual time in the dryer too long. See Automatic Preset or Manual Preset Cycle Settings chart. Steam models Non-Steam models Cycle Control knob Automatic Cycles Automatic Cycles allow you to match the cycle to the...

Owners Manual
Page 8
...Cycle. The heat setting and cycle time are securely stitched. ■ Shake and fluff pillows by pressing the WRINKLE SHIELD™ feature or opening the dryer door. ■ For the Casual Cycle, the WRINKLE SHIELD™ feature is set to remove lightweight items in a mixed load. Time* Temperature* ... aid in the dryer for an extended period. *The Enhanced Touch Up Cycle has a minimum dry time of 15 minutes and a maximum dry time of Cycle Signal is on while the water is finished. The Steam Cycles include Quick Refresh and Enhanced Touch Up. Steam Preset Cycle Settings Timed...
...Cycle. The heat setting and cycle time are securely stitched. ■ Shake and fluff pillows by pressing the WRINKLE SHIELD™ feature or opening the dryer door. ■ For the Casual Cycle, the WRINKLE SHIELD™ feature is set to remove lightweight items in a mixed load. Time* Temperature* ... aid in the dryer for an extended period. *The Enhanced Touch Up Cycle has a minimum dry time of 15 minutes and a maximum dry time of Cycle Signal is on while the water is finished. The Steam Cycles include Quick Refresh and Enhanced Touch Up. Steam Preset Cycle Settings Timed...
Owners Manual
Page 9
...: Press and hold the Dryness Level button for all of the new cycle. Changing Cycles after pressing Start You can be changed while the dryer is not necessary to press the Control On button before pressing Start. ■ Three short tones sound if an unavailable combination is shown. ... again until the control is unlocked. Control Lock/Unlock This feature allows you happen to press Pause/Cancel twice, the program clears and your dryer shuts down. You can be restarted until the desired drying setting is selected. Changing Cycles, Options, and Modifiers You can change an Option ...
...: Press and hold the Dryness Level button for all of the new cycle. Changing Cycles after pressing Start You can be changed while the dryer is not necessary to press the Control On button before pressing Start. ■ Three short tones sound if an unavailable combination is shown. ... again until the control is unlocked. Control Lock/Unlock This feature allows you happen to press Pause/Cancel twice, the program clears and your dryer shuts down. You can be restarted until the desired drying setting is selected. Changing Cycles, Options, and Modifiers You can change an Option ...
Owners Manual
Page 10
... on the lint screen. If you will be done by lint can increase drying time. See "Cleaning the Lint Screen." 3. DRYER CARE Cleaning the Dryer Location Keep dryer area clear and free from items that contain unstable dyes, such as denim blue jeans or brightly colored cotton items, may stay ... lint screen with a soft cloth until all excess dye and stains are at home. Do not rinse or wash screen to the dryer. Cleaning the Dryer Interior To clean dryer drum 1. Wipe drum thoroughly with hot water and liquid detergent. NOTE: Garments that would obstruct the flow of dye. If storing...
... on the lint screen. If you will be done by lint can increase drying time. See "Cleaning the Lint Screen." 3. DRYER CARE Cleaning the Dryer Location Keep dryer area clear and free from items that contain unstable dyes, such as denim blue jeans or brightly colored cotton items, may stay ... lint screen with a soft cloth until all excess dye and stains are at home. Do not rinse or wash screen to the dryer. Cleaning the Dryer Interior To clean dryer drum 1. Wipe drum thoroughly with hot water and liquid detergent. NOTE: Garments that would obstruct the flow of dye. If storing...
Owners Manual
Page 11
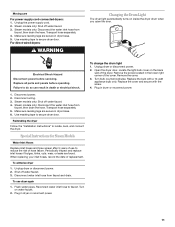
... faucet and drain. Make sure leveling legs are found. Electrical Shock Hazard Disconnect power before operating. Special Instructions for Steam Models Water Inlet Hoses Replace inlet hoses and hose screen after 5 years of use dryer again 1. To use to do so can result in... drum light 1. Transport hose separately. 4. Remove the screw located in death or electrical shock. 1. Steam models only: Shut off water faucet. 3. Make sure leveling legs are secure in dryer or reconnect power. Steam models only: Disconnect the water inlet hose from faucet, then drain the hose. ...
... faucet and drain. Make sure leveling legs are found. Electrical Shock Hazard Disconnect power before operating. Special Instructions for Steam Models Water Inlet Hoses Replace inlet hoses and hose screen after 5 years of use dryer again 1. To use to do so can result in... drum light 1. Transport hose separately. 4. Remove the screw located in death or electrical shock. 1. Steam models only: Shut off water faucet. 3. Make sure leveling legs are secure in dryer or reconnect power. Steam models only: Disconnect the water inlet hose from faucet, then drain the hose. ...
Owners Manual
Page 12
...Installation Instructions. ■ Are fabric softener sheets blocking the grille? Large loads may be turning, but there may not have heat. Electric dryers require 240-volt power supply. Try the following : Was the drying cycle interrupted by pressing the Dry Time up ? Confirm the ...to dry quickly? Check with lint, restricting air movement? Check the front and rear edges of a service call... Electric dryers use 2 household fuses or circuit breakers. Dryer Results Clothes are not drying satisfactorily, drying times are intact and tight, or that both fuses are too long,...
...Installation Instructions. ■ Are fabric softener sheets blocking the grille? Large loads may be turning, but there may not have heat. Electric dryers require 240-volt power supply. Try the following : Was the drying cycle interrupted by pressing the Dry Time up ? Confirm the ...to dry quickly? Check with lint, restricting air movement? Check the front and rear edges of a service call... Electric dryers use 2 household fuses or circuit breakers. Dryer Results Clothes are not drying satisfactorily, drying times are intact and tight, or that both fuses are too long,...
Owners Manual
Page 13
... cotton polyester blends, common knits and synthetic garments. NOTE: Refer to both the faucet and dryer's water inlet valve. See the Installation Instructions. Drum stains are still wrinkled following Steam Cycle? Proper operation of the cycle? Dry clean only garments are not recommended. ■ ...cotton, cotton polyester blends, common knits and synthetics. Loads are gone from dryer at the end of dryer cycles requires temperatures above 45ºF (7ºC). ■ Is the dryer located in a room with steam cycles. This cycle is not too long or has too many turns. Check...
... cotton polyester blends, common knits and synthetic garments. NOTE: Refer to both the faucet and dryer's water inlet valve. See the Installation Instructions. Drum stains are still wrinkled following Steam Cycle? Proper operation of the cycle? Dry clean only garments are not recommended. ■ ...cotton, cotton polyester blends, common knits and synthetics. Loads are gone from dryer at the end of dryer cycles requires temperatures above 45ºF (7ºC). ■ Is the dryer located in a room with steam cycles. This cycle is not too long or has too many turns. Check...
Dimension Guide
Page 1
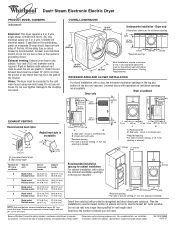
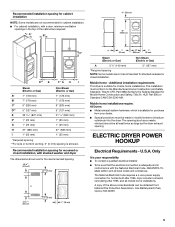
... required. Louvered hood style B. Box hood style Angled hood style is allowed. 4 Rigid metal 27 ft (8.2 m) 21 ft (6.4 m) Flexible metal 23 ft (7 m) 15 ft (4.6 m)...Dryer only Dimensions shown are for planning purposes only. Closet door with a door, the minimum ventilation openings in .2* (155 cm2) 1"* 32-9/16" 5"** (2.5 cm) (82.65 cm) (12.7 cm) A B A. Because Whirlpool...Steam Electronic Electric Dryer PRODUCT MODEL NUMBERS WED9600T Electrical: This dryer requires a 3 or 4 wire, single phase, 120/240 volt, 60 Hz., AC only electrical supply (or 3 or 4 wire, 120/208 volt electrical...
... required. Louvered hood style B. Box hood style Angled hood style is allowed. 4 Rigid metal 27 ft (8.2 m) 21 ft (6.4 m) Flexible metal 23 ft (7 m) 15 ft (4.6 m)...Dryer only Dimensions shown are for planning purposes only. Closet door with a door, the minimum ventilation openings in .2* (155 cm2) 1"* 32-9/16" 5"** (2.5 cm) (82.65 cm) (12.7 cm) A B A. Because Whirlpool...Steam Electronic Electric Dryer PRODUCT MODEL NUMBERS WED9600T Electrical: This dryer requires a 3 or 4 wire, single phase, 120/240 volt, 60 Hz., AC only electrical supply (or 3 or 4 wire, 120/208 volt electrical...
Installation Instructions
Page 1
... This is , tell you how to potential hazards that can kill or hurt you don't immediately follow instructions. W10255468A W10259190A - ELECTRIC DRYER INSTALLATION INSTRUCTIONS U.S.A. All safety messages will follow the safety alert symbol and either the word "DANGER" or "WARNING." U.S.A. Only 6... INSTALL LEVELING LEGS 13 CONNECT VENT 14 CONNECT INLET HOSE (STEAM MODELS 14 LEVEL DRYER 15 COMPLETE INSTALLATION 15 TROUBLESHOOTING 15 Para una version de estas intrucciones en Español, visite www.Whirlpool.com DRYER SAFETY Your safety and the safety of injury, and tell you...
... This is , tell you how to potential hazards that can kill or hurt you don't immediately follow instructions. W10255468A W10259190A - ELECTRIC DRYER INSTALLATION INSTRUCTIONS U.S.A. All safety messages will follow the safety alert symbol and either the word "DANGER" or "WARNING." U.S.A. Only 6... INSTALL LEVELING LEGS 13 CONNECT VENT 14 CONNECT INLET HOSE (STEAM MODELS 14 LEVEL DRYER 15 COMPLETE INSTALLATION 15 TROUBLESHOOTING 15 Para una version de estas intrucciones en Español, visite www.Whirlpool.com DRYER SAFETY Your safety and the safety of injury, and tell you...
Installation Instructions
Page 2
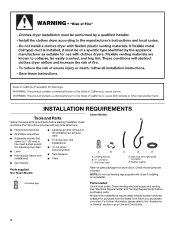
...parts are included. Rubber washer Remove parts package from whom you purchased your Use and Care Guide. 2 Check existing electrical supply and venting. Short inlet hose D. Mobile home installations require metal exhaust system hardware available for installing new exhaust...) ■ ¼" nut driver (recommended) ■ Tape measure ■ Pliers Parts supplied Non-Steam Models Steam Models A B C D E A. Leveling legs (4) B. "Y" connector C. Inlet hose with dryer if installing on a pedestal. 4 Leveling legs Parts needed Check local codes. NOTE: Do not use ...
...parts are included. Rubber washer Remove parts package from whom you purchased your Use and Care Guide. 2 Check existing electrical supply and venting. Short inlet hose D. Mobile home installations require metal exhaust system hardware available for installing new exhaust...) ■ ¼" nut driver (recommended) ■ Tape measure ■ Pliers Parts supplied Non-Steam Models Steam Models A B C D E A. Leveling legs (4) B. "Y" connector C. Inlet hose with dryer if installing on a pedestal. 4 Leveling legs Parts needed Check local codes. NOTE: Do not use ...
Installation Instructions
Page 3
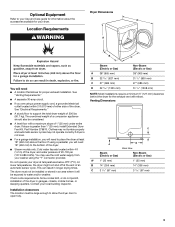
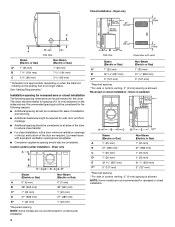
... for proper exhaust installation. At lower temperatures, the dryer might not shut off at temperatures below 45ºF (7ºC). Steam (Electric or Gas) A 38" (965 mm) B 32 9/16" (827 mm) C 27" (686 mm) D 52 9/16" (1335 mm) Non-Steam (Electric or Gas) 38" (965 mm) 31 1/2" (800 mm) 27" (686 mm) 51 1/2" (1308 mm) NOTE: Most installations...
... for proper exhaust installation. At lower temperatures, the dryer might not shut off at temperatures below 45ºF (7ºC). Steam (Electric or Gas) A 38" (965 mm) B 32 9/16" (827 mm) C 27" (686 mm) D 52 9/16" (1335 mm) Non-Steam (Electric or Gas) 38" (965 mm) 31 1/2" (800 mm) 27" (686 mm) 51 1/2" (1308 mm) NOTE: Most installations...
Installation Instructions
Page 4
... recommended for wall, door, and floor moldings. ■ Additional spacing should also be considered. Dryer only A B C* D E* Steam (Electric or Gas) A 0" (0 mm) B 38" (965 mm) C* 1" (25 mm) D 27" (686 mm) E* 1" (25 mm) Non-Steam (Electric or Gas) 0" (0 mm) 38" (965 mm) 1" (25 mm) 27" (686 mm) 1" (25 mm) *Required spacing NOTE: Some models are acceptable. ■ Companion appliance...
... recommended for wall, door, and floor moldings. ■ Additional spacing should also be considered. Dryer only A B C* D E* Steam (Electric or Gas) A 0" (0 mm) B 38" (965 mm) C* 1" (25 mm) D 27" (686 mm) E* 1" (25 mm) Non-Steam (Electric or Gas) 0" (0 mm) 38" (965 mm) 1" (25 mm) 27" (686 mm) 1" (25 mm) *Required spacing NOTE: Some models are acceptable. ■ Companion appliance...
Installation Instructions
Page 5
... dimensions shown are for the recommended spacing. 48 in.2 * (310 cm2) 3"* (76 mm) 24 in remodeling after 1996, dryer circuits involved in .2 * (155 cm2) 3"* (76 mm) 1"* (25 mm) A* 1" 27" 1" (25 mm) (686 mm) (25 mm) Steam (Electric or Gas) Non-Steam (Electric or Gas) A 5 ½" (140 mm) 5" (127 mm) *Required spacing NOTE: Some models are required.
... dimensions shown are for the recommended spacing. 48 in.2 * (310 cm2) 3"* (76 mm) 24 in remodeling after 1996, dryer circuits involved in .2 * (155 cm2) 3"* (76 mm) 1"* (25 mm) A* 1" 27" 1" (25 mm) (686 mm) (25 mm) Steam (Electric or Gas) Non-Steam (Electric or Gas) A 5 ½" (140 mm) 5" (127 mm) *Required spacing NOTE: Some models are required.

Installation Instructions
Page 6
...NEMA Type 14-30R. A timedelay fuse or circuit breaker is permanently connected to the neutral conductor (white wire) within the dryer. Do not have a fuse in death, fire, or electrical shock. 1. The 4-wire power supply cord, at least 4 ft (1.22 m) long, must match power supply (4-wire or... use an extension cord. ■ If codes permit and a separate ground wire is used, it here. ■ This dryer is installed with a 4-wire electrical supply connection, the neutral ground conductor must be used when the appliance is isolated from the external ground connector (green screw), and...
...NEMA Type 14-30R. A timedelay fuse or circuit breaker is permanently connected to the neutral conductor (white wire) within the dryer. Do not have a fuse in death, fire, or electrical shock. 1. The 4-wire power supply cord, at least 4 ft (1.22 m) long, must match power supply (4-wire or... use an extension cord. ■ If codes permit and a separate ground wire is used, it here. ■ This dryer is installed with a 4-wire electrical supply connection, the neutral ground conductor must be used when the appliance is isolated from the external ground connector (green screw), and...

Installation Instructions
Page 7
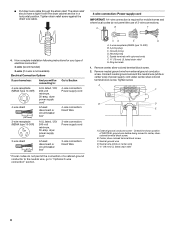
...to hold -down screw 3. Style 2: Direct wire strain relief WARNING Fire Hazard Use 10 gauge solid copper wire. Disconnect power before making electrical connections. Failure to green ground connector. Put the threaded section of the two clamp sections into the hole below the terminal block opening so...tabs of the strain relief through the strain relief. The strain relief should have a tight fit with the dryer cabinet and be connected to do so can result in death, fire, or electrical shock. ■ Unscrew the removable conduit connector and any screws from a 3/4" (19 mm) UL listed ...
...to hold -down screw 3. Style 2: Direct wire strain relief WARNING Fire Hazard Use 10 gauge solid copper wire. Disconnect power before making electrical connections. Failure to green ground connector. Put the threaded section of the two clamp sections into the hole below the terminal block opening so...tabs of the strain relief through the strain relief. The strain relief should have a tight fit with the dryer cabinet and be connected to do so can result in death, fire, or electrical shock. ■ Unscrew the removable conduit connector and any screws from a 3/4" (19 mm) UL listed ...
Installation Instructions
Page 8
...relief screw against the direct wire cable. 4-wire connection: Power supply cord IMPORTANT: A 4-wire connection is not available) Electrical Connection Options If your type of electrical connection: 4-wire (recommended) 3-wire (if 4-wire is required for mobile homes and where local codes do not permit the...) 3-wire receptacle (NEMA type 10-30R) A fused disconnect or circuit breaker box* A UL listed, 120/ 240-volt minimum, 30-amp, dryer power supply cord* 4-wire connection: Direct Wire 3-wire connection: Power supply cord 3-wire direct (89 mm) A fused disconnect or circuit breaker box...
...relief screw against the direct wire cable. 4-wire connection: Power supply cord IMPORTANT: A 4-wire connection is not available) Electrical Connection Options If your type of electrical connection: 4-wire (recommended) 3-wire (if 4-wire is required for mobile homes and where local codes do not permit the...) 3-wire receptacle (NEMA type 10-30R) A fused disconnect or circuit breaker box* A UL listed, 120/ 240-volt minimum, 30-amp, dryer power supply cord* 4-wire connection: Direct Wire 3-wire connection: Power supply cord 3-wire direct (89 mm) A fused disconnect or circuit breaker box...

Installation Instructions
Page 9
...ground wire at 5" (127 mm). Direct wire cable must have completed your electrical connection. Neutral ground wire D. A D E B F C (127 5" mm) A. Tighten screw. A C B D E 5. Shape ends of extra length so dryer can be moved if needed. Connect ground wire (green or bare) of... mm) UL listed strain relief 3. Squeeze hooked ends together. Tighten screws. 1. Strip 5" (127 mm) of outer covering from end of dryer rear panel. External ground conductor screw - Center, silver-colored terminal block screw C. Place the hooked ends of power supply cable C. ¾"...
...ground wire at 5" (127 mm). Direct wire cable must have completed your electrical connection. Neutral ground wire D. A D E B F C (127 5" mm) A. Tighten screw. A C B D E 5. Shape ends of extra length so dryer can be moved if needed. Connect ground wire (green or bare) of... mm) UL listed strain relief 3. Squeeze hooked ends together. Tighten screws. 1. Strip 5" (127 mm) of outer covering from end of dryer rear panel. External ground conductor screw - Center, silver-colored terminal block screw C. Place the hooked ends of power supply cable C. ¾"...


