
Installation Instructions
Page 1
...this manual and on your appliance. W10255468C W10259190B - SP ONLY Para una versión de estas instrucciones en español, visite www.Whirlpool.com TABLE OF CONTENTS DRYER SAFETY 1 INSTALLATION REQUIREMENTS 2 Tools and Parts 2 Optional Equipment 3 Location Requirements 3 ELECTRIC DRYER POWER HOOKUP 5 Electrical...Requirements 11 Plan Vent System 12 Install Vent System 13 INSTALL LEVELING LEGS 13 CONNECT VENT 14 CONNECT INLET HOSE (STEAM MODELS 14 LEVEL DRYER 15 COMPLETE INSTALLATION 15 TROUBLESHOOTING 15 DRYER SAFETY Your safety and the safety of injury, and tell ...
...this manual and on your appliance. W10255468C W10259190B - SP ONLY Para una versión de estas instrucciones en español, visite www.Whirlpool.com TABLE OF CONTENTS DRYER SAFETY 1 INSTALLATION REQUIREMENTS 2 Tools and Parts 2 Optional Equipment 3 Location Requirements 3 ELECTRIC DRYER POWER HOOKUP 5 Electrical...Requirements 11 Plan Vent System 12 Install Vent System 13 INSTALL LEVELING LEGS 13 CONNECT VENT 14 CONNECT INLET HOSE (STEAM MODELS 14 LEVEL DRYER 15 COMPLETE INSTALLATION 15 TROUBLESHOOTING 15 DRYER SAFETY Your safety and the safety of injury, and tell ...

Installation Instructions
Page 2
... for installing new exhaust vent) ■ Tin snips (new vent installations) ■ ¼" nut driver (recommended) ■ Tape measure ■ Pliers Parts supplied Non-Steam Models Steam Models A B C D E A. NOTE: Do not use leveling legs supplied with dryer if installing on a pedestal. For further information, please refer to 1" (25 mm) or hex-head...
... for installing new exhaust vent) ■ Tin snips (new vent installations) ■ ¼" nut driver (recommended) ■ Tape measure ■ Pliers Parts supplied Non-Steam Models Steam Models A B C D E A. NOTE: Do not use leveling legs supplied with dryer if installing on a pedestal. For further information, please refer to 1" (25 mm) or hex-head...

Installation Instructions
Page 3
... quarters. Location Requirements Installation clearances The location must not be large enough to allow the dryer door to the bottom of the dryer. ■ Steam models only: Cold water faucets located within 2 ft (610 mm) of either side of an automatic sensor cycle. See "Venting Requirements." ■ A separate 30-amp circuit...
... quarters. Location Requirements Installation clearances The location must not be large enough to allow the dryer door to the bottom of the dryer. ■ Steam models only: Cold water faucets located within 2 ft (610 mm) of either side of an automatic sensor cycle. See "Venting Requirements." ■ A separate 30-amp circuit...
Installation Instructions
Page 4
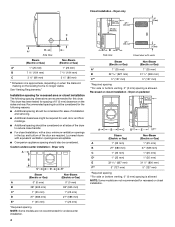
...) 31 1/2" (800 mm) F** 5" (127 mm) 5" (127 mm) *Required spacing **For side or bottom venting, 0" (0 mm) spacing is allowed NOTE: Some models are not recommended for recessed or closet installation. Dryer only A B C* D E* Steam (Electric or Gas) Non-Steam (Electric or Gas) A 0" (0 mm) 0"... C* 1" (25 mm) 1" (25 mm) D 27" (686 mm) 27" (686 mm) E* 1" (25 mm) 1" (25 mm) *Required spacing NOTE: Some models are not recommended for undercounter installation. 4 A* B C** Side view Closet door with vents Steam (Electric or Gas) Non-Steam (Electric or Gas) A* 1" (25 mm) ...
...) 31 1/2" (800 mm) F** 5" (127 mm) 5" (127 mm) *Required spacing **For side or bottom venting, 0" (0 mm) spacing is allowed NOTE: Some models are not recommended for recessed or closet installation. Dryer only A B C* D E* Steam (Electric or Gas) Non-Steam (Electric or Gas) A 0" (0 mm) 0"... C* 1" (25 mm) 1" (25 mm) D 27" (686 mm) 27" (686 mm) E* 1" (25 mm) 1" (25 mm) *Required spacing NOTE: Some models are not recommended for undercounter installation. 4 A* B C** Side view Closet door with vents Steam (Electric or Gas) Non-Steam (Electric or Gas) A* 1" (25 mm) ...

Installation Instructions
Page 5
...Metal exhaust system hardware, which is suitable for mobile home installations. Recommended installation spacing for cabinet installation NOTE: Some models are not recommended for cabinet installation. ■ For cabinet installation, with stacked washer and dryer The dimensions shown are...Steam (Electric or Gas) Non-Steam (Electric or Gas) A* 5 ½" (140 mm) 5" (127 mm) *Required spacing NOTE: Some models are required. Recommended installation spacing for recessed or closet installation, with a door, minimum ventilation openings in remodeling after 1996, and all local codes and...
...Metal exhaust system hardware, which is suitable for mobile home installations. Recommended installation spacing for cabinet installation NOTE: Some models are not recommended for cabinet installation. ■ For cabinet installation, with stacked washer and dryer The dimensions shown are...Steam (Electric or Gas) Non-Steam (Electric or Gas) A* 5 ½" (140 mm) 5" (127 mm) *Required spacing NOTE: Some models are required. Recommended installation spacing for recessed or closet installation, with a door, minimum ventilation openings in remodeling after 1996, and all local codes and...
Installation Instructions
Page 14
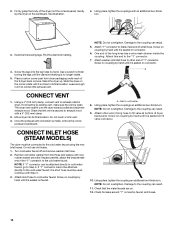
... on coupling by hand until it is seated on coupling by hand until it is secured to the cold water faucet. CONNECT INLET HOSE (STEAM MODELS) The dryer must be attached directly to existing vent, make sure the vent is seated on connector. 6. Continue with a 4" (102 mm) clamp. 2. Using pliers, tighten...
... on coupling by hand until it is seated on coupling by hand until it is secured to the cold water faucet. CONNECT INLET HOSE (STEAM MODELS) The dryer must be attached directly to existing vent, make sure the vent is seated on connector. 6. Continue with a 4" (102 mm) clamp. 2. Using pliers, tighten...

Installation Instructions
Page 15
...you receive an L2 code, there may be turning, but there may be 2 household fuses or circuit breakers for certain part replacement or repair. All Models: 13. Dryer Operation Dryer will continue to run ■ Has a household fuse blown, or has a circuit breaker tripped? Replace the fuse or.... Press any dust. 8. Use a wrench to the need for the dryer. Check that the dryer is recommended to the estimated time remaining. 15 Steam Models Only: 10. Select a Timed Dry heated cycle, and start , check the following : Was the drying cycle interrupted by a power failure? If you...
...you receive an L2 code, there may be turning, but there may be 2 household fuses or circuit breakers for certain part replacement or repair. All Models: 13. Dryer Operation Dryer will continue to run ■ Has a household fuse blown, or has a circuit breaker tripped? Replace the fuse or.... Press any dust. 8. Use a wrench to the need for the dryer. Check that the dryer is recommended to the estimated time remaining. 15 Steam Models Only: 10. Select a Timed Dry heated cycle, and start , check the following : Was the drying cycle interrupted by a power failure? If you...
Owners Manual
Page 2
... the complete model and serial number of your area or to schedule service, visit www.whirlpool.com/customer support or refer to local dealers, repair parts distributors, and service companies. To locate FSP® replacement parts in your correspondence. Whirlpool designated service ...distributors, and service companies. To order accessories in Canada. For further assistance If you need further assistance, you can write to Whirlpool Corporation with : ■ Features and specifications on a pedestal? Accessory Stack Kit Door Reversal Kit Back Guard Optional Exhaust Installation...
... the complete model and serial number of your area or to schedule service, visit www.whirlpool.com/customer support or refer to local dealers, repair parts distributors, and service companies. To locate FSP® replacement parts in your correspondence. Whirlpool designated service ...distributors, and service companies. To order accessories in Canada. For further assistance If you need further assistance, you can write to Whirlpool Corporation with : ■ Features and specifications on a pedestal? Accessory Stack Kit Door Reversal Kit Back Guard Optional Exhaust Installation...
Owners Manual
Page 7
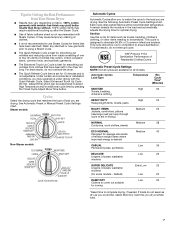
... CASUAL Permanent press, synthetics Low 35 DELICATE Lingerie, blouses, washable woolens Low 25 SUPER DELICATE Lingerie, blouses, washable woolens (On some models - For best results, do not seem as dry as towels, bedding, children's clothing, or other items needing to the load you...Select Enhanced Touch Up Cycle (20 min. Under certain environmental or installation conditions, you dry a similar load. 7 Steam models Non-Steam models Cycle Control knob Automatic Cycles Automatic Cycles allow you to match the cycle to be sanitized. See the following Automatic Preset ...
... CASUAL Permanent press, synthetics Low 35 DELICATE Lingerie, blouses, washable woolens Low 25 SUPER DELICATE Lingerie, blouses, washable woolens (On some models - For best results, do not seem as dry as towels, bedding, children's clothing, or other items needing to the load you...Select Enhanced Touch Up Cycle (20 min. Under certain environmental or installation conditions, you dry a similar load. 7 Steam models Non-Steam models Cycle Control knob Automatic Cycles Automatic Cycles allow you to match the cycle to be sanitized. See the following Automatic Preset ...
Owners Manual
Page 8
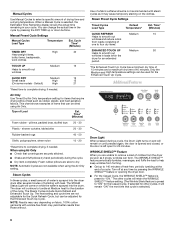
... - 50 Olefin, polypropylene, sheer nylon 10 - 20 *Reset time to smooth out wrinkles Medium 15 QUICK DRY Medium 15 Small loads High 15 (On some models - NOTE: Automatic Cycles are slow to complete drying, if needed . The WRINKLE SHIELD™ feature periodically tumbles, rearranges, and fluffs the load to "ON." When...
... - 50 Olefin, polypropylene, sheer nylon 10 - 20 *Reset time to smooth out wrinkles Medium 15 QUICK DRY Medium 15 Small loads High 15 (On some models - NOTE: Automatic Cycles are slow to complete drying, if needed . The WRINKLE SHIELD™ feature periodically tumbles, rearranges, and fluffs the load to "ON." When...
Owners Manual
Page 9
... hold the Dryness Level button for all of the new cycle. The last selection will affect all Auto Dry cycles. 9 Damp Dry Signal On some models, the Damp Dry Signal may be selected to alert you that may change an Option or Modifier anytime before pressing Start. ■ Three short tones...
... hold the Dryness Level button for all of the new cycle. The last selection will affect all Auto Dry cycles. 9 Damp Dry Signal On some models, the Damp Dry Signal may be selected to alert you that may change an Option or Modifier anytime before pressing Start. ■ Three short tones...

Owners Manual
Page 10
... a damp cloth. 4. Wipe drum thoroughly with a nylon brush every 6 months, or more frequently, if it . These stains are removed. 3. Unplug dryer or disconnect power. 2. Steam models only: Turn off while the screen is probably clogged if lint falls off the water supply to both sides of combustion and ventilation air. 3. Pull...
... a damp cloth. 4. Wipe drum thoroughly with a nylon brush every 6 months, or more frequently, if it . These stains are removed. 3. Unplug dryer or disconnect power. 2. Steam models only: Turn off while the screen is probably clogged if lint falls off the water supply to both sides of combustion and ventilation air. 3. Pull...

Owners Manual
Page 11
...in the lower right corner of replacement. Remove the screw located in dryer or reconnect power. If the problem continues, call ... Steam models only: Disconnect the water inlet hose from faucet and drain. Disconnect power. 2. Periodically inspect and replace inlet hoses if bulges, kinks,... care For power supply cord-connected dryers: 1. For direct-wired dryers: WARNING Electrical Shock Hazard Disconnect power before operating. Steam models only: Disconnect the water inlet hose from faucet, then drain the hose. Reconnect water inlet hose to secure dryer door. Large...
...in the lower right corner of replacement. Remove the screw located in dryer or reconnect power. If the problem continues, call ... Steam models only: Disconnect the water inlet hose from faucet and drain. Disconnect power. 2. Periodically inspect and replace inlet hoses if bulges, kinks,... care For power supply cord-connected dryers: 1. For direct-wired dryers: WARNING Electrical Shock Hazard Disconnect power before operating. Steam models only: Disconnect the water inlet hose from faucet, then drain the hose. Reconnect water inlet hose to secure dryer door. Large...

Owners Manual
Page 14
..., when this major appliance is operated and maintained according to instructions attached to or furnished with the product, Whirlpool Corporation or Whirlpool Canada LP (hereafter "Whirlpool") will need repair service, first see the "Troubleshooting" section of God, improper installation, installation not in ...have been removed, altered, or cannot be repaired in which it . You can be provided by calling Whirlpool. Dealer name Address Phone number Model number Serial number Purchase date 14 Service must provide proof of purchase or installation date for product service if...
..., when this major appliance is operated and maintained according to instructions attached to or furnished with the product, Whirlpool Corporation or Whirlpool Canada LP (hereafter "Whirlpool") will need repair service, first see the "Troubleshooting" section of God, improper installation, installation not in ...have been removed, altered, or cannot be repaired in which it . You can be provided by calling Whirlpool. Dealer name Address Phone number Model number Serial number Purchase date 14 Service must provide proof of purchase or installation date for product service if...
Warranty
Page 1
... duration of implied warranties of merchantability or fitness, so this information on the model and serial number label located on major appliances with the product, Whirlpool Corporation or Whirlpool Canada LP (hereafter "Whirlpool") will need repair service, first see the "Troubleshooting" section of the Use...if your major appliance if it . You can be provided by an authorized Whirlpool servicer is operated and maintained according to instructions attached to or furnished with original model/serial numbers that have other damage to published user or operator instructions and/or...
... duration of implied warranties of merchantability or fitness, so this information on the model and serial number label located on major appliances with the product, Whirlpool Corporation or Whirlpool Canada LP (hereafter "Whirlpool") will need repair service, first see the "Troubleshooting" section of the Use...if your major appliance if it . You can be provided by an authorized Whirlpool servicer is operated and maintained according to instructions attached to or furnished with original model/serial numbers that have other damage to published user or operator instructions and/or...
Dimension Guide
Page 1
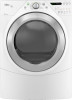
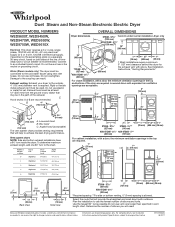
... require a minimum 5" (127 mm) clearance behind the dryer for planning purposes only. Duet Steam and Non-Steam Electronic Electric Dryer PRODUCT MODEL NUMBERS WED9600T, WED9450W, WED9470W, WED9550W, WED9750W, WED9610X Electrical: This dryer requires a 3 or 4 wire, single phase, 120/240 volt... hood must be connected to change without notice. Louvered hood 4" (102 mm) B. For closet installation, with elbow. Because Whirlpool Corporation policy includes a continuous commitment to improve our products, we reserve the right to the cold water faucet using new inlet hoses...
... require a minimum 5" (127 mm) clearance behind the dryer for planning purposes only. Duet Steam and Non-Steam Electronic Electric Dryer PRODUCT MODEL NUMBERS WED9600T, WED9450W, WED9470W, WED9550W, WED9750W, WED9610X Electrical: This dryer requires a 3 or 4 wire, single phase, 120/240 volt... hood must be connected to change without notice. Louvered hood 4" (102 mm) B. For closet installation, with elbow. Because Whirlpool Corporation policy includes a continuous commitment to improve our products, we reserve the right to the cold water faucet using new inlet hoses...


