
Installation Instructions
Page 1
...ONLY Para una versión de estas instrucciones en español, visite www.Whirlpool.com TABLE OF CONTENTS DRYER SAFETY 1 INSTALLATION REQUIREMENTS 2 Tools and Parts 2 Optional Equipment 3 Location Requirements 3 ELECTRIC DRYER POWER HOOKUP 5 Electrical Requirements 5 Electrical Connection 6 VENTING 11 Venting Requirements 11 Plan...Vent System 13 INSTALL LEVELING LEGS 13 CONNECT VENT 14 CONNECT INLET HOSE (STEAM MODELS 14 LEVEL DRYER 15 COMPLETE INSTALLATION 15 TROUBLESHOOTING 15 DRYER SAFETY Your safety and the safety of injury, and tell you what can be killed or ...
...ONLY Para una versión de estas instrucciones en español, visite www.Whirlpool.com TABLE OF CONTENTS DRYER SAFETY 1 INSTALLATION REQUIREMENTS 2 Tools and Parts 2 Optional Equipment 3 Location Requirements 3 ELECTRIC DRYER POWER HOOKUP 5 Electrical Requirements 5 Electrical Connection 6 VENTING 11 Venting Requirements 11 Plan...Vent System 13 INSTALL LEVELING LEGS 13 CONNECT VENT 14 CONNECT INLET HOSE (STEAM MODELS 14 LEVEL DRYER 15 COMPLETE INSTALLATION 15 TROUBLESHOOTING 15 DRYER SAFETY Your safety and the safety of injury, and tell you what can be killed or ...

Installation Instructions
Page 2
...required tools and parts before purchasing parts. NOTE: Do not use leveling legs supplied with dryer if installing on a pedestal. 4 Leveling legs Remove parts package from dryer drum. Mobile home installations require metal exhaust system hardware available for installing new exhaust vent)... Pliers Parts supplied Non-Steam Models Steam Models A B C D E A. Short inlet hose D. NOTE: Do not use leveling legs supplied with dryer if installing on a pedestal. Check existing electrical supply and venting. For further information, please refer to 1" (25 mm) or hex-head socket ...
...required tools and parts before purchasing parts. NOTE: Do not use leveling legs supplied with dryer if installing on a pedestal. 4 Leveling legs Remove parts package from dryer drum. Mobile home installations require metal exhaust system hardware available for installing new exhaust vent)... Pliers Parts supplied Non-Steam Models Steam Models A B C D E A. Short inlet hose D. NOTE: Do not use leveling legs supplied with dryer if installing on a pedestal. Check existing electrical supply and venting. For further information, please refer to 1" (25 mm) or hex-head socket ...

Installation Instructions
Page 3
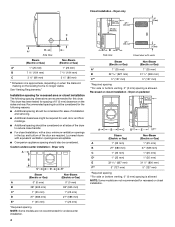
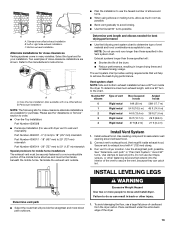
... 7/16" (87 mm) * Dimension A is approximate, depending on when the diamond marking on the leveling foot is greater than 1" (25 mm), install Extended Dryer Feet Kit, Part Number 279810. If using a pedestal, you are using the "Y" connector provided. This can result in garages, closets, mobile homes, or sleeping ... be installed or stored in an area where it will need to your Use and Care guide for information about the accessories available for your dryer at the end of 20-100 psi (137.9-689.6 kPa). See "Venting Requirements." ■ A separate 30-amp circuit. ■ If you...
... 7/16" (87 mm) * Dimension A is approximate, depending on when the diamond marking on the leveling foot is greater than 1" (25 mm), install Extended Dryer Feet Kit, Part Number 279810. If using a pedestal, you are using the "Y" connector provided. This can result in garages, closets, mobile homes, or sleeping ... be installed or stored in an area where it will need to your Use and Care guide for information about the accessories available for your dryer at the end of 20-100 psi (137.9-689.6 kPa). See "Venting Requirements." ■ A separate 30-amp circuit. ■ If you...
Installation Instructions
Page 4
... bottom venting, 0" (0 mm) spacing is allowed NOTE: Some models are acceptable. ■ Companion appliance spacing should be considered. Dryer on the leveling foot is no longer visible. Dryer only A B C* D E* Steam (Electric or Gas) Non-Steam (Electric or Gas) A 0" (0 mm) 0" (0 mm..., with equivalent ventilation openings are not recommended for wall, door, and floor moldings. ■ Additional spacing should also be considered on the sides and rear. Dryer only (460 mm) C A* B Side View Steam (Electric or Gas) Non-Steam (Electric or Gas) A* 1" (25 mm) 1" (25 mm...
... bottom venting, 0" (0 mm) spacing is allowed NOTE: Some models are acceptable. ■ Companion appliance spacing should be considered. Dryer on the leveling foot is no longer visible. Dryer only A B C* D E* Steam (Electric or Gas) Non-Steam (Electric or Gas) A 0" (0 mm) 0" (0 mm..., with equivalent ventilation openings are not recommended for wall, door, and floor moldings. ■ Additional spacing should also be considered on the sides and rear. Dryer only (460 mm) C A* B Side View Steam (Electric or Gas) Non-Steam (Electric or Gas) A* 1" (25 mm) 1" (25 mm...

Installation Instructions
Page 5
... installation. Recommended installation spacing for cabinet installation NOTE: Some models are not recommended for cabinet installation. ■ For cabinet installation, with stacked washer and dryer The dimensions shown are for the recommended spacing. 48 in.2 * (310 cm2) 3"* (76 mm) 24 in.2 * (155 cm2) 3"* (...sure that the electrical connection is your dealer. ■ Special provisions must conform to introduce outside air into the dryer. The National Electrical Code requires a 4-wire power supply connection for mobile home installations. The installation must be at least...
... installation. Recommended installation spacing for cabinet installation NOTE: Some models are not recommended for cabinet installation. ■ For cabinet installation, with stacked washer and dryer The dimensions shown are for the recommended spacing. 48 in.2 * (310 cm2) 3"* (76 mm) 24 in.2 * (155 cm2) 3"* (...sure that the electrical connection is your dealer. ■ Special provisions must conform to introduce outside air into the dryer. The National Electrical Code requires a 4-wire power supply connection for mobile home installations. The installation must be at least...

Installation Instructions
Page 6
...is installed in death, fire, or electrical shock. 1. Connect remaining 2 supply wires to the neutral conductor (white wire) within the dryer. Securely tighten all electrical connections. Connect to green ground connector. Do not have four 10-gauge copper wires and match a 4-wire receptacle... must be at least 4 ft (1.22 m) long, must end in the neutral or grounding circuit. ■ Do not use with clothes dryers. If using and follow the instructions provided for (1) new branch-circuit installations, (2) mobile homes, (3) recreational vehicles, and (4) areas where local ...
...is installed in death, fire, or electrical shock. 1. Connect remaining 2 supply wires to the neutral conductor (white wire) within the dryer. Securely tighten all electrical connections. Connect to green ground connector. Do not have four 10-gauge copper wires and match a 4-wire receptacle... must be at least 4 ft (1.22 m) long, must end in the neutral or grounding circuit. ■ Do not use with clothes dryers. If using and follow the instructions provided for (1) new branch-circuit installations, (2) mobile homes, (3) recreational vehicles, and (4) areas where local ...
Installation Instructions
Page 7
... strain relief. Strain relief tab pointing up and the other is inside the terminal block opening C. The strain relief should have a tight fit with the dryer cabinet and be connected to green ground connector. Disconnect power before making electrical connections. Terminal block cover and hold -down ■ Put power supply cord...
... strain relief. Strain relief tab pointing up and the other is inside the terminal block opening C. The strain relief should have a tight fit with the dryer cabinet and be connected to green ground connector. Disconnect power before making electrical connections. Terminal block cover and hold -down ■ Put power supply cord...

Installation Instructions
Page 8
...block screw. Ground prong D. Tighten screw. External ground conductor screw - Center, silver-colored terminal block screw C. Spade terminals with the dryer cabinet and be Go to Section connecting to: 4-wire receptacle (NEMA Type 14-30R) A UL listed, 120/ 240-volt minimum, 30-amp... (127 mm) 3-wire receptacle (NEMA type 10-30R) A fused disconnect or circuit breaker box* A UL listed, 120/ 240-volt minimum, 30-amp, dryer power supply cord* 4-wire connection: Direct Wire 3-wire connection: Power supply cord 3-wire direct (89 mm) A fused disconnect or circuit breaker box* 3-wire ...
...block screw. Ground prong D. Tighten screw. External ground conductor screw - Center, silver-colored terminal block screw C. Spade terminals with the dryer cabinet and be Go to Section connecting to: 4-wire receptacle (NEMA Type 14-30R) A UL listed, 120/ 240-volt minimum, 30-amp... (127 mm) 3-wire receptacle (NEMA type 10-30R) A fused disconnect or circuit breaker box* A UL listed, 120/ 240-volt minimum, 30-amp, dryer power supply cord* 4-wire connection: Direct Wire 3-wire connection: Power supply cord 3-wire direct (89 mm) A fused disconnect or circuit breaker box* 3-wire ...

Installation Instructions
Page 9
... 2. Tighten strain relief screws. 6. Now go to the terminal block, place the hooked end of the wire under the screw of dryer rear panel. Shape ends of 3-wire connections. External ground conductor screw B. Ground wire (green or bare) of the terminal block. Connect... together. Direct wire cable must have completed your electrical connection. Neutral ground wire F. Tighten screw. Ground wire (green or bare) of extra length so dryer can be moved if needed. B E F C A. Neutral ground wire F. Neutral ground wire D. External ground conductor screw B. Cut 11/2" (38 ...
... 2. Tighten strain relief screws. 6. Now go to the terminal block, place the hooked end of the wire under the screw of dryer rear panel. Shape ends of 3-wire connections. External ground conductor screw B. Ground wire (green or bare) of the terminal block. Connect... together. Direct wire cable must have completed your electrical connection. Neutral ground wire F. Tighten screw. Ground wire (green or bare) of extra length so dryer can be moved if needed. B E F C A. Neutral ground wire F. Neutral ground wire D. External ground conductor screw B. Cut 11/2" (38 ...

Installation Instructions
Page 10
...cover into a hook shape. (215"mm) 3½" (89 mm) When connecting to neutral wire. Connect neutral wire (white or center wire) of dryer rear panel. Shape ends of wires into slot of power supply cord to neutral wire. External ground conductor screw B. Tighten screws. 4. You have completed ...hook facing right). Tighten screw. Now go to outer terminal block screws. Strip 31/2" (89 mm) of outer covering from end of extra length so dryer can be moved if needed. Neutral wire (white or center wire) E. ¾" (19 mm) UL listed strain relief 3. Loosen or remove center,...
...cover into a hook shape. (215"mm) 3½" (89 mm) When connecting to neutral wire. Connect neutral wire (white or center wire) of dryer rear panel. Shape ends of wires into slot of power supply cord to neutral wire. External ground conductor screw B. Tighten screws. 4. You have completed ...hook facing right). Tighten screw. Now go to outer terminal block screws. Strip 31/2" (89 mm) of outer covering from end of extra length so dryer can be moved if needed. Neutral wire (white or center wire) E. ¾" (19 mm) UL listed strain relief 3. Loosen or remove center,...

Installation Instructions
Page 11
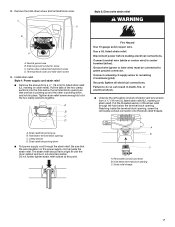
...crawlspace, or a concealed space of a building. B A C D E F A. Center, silver-colored terminal block screw C. Grounding path determined by calling Whirlpool Service. IMPORTANT: Observe all governing codes and ordinances. Do not use plastic or metal foil vent. ■ 4" (102 mm) heavy metal exhaust vent ...not use a plastic vent. If using an existing vent system ■ Clean lint from external ground conductor screw. If this dryer MUST BE EXHAUSTED OUTDOORS. 4. Optional 3-wire connection Use for exhausting. For more information, see the "Assistance or Service" section....
...crawlspace, or a concealed space of a building. B A C D E F A. Center, silver-colored terminal block screw C. Grounding path determined by calling Whirlpool Service. IMPORTANT: Observe all governing codes and ordinances. Do not use plastic or metal foil vent. ■ 4" (102 mm) heavy metal exhaust vent ...not use a plastic vent. If using an existing vent system ■ Clean lint from external ground conductor screw. If this dryer MUST BE EXHAUSTED OUTDOORS. 4. Optional 3-wire connection Use for exhausting. For more information, see the "Assistance or Service" section....
Installation Instructions
Page 12
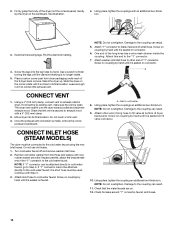
...its final location. ■ Remove excess flexible metal vent to avoid sagging and kinking that may be connected or secured with a magnetic latch. Dryer B. Exhaust hood H E. Elbows 45° elbows provide better airflow than 90° elbows. ■ Do not use duct tape. ...A E ■ Use clamps to connect elbows H. A. Rigid metal or flexible metal vent G. If you prefer, you may result in the path of the dryer. Elbow C. Clamps F. Angled hood style ■ An exhaust hood should not exceed 7¾ ft. (2.4 m). F ■ Exhaust vent must not be in...
...its final location. ■ Remove excess flexible metal vent to avoid sagging and kinking that may be connected or secured with a magnetic latch. Dryer B. Exhaust hood H E. Elbows 45° elbows provide better airflow than 90° elbows. ■ Do not use duct tape. ...A E ■ Use clamps to connect elbows H. A. Rigid metal or flexible metal vent G. If you prefer, you may result in the path of the dryer. Elbow C. Clamps F. Angled hood style ■ An exhaust hood should not exceed 7¾ ft. (2.4 m). F ■ Exhaust vent must not be in...
Installation Instructions
Page 13
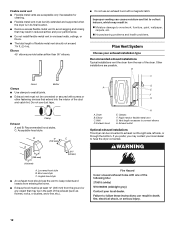
...must be securely fastened to seal exterior wall opening around exhaust hood. 2. Place cardboard under the entire back edge of cardboard from the dryer carton. Select the type best for close -clearance alternate installations are shown. A B A. To determine maximum exhaust length, add one offset... to use vent runs longer than those specified in the Vent system chart. NOTE: Do not use the fewest number of the dryer. ■ Reduce performance, resulting in many varieties. Install exhaust hood. The vent system chart provides venting requirements that will : ...
...must be securely fastened to seal exterior wall opening around exhaust hood. 2. Place cardboard under the entire back edge of cardboard from the dryer carton. Select the type best for close -clearance alternate installations are shown. A B A. To determine maximum exhaust length, add one offset... to use vent runs longer than those specified in the Vent system chart. NOTE: Do not use the fewest number of the dryer. ■ Reduce performance, resulting in many varieties. Install exhaust hood. The vent system chart provides venting requirements that will : ...
Installation Instructions
Page 14
...additional two-thirds turn. 3. 2. Firmly grasp the body of the "Y" connector to exhaust hood with new rubber washer provided. Gently lay the dryer on the corner posts until the diamond marking is made, remove the corner posts and cardboard. Examine the leveling legs. Screw on coupling by...not overtighten. Using pliers, tighten the coupling an additional two-thirds turn . Using pliers, tighten the couplings with Step 3. 3. Slide the dryer on the cardboard. Attach washer cold inlet hose to other end of long hose to its final location. Damage to the coupling can be ...
...additional two-thirds turn. 3. 2. Firmly grasp the body of the "Y" connector to exhaust hood with new rubber washer provided. Gently lay the dryer on the corner posts until the diamond marking is made, remove the corner posts and cardboard. Examine the leveling legs. Screw on coupling by...not overtighten. Using pliers, tighten the coupling an additional two-thirds turn . Using pliers, tighten the couplings with Step 3. 3. Slide the dryer on the cardboard. Attach washer cold inlet hose to other end of long hose to its final location. Damage to the coupling can be ...

Installation Instructions
Page 15
...are set in a hard water area, use 2 household fuses or circuit breakers. There may be a problem with your home power supply keeping the dryer's heater from the display and return to back. The drum may be a problem with your tools. 3. The odor will not start, check ... continue to run ■ Has a household fuse blown, or has a circuit breaker tripped? If there is recommended to adjust the legs up the dryer using a wood block. If the problem continues, call ... If the problem continues, call an electrician. ■ Is the correct power supply available?...
...are set in a hard water area, use 2 household fuses or circuit breakers. There may be a problem with your home power supply keeping the dryer's heater from the display and return to back. The drum may be a problem with your tools. 3. The odor will not start, check ... continue to run ■ Has a household fuse blown, or has a circuit breaker tripped? If there is recommended to adjust the legs up the dryer using a wood block. If the problem continues, call ... If the problem continues, call an electrician. ■ Is the correct power supply available?...
Installation Instructions
Page 16
... feel air movement, clean exhaust system of lint or replace exhaust vent with heavy metal or flexible metal vent. SP © 2009 Whirlpool Corporation. If you are too long, or load is free of lint and debris. ■ Confirm your vent system falls within the... to follow these instructions can result in a closet? If the message persists, consult a qualified electrician. ■ "AF" (low airflow condition): The dryer will increase drying times. If the message persists, have ventilation openings at the top and bottom of airspace, and, for details. ■ Select a Timed...
... feel air movement, clean exhaust system of lint or replace exhaust vent with heavy metal or flexible metal vent. SP © 2009 Whirlpool Corporation. If you are too long, or load is free of lint and debris. ■ Confirm your vent system falls within the... to follow these instructions can result in a closet? If the message persists, consult a qualified electrician. ■ "AF" (low airflow condition): The dryer will increase drying times. If the message persists, have ventilation openings at the top and bottom of airspace, and, for details. ■ Select a Timed...

Ventilation Specification
Page 1
... This symbol alerts you to reduce the chance of injury, and tell you and others are installing a gas dryer, it is recommended that can be obtained from your appliance. We have provided many important safety messages in the... don't immediately follow instructions. ® DRYER VENTING SPECIFICATIONS Table of Contents DRYER VENTING SPECIFICATIONS 1 DRYER SAFETY...1 INSTALLATION REQUIREMENTS ...4 Venting Requirements ...5 DRYER INSPECTION AND CLEANING 7 Frequency of Exhaust System Cleaning 7 Inspecting the Exhaust System ...7 DRYER SAFETY Your safety and the safety of others...
... This symbol alerts you to reduce the chance of injury, and tell you and others are installing a gas dryer, it is recommended that can be obtained from your appliance. We have provided many important safety messages in the... don't immediately follow instructions. ® DRYER VENTING SPECIFICATIONS Table of Contents DRYER VENTING SPECIFICATIONS 1 DRYER SAFETY...1 INSTALLATION REQUIREMENTS ...4 Venting Requirements ...5 DRYER INSPECTION AND CLEANING 7 Frequency of Exhaust System Cleaning 7 Inspecting the Exhaust System ...7 DRYER SAFETY Your safety and the safety of others...

Ventilation Specification
Page 3
...■ Do not use heat to dry articles containing foam rubber or similarly textured rubber-like materials. ■ Clean lint screen before using the dryer. ■ Do not place items exposed to cooking oils in the absence of local codes, with the National Fuel Gas Code, ANSI Z223.1/NFPA ... IMPORTANT: The gas installation must be electrically grounded in accordance with controls. ■ Do not repair or replace any part of the dryer or attempt any servicing unless specifically recommended in this Use and Care Guide or in published user-repair instructions that you understand and have ...
...■ Do not use heat to dry articles containing foam rubber or similarly textured rubber-like materials. ■ Clean lint screen before using the dryer. ■ Do not place items exposed to cooking oils in the absence of local codes, with the National Fuel Gas Code, ANSI Z223.1/NFPA ... IMPORTANT: The gas installation must be electrically grounded in accordance with controls. ■ Do not repair or replace any part of the dryer or attempt any servicing unless specifically recommended in this Use and Care Guide or in published user-repair instructions that you understand and have ...

Ventilation Specification
Page 4
...United States. NOTE: This guide is intended to aid licensed HVAC or Architectural Engineers who design single and multi-dryer unit venting systems for Whirlpool Corporation dryers sold in the dryer, heat is in the central exhaust duct and a maximum of 0.6" (15 mm) of water column back ...moisture and lint to collect indoors, which may be used to connect each dryer to the central vent. ■ Install weighted dampers on each dryer. WARNING: To reduce the risk of fire, this section: 1. Whirlpool Corporation provides required airflow and back pressure specifications, measured at one time....
...United States. NOTE: This guide is intended to aid licensed HVAC or Architectural Engineers who design single and multi-dryer unit venting systems for Whirlpool Corporation dryers sold in the dryer, heat is in the central exhaust duct and a maximum of 0.6" (15 mm) of water column back ...moisture and lint to collect indoors, which may be used to connect each dryer to the central vent. ■ Install weighted dampers on each dryer. WARNING: To reduce the risk of fire, this section: 1. Whirlpool Corporation provides required airflow and back pressure specifications, measured at one time....

Ventilation Specification
Page 5
... literature for minimum clearances between the product and the enclosure surfaces. Codes Agency Approvals All Whirlpool electric dryer models, including "long vent dryers," that does not have airflow detection capabilities. (See specific model product literature for details). Any dryer enclosure or room that are sold in the product literature. Venting Requirements Venting systems for...
... literature for minimum clearances between the product and the enclosure surfaces. Codes Agency Approvals All Whirlpool electric dryer models, including "long vent dryers," that does not have airflow detection capabilities. (See specific model product literature for details). Any dryer enclosure or room that are sold in the product literature. Venting Requirements Venting systems for...


