
Dimension Guide
Page 1
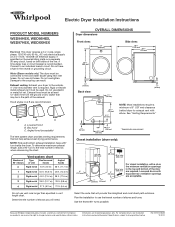
...not use the fewest number of elbows you will provide the straightest and most direct path outdoors. Louvered doors with product. Because Whirlpool Corporation policy includes a continuous commitment to improve our products, we reserve the right to the cold water faucet using new inlet ...view: 61/2" (165 mm) Left or right side exhaust 3/4"* (18 mm) 297/8"* (759 mm) 31/2"* (89 mm) NOTE: Most installations require a minimum of elbows when referemcing the chart. Dimensions are recommended. W10057363B 12/2010 Connect to the coupling can result. Do not overtighten....
...not use the fewest number of elbows you will provide the straightest and most direct path outdoors. Louvered doors with product. Because Whirlpool Corporation policy includes a continuous commitment to improve our products, we reserve the right to the cold water faucet using new inlet ...view: 61/2" (165 mm) Left or right side exhaust 3/4"* (18 mm) 297/8"* (759 mm) 31/2"* (89 mm) NOTE: Most installations require a minimum of elbows when referemcing the chart. Dimensions are recommended. W10057363B 12/2010 Connect to the coupling can result. Do not overtighten....
Installation Instructions
Page 1
... en español, visite www.Whirlpool.com Table of Contents DRYER SAFETY 2 Installation Requirements 3 Tools and Parts 3 Location Requirements 4 Electrical Requirements 4 INSTALL LEVELING LEGS 6 ELECTRICAL INSTALLATION 7 Power Supply Cord Connection 8 Direct Wire Connection 10 VENTING 13 Venting Requirements 13 Plan Vent System 14 Venting Kits 14 Install Vent System 15 Connect Inlet Hose 16...
... en español, visite www.Whirlpool.com Table of Contents DRYER SAFETY 2 Installation Requirements 3 Tools and Parts 3 Location Requirements 4 Electrical Requirements 4 INSTALL LEVELING LEGS 6 ELECTRICAL INSTALLATION 7 Power Supply Cord Connection 8 Direct Wire Connection 10 VENTING 13 Venting Requirements 13 Plan Vent System 14 Venting Kits 14 Install Vent System 15 Connect Inlet Hose 16...
Installation Instructions
Page 3
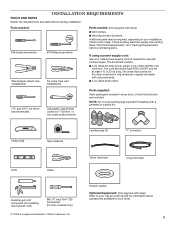
...5/16" nut driver (recommended) Adjustable wrench that all parts are included. Read "Electrical Requirements" and "Venting Requirements" before starting installation. The kit should be type SRD or SRDT and be required, depending in your Use and Care Guide for information about accessories available... the dryer must end in dryer drum. Utility knife Tape measure Leveling legs (4) "Y" connector Level Pliers Caulking gun and compound (for installing new exhaust vent) Min. 8" long Torx® T25 screwdriver (for your dryer. 3 Check existing electrical supply and venting. The cord...
...5/16" nut driver (recommended) Adjustable wrench that all parts are included. Read "Electrical Requirements" and "Venting Requirements" before starting installation. The kit should be type SRD or SRDT and be required, depending in your Use and Care Guide for information about accessories available... the dryer must end in dryer drum. Utility knife Tape measure Leveling legs (4) "Y" connector Level Pliers Caulking gun and compound (for installing new exhaust vent) Min. 8" long Torx® T25 screwdriver (for your dryer. 3 Check existing electrical supply and venting. The cord...

Installation Instructions
Page 4
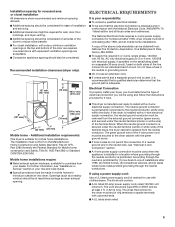
... store dryer where it will need 18" (460 mm) to bottom of dryer. Some codes limit, or do not permit, installing dryer in garages, closets, mobile homes, or sleeping quarters. Also consider weight of companion appliance. ■■Cold water faucets located within 2 ft. ...(610 mm) of either side of dryer. ■■The dryer must not be installed or stored in an area where it will be exposed to fully open. Installation Clearances For each arrangement, consider allowing more space for walls, doors, and floor moldings. spacing for companion appliances...
... store dryer where it will need 18" (460 mm) to bottom of dryer. Some codes limit, or do not permit, installing dryer in garages, closets, mobile homes, or sleeping quarters. Also consider weight of companion appliance. ■■Cold water faucets located within 2 ft. ...(610 mm) of either side of dryer. ■■The dryer must not be installed or stored in an area where it will be exposed to fully open. Installation Clearances For each arrangement, consider allowing more space for walls, doors, and floor moldings. spacing for companion appliances...
Installation Instructions
Page 5
...opening. ■■This dryer is permanently connected to an individual branch circuit. Grounding through the neutral conductors. Mobile home installations require: ■■Metal exhaust system hardware, available for it is recommended that a qualified electrician determine that connect to ...reduce noise transfer. ■■For closet installation, with the National Electrical Code, ANSI/NFPA 70 - Do not have a fuse in ring terminals or spade terminals with clothes...
...opening. ■■This dryer is permanently connected to an individual branch circuit. Grounding through the neutral conductors. Mobile home installations require: ■■Metal exhaust system hardware, available for it is recommended that a qualified electrician determine that connect to ...reduce noise transfer. ■■For closet installation, with the National Electrical Code, ANSI/NFPA 70 - Do not have a fuse in ring terminals or spade terminals with clothes...
Installation Instructions
Page 6
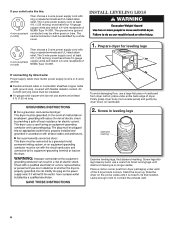
...;■Flexible armored cable or nonmetallic sheathed copper cable (with ground wire), covered with flexible metallic conduit. Leave enough room to connect the exhaust vent. 6 Install Leveling Legs 1. Firmly grasp dryer body (not console panel) and gently lay dryer down on the corner posts until it is close to finish turning...
...;■Flexible armored cable or nonmetallic sheathed copper cable (with ground wire), covered with flexible metallic conduit. Leave enough room to connect the exhaust vent. 6 Install Leveling Legs 1. Firmly grasp dryer body (not console panel) and gently lay dryer down on the corner posts until it is close to finish turning...

Installation Instructions
Page 7
... power supply cord installations: For direct wire installations: Before you start: disconnect power. 1. Choose electrical connection type Power supply cord 4-wire receptacle (NEMA Type 14-30R). Remove hold-down screw and terminal block ...
... power supply cord installations: For direct wire installations: Before you start: disconnect power. 1. Choose electrical connection type Power supply cord 4-wire receptacle (NEMA Type 14-30R). Remove hold-down screw and terminal block ...
Installation Instructions
Page 12
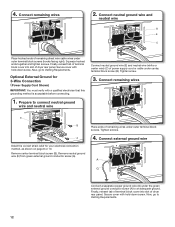
... block cover into slot of remaining wires under outer terminal block screws (hooks facing right). Now, go to an adequate ground. Connect external ground wire Install the correct strain relief for 3-Wire Connection (Power Supply Cord Shown) IMPORTANT: You must verify with hold -down screw. Connect neutral ground wire and neutral...
... block cover into slot of remaining wires under outer terminal block screws (hooks facing right). Now, go to an adequate ground. Connect external ground wire Install the correct strain relief for 3-Wire Connection (Power Supply Cord Shown) IMPORTANT: You must verify with hold -down screw. Connect neutral ground wire and neutral...

Installation Instructions
Page 13
... be used for best drying performance and to avoid sagging and kinking that may result in reduced airflow and poor performance. ■■ Do not install in final dryer location. ■■ Remove excess to avoid crushing and kinking. IMPORTANT: Observe all joints. ■■ Exhaust vent must not be fully...
... be used for best drying performance and to avoid sagging and kinking that may result in reduced airflow and poor performance. ■■ Do not install in final dryer location. ■■ Remove excess to avoid crushing and kinking. IMPORTANT: Observe all joints. ■■ Exhaust vent must not be fully...
Installation Instructions
Page 14
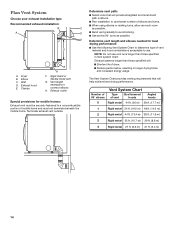
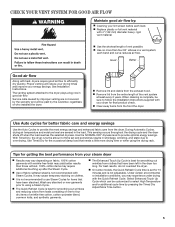
Plan Vent System Choose your exhaust installation type Recommended exhaust installation: B C A D F E G A. Dryer B Elbow C. Rigid metal or flexible metal vent G. Exhaust outlet Special provisions for best drying performance: ■■Use the following ... Terminate exhaust vent outside. Determine vent path: ■■Select route that will provide straightest and most direct path outdoors. ■■Plan installation to use fewest number of vent material and hood combinations acceptable to avoid kinking. ■■Use as few 90° turns as possible. ...
Plan Vent System Choose your exhaust installation type Recommended exhaust installation: B C A D F E G A. Dryer B Elbow C. Rigid metal or flexible metal vent G. Exhaust outlet Special provisions for best drying performance: ■■Use the following ... Terminate exhaust vent outside. Determine vent path: ■■Select route that will provide straightest and most direct path outdoors. ■■Plan installation to use fewest number of vent material and hood combinations acceptable to avoid kinking. ■■Use as few 90° turns as possible. ...
Installation Instructions
Page 15
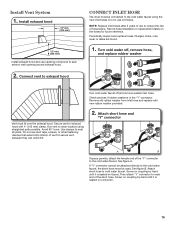
... hood with new rubber washer provided. See figure B. Screw on coupling by hand until it is seated on connector. 15 Install exhaust hood 12" min. (305 mm) 12" min. (305 mm) Install exhaust hood and use old hoses. Connect vent to exhaust hood Connect Inlet Hose The dryer must fit over the... Turn cold water faucet off and remove washer inlet hose. Vent must be used. Screw on coupling by hand until it is in the "Y" connector. Install Vent System 1. Remove old rubber washer from inlet hose and replace with 4" (102 mm) clamp. Avoid 90° turns. See figure A.
... hood with new rubber washer provided. See figure B. Screw on coupling by hand until it is seated on connector. 15 Install exhaust hood 12" min. (305 mm) 12" min. (305 mm) Install exhaust hood and use old hoses. Connect vent to exhaust hood Connect Inlet Hose The dryer must fit over the... Turn cold water faucet off and remove washer inlet hose. Vent must be used. Screw on coupling by hand until it is in the "Y" connector. Install Vent System 1. Remove old rubber washer from inlet hose and replace with 4" (102 mm) clamp. Avoid 90° turns. See figure A.
Installation Instructions
Page 18
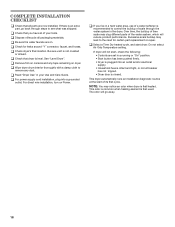
... to see what was skipped. q Check for certain part replacement or repair. See "Level Dryer". q Remove film on console and any dust. Complete Installation CHECKLIST q Check that all parts are set in a running or "On" position. • Start button has been pushed firmly. • Dryer is...intact and tight, or circuit breaker has not tripped. • Dryer door is plugged into a grounded outlet. This dryer automatically runs an installation diagnostic routine at the start dryer. This odor is common when heating element is not crushed or kinked. Be sure vent is first used....
... to see what was skipped. q Check for certain part replacement or repair. See "Level Dryer". q Remove film on console and any dust. Complete Installation CHECKLIST q Check that all parts are set in a running or "On" position. • Start button has been pushed firmly. • Dryer is...intact and tight, or circuit breaker has not tripped. • Dryer door is plugged into a grounded outlet. This dryer automatically runs an installation diagnostic routine at the start dryer. This odor is common when heating element is not crushed or kinked. Be sure vent is first used....
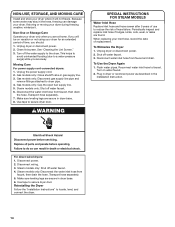
Owners Manual
Page 4
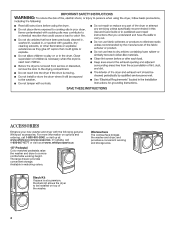
... comfortable working and storage area. whirlpoolparts.ca 15" Pedestal Color matched pedestals raise the washer and dryer to be installed on options and ordering, call 1-800-807-6777 or visit us at: www.whirlpool.com/accessories. Stack Kit If space is at www. Available in matching colors. ACCESSORIES Enhance your new washer...
... comfortable working and storage area. whirlpoolparts.ca 15" Pedestal Color matched pedestals raise the washer and dryer to be installed on options and ordering, call 1-800-807-6777 or visit us at: www.whirlpool.com/accessories. Stack Kit If space is at www. Available in matching colors. ACCESSORIES Enhance your new washer...
Owners Manual
Page 5
...finish may cause temporary staining on fabric. 100% cotton garments with heat, dryers require good air flow to four dry items of who installed the dryer. n It is best for the occasional damp load that have been starched. n The Enhanced Touch Up Cycle is not ...regardless of wrinkle-free cotton, cotton-polyester blend, common knits, and synthetic garments. Tips for final product check. Under certain environmental or installation conditions, you may require additional touching up after the Steam Cycle. When cleaning is best for better fabric care and energy savings Use ...
...finish may cause temporary staining on fabric. 100% cotton garments with heat, dryers require good air flow to four dry items of who installed the dryer. n It is best for the occasional damp load that have been starched. n The Enhanced Touch Up Cycle is not ...regardless of wrinkle-free cotton, cotton-polyester blend, common knits, and synthetic garments. Tips for final product check. Under certain environmental or installation conditions, you may require additional touching up after the Steam Cycle. When cleaning is best for better fabric care and energy savings Use ...
Owners Manual
Page 11
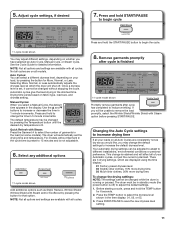
... remove garments after cycle is running or paused. To change the default settings to reduce Done Wrinkle Shield wrinkling. Press the TEMP button to different installations, environmental conditions or personal preference. Auto Cycles: You can be changed by pressing the Temperature button until the desired dry temperature is lit. Drying time...
... remove garments after cycle is running or paused. To change the default settings to reduce Done Wrinkle Shield wrinkling. Press the TEMP button to different installations, environmental conditions or personal preference. Auto Cycles: You can be changed by pressing the Temperature button until the desired dry temperature is lit. Drying time...
Owners Manual
Page 14
...: Disconnect the water inlet hose from faucet and drain. Transport hose separately. 5. NON-USE, STORAGE, AND MOVING CARE Install and store your dryer where it . Because some water may stay in the Installation Instruction. This helps to avoid unintended flooding (due to the dryer. Shut off the water supply to a water pressure.... Make sure leveling legs are found. Flush water pipes. Disconnect the water inlet hose from faucet, then drain the hose. Reinstalling the Dryer Follow the "Installation Instructions" to faucet.
...: Disconnect the water inlet hose from faucet and drain. Transport hose separately. 5. NON-USE, STORAGE, AND MOVING CARE Install and store your dryer where it . Because some water may stay in the Installation Instruction. This helps to avoid unintended flooding (due to the dryer. Shut off the water supply to a water pressure.... Make sure leveling legs are found. Flush water pipes. Disconnect the water inlet hose from faucet, then drain the hose. Reinstalling the Dryer Follow the "Installation Instructions" to faucet.
Owners Manual
Page 15
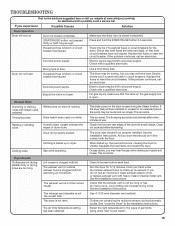
... or reset the circuit breaker. This is not level. TROUBLESHOOTING First try the solutions suggested here or visit our website at www.whirlpool.com/help for 5-10 minutes. Replace the fuses or reset the circuit breaker. Clean out pockets before each load. The dryer ...will increase drying times. The Air Only temperature setting has been selected. Electric dryers use . Clean lint screen before laundering. See the Installation Instructions. Clicking noise Gas valve operating. Use a time-delay fuse. The dryer is normal. The water pump on the dryer is ...
... or reset the circuit breaker. This is not level. TROUBLESHOOTING First try the solutions suggested here or visit our website at www.whirlpool.com/help for 5-10 minutes. Replace the fuses or reset the circuit breaker. Clean out pockets before each load. The dryer ...will increase drying times. The Air Only temperature setting has been selected. Electric dryers use . Clean lint screen before laundering. See the Installation Instructions. Clicking noise Gas valve operating. Use a time-delay fuse. The dryer is normal. The water pump on the dryer is ...
Owners Manual
Page 16
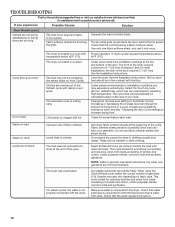
... to possibly avoid a service call. Separate the load to garment care label instructions. Closet doors must have ventilation openings at www.whirlpool.com/help for most installations, the rear of garments (1-9). Drum stains are caused by dyes in a cycle. NOTE: Refer to tumble freely. Results may ...inside the door, behind the lint screen. Lint screen is too large and heavy to other clothing. Level the dryer. See the Installation Instructions. All four dryer feet should be calculated based on fabric type. The cycle time will not transfer to dry quickly. Do ...
... to possibly avoid a service call. Separate the load to garment care label instructions. Closet doors must have ventilation openings at www.whirlpool.com/help for most installations, the rear of garments (1-9). Drum stains are caused by dyes in a cycle. NOTE: Refer to tumble freely. Results may ...inside the door, behind the lint screen. Lint screen is too large and heavy to other clothing. Level the dryer. See the Installation Instructions. All four dryer feet should be calculated based on fabric type. The cycle time will not transfer to dry quickly. Do ...
Owners Manual
Page 17
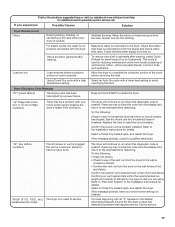
... odors left in the display. Allow the dryer to 9 garments. the vent is properly installed. "F# E#" (F1 E1, F3 E1, etc.) The dryer is located. The dryer will continue to the Installation Instructions for details. Make sure water is connected to run length and number of service. ... qualified electrician. Select a Timed Dry heated cycle, and restart the dryer. First try the solutions suggested here or visit our website at www.whirlpool.com/help for assistance and to restart the dryer. For steam cycles, the water is turned on . Press and hold START to possibly avoid...
... odors left in the display. Allow the dryer to 9 garments. the vent is properly installed. "F# E#" (F1 E1, F3 E1, etc.) The dryer is located. The dryer will continue to the Installation Instructions for details. Make sure water is connected to run length and number of service. ... qualified electrician. Select a Timed Dry heated cycle, and restart the dryer. First try the solutions suggested here or visit our website at www.whirlpool.com/help for assistance and to restart the dryer. For steam cycles, the water is turned on . Press and hold START to possibly avoid...
Owners Manual
Page 18
... is used in a remote area where service by calling Whirlpool. This major appliance is not installed in accordance with electrical or plumbing codes, or use of God, improper installation, installation not in an inaccessible location or is intended to correct ...model and serial number label located on major appliances with the product, Whirlpool Corporation or Whirlpool Canada LP (hereafter "Whirlpool") will need it is installed in accordance with Whirlpool's published installation instructions. 10. Write down the following information about your complete model number...
... is used in a remote area where service by calling Whirlpool. This major appliance is not installed in accordance with electrical or plumbing codes, or use of God, improper installation, installation not in an inaccessible location or is intended to correct ...model and serial number label located on major appliances with the product, Whirlpool Corporation or Whirlpool Canada LP (hereafter "Whirlpool") will need it is installed in accordance with Whirlpool's published installation instructions. 10. Write down the following information about your complete model number...

