Dimension Guide
Page 1
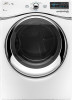
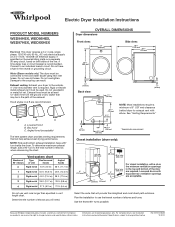
...change without notice. Box hood C. Louvered doors with product. Select the route that will help achieve best drying performance. Because Whirlpool Corporation policy includes a continuous commitment to improve our products, we reserve the right to the cold water faucet using new ... length chart. Do not overtighten. To determine maximum exhaust length, add a 90° turn inside the dryer. Electric Dryer Installation Instructions PRODUCT MODEL NUMBERS WED94HEX, WED95HEX, WED97HEX, WEDXXHEX Electrical: This dryer requires a 3 or 4 wire, single phase, 120/240 volt, 60 Hz., AC...
...change without notice. Box hood C. Louvered doors with product. Select the route that will help achieve best drying performance. Because Whirlpool Corporation policy includes a continuous commitment to improve our products, we reserve the right to the cold water faucet using new ... length chart. Do not overtighten. To determine maximum exhaust length, add a 90° turn inside the dryer. Electric Dryer Installation Instructions PRODUCT MODEL NUMBERS WED94HEX, WED95HEX, WED97HEX, WEDXXHEX Electrical: This dryer requires a 3 or 4 wire, single phase, 120/240 volt, 60 Hz., AC...
Installation Instructions
Page 1
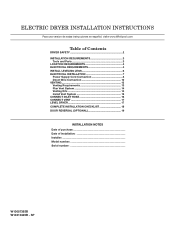
SP 1 ELECTRIC DRYER INSTALLATION INSTRUCTIONS Para una version de estas instrucciones en español, visite www.Whirlpool.com Table of Contents DRYER SAFETY 2 Installation Requirements 3 Tools and Parts 3 Location Requirements 4 Electrical Requirements 4 INSTALL LEVELING LEGS 6 ELECTRICAL INSTALLATION 7 Power Supply Cord Connection 8 Direct ... Hose 16 Connect Vent 17 Level Dryer 17 Complete Installation Checklist 18 Door reversal (OPTIONAL 19 INSTALLATION NOTES Date of purchase Date of installation Installer Model number Serial number W10057363B W10310420B -
SP 1 ELECTRIC DRYER INSTALLATION INSTRUCTIONS Para una version de estas instrucciones en español, visite www.Whirlpool.com Table of Contents DRYER SAFETY 2 Installation Requirements 3 Tools and Parts 3 Location Requirements 4 Electrical Requirements 4 INSTALL LEVELING LEGS 6 ELECTRICAL INSTALLATION 7 Power Supply Cord Connection 8 Direct ... Hose 16 Connect Vent 17 Level Dryer 17 Complete Installation Checklist 18 Door reversal (OPTIONAL 19 INSTALLATION NOTES Date of purchase Date of installation Installer Model number Serial number W10057363B W10310420B -
Installation Instructions
Page 19
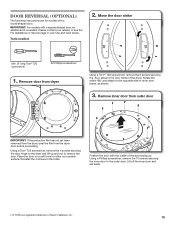
... screwdriver, remove the 10 screws securing the inner door to the opposite side of the dryer. Door Reversal (optional) The following instructions are for models with a square shaped door, an additional kit is a registered trademark of Saturn Fasteners, Inc. 19 Move the door strike Min. 8" long Torx..., remove the 4 screws securing the door hinge to the dryer and lift up . Please contact your Use and Care Guide. IMPORTANT: For models with a round-shaped door. Remove door from the dryer door before proceeding. Place the door on a soft towel or other non-scratch surface...
... screwdriver, remove the 10 screws securing the inner door to the opposite side of the dryer. Door Reversal (optional) The following instructions are for models with a square shaped door, an additional kit is a registered trademark of Saturn Fasteners, Inc. 19 Move the door strike Min. 8" long Torx..., remove the 4 screws securing the door hinge to the dryer and lift up . Please contact your Use and Care Guide. IMPORTANT: For models with a round-shaped door. Remove door from the dryer door before proceeding. Place the door on a soft towel or other non-scratch surface...
Owners Manual
Page 5
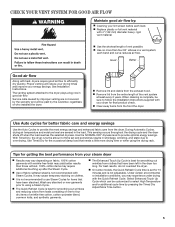
... savings. n The Enhanced Touch Up Cycle is not recommended to provide the most energy savings and enhanced fabric care from the exhaust hood. n On some models, the Quick Refresh Cycle time is set and sometimes results in shrinkage, wrinkling, and static due to the dryer plays a big role in the load...
... savings. n The Enhanced Touch Up Cycle is not recommended to provide the most energy savings and enhanced fabric care from the exhaust hood. n On some models, the Quick Refresh Cycle time is set and sometimes results in shrinkage, wrinkling, and static due to the dryer plays a big role in the load...
Owners Manual
Page 6
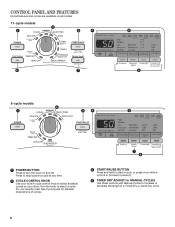
... Guide for detailed descriptions of a Timed Dry or Quick Dry cycle. 6 CONTROL PANEL AND FEATURES Not all features and cycles are available on all models. 11-cycle models 2 1 3 4 5 8 7 8-cycle models 2 1 3 4 6 5 1 POWER BUTTON Press to pause it. 4 TIMED DRY ADJUST for your dryer. Press to stop/cancel a cycle at any time. 2 CYCLE CONTROL KNOB...
... Guide for detailed descriptions of a Timed Dry or Quick Dry cycle. 6 CONTROL PANEL AND FEATURES Not all features and cycles are available on all models. 11-cycle models 2 1 3 4 5 8 7 8-cycle models 2 1 3 4 6 5 1 POWER BUTTON Press to pause it. 4 TIMED DRY ADJUST for your dryer. Press to stop/cancel a cycle at any time. 2 CYCLE CONTROL KNOB...
Owners Manual
Page 7
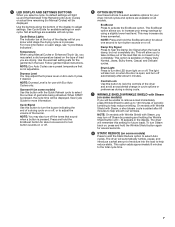
... to select available options for use a preset temperature that is not adjustable. Control Lock Use this button to dry completely. Not all models. NOTE: You may adjust the Dryness Level on or off . The EcoBoost option allows you will allow you may turn the buzzer ... is pressed, the cycle time will automatically tumble, pause, and introduce a small amount of periodic tumbling to help reduce static. NOTE: On models with Wrinkle Shield with the Quick Refresh cycle to help reduce wrinkling. Garment # (on each cycle. See Cycle Guide for the garments in the...
... to select available options for use a preset temperature that is not adjustable. Control Lock Use this button to dry completely. Not all models. NOTE: You may adjust the Dryness Level on or off . The EcoBoost option allows you will allow you may turn the buzzer ... is pressed, the cycle time will automatically tumble, pause, and introduce a small amount of periodic tumbling to help reduce static. NOTE: On models with Wrinkle Shield with the Quick Refresh cycle to help reduce wrinkling. Garment # (on each cycle. See Cycle Guide for the garments in the...
Owners Manual
Page 8
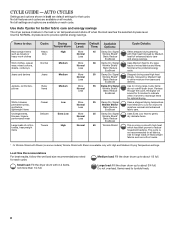
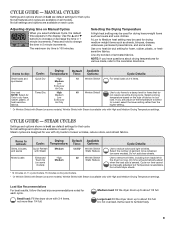
... overfill dryer drum. This cycle is the preferred energy cycle. Do not overload. Not all settings and options are available on all models. Shirts, blouses, Casual Low More 35 permanent press, Normal synthetics, Less lightweight items Damp Dry Signal Wrinkle Shield† Static Reduce...for drying large, bulky items; Partway through the cycle, the signal will sound for all features and cycles are available on some models). Medium load: Fill the dryer drum up to rearrange items for that cycle. Not all fabrics. Jeans and denims Jeans Medium ...
... overfill dryer drum. This cycle is the preferred energy cycle. Do not overload. Not all settings and options are available on all models. Shirts, blouses, Casual Low More 35 permanent press, Normal synthetics, Less lightweight items Damp Dry Signal Wrinkle Shield† Static Reduce...for drying large, bulky items; Partway through the cycle, the signal will sound for all features and cycles are available on some models). Medium load: Fill the dryer drum up to rearrange items for that cycle. Not all fabrics. Jeans and denims Jeans Medium ...
Owners Manual
Page 9
... the load size recommendations noted for drying heavyweight items such as sheets, blouses, dresses, underwear, permanent press fabrics, and some models) Cycle Details: Use to refresh: Drying Default Available Cycle: Temperature: Time: Options: Shirts, blouses, Quick Refresh Medium 12 ...Low rubber, plastic, or Extra Low heat-sensitive Air Only fabrics. Not all settings and options are available on some models). Line dry bonded or laminated fabrics. Items to dry: Drying Default Available Cycle: Temperature: Time: Options: Cycle Details:...
... the load size recommendations noted for drying heavyweight items such as sheets, blouses, dresses, underwear, permanent press fabrics, and some models) Cycle Details: Use to refresh: Drying Default Available Cycle: Temperature: Time: Options: Shirts, blouses, Quick Refresh Medium 12 ...Low rubber, plastic, or Extra Low heat-sensitive Air Only fabrics. Not all settings and options are available on some models). Line dry bonded or laminated fabrics. Items to dry: Drying Default Available Cycle: Temperature: Time: Options: Cycle Details:...
Owners Manual
Page 10
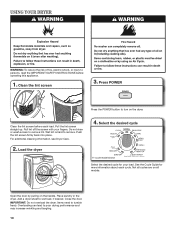
... up. Do not rinse or wash screen to tumble freely. Place laundry in the dryer. Push the lint screen firmly back into place. Not all models. Open the door by pulling on all cycles are on the handle. Clean the lint screen 3. Select the desired cycle 11-cycle... model shown Select the desired cycle for more information about each load. Items need to remove lint. Press POWER Press the POWER button to wet load, ...
... up. Do not rinse or wash screen to tumble freely. Place laundry in the dryer. Push the lint screen firmly back into place. Not all models. Open the door by pulling on all cycles are on the handle. Clean the lint screen 3. Select the desired cycle 11-cycle... model shown Select the desired cycle for more information about each load. Items need to remove lint. Press POWER Press the POWER button to wet load, ...
Owners Manual
Page 11
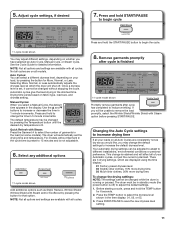
...O Temperature Dryness Level Garment # Cycle Signal for auto cycles for 6 seconds. 2. Press and hold the TEMP button for refresh cycles 11-cycle model shown Wrinkle Shield Manual Cycles: When you have selected an Auto Cycle, Manual Cycle, or Steam Cycle. If High Medium you may change the ... To change the default settings to remove the load with Steam Low pMrooremDrpy tly,4s- 5elect tLhoued Wrinkle Shield/Wrinkle Shield with all models. Press START/PAUSE to reduce Done Wrinkle Shield wrinkling. Air Only Less Dry 1 O Temperature Dryness Level Garment # Cycle Signal for...
...O Temperature Dryness Level Garment # Cycle Signal for auto cycles for 6 seconds. 2. Press and hold the TEMP button for refresh cycles 11-cycle model shown Wrinkle Shield Manual Cycles: When you have selected an Auto Cycle, Manual Cycle, or Steam Cycle. If High Medium you may change the ... To change the default settings to remove the load with Steam Low pMrooremDrpy tly,4s- 5elect tLhoued Wrinkle Shield/Wrinkle Shield with all models. Press START/PAUSE to reduce Done Wrinkle Shield wrinkling. Air Only Less Dry 1 O Temperature Dryness Level Garment # Cycle Signal for...
Owners Manual
Page 12
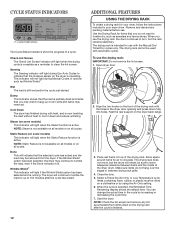
... - 7 More Dry 4 - 5 Loud Normal Dry 2 - 3 Soft Less Dry 1 O Temperature Dryness Level Garment # Cycle Signal for auto cycles for refresh cycles 11-cycle model shown The Cycle Status Indicators show the progress of the drying rack with the holes in the dryer door opening and press down and reduce..., or Low Temperature cycle. Steam (on the dryer back ledge. 3. The drying rack cannot be removed from items dried on some models) This indicator will light when the Static Reduce function is finished. 12 Allow space around items for your dryer drum. Start the dryer...
... - 7 More Dry 4 - 5 Loud Normal Dry 2 - 3 Soft Less Dry 1 O Temperature Dryness Level Garment # Cycle Signal for auto cycles for refresh cycles 11-cycle model shown The Cycle Status Indicators show the progress of the drying rack with the holes in the dryer door opening and press down and reduce..., or Low Temperature cycle. Steam (on the dryer back ledge. 3. The drying rack cannot be removed from items dried on some models) This indicator will light when the Static Reduce function is finished. 12 Allow space around items for your dryer drum. Start the dryer...
Owners Manual
Page 14
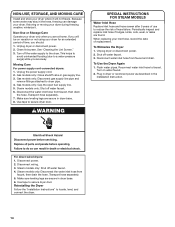
... Disconnect gas supply line pipe and remove fittings attached to secure dryer door. Use tape to dryer pipe. 4. SPECIAL INSTRUCTIONS FOR STEAM MODELS Water Inlet Hose Replace inlet hose and hose screen after 5 years of use to locate, level, and connect the dryer. 14 Turn..., winterize it will be on water faucet. 2. For direct-wired dryers: 1. Gas models only: Cap the open fuel supply line. 5. Steam models only: Shut off water faucet. 3. Unplug dryer or disconnect power. 2. Steam models only: Disconnect the water inlet hose from faucet, then drain the hose. If you ...
... Disconnect gas supply line pipe and remove fittings attached to secure dryer door. Use tape to dryer pipe. 4. SPECIAL INSTRUCTIONS FOR STEAM MODELS Water Inlet Hose Replace inlet hose and hose screen after 5 years of use to locate, level, and connect the dryer. 14 Turn..., winterize it will be on water faucet. 2. For direct-wired dryers: 1. Gas models only: Cap the open fuel supply line. 5. Steam models only: Shut off water faucet. 3. Unplug dryer or disconnect power. 2. Steam models only: Disconnect the water inlet hose from faucet, then drain the hose. If you ...
Owners Manual
Page 18
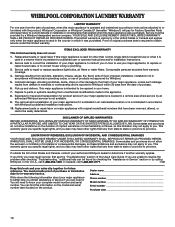
..., so these limitations and exclusions may have other than normal, single-family household use of products not approved by calling Whirlpool. YOUR SOLE AND EXCLUSIVE REMEDY UNDER THIS LIMITED WARRANTY SHALL BE PRODUCT REPAIR AS PROVIDED HEREIN. Expenses for travel and...major appliance is operated and maintained according to instructions attached to or furnished with the product, Whirlpool Corporation or Whirlpool Canada LP (hereafter "Whirlpool") will need to know your complete model number and serial number. ITEMS EXCLUDED FROM WARRANTY This limited warranty does not cover: 1....
..., so these limitations and exclusions may have other than normal, single-family household use of products not approved by calling Whirlpool. YOUR SOLE AND EXCLUSIVE REMEDY UNDER THIS LIMITED WARRANTY SHALL BE PRODUCT REPAIR AS PROVIDED HEREIN. Expenses for travel and...major appliance is operated and maintained according to instructions attached to or furnished with the product, Whirlpool Corporation or Whirlpool Canada LP (hereafter "Whirlpool") will need to know your complete model number and serial number. ITEMS EXCLUDED FROM WARRANTY This limited warranty does not cover: 1....

Warranty
Page 1
...Speci ed Parts and repair labor to correct defects in a remote area where service by calling Whirlpool. You can be provided by Whirlpool. 5. Dealer name Address Phone number Model number Serial number Purchase date 18 Service must provide proof of incidental or consequential damages, so ... warranty. The removal and reinstallation of merchantability or tness, so this information on the model and serial number label located on how to use or when it was purchased. WHIRLPOOL SHALL NOT BE LIABLE FOR INCIDENTAL OR CONSEQUENTIAL DAMAGES. This warranty gives you speci c...
...Speci ed Parts and repair labor to correct defects in a remote area where service by calling Whirlpool. You can be provided by Whirlpool. 5. Dealer name Address Phone number Model number Serial number Purchase date 18 Service must provide proof of incidental or consequential damages, so ... warranty. The removal and reinstallation of merchantability or tness, so this information on the model and serial number label located on how to use or when it was purchased. WHIRLPOOL SHALL NOT BE LIABLE FOR INCIDENTAL OR CONSEQUENTIAL DAMAGES. This warranty gives you speci c...


