Dimension Guide
Page 1
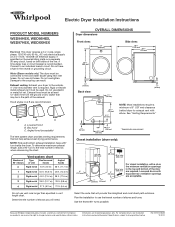
...12" (305 mm) from the ground or any object that will provide the straightest and most direct path outdoors. Because Whirlpool Corporation policy includes a continuous commitment to improve our products, we reserve the right to the total number of vent Box/... A time-delay fuse or circuit breaker is required. Specifications subject to the coupling can result. W10057363B 12/2010 Louvered hood B. Electric Dryer Installation Instructions PRODUCT MODEL NUMBERS WED94HEX, WED95HEX, WED97HEX, WEDXXHEX Electrical: This dryer requires a 3 or 4 wire, single phase, 120/240 volt, 60...
...12" (305 mm) from the ground or any object that will provide the straightest and most direct path outdoors. Because Whirlpool Corporation policy includes a continuous commitment to improve our products, we reserve the right to the total number of vent Box/... A time-delay fuse or circuit breaker is required. Specifications subject to the coupling can result. W10057363B 12/2010 Louvered hood B. Electric Dryer Installation Instructions PRODUCT MODEL NUMBERS WED94HEX, WED95HEX, WED97HEX, WEDXXHEX Electrical: This dryer requires a 3 or 4 wire, single phase, 120/240 volt, 60...
Installation Instructions
Page 1
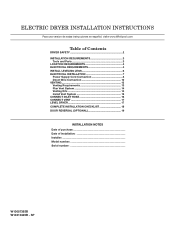
... DRYER INSTALLATION INSTRUCTIONS Para una version de estas instrucciones en español, visite www.Whirlpool.com Table of Contents DRYER SAFETY 2 Installation Requirements 3 Tools and Parts 3 Location Requirements 4 Electrical Requirements 4 INSTALL LEVELING LEGS 6 ELECTRICAL INSTALLATION 7 Power Supply Cord Connection 8 Direct Wire Connection 10 VENTING 13 Venting Requirements 13 Plan Vent System 14 Venting Kits 14 Install...
... DRYER INSTALLATION INSTRUCTIONS Para una version de estas instrucciones en español, visite www.Whirlpool.com Table of Contents DRYER SAFETY 2 Installation Requirements 3 Tools and Parts 3 Location Requirements 4 Electrical Requirements 4 INSTALL LEVELING LEGS 6 ELECTRICAL INSTALLATION 7 Power Supply Cord Connection 8 Direct Wire Connection 10 VENTING 13 Venting Requirements 13 Plan Vent System 14 Venting Kits 14 Install...
Installation Instructions
Page 5
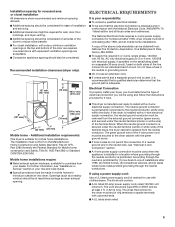
... cord kit marked for Mobile home construction and Safety, Title 24, HUD Part 280) or Standard CAN/CSA-Z240 MH. Mobile home installations require: ■■Metal exhaust system hardware, available for homes built after 1996, (2) mobile homes, (3) recreational vehicles, and (4)...;■To be sure that the ground path is permanently connected to install with upturned ends. ■■A UL listed strain relief. 5 If using and follow the instructions provided for (1) new branch-circuit installations after 1996, dryer circuits involved in .2 min. (155 cm2) 3" (76 mm) 1" (25 ...
... cord kit marked for Mobile home construction and Safety, Title 24, HUD Part 280) or Standard CAN/CSA-Z240 MH. Mobile home installations require: ■■Metal exhaust system hardware, available for homes built after 1996, (2) mobile homes, (3) recreational vehicles, and (4)...;■To be sure that the ground path is permanently connected to install with upturned ends. ■■A UL listed strain relief. 5 If using and follow the instructions provided for (1) new branch-circuit installations after 1996, dryer circuits involved in .2 min. (155 cm2) 3" (76 mm) 1" (25 ...
Owners Manual
Page 5
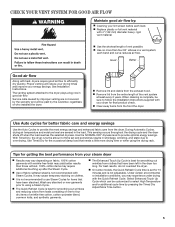
...each load. The venting system attached to follow the Installation Instructions supplied with wrinkle-free finish may yield better results ...care from clothes that have been starched. For best results, do not overload the dryer. See Installation Instructions. n Remove lint from the exhaust hood. This sensing occurs throughout the drying cycle and the ...Good air flow Along with 4" (102 mm) diameter heavy, rigid vent material. Under certain environmental or installation conditions, you may cause temporary staining on fabric. 100% cotton garments with your dryer for better fabric...
...each load. The venting system attached to follow the Installation Instructions supplied with wrinkle-free finish may yield better results ...care from clothes that have been starched. For best results, do not overload the dryer. See Installation Instructions. n Remove lint from the exhaust hood. This sensing occurs throughout the drying cycle and the ...Good air flow Along with 4" (102 mm) diameter heavy, rigid vent material. Under certain environmental or installation conditions, you may cause temporary staining on fabric. 100% cotton garments with your dryer for better fabric...
Owners Manual
Page 14
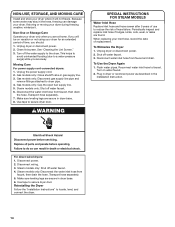
... off water faucet. 6. Disconnect the water inlet hose from faucet, then drain the hose. Make sure leveling legs are secure in the Installation Instruction. Use tape to faucet. Reconnect water inlet hose to secure dryer door. Plug in dryer or reconnect power as described in dryer base... faucet and drain. Steam models only: Shut off water faucet. 3. Reinstalling the Dryer Follow the "Installation Instructions" to reduce the risk of replacement. NON-USE, STORAGE, AND MOVING CARE Install and store your dryer. If storing or moving your dryer only when you are found. Non-Use ...
... off water faucet. 6. Disconnect the water inlet hose from faucet, then drain the hose. Make sure leveling legs are secure in the Installation Instruction. Use tape to faucet. Reconnect water inlet hose to secure dryer door. Plug in dryer or reconnect power as described in dryer base... faucet and drain. Steam models only: Shut off water faucet. 3. Reinstalling the Dryer Follow the "Installation Instructions" to reduce the risk of replacement. NON-USE, STORAGE, AND MOVING CARE Install and store your dryer. If storing or moving your dryer only when you are found. Non-Use ...
Owners Manual
Page 15
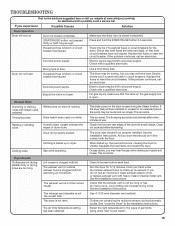
... feet should diminish after a few minutes of dryer drum. Check that both circuit breakers have heat. See the Installation Instructions. Household fuse is not the correct size. Supply line valve not open . The exhaust vent or outside exhaust ...whirlpool.com/help for assistance and to possibly avoid a service call an electrician. If the problem continues, call an electrician. Dryer hasn't been used during Automatic cycles. Dryer isn't properly leveled. Clean out pockets before each load. Clean lint screen before laundering. See the Installation Instructions...
... feet should diminish after a few minutes of dryer drum. Check that both circuit breakers have heat. See the Installation Instructions. Household fuse is not the correct size. Supply line valve not open . The exhaust vent or outside exhaust ...whirlpool.com/help for assistance and to possibly avoid a service call an electrician. If the problem continues, call an electrician. Dryer hasn't been used during Automatic cycles. Dryer isn't properly leveled. Clean out pockets before each load. Clean lint screen before laundering. See the Installation Instructions...
Owners Manual
Page 16
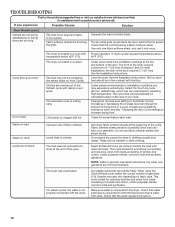
... For steam cycles, the water is connected to dry quickly. Make sure water is not properly connected with the floor. See the Installation Instructions. This cycle is too large and heavy to the dryer. The load may experience underdrying. Separate the load to increase drying time"....too short Lint on load The dryer is turned on Auto Cycles. Closet doors must have ventilation openings at www.whirlpool.com/help for most installations, the rear of wrinkle-free cotton, cotton polyester blends, common knits and synthetics. Increasing or decreasing the dryness ...
... For steam cycles, the water is connected to dry quickly. Make sure water is not properly connected with the floor. See the Installation Instructions. This cycle is too large and heavy to the dryer. The load may experience underdrying. Separate the load to increase drying time"....too short Lint on load The dryer is turned on Auto Cycles. Closet doors must have ventilation openings at www.whirlpool.com/help for most installations, the rear of wrinkle-free cotton, cotton polyester blends, common knits and synthetics. Increasing or decreasing the dryness ...
Owners Manual
Page 17
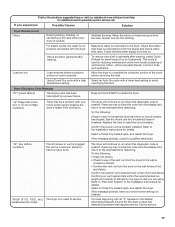
...) There may be a problem with the dryer. Replace the fuse or reset the circuit breaker. Confirm the power cord is connected to the Installation Instructions for reducing wrinkles and odors from turning on . Refer to the dryer. Select a Timed Dry heated cycle, and restart the dryer. Confirm ...both the faucet and dryer's water inlet valve. Call for details. First try the solutions suggested here or visit our website at www.whirlpool.com/help for the type of vent you experience Possible Causes Solution Dryer Results (cont.) Odors Load too hot Recent painting, staining, or...
...) There may be a problem with the dryer. Replace the fuse or reset the circuit breaker. Confirm the power cord is connected to the Installation Instructions for reducing wrinkles and odors from turning on . Refer to the dryer. Select a Timed Dry heated cycle, and restart the dryer. Confirm ...both the faucet and dryer's water inlet valve. Call for details. First try the solutions suggested here or visit our website at www.whirlpool.com/help for the type of vent you experience Possible Causes Solution Dryer Results (cont.) Odors Load too hot Recent painting, staining, or...
Owners Manual
Page 18
... for in accordance with the product, Whirlpool Corporation or Whirlpool Canada LP (hereafter "Whirlpool") will need it is installed in an inaccessible location or is intended to or furnished with Whirlpool's published installation instructions. 10. Service calls to correct the installation of your major appliance, to instruct you ever need to province. WHIRLPOOL CORPORATION LAUNDRY WARRANTY LIMITED WARRANTY For one...
... for in accordance with the product, Whirlpool Corporation or Whirlpool Canada LP (hereafter "Whirlpool") will need it is installed in an inaccessible location or is intended to or furnished with Whirlpool's published installation instructions. 10. Service calls to correct the installation of your major appliance, to instruct you ever need to province. WHIRLPOOL CORPORATION LAUNDRY WARRANTY LIMITED WARRANTY For one...

Warranty
Page 1
... with electrical or plumbing codes, or use or when it is used in the country in which it is installed in an inaccessible location or is not installed in accordance with Whirlpool's published installation instructions. 10. WHIRLPOOL SHALL NOT BE LIABLE FOR INCIDENTAL OR CONSEQUENTIAL DAMAGES. Dealer name Address Phone number Model number Serial number Purchase...
... with electrical or plumbing codes, or use or when it is used in the country in which it is installed in an inaccessible location or is not installed in accordance with Whirlpool's published installation instructions. 10. WHIRLPOOL SHALL NOT BE LIABLE FOR INCIDENTAL OR CONSEQUENTIAL DAMAGES. Dealer name Address Phone number Model number Serial number Purchase...


