
Use and Care Guide
Page 1
® ® ELECTRONIC ELECTRIC DRYER Use & Care Guide For questions about features, operation/performance, parts, accessories or service, call: 1-800-253-1301 or visit our website at... www.whirlpool.com Table of Contents 2 W10182361A
® ® ELECTRONIC ELECTRIC DRYER Use & Care Guide For questions about features, operation/performance, parts, accessories or service, call: 1-800-253-1301 or visit our website at... www.whirlpool.com Table of Contents 2 W10182361A
Use and Care Guide
Page 2
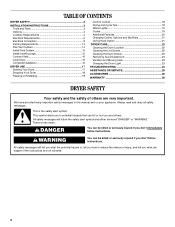
... can be killed or seriously injured if you what the potential hazard is the safety alert symbol. TABLE OF CONTENTS DRYER SAFETY 2 INSTALLATION INSTRUCTIONS 3 Tools and Parts 3 Options 4 Location Requirements 4 Electrical Requirements 6 Electrical Connection 8 Venting Requirements 13 Plan Vent System 14 Install Vent System 15 Install Leveling Legs 15 Connect Vent 16 Level...
... can be killed or seriously injured if you what the potential hazard is the safety alert symbol. TABLE OF CONTENTS DRYER SAFETY 2 INSTALLATION INSTRUCTIONS 3 Tools and Parts 3 Options 4 Location Requirements 4 Electrical Requirements 6 Electrical Connection 8 Venting Requirements 13 Plan Vent System 14 Install Vent System 15 Install Leveling Legs 15 Connect Vent 16 Level...
Use and Care Guide
Page 3
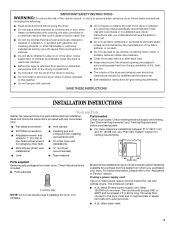
...for use with clothes dryers. Check existing electrical supply and venting. If using the dryer. ■ Do not place items exposed to cooking oils in your dryer. IMPORTANT SAFETY INSTRUCTIONS WARNING: To reduce the risk of fire, electric shock, or injury to persons when using the dryer, follow the instructions ... Do not reach into the dryer if the drum is moving. ■ Do not install or store the dryer where it will be at least 4 ft (1.22 m) long. Close supervision of children is necessary when the dryer is used near children. ■ Before the dryer is removed from service or ...
...for use with clothes dryers. Check existing electrical supply and venting. If using the dryer. ■ Do not place items exposed to cooking oils in your dryer. IMPORTANT SAFETY INSTRUCTIONS WARNING: To reduce the risk of fire, electric shock, or injury to persons when using the dryer, follow the instructions ... Do not reach into the dryer if the drum is moving. ■ Do not install or store the dryer where it will be at least 4 ft (1.22 m) long. Close supervision of children is necessary when the dryer is used near children. ■ Before the dryer is removed from service or ...
Use and Care Guide
Page 4
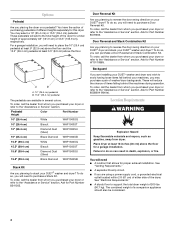
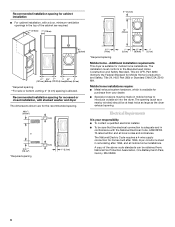
...W10110889. To order, call the dealer from dryer. Place dryer at least 3.5" (8.9 cm) above the floor for this dryer. See "Electrical Requirements." ■ A sturdy floor to the "Assistance or Service" section. You may purchase a pair of washer/dryer backguards. To order, call the dealer from ...cm) or 53.5" (135.9 cm), respectively. Options Pedestal Are you are using a power supply cord, a grounded electrical outlet located within 2 ft (61 cm) of either side of the dryer. Pedestal Height Color Part Number 10" (25.4 cm) White WHP1000SQ 10" (25.4 cm) Biscuit WHP1000ST 10"...
...W10110889. To order, call the dealer from dryer. Place dryer at least 3.5" (8.9 cm) above the floor for this dryer. See "Electrical Requirements." ■ A sturdy floor to the "Assistance or Service" section. You may purchase a pair of washer/dryer backguards. To order, call the dealer from ...cm) or 53.5" (135.9 cm), respectively. Options Pedestal Are you are using a power supply cord, a grounded electrical outlet located within 2 ft (61 cm) of either side of the dryer. Pedestal Height Color Part Number 10" (25.4 cm) White WHP1000SQ 10" (25.4 cm) Biscuit WHP1000ST 10"...
Use and Care Guide
Page 6
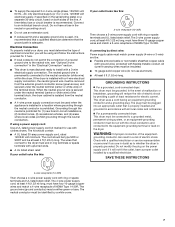
...Standard, Title 24 CFR, Part 3280 (formerly the Federal Standard for homes built after 1996, dryer circuits involved in remodeling after 1996, and all local codes and ordinances. The National Electric Code requires a 4-wire supply connection for Mobile Home Construction and Safety, Title 24, HUD...as a nearby window) should be at least twice as large as the dryer exhaust opening. Mobile home installations require: ■ Metal exhaust system hardware, which is adequate and in conformance with the National Electrical Code, ANSI/NFPA 70-latest edition and all mobile home installations. A...
...Standard, Title 24 CFR, Part 3280 (formerly the Federal Standard for homes built after 1996, dryer circuits involved in remodeling after 1996, and all local codes and ordinances. The National Electric Code requires a 4-wire supply connection for Mobile Home Construction and Safety, Title 24, HUD...as a nearby window) should be at least twice as large as the dryer exhaust opening. Mobile home installations require: ■ Metal exhaust system hardware, which is adequate and in conformance with the National Electrical Code, ANSI/NFPA 70-latest edition and all mobile home installations. A...
Use and Care Guide
Page 7
..., rated 120/240 volt minimum. All current-carrying wires must end in the "Electrical Connection" section. ■ This dryer is manufactured ready to whether the dryer is prohibited. This dryer uses a cord having an equipment-grounding conductor and a grounding plug. Grounding through... representative or personnel if you will reduce the risk of electric shock by a qualified electrician. The 3-wire power supply cord, at least 4 ft (1.22 m) long. GROUNDING INSTRUCTIONS ■ For a grounded, cord-connected dryer: This dryer must be : ■ Flexible armored cable or nonmetallic ...
..., rated 120/240 volt minimum. All current-carrying wires must end in the "Electrical Connection" section. ■ This dryer is manufactured ready to whether the dryer is prohibited. This dryer uses a cord having an equipment-grounding conductor and a grounding plug. Grounding through... representative or personnel if you will reduce the risk of electric shock by a qualified electrician. The 3-wire power supply cord, at least 4 ft (1.22 m) long. GROUNDING INSTRUCTIONS ■ For a grounded, cord-connected dryer: This dryer must be : ■ Flexible armored cable or nonmetallic ...
Use and Care Guide
Page 8
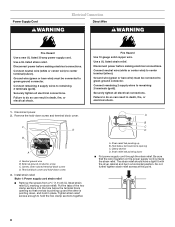
... relief. Connect remaining 2 supply wires to center terminal (silver). Fire Hazard Use 10 gauge solid copper wire. Use a UL listed strain relief. Securely tighten all electrical connections. Disconnect power. 2. C D B A A. Neutral ground wire B. External ground conductor screw C. Terminal block cover and hold -down ■ Put power supply cord through the strain relief... tab pointing down screw and terminal block cover. Be sure that one tab is pointing up B. The strain relief should have a tight fit with the dryer cabinet and be connected to hold in a horizontal position.
... relief. Connect remaining 2 supply wires to center terminal (silver). Fire Hazard Use 10 gauge solid copper wire. Use a UL listed strain relief. Securely tighten all electrical connections. Disconnect power. 2. C D B A A. Neutral ground wire B. External ground conductor screw C. Terminal block cover and hold -down ■ Put power supply cord through the strain relief... tab pointing down screw and terminal block cover. Be sure that one tab is pointing up B. The strain relief should have a tight fit with the dryer cabinet and be connected to hold in a horizontal position.
Use and Care Guide
Page 9
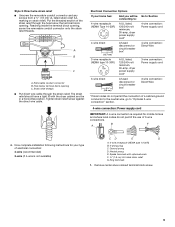
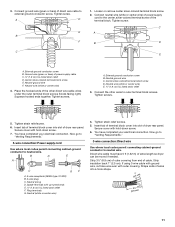
... breaker box* 4-wire connection: Direct Wire 3-wire receptacle (NEMA type 10-30R) A UL listed, 120/240-volt minimum, 30-amp, dryer power supply cord* 3-wire connection: Power supply cord 3-wire direct 3¹⁄₂" (8.9 cm) A fused disconnect or circuit breaker box*..., screw the removable conduit connector onto the strain relief threads. Put the threaded section of 3-wire connections. Neutral prong E. Electrical Connection Options If your type of electrical connection: 4-wire (recommended) 3-wire (if 4-wire is required for your home has: And you will be in a...
... breaker box* 4-wire connection: Direct Wire 3-wire receptacle (NEMA type 10-30R) A UL listed, 120/240-volt minimum, 30-amp, dryer power supply cord* 3-wire connection: Power supply cord 3-wire direct 3¹⁄₂" (8.9 cm) A fused disconnect or circuit breaker box*..., screw the removable conduit connector onto the strain relief threads. Put the threaded section of 3-wire connections. Neutral prong E. Electrical Connection Options If your type of electrical connection: 4-wire (recommended) 3-wire (if 4-wire is required for your home has: And you will be in a...
Use and Care Guide
Page 10
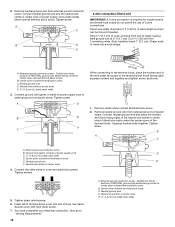
...tab of terminal block cover into a hook shape. (2.15" cm) A. You have 5 ft (1.52 m) of NEUTRAL ground wire before being moved to the terminal block, place the hooked... or center wire) E. ¾" (1.9 cm) UL listed strain relief 2. Direct wire cable must have completed your electrical connection. B A C A. Connect the other wires to "Venting Requirements." 10 D E A. External ground conductor screw...Secure cover with hold-down screw. 7. Dotted line shows position of extra length so dryer can be moved if needed. Shape ends of power supply cord to center silver-colored ...
...tab of terminal block cover into a hook shape. (2.15" cm) A. You have 5 ft (1.52 m) of NEUTRAL ground wire before being moved to the terminal block, place the hooked... or center wire) E. ¾" (1.9 cm) UL listed strain relief 2. Direct wire cable must have completed your electrical connection. B A C A. Connect the other wires to "Venting Requirements." 10 D E A. External ground conductor screw...Secure cover with hold-down screw. 7. Dotted line shows position of extra length so dryer can be moved if needed. Shape ends of power supply cord to center silver-colored ...
Use and Care Guide
Page 11
... block cover into a hook shape. 1" (2.5 cm) 3¹⁄₂" (8.9 cm) 11 Direct wire cable must have 5 ft (1.52 m) of dryer rear panel. Shape ends of direct wire cable to neutral wire. Connect ground wire (green or bare) of wires into slot of...8322;" (8.9 cm) of outer covering from end of cable. External ground conductor screw B. A D E B F C 1. You have completed your electrical connection. Now go to "Venting Requirements." 3-wire connection: Power supply cord Use where local codes permit connecting cabinet-ground conductor to external ground conductor screw...
... block cover into a hook shape. 1" (2.5 cm) 3¹⁄₂" (8.9 cm) 11 Direct wire cable must have 5 ft (1.52 m) of dryer rear panel. Shape ends of direct wire cable to neutral wire. Connect ground wire (green or bare) of wires into slot of...8322;" (8.9 cm) of outer covering from end of cable. External ground conductor screw B. A D E B F C 1. You have completed your electrical connection. Now go to "Venting Requirements." 3-wire connection: Power supply cord Use where local codes permit connecting cabinet-ground conductor to external ground conductor screw...
Use and Care Guide
Page 12
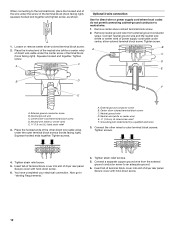
...C. Tighten screws. 4. Secure cover with hold -down screw. 12 Connect neutral ground wire and the neutral wire (white or center wire) of dryer rear panel. B A C D E B D F E A. Center silver-colored terminal block screw D. Place the hooked ends of terminal block ...(hook facing right). External ground conductor screw B. You have completed your electrical connection. Loosen or remove center silver-colored terminal block screw. 2. Place the hooked end of the neutral wire (white or center wire) of...
...C. Tighten screws. 4. Secure cover with hold -down screw. 12 Connect neutral ground wire and the neutral wire (white or center wire) of dryer rear panel. B A C D E B D F E A. Center silver-colored terminal block screw D. Place the hooked ends of terminal block ...(hook facing right). External ground conductor screw B. You have completed your electrical connection. Loosen or remove center silver-colored terminal block screw. 2. Place the hooked end of the neutral wire (white or center wire) of...
Use and Care Guide
Page 14
... or bushes, snow line, etc.). ■ Do not use an exhaust hood with one of the following kits for close -clearance installations are possible. Dryer B. Other installations are shown. Periscope installation NOTE: The following kits: 279818 (white) 279820 (black) 279925 (biscuit) 279969 (pewter) 280171 (diamond dust...right side, left side, or through the bottom. Rigid metal or flexible metal vent G. A B C A. Exhaust outlet Optional exhaust installations This dryer can result in death, fire, electrical shock, or serious injury. Left or right side exhaust installation C.
... or bushes, snow line, etc.). ■ Do not use an exhaust hood with one of the following kits for close -clearance installations are possible. Dryer B. Other installations are shown. Periscope installation NOTE: The following kits: 279818 (white) 279820 (black) 279925 (biscuit) 279969 (pewter) 280171 (diamond dust...right side, left side, or through the bottom. Rigid metal or flexible metal vent G. A B C A. Exhaust outlet Optional exhaust installations This dryer can result in death, fire, electrical shock, or serious injury. Left or right side exhaust installation C.

Use and Care Guide
Page 16
... posts until the diamond marking is closed. Firmly grasp the body of the dryer. Slide the dryer on the dryer. 8. Connect Vent 1. The dryer vent must fit over the dryer exhaust outlet and inside the exhaust hood. Move dryer into an outlet and/or electrical supply is connected. ■ Household fuse is intact and tight, or circuit...
... posts until the diamond marking is closed. Firmly grasp the body of the dryer. Slide the dryer on the dryer. 8. Connect Vent 1. The dryer vent must fit over the dryer exhaust outlet and inside the exhaust hood. Move dryer into an outlet and/or electrical supply is connected. ■ Household fuse is intact and tight, or circuit...
Use and Care Guide
Page 17
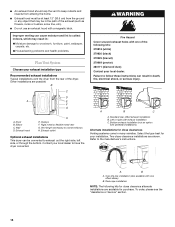
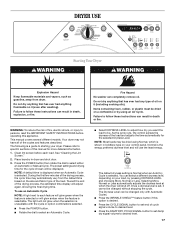
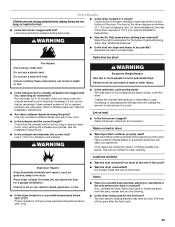
Do not dry anything flammable on it (even after washing). WARNING: To reduce the risk of fire, electric shock, or injury to starting your dryer. The following is the energy preferred dryness level and will shut off. See "Cleaning the Lint Screen." 2. Normal is a guide to ...dryness level at which is unavailable with Automatic Cycles. ■ Press the WRINKLE SHIELD™ feature button if this appliance. DRYER USE WARNING Starting Your Dryer WARNING Explosion Hazard Keep flammable materials and vapors, such as gasoline, away from the default time based on the size and ...
Do not dry anything flammable on it (even after washing). WARNING: To reduce the risk of fire, electric shock, or injury to starting your dryer. The following is the energy preferred dryness level and will shut off. See "Cleaning the Lint Screen." 2. Normal is a guide to ...dryness level at which is unavailable with Automatic Cycles. ■ Press the WRINKLE SHIELD™ feature button if this appliance. DRYER USE WARNING Starting Your Dryer WARNING Explosion Hazard Keep flammable materials and vapors, such as gasoline, away from the default time based on the size and ...
Use and Care Guide
Page 23
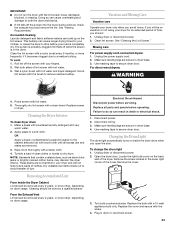
...can result in death or electrical shock. 1. Clean the lint screen with the brush to remove residue buildup. If you will not stain future loads of clothes. Clean lint screen. Use masking tape to a soft cloth. Apply paste to secure dryer door. These stains are ... Apply a liquid, nonflammable household cleaner to dry drum. Electrical Shock Hazard Disconnect power before operating. To change the drum light 1. Remove the cover. 3. Wet both the dryer and fabrics. ■ If lint falls off the screen with your dryer and will be removed every 2 years, or more often...
...can result in death or electrical shock. 1. Clean the lint screen with the brush to remove residue buildup. If you will not stain future loads of clothes. Clean lint screen. Use masking tape to a soft cloth. Apply paste to secure dryer door. These stains are ... Apply a liquid, nonflammable household cleaner to dry drum. Electrical Shock Hazard Disconnect power before operating. To change the drum light 1. Remove the cover. 3. Wet both the dryer and fabrics. ■ If lint falls off the screen with your dryer and will be removed every 2 years, or more often...
Use and Care Guide
Page 24
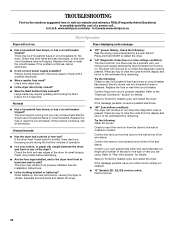
... the message persists, have not tripped. www.whirlpool.com/help - In Canada www.whirlpool.ca Dryer Operation Dryer will turn, but there may be turning, but you are intact and tight, or that both fuses are using. Replace the fuse or reset the circuit breaker. Electric dryers require 240-volt power supply. Unusual sounds ■ Has...
... the message persists, have not tripped. www.whirlpool.com/help - In Canada www.whirlpool.ca Dryer Operation Dryer will turn, but there may be turning, but you are intact and tight, or that both fuses are using. Replace the fuse or reset the circuit breaker. Electric dryers require 240-volt power supply. Unusual sounds ■ Has...
Use and Care Guide
Page 25
... hood to do not feel air movement, clean exhaust system of dryer cycles requires temperatures above the floor for air movement. The new electric heating element may not be gone after the first cycle. 25 Add dryer fabric softener sheets at least 18 inches (46 cm) above 45...ºF (7ºC). Dryer Results Clothes are not drying satisfactorily, drying times are too...
... hood to do not feel air movement, clean exhaust system of dryer cycles requires temperatures above the floor for air movement. The new electric heating element may not be gone after the first cycle. 25 Add dryer fabric softener sheets at least 18 inches (46 cm) above 45...ºF (7ºC). Dryer Results Clothes are not drying satisfactorily, drying times are too...


