
Use and Care Guide
Page 1
www.whirlpool.com Table of Contents 2 W10182361A ® ® ELECTRONIC ELECTRIC DRYER Use & Care Guide For questions about features, operation/performance, parts, accessories or service, call: 1-800-253-1301 or visit our website at...
www.whirlpool.com Table of Contents 2 W10182361A ® ® ELECTRONIC ELECTRIC DRYER Use & Care Guide For questions about features, operation/performance, parts, accessories or service, call: 1-800-253-1301 or visit our website at...
Use and Care Guide
Page 2
... hurt you and others are not followed. 2 This symbol alerts you to reduce the chance of others . TABLE OF CONTENTS DRYER SAFETY 2 INSTALLATION INSTRUCTIONS 3 Tools and Parts 3 Options 4 Location Requirements 4 Electrical Requirements 6 Electrical Connection 8 Venting Requirements 13 Plan Vent System 14 Install Vent System 15 Install Leveling Legs 15 Connect Vent 16 Level...
... hurt you and others are not followed. 2 This symbol alerts you to reduce the chance of others . TABLE OF CONTENTS DRYER SAFETY 2 INSTALLATION INSTRUCTIONS 3 Tools and Parts 3 Options 4 Location Requirements 4 Electrical Requirements 6 Electrical Connection 8 Venting Requirements 13 Plan Vent System 14 Install Vent System 15 Install Leveling Legs 15 Connect Vent 16 Level...
Use and Care Guide
Page 3
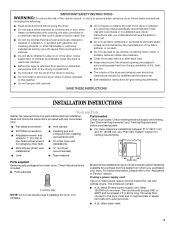
...drycleaning solvents, or other flammable or explosive substances as they give off vapors that you purchased your dryer. Check existing electrical supply and venting. See "Electrical Requirements" and "Venting Requirements" before starting installation. SAVE THESE INSTRUCTIONS INSTALLATION INSTRUCTIONS Tools and Parts ...be type SRD or SRDT and be at least 4 ft (1.22 m) long. IMPORTANT SAFETY INSTRUCTIONS WARNING: To reduce the risk of fire, electric shock, or injury to persons when using the dryer, follow the instructions provided with any servicing unless specifically ...
...drycleaning solvents, or other flammable or explosive substances as they give off vapors that you purchased your dryer. Check existing electrical supply and venting. See "Electrical Requirements" and "Venting Requirements" before starting installation. SAVE THESE INSTRUCTIONS INSTALLATION INSTRUCTIONS Tools and Parts ...be type SRD or SRDT and be at least 4 ft (1.22 m) long. IMPORTANT SAFETY INSTRUCTIONS WARNING: To reduce the risk of fire, electric shock, or injury to persons when using the dryer, follow the instructions provided with any servicing unless specifically ...
Use and Care Guide
Page 4
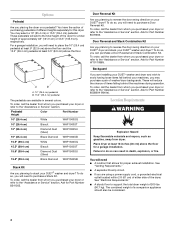
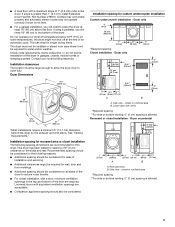
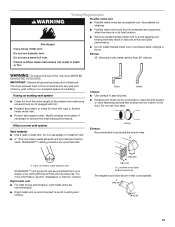
...can purchase a Door Reversal and Stack Combination Kit. Ask for a garage installation. To order, call the dealer from whom you purchased your dryer or refer to the "Assistance or Service" section. Ask for proper exhaust installation. See "Venting Requirements." ■ A separate 30-amp circuit... pedestals will need to the "Assistance or Service" section. To do so, you are using a power supply cord, a grounded electrical outlet located within 2 ft (61 cm) of either side of 200 lbs (90.7 kg). Backguard If you will reduce the chance of a companion appliance should...
...can purchase a Door Reversal and Stack Combination Kit. Ask for a garage installation. To order, call the dealer from whom you purchased your dryer or refer to the "Assistance or Service" section. Ask for proper exhaust installation. See "Venting Requirements." ■ A separate 30-amp circuit... pedestals will need to the "Assistance or Service" section. To do so, you are using a power supply cord, a grounded electrical outlet located within 2 ft (61 cm) of either side of 200 lbs (90.7 kg). Backguard If you will reduce the chance of a companion appliance should...
Use and Care Guide
Page 5
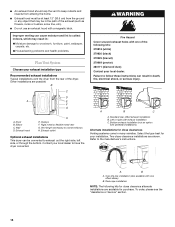
...(130.81 cm) *31½" (80 cm) 27" (68.6 cm) *Most installations require a minimum 5" (12.7 cm) clearance behind the dryer for this dryer. This can result in garages, closets, mobile homes or sleeping quarters. See "Venting Requirements." Louvered doors with a maximum slope of 1" (2.5 cm) under... to open fully. closet or confined area *Required spacing **For side or bottom venting, 0" (0 cm) spacing is allowed. Dryer on all sides of the dryer to the bottom of the dryer. The dryer must be considered on pedestal 14" max.* (35.6 cm) 18" min.* (45.72 cm) 1" (2.5 cm) 27"...
...(130.81 cm) *31½" (80 cm) 27" (68.6 cm) *Most installations require a minimum 5" (12.7 cm) clearance behind the dryer for this dryer. This can result in garages, closets, mobile homes or sleeping quarters. See "Venting Requirements." Louvered doors with a maximum slope of 1" (2.5 cm) under... to open fully. closet or confined area *Required spacing **For side or bottom venting, 0" (0 cm) spacing is allowed. Dryer on all sides of the dryer to the bottom of the dryer. The dryer must be considered on pedestal 14" max.* (35.6 cm) 18" min.* (45.72 cm) 1" (2.5 cm) 27"...
Use and Care Guide
Page 6
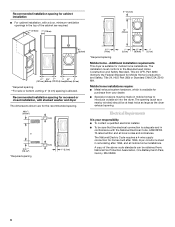
...*Required spacing Mobile home - The opening (such as a nearby window) should be at least twice as large as the dryer exhaust opening. Additional installation requirements This dryer is allowed. Mobile home installations require: ■ Metal exhaust system hardware, which is adequate and in conformance with stacked washer... It is your dealer. ■ Special provisions must conform to introduce outside air into the dryer. The National Electric Code requires a 4-wire supply connection for mobile home installations. Recommended installation spacing for cabinet installation ■ For ...
...*Required spacing Mobile home - The opening (such as a nearby window) should be at least twice as large as the dryer exhaust opening. Additional installation requirements This dryer is allowed. Mobile home installations require: ■ Metal exhaust system hardware, which is adequate and in conformance with stacked washer... It is your dealer. ■ Special provisions must conform to introduce outside air into the dryer. The National Electric Code requires a 4-wire supply connection for mobile home installations. Recommended installation spacing for cabinet installation ■ For ...
Use and Care Guide
Page 7
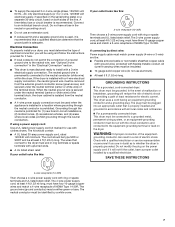
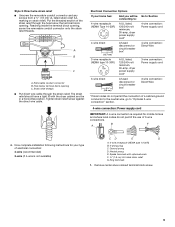
...a grounded metal, permanent wiring system, or an equipment-grounding conductor must end in the "Electrical Connection" section. ■ This dryer is properly grounded. The ground wire (ground conductor) may be at least 4 ft (1.22 m) long. The neutral conductor must have a proper outlet installed by providing a ... branch circuit. The 3-wire power supply cord, at least 4 ft (1.22 m) long, must be run with ring or spade terminals and UL listed strain relief. If the dryer is installed with a 4-wire electrical supply connection, the neutral ground wire must be removed from the ...
...a grounded metal, permanent wiring system, or an equipment-grounding conductor must end in the "Electrical Connection" section. ■ This dryer is properly grounded. The ground wire (ground conductor) may be at least 4 ft (1.22 m) long. The neutral conductor must have a proper outlet installed by providing a ... branch circuit. The 3-wire power supply cord, at least 4 ft (1.22 m) long, must be run with ring or spade terminals and UL listed strain relief. If the dryer is installed with a 4-wire electrical supply connection, the neutral ground wire must be removed from the ...
Use and Care Guide
Page 8
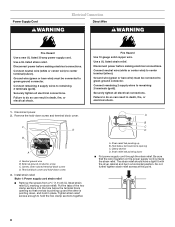
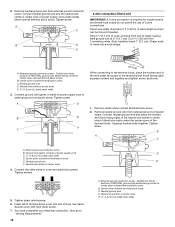
... (green or bare wire) must be connected to green ground connector. Ground wire (green or bare wire) must be in death, fire, or electrical shock. 1. Remove the hold -down screw and terminal block cover. External ground conductor screw C. Put the tabs of the two clamp sections into ... Hole below the terminal block opening C. Be sure that one tab is pointing up B. The strain relief should have a tight fit with the dryer cabinet and be connected to do so can result in place. Failure to green ground connector. Disconnect power. 2. Style 1: Power supply cord strain ...
... (green or bare wire) must be connected to green ground connector. Ground wire (green or bare wire) must be in death, fire, or electrical shock. 1. Remove the hold -down screw and terminal block cover. External ground conductor screw C. Put the tabs of the two clamp sections into ... Hole below the terminal block opening C. Be sure that one tab is pointing up B. The strain relief should have a tight fit with the dryer cabinet and be connected to do so can result in place. Failure to green ground connector. Disconnect power. 2. Style 1: Power supply cord strain ...
Use and Care Guide
Page 9
... D. Reaching inside the terminal block opening C. Hole below the terminal block opening. Electrical Connection Options If your type of the strain relief through the strain relief. Spade terminals with the dryer cabinet and be Go to Section connecting to: 4-wire receptacle (NEMA Type 14-30R...NEMA type 14-30R) B. 4-prong plug C. Remove center silver-colored terminal block screw. 9 B F A 4. Put the threaded section of electrical connection: 4-wire (recommended) 3-wire (if 4-wire is required for mobile homes and where local codes do not permit the use of 3-wire ...
... D. Reaching inside the terminal block opening C. Hole below the terminal block opening. Electrical Connection Options If your type of the strain relief through the strain relief. Spade terminals with the dryer cabinet and be Go to Section connecting to: 4-wire receptacle (NEMA Type 14-30R...NEMA type 14-30R) B. 4-prong plug C. Remove center silver-colored terminal block screw. 9 B F A 4. Put the threaded section of electrical connection: 4-wire (recommended) 3-wire (if 4-wire is required for mobile homes and where local codes do not permit the use of 3-wire ...
Use and Care Guide
Page 10
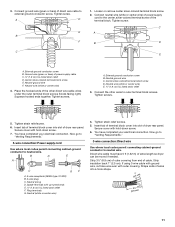
... to center silver-colored terminal block screw. B A C A. Center silver-colored terminal block screw E. Tighten screws. 5. You have 5 ft (1.52 m) of dryer rear panel. Neutral wire (white or center wire) E. ¾" (1.9 cm) UL listed strain relief Cut 1¹⁄₂" (3.8 cm...the screw of NEUTRAL ground wire before being moved to center silver-colored terminal block screw. B. Direct wire cable must have completed your electrical connection. Neutral wire (white or center wire) E. ¾" (1.9 cm) UL listed strain relief 3. Insert tab of terminal block cover...
... to center silver-colored terminal block screw. B A C A. Center silver-colored terminal block screw E. Tighten screws. 5. You have 5 ft (1.52 m) of dryer rear panel. Neutral wire (white or center wire) E. ¾" (1.9 cm) UL listed strain relief Cut 1¹⁄₂" (3.8 cm...the screw of NEUTRAL ground wire before being moved to center silver-colored terminal block screw. B. Direct wire cable must have completed your electrical connection. Neutral wire (white or center wire) E. ¾" (1.9 cm) UL listed strain relief 3. Insert tab of terminal block cover...
Use and Care Guide
Page 11
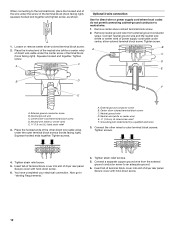
... codes permit connecting cabinet-ground conductor to the center, silver-colored terminal screw of dryer rear panel. A D E B F C 1. External ground conductor screw B. Tighten screws. 5. You have completed your electrical connection. Spade terminals with hold -down screw. 6. External ground conductor screw B....Neutral ground wire F. Place the hooked ends of direct wire cable to external ground conductor screw. Neutral ground wire C. You have 5 ft (1.52 m) of power supply cable C. ¾" (1.9 cm) UL listed strain relief D. If using 3-wire cable with ground wire...
... codes permit connecting cabinet-ground conductor to the center, silver-colored terminal screw of dryer rear panel. A D E B F C 1. External ground conductor screw B. Tighten screws. 5. You have completed your electrical connection. Spade terminals with hold -down screw. 6. External ground conductor screw B....Neutral ground wire F. Place the hooked ends of direct wire cable to external ground conductor screw. Neutral ground wire C. You have 5 ft (1.52 m) of power supply cable C. ¾" (1.9 cm) UL listed strain relief D. If using 3-wire cable with ground wire...
Use and Care Guide
Page 12
...of terminal block cover into slot of the wire under the outer terminal block screws (hooks facing right). You have completed your electrical connection. Tighten screw. Tighten screw. Squeeze hooked ends together. Secure cover with hold -down screw. 6. When connecting to an... hooked end together. Remove neutral ground wire from the external ground conductor screw to the terminal block, place the hooked end of dryer rear panel. A. Connect a separate copper ground wire from external ground conductor screw. External ground conductor screw B. External ground conductor ...
...of terminal block cover into slot of the wire under the outer terminal block screws (hooks facing right). You have completed your electrical connection. Tighten screw. Tighten screw. Squeeze hooked ends together. Secure cover with hold -down screw. 6. When connecting to an... hooked end together. Remove neutral ground wire from the external ground conductor screw to the terminal block, place the hooked end of dryer rear panel. A. Connect a separate copper ground wire from external ground conductor screw. External ground conductor screw B. External ground conductor ...
Use and Care Guide
Page 13
... extend into any plastic or metal foil vent with rigid or flexible heavy metal vent. ■ Review Vent system chart. If this dryer MUST BE EXHAUSTED OUTDOORS. For more information, see the "Assistance or Service" section. Clamp Exhaust Recommended hood styles are recommended. Box ...4" (10.2 cm) A. Fire Hazard Use a heavy metal vent. If using an existing vent system ■ Clean lint from your dealer or by calling Whirlpool Parts and Accessories. Do not use plastic or metal foil vent. ■ 4" (10.2 cm) heavy metal exhaust vent and clamps must be fully extended ...
... extend into any plastic or metal foil vent with rigid or flexible heavy metal vent. ■ Review Vent system chart. If this dryer MUST BE EXHAUSTED OUTDOORS. For more information, see the "Assistance or Service" section. Clamp Exhaust Recommended hood styles are recommended. Box ...4" (10.2 cm) A. Fire Hazard Use a heavy metal vent. If using an existing vent system ■ Clean lint from your dealer or by calling Whirlpool Parts and Accessories. Do not use plastic or metal foil vent. ■ 4" (10.2 cm) heavy metal exhaust vent and clamps must be fully extended ...
Use and Care Guide
Page 14
...the-top installation (also available with one offset elbow) B. B C D A E F G A. Exhaust outlet Optional exhaust installations This dryer can be in : Moisture damage to connect elbows H. WARNING Fire Hazard Cover unused exhaust holes with one of the following kits for ...side, or through the bottom. Elbow C. Wall D. Other installations are available for close clearances Venting systems come in death, fire, electrical shock, or serious injury. Bottom exhaust installation (not an option with a magnetic latch. Periscope installation NOTE: The following kits: ...
...the-top installation (also available with one offset elbow) B. B C D A E F G A. Exhaust outlet Optional exhaust installations This dryer can be in : Moisture damage to connect elbows H. WARNING Fire Hazard Cover unused exhaust holes with one of the following kits for ...side, or through the bottom. Elbow C. Wall D. Other installations are available for close clearances Venting systems come in death, fire, electrical shock, or serious injury. Bottom exhaust installation (not an option with a magnetic latch. Periscope installation NOTE: The following kits: ...

Use and Care Guide
Page 15
... 27 ft (8.2 m) 21 ft (6.4 m) Flexible metal 23 ft (7 m) 15 ft (4.6 m) Determine vent path ■ Select the route that will provide the straightest and most direct path outdoors. ■ Plan the installation to use with 4" (10.2 cm) clamp. 3. Determine vent length and elbows needed for mobile home installations The exhaust vent must fit inside the dryer...
... 27 ft (8.2 m) 21 ft (6.4 m) Flexible metal 23 ft (7 m) 15 ft (4.6 m) Determine vent path ■ Select the route that will provide the straightest and most direct path outdoors. ■ Plan the installation to use with 4" (10.2 cm) clamp. 3. Determine vent length and elbows needed for mobile home installations The exhaust vent must fit inside the dryer...

Use and Care Guide
Page 16
...Vent 1. If connecting to connect the exhaust vent. Move dryer into an outlet. Check levelness first side to side, then front to adjust the legs up or down and check again for levelness. 16 Screw the legs into an outlet and/or electrical supply is connected. ■ Household fuse is intact ...and tight, or circuit breaker has not tripped. ■ Dryer door is not level, prop up . Do not select the Air Only Temperature setting. If ...
...Vent 1. If connecting to connect the exhaust vent. Move dryer into an outlet. Check levelness first side to side, then front to adjust the legs up or down and check again for levelness. 16 Screw the legs into an outlet and/or electrical supply is connected. ■ Household fuse is intact ...and tight, or circuit breaker has not tripped. ■ Dryer door is not level, prop up . Do not select the Air Only Temperature setting. If ...
Use and Care Guide
Page 17
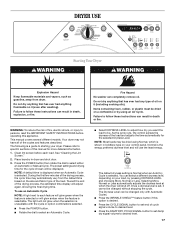
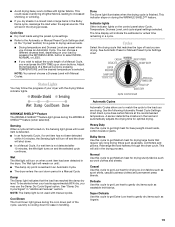
... a clothesline or by pressing DRYNESS LEVEL and choosing More, Normal or Less. Items containing foam, rubber, or plastic must be displayed. Your dryer may be . Clean lint screen before operating this appliance. This manual covers several different models. During the first few minutes of the load.... will adjust again, showing the final drying time. The preset settings and drying time for more detailed information. 1. Toward the end of fire, electric shock, or injury to desired level. 17 To use the least energy. Once a dryness level is desired. ■ Press the CYCLE SIGNAL ...
... a clothesline or by pressing DRYNESS LEVEL and choosing More, Normal or Less. Items containing foam, rubber, or plastic must be displayed. Your dryer may be . Clean lint screen before operating this appliance. This manual covers several different models. During the first few minutes of the load.... will adjust again, showing the final drying time. The preset settings and drying time for more detailed information. 1. Toward the end of fire, electric shock, or injury to desired level. 17 To use the least energy. Once a dryness level is desired. ■ Press the CYCLE SIGNAL ...
Use and Care Guide
Page 18
... directions when they tumble. Follow package instructions. ■ Remove the load from clothing. Press the PAUSE/CANCEL key twice to stop the dryer and clear the settings, allowing you to lock your load. An electronic control determines the load type to reduce wrinkling. To use the ... of drying time and enhances fabric care. Pressing the DRY TIME or TEMPERATURE buttons will glow amber when the feature is extracted from the dryer as soon as moisture is selectable. You can be adjusted. The length of all cycles. Temperature settings can also use a Manual Cycle ...
... directions when they tumble. Follow package instructions. ■ Remove the load from clothing. Press the PAUSE/CANCEL key twice to stop the dryer and clear the settings, allowing you to lock your load. An electronic control determines the load type to reduce wrinkling. To use the ... of drying time and enhances fabric care. Pressing the DRY TIME or TEMPERATURE buttons will glow amber when the feature is extracted from the dryer as soon as moisture is selectable. You can be adjusted. The length of all cycles. Temperature settings can also use a Manual Cycle ...
Use and Care Guide
Page 19
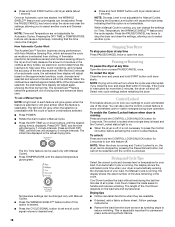
... towels or jeans. See the following Automatic Preset Cycle Settings chart. Heavy Duty Use this cycle to get Medium heat for ease in the dryer. This will indicate the estimated or actual time remaining in the Bulky Items cycle, rearrange the load when the signal sounds. You can choose.... Cycles Select the drying cycle that require very long drying times such as jackets, comforters and pillows. Rearrange the load halfway through the dryer cycle. Super Delicate Use this cycle to gently dry items such as work clothes with Manual Cycles. Wet The Wet light will aid in...
... towels or jeans. See the following Automatic Preset Cycle Settings chart. Heavy Duty Use this cycle to get Medium heat for ease in the dryer. This will indicate the estimated or actual time remaining in the Bulky Items cycle, rearrange the load when the signal sounds. You can choose.... Cycles Select the drying cycle that require very long drying times such as jackets, comforters and pillows. Rearrange the load halfway through the dryer cycle. Super Delicate Use this cycle to gently dry items such as work clothes with Manual Cycles. Wet The Wet light will aid in...
Use and Care Guide
Page 20
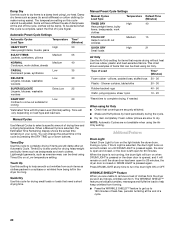
... Low temperature setting. You can be alerted when this cycle is selected, the Estimated Time Remaining display shows the actual time remaining in the dryer too long. Timed Dry Use this cycle to dry. Touch Up Use this setting to smooth out wrinkles Medium QUICK DRY Small loads High ...Manual Cycles Load Type Temperature TIMED DRY Heavyweight items, bulky items, bedspreads, work clothes High TOUCH UP Helps to help keep wrinkles from the dryer as soon as jeans (to avoid stiffness) or cotton clothing (to get up or down buttons. Foam rubber pillows are slow to complete drying...
... Low temperature setting. You can be alerted when this cycle is selected, the Estimated Time Remaining display shows the actual time remaining in the dryer too long. Timed Dry Use this cycle to dry. Touch Up Use this setting to smooth out wrinkles Medium QUICK DRY Small loads High ...Manual Cycles Load Type Temperature TIMED DRY Heavyweight items, bulky items, bedspreads, work clothes High TOUCH UP Helps to help keep wrinkles from the dryer as soon as jeans (to avoid stiffness) or cotton clothing (to get up or down buttons. Foam rubber pillows are slow to complete drying...


