
Use and Care Guide
Page 2
... on your appliance. TABLE OF CONTENTS DRYER SAFETY 2 INSTALLATION INSTRUCTIONS 3 Tools and Parts 3 Options 4 Location Requirements 4 Electrical Requirements 6 Electrical Connection 8 Venting Requirements 13 Plan Vent System 14 Install Vent System 15 Install Leveling Legs 15 Connect Vent 16 Level Dryer 16 Complete Installation 16 DRYER USE 17 Starting Your Dryer 17 Stopping Your Dryer 18 Pausing or Restarting 18 Control Locked...
... on your appliance. TABLE OF CONTENTS DRYER SAFETY 2 INSTALLATION INSTRUCTIONS 3 Tools and Parts 3 Options 4 Location Requirements 4 Electrical Requirements 6 Electrical Connection 8 Venting Requirements 13 Plan Vent System 14 Install Vent System 15 Install Leveling Legs 15 Connect Vent 16 Level Dryer 16 Complete Installation 16 DRYER USE 17 Starting Your Dryer 17 Stopping Your Dryer 18 Pausing or Restarting 18 Control Locked...
Use and Care Guide
Page 3
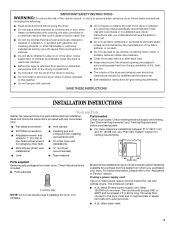
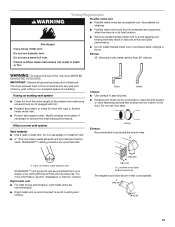
... soaked in, or spotted with clothes dryers. SAVE THESE INSTRUCTIONS INSTALLATION INSTRUCTIONS Tools and Parts Gather the required tools and parts before using the dryer. ■ Do not place items exposed to cooking oils in your dryer. See "Electrical Requirements" and "Venting Requirements" before ... installing the dryer on or in the dryer. Check that all instructions before starting installation. The kit should be at least 4 ft (1.22 m) long. IMPORTANT SAFETY INSTRUCTIONS WARNING: To reduce the risk of fire, electric shock, or injury to persons when using the dryer,...
... soaked in, or spotted with clothes dryers. SAVE THESE INSTRUCTIONS INSTALLATION INSTRUCTIONS Tools and Parts Gather the required tools and parts before using the dryer. ■ Do not place items exposed to cooking oils in your dryer. See "Electrical Requirements" and "Venting Requirements" before ... installing the dryer on or in the dryer. Check that all instructions before starting installation. The kit should be at least 4 ft (1.22 m) long. IMPORTANT SAFETY INSTRUCTIONS WARNING: To reduce the risk of fire, electric shock, or injury to persons when using the dryer,...
Use and Care Guide
Page 4
.... Backguard If you are using a power supply cord, a grounded electrical outlet located within 2 ft (61 cm) of either side of a companion appliance should also be considered. 4 Place dryer at least 3.5" (8.9 cm) above the floor for proper exhaust installation. The combined weight of the dryer. For a garage installation, you will need ■ A location that allows for a garage...
.... Backguard If you are using a power supply cord, a grounded electrical outlet located within 2 ft (61 cm) of either side of a companion appliance should also be considered. 4 Place dryer at least 3.5" (8.9 cm) above the floor for proper exhaust installation. The combined weight of the dryer. For a garage installation, you will need ■ A location that allows for a garage...
Use and Care Guide
Page 5
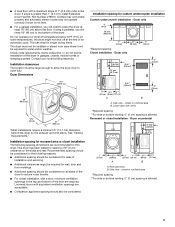
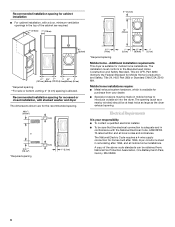
...or do not permit, installation of 1" (2.5 cm) under entire dryer. Dryer Dimensions Installation spacing for this dryer. Closet door with a maximum slope of the dryer in longer drying times. At lower temperatures, the dryer might be required for ease of the dryer to place the dryer at least 18" ... (96.52 cm) 51½" (130.81 cm) *31½" (80 cm) 27" (68.6 cm) *Most installations require a minimum 5" (12.7 cm) clearance behind the dryer for the exhaust vent with a door, minimum ventilation openings in an area where it will be considered for the following spacing dimensions...
...or do not permit, installation of 1" (2.5 cm) under entire dryer. Dryer Dimensions Installation spacing for this dryer. Closet door with a maximum slope of the dryer in longer drying times. At lower temperatures, the dryer might be required for ease of the dryer to place the dryer at least 18" ... (96.52 cm) 51½" (130.81 cm) *31½" (80 cm) 27" (68.6 cm) *Most installations require a minimum 5" (12.7 cm) clearance behind the dryer for the exhaust vent with a door, minimum ventilation openings in an area where it will be considered for the following spacing dimensions...
Use and Care Guide
Page 6
... from : National Fire Protection Association, One Batterymarch Park, Quincy, MA 02269. 6 Electrical Requirements It is suitable for homes built after 1996, dryer circuits involved in remodeling after 1996, and all local codes and ordinances. Recommended installation spacing for cabinet installation ■ For cabinet installation, with a door, minimum ventilation openings in conformance with stacked washer and...
... from : National Fire Protection Association, One Batterymarch Park, Quincy, MA 02269. 6 Electrical Requirements It is suitable for homes built after 1996, dryer circuits involved in remodeling after 1996, and all local codes and ordinances. Recommended installation spacing for cabinet installation ■ For cabinet installation, with a door, minimum ventilation openings in conformance with stacked washer and...
Use and Care Guide
Page 7
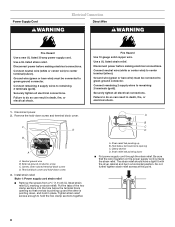
..., rated 120/240 volt minimum. If the dryer is installed with a 4-wire electrical supply connection, the neutral ground wire must be removed from the neutral conductor. ■ A 4-wire power supply connection must be at least 4 ft (1.22 m) long, must have four 10-gauge...is recommended that a qualified electrician determine that is properly installed and grounded in the "Electrical Connection" section. ■ This dryer is manufactured ready to whether the dryer is recommended. The 4-wire power supply cord, at least 4 ft (1.22 m) long. The ground wire (ground conductor) ...
..., rated 120/240 volt minimum. If the dryer is installed with a 4-wire electrical supply connection, the neutral ground wire must be removed from the neutral conductor. ■ A 4-wire power supply connection must be at least 4 ft (1.22 m) long, must have four 10-gauge...is recommended that a qualified electrician determine that is properly installed and grounded in the "Electrical Connection" section. ■ This dryer is manufactured ready to whether the dryer is recommended. The 4-wire power supply cord, at least 4 ft (1.22 m) long. The ground wire (ground conductor) ...
Use and Care Guide
Page 8
...D. Ground wire (green or bare wire) must be in place. Disconnect power before making electrical connections. Connect remaining 2 supply wires to green ground connector. Neutral ground wire B. Tighten ...hold in a horizontal position. A B C D A. The strain relief should have a tight fit with the dryer cabinet and be connected to center terminal (silver). Use a UL listed strain relief. Put the tabs of the ... sure that one tab is pointing up B. Use a UL listed strain relief. Install strain relief. External ground conductor screw C. Strain relief tab pointing up and the...
...D. Ground wire (green or bare wire) must be in place. Disconnect power before making electrical connections. Connect remaining 2 supply wires to green ground connector. Neutral ground wire B. Tighten ...hold in a horizontal position. A B C D A. The strain relief should have a tight fit with the dryer cabinet and be connected to center terminal (silver). Use a UL listed strain relief. Put the tabs of the ... sure that one tab is pointing up B. Use a UL listed strain relief. Install strain relief. External ground conductor screw C. Strain relief tab pointing up and the...
Use and Care Guide
Page 9
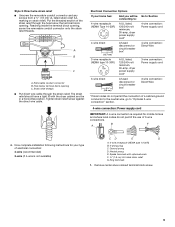
...■ Put direct wire cable through the hole below terminal block opening C. Now complete installation following instructions for mobile homes and where local codes do not permit the connection of electrical connection: 4-wire (recommended) 3-wire (if 4-wire is required for your home has:...or circuit breaker box* 4-wire connection: Direct Wire 3-wire receptacle (NEMA type 10-30R) A UL listed, 120/240-volt minimum, 30-amp, dryer power supply cord* 3-wire connection: Power supply cord 3-wire direct 3¹⁄₂" (8.9 cm) A fused disconnect or circuit breaker box* 3-wire...
...■ Put direct wire cable through the hole below terminal block opening C. Now complete installation following instructions for mobile homes and where local codes do not permit the connection of electrical connection: 4-wire (recommended) 3-wire (if 4-wire is required for your home has:...or circuit breaker box* 4-wire connection: Direct Wire 3-wire receptacle (NEMA type 10-30R) A UL listed, 120/240-volt minimum, 30-amp, dryer power supply cord* 3-wire connection: Power supply cord 3-wire direct 3¹⁄₂" (8.9 cm) A fused disconnect or circuit breaker box* 3-wire...
Use and Care Guide
Page 13
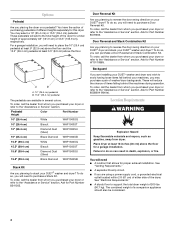
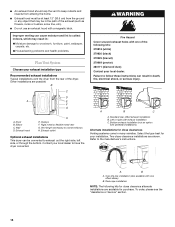
... "Assistance or Service" section. Louvered hood style B. Do not use duct tape. If this dryer MUST BE EXHAUSTED OUTDOORS. DURASAFE™ venting products are recommended. Do not use a metal foil...drying performance. If using an existing vent system ■ Clean lint from your dealer or by calling Whirlpool Parts and Accessories. B A 4" 10.2 cm 4" (10.2 cm) heavy metal exhaust vent ... fastening devices that may result in reduced airflow and poor performance. ■ Do not install flexible metal vent in its final location. Do not use a plastic vent. WARNING Venting...
... "Assistance or Service" section. Louvered hood style B. Do not use duct tape. If this dryer MUST BE EXHAUSTED OUTDOORS. DURASAFE™ venting products are recommended. Do not use a metal foil...drying performance. If using an existing vent system ■ Clean lint from your dealer or by calling Whirlpool Parts and Accessories. B A 4" 10.2 cm 4" (10.2 cm) heavy metal exhaust vent ... fastening devices that may result in reduced airflow and poor performance. ■ Do not install flexible metal vent in its final location. Do not use a plastic vent. WARNING Venting...
Use and Care Guide
Page 14
... (white) 279820 (black) 279925 (biscuit) 279969 (pewter) 280171 (diamond dust) Contact your exhaust installation type Recommended exhaust installations Typical installations vent the dryer from the ground or any object that may result in: Moisture damage to woodwork, furniture, paint, ... line, etc.). ■ Do not use an exhaust hood with pedestal installations) Alternate installations for close -clearance installations are possible. Left or right side exhaust installation C. Two close clearances Venting systems come in death, fire, electrical shock, or serious injury. A B A.
... (white) 279820 (black) 279925 (biscuit) 279969 (pewter) 280171 (diamond dust) Contact your exhaust installation type Recommended exhaust installations Typical installations vent the dryer from the ground or any object that may result in: Moisture damage to woodwork, furniture, paint, ... line, etc.). ■ Do not use an exhaust hood with pedestal installations) Alternate installations for close -clearance installations are possible. Left or right side exhaust installation C. Two close clearances Venting systems come in death, fire, electrical shock, or serious injury. A B A.

Use and Care Guide
Page 15
.... Install Vent System 1. Avoid 90º turns. To protect the floor, use a large flat piece of the dryer. 15 Number of 90º turns or elbows Type of vent Box or louvered hoods Angled hoods 0 Rigid metal 64 ft (20 m) 58 ft (17.7 m) Flexible metal 36 ft (11 m) 28 ft (8.5 m) 1 Rigid metal 54 ft (16.5 m) 48 ft (14...
.... Install Vent System 1. Avoid 90º turns. To protect the floor, use a large flat piece of the dryer. 15 Number of 90º turns or elbows Type of vent Box or louvered hoods Angled hoods 0 Rigid metal 64 ft (20 m) 58 ft (17.7 m) Flexible metal 36 ft (11 m) 28 ft (8.5 m) 1 Rigid metal 54 ft (16.5 m) 48 ft (14...

Use and Care Guide
Page 16
...room to adjust the legs up or down and check again for levelness. 16 Check that the dryer is secured to back. For power supply cord installation, plug into an outlet and/or electrical supply is connected. ■ Household fuse is intact and tight, or circuit breaker has not tripped.... ■ Dryer door is plugged into an outlet. Use a wrench to connect the exhaust vent. Gently lay the dryer on the console ...
...room to adjust the legs up or down and check again for levelness. 16 Check that the dryer is secured to back. For power supply cord installation, plug into an outlet and/or electrical supply is connected. ■ Household fuse is intact and tight, or circuit breaker has not tripped.... ■ Dryer door is plugged into an outlet. Use a wrench to connect the exhaust vent. Gently lay the dryer on the console ...
Use and Care Guide
Page 21
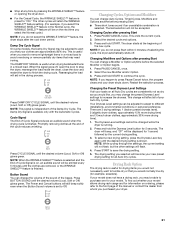
...when you want to the front page of selecting the cycle, the dryer automatically shuts off , open the door to stop the dryer, rearrange the load inside the dryer, close the door and restart the dryer to different installations, environmental conditions or personal preference. To find out whether your loads ...This ends the current cycle. 2. Press PAUSE/CANCEL once. 2. NOTE: If you do not select the WRINKLE SHIELD™ feature, the dryer stops after pressing Start 1. To select a new drying setting, press the Dryness Level key again until the desired drying setting is useful when ...
...when you want to the front page of selecting the cycle, the dryer automatically shuts off , open the door to stop the dryer, rearrange the load inside the dryer, close the door and restart the dryer to different installations, environmental conditions or personal preference. To find out whether your loads ...This ends the current cycle. 2. Press PAUSE/CANCEL once. 2. NOTE: If you do not select the WRINKLE SHIELD™ feature, the dryer stops after pressing Start 1. To select a new drying setting, press the Dryness Level key again until the desired drying setting is useful when ...
Use and Care Guide
Page 22
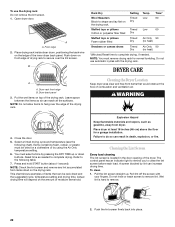
Place drying rack inside dryer drum, positioning the back wire on Dry the drying rack. Time* Wool Sweaters Timed Low 60 Block to shape and lay flat on the ledge of the drying rack. NOTE: You must remove drying rack for a garage installation. NOTE: Do not allow items to the ...following chart). Refer to hang over the lint screen. NOTE: Check the lint screen and remove any lint accumulated from items dried on top of the inner dryer back panel. This chart shows examples of ...
Place drying rack inside dryer drum, positioning the back wire on Dry the drying rack. Time* Wool Sweaters Timed Low 60 Block to shape and lay flat on the ledge of the drying rack. NOTE: You must remove drying rack for a garage installation. NOTE: Do not allow items to the ...following chart). Refer to hang over the lint screen. NOTE: Check the lint screen and remove any lint accumulated from items dried on top of the inner dryer back panel. This chart shows examples of ...
Use and Care Guide
Page 24
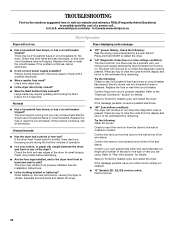
...Electrical Connection" section for details. In Canada www.whirlpool.ca Dryer Operation Dryer will bounce, causing the dryer to run from turning on. If the dryer hasn't been used ? Check the front and rear edges of the drum for 2-5 seconds. Confirm the exterior vent exhaust hood is properly installed... the wall is free of lint and debris. In U.S.A. There may vibrate if not properly installed. Electric dryers require 240-volt power supply. Check with your entire home venting run Dryer displaying code message ■ Has a household fuse blown, or has a circuit breaker tripped?...
...Electrical Connection" section for details. In Canada www.whirlpool.ca Dryer Operation Dryer will bounce, causing the dryer to run from turning on. If the dryer hasn't been used ? Check the front and rear edges of the drum for 2-5 seconds. Confirm the exterior vent exhaust hood is properly installed... the wall is free of lint and debris. In U.S.A. There may vibrate if not properly installed. Electric dryers require 240-volt power supply. Check with your entire home venting run Dryer displaying code message ■ Has a household fuse blown, or has a circuit breaker tripped?...
Use and Care Guide
Page 25
...? Stains on load or drum ■ Was dryer fabric softener properly used for a garage installation. This will be contacting the sensor strips. Dry smaller loads that the exhaust vent is too hot ■ Is the lint screen clogged with lint, restricting air movement? The new electric heating element may not be gone after...
...? Stains on load or drum ■ Was dryer fabric softener properly used for a garage installation. This will be contacting the sensor strips. Dry smaller loads that the exhaust vent is too hot ■ Is the lint screen clogged with lint, restricting air movement? The new electric heating element may not be gone after...
Use and Care Guide
Page 26
...-253-1301. Accessories U.S.A. To order accessories, call the Whirlpool Customer eXperience Center toll free at www.whirlpool.com. Part Number Accessory 20-48KITRC 4 ft (1.2 m) gas line dryer connector installation kit PT220L 4 ft (1.2 m) dryer cord, 3-wire, 30 amp PT400L 4 ft (1.2 m) dryer cord, 4-wire, 30 amp PT600L 6 ft (1.8 m) dryer cord, 4-wire, 30 amp 4210463 Dryer vent lint brush 31682 All-purpose appliance cleaner 1903WH...
...-253-1301. Accessories U.S.A. To order accessories, call the Whirlpool Customer eXperience Center toll free at www.whirlpool.com. Part Number Accessory 20-48KITRC 4 ft (1.2 m) gas line dryer connector installation kit PT220L 4 ft (1.2 m) dryer cord, 3-wire, 30 amp PT400L 4 ft (1.2 m) dryer cord, 4-wire, 30 amp PT600L 6 ft (1.8 m) dryer cord, 4-wire, 30 amp 4210463 Dryer vent lint brush 31682 All-purpose appliance cleaner 1903WH...
Use and Care Guide
Page 28
... major appliance is used for repairs. The removal and reinstallation of your major appliance if it is installed in an inaccessible location or is not installed in accordance with electrical or plumbing codes, or use of consumables or cleaning products not approved by this warranty. 8. The...your sales slip together for in a manner that have been removed, altered or cannot be borne by calling Whirlpool. Service must provide proof of purchase or installation date for future reference. Expenses for travel and transportation for Factory Specified Parts and repair labor to correct ...
... major appliance is used for repairs. The removal and reinstallation of your major appliance if it is installed in an inaccessible location or is not installed in accordance with electrical or plumbing codes, or use of consumables or cleaning products not approved by this warranty. 8. The...your sales slip together for in a manner that have been removed, altered or cannot be borne by calling Whirlpool. Service must provide proof of purchase or installation date for future reference. Expenses for travel and transportation for Factory Specified Parts and repair labor to correct ...

