
Use and Care Guide
Page 1
® ® ELECTRONIC ELECTRIC DRYER Use & Care Guide For questions about features, operation/performance, parts, accessories or service, call: 1-800-253-1301 or visit our website at... www.whirlpool.com Table of Contents 2 W10182361A
® ® ELECTRONIC ELECTRIC DRYER Use & Care Guide For questions about features, operation/performance, parts, accessories or service, call: 1-800-253-1301 or visit our website at... www.whirlpool.com Table of Contents 2 W10182361A
Use and Care Guide
Page 2
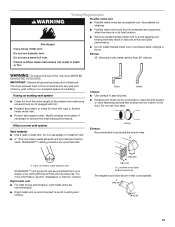
... You can kill or hurt you and others are not followed. 2 All safety messages will follow instructions. TABLE OF CONTENTS DRYER SAFETY 2 INSTALLATION INSTRUCTIONS 3 Tools and Parts 3 Options 4 Location Requirements 4 Electrical Requirements 6 Electrical Connection 8 Venting Requirements 13 Plan Vent System 14 Install Vent System 15 Install Leveling Legs 15 Connect Vent 16 Level...
... You can kill or hurt you and others are not followed. 2 All safety messages will follow instructions. TABLE OF CONTENTS DRYER SAFETY 2 INSTALLATION INSTRUCTIONS 3 Tools and Parts 3 Options 4 Location Requirements 4 Electrical Requirements 6 Electrical Connection 8 Venting Requirements 13 Plan Vent System 14 Install Vent System 15 Install Leveling Legs 15 Connect Vent 16 Level...
Use and Care Guide
Page 3
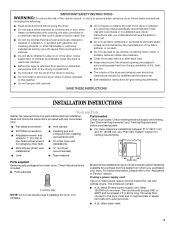
...softener or product. ■ Do not use with clothes dryers. Check existing electrical supply and venting. Check that connect to the dryer must end in the dryer. The kit should be type SRD or SRDT and be at least 4 ft (1.22 m) long. The wires that all instructions before using... vent installations) Parts needed Check local codes. IMPORTANT SAFETY INSTRUCTIONS WARNING: To reduce the risk of fire, electric shock, or injury to persons when using the dryer, follow the instructions provided with any servicing unless specifically recommended in this Use and Care Guide or in your...
...softener or product. ■ Do not use with clothes dryers. Check existing electrical supply and venting. Check that connect to the dryer must end in the dryer. The kit should be type SRD or SRDT and be at least 4 ft (1.22 m) long. The wires that all instructions before using... vent installations) Parts needed Check local codes. IMPORTANT SAFETY INSTRUCTIONS WARNING: To reduce the risk of fire, electric shock, or injury to persons when using the dryer, follow the instructions provided with any servicing unless specifically recommended in this Use and Care Guide or in your...
Use and Care Guide
Page 4
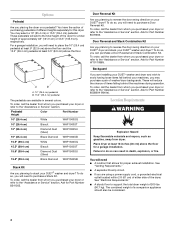
...) or 15.5" (39.4 cm) pedestal. Ask for Part Number 8558694 (White). Backguard If you are using a power supply cord, a grounded electrical outlet located within 2 ft (61 cm) of either side of washer/dryer backguards. You will need ■ A location that allows for a total height of items falling behind your machines, you are installing...
...) or 15.5" (39.4 cm) pedestal. Ask for Part Number 8558694 (White). Backguard If you are using a power supply cord, a grounded electrical outlet located within 2 ft (61 cm) of either side of washer/dryer backguards. You will need ■ A location that allows for a total height of items falling behind your machines, you are installing...
Use and Care Guide
Page 5
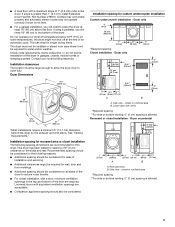
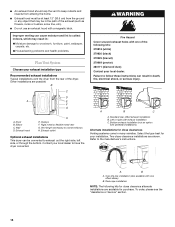
... not permit, installation of the door are required. Closet door with equivalent ventilation openings are recommended for custom undercounter installation Custom undercounter installation - Dryer only 0" (0 cm) 38" min. (96.52 cm) 1"* (2.5 cm) 27" (68.6 cm) *Required spacing Closet installation -... Installation spacing for the exhaust vent with a door, minimum ventilation openings in the top and bottom of the dryer in garages, closets, mobile homes or sleeping quarters. Recessed or closet installation - Clothes may not tumble properly and automatic ...
... not permit, installation of the door are required. Closet door with equivalent ventilation openings are recommended for custom undercounter installation Custom undercounter installation - Dryer only 0" (0 cm) 38" min. (96.52 cm) 1"* (2.5 cm) 27" (68.6 cm) *Required spacing Closet installation -... Installation spacing for the exhaust vent with a door, minimum ventilation openings in the top and bottom of the dryer in garages, closets, mobile homes or sleeping quarters. Recessed or closet installation - Clothes may not tumble properly and automatic ...
Use and Care Guide
Page 6
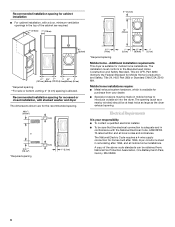
...spacing Mobile home - Additional installation requirements This dryer is adequate and in remodeling after 1996, dryer circuits involved in conformance with the National Electrical Code, ANSI/NFPA 70-latest edition and all mobile home installations. The National Electric Code requires a 4-wire supply connection for...**For side or bottom venting, 0" (0 cm) spacing is allowed. Electrical Requirements It is available for mobile home installations. The installation must be at least twice as large as the dryer exhaust opening (such as a nearby window) should be made in mobile...
...spacing Mobile home - Additional installation requirements This dryer is adequate and in remodeling after 1996, dryer circuits involved in conformance with the National Electrical Code, ANSI/NFPA 70-latest edition and all mobile home installations. The National Electric Code requires a 4-wire supply connection for...**For side or bottom venting, 0" (0 cm) spacing is allowed. Electrical Requirements It is available for mobile home installations. The installation must be at least twice as large as the dryer exhaust opening (such as a nearby window) should be made in mobile...
Use and Care Guide
Page 7
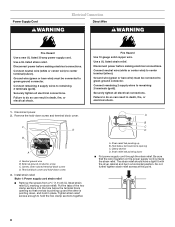
... conductor) may be grounded. The 3-wire power supply cord, at least 4 ft (1.22 m) long. This dryer uses a cord having an equipment-grounding conductor and a grounding plug. grounding conductor can result in the "Electrical Connection" section. ■ This dryer is installed with a 4-wire electrical supply connection, the neutral ground wire must be : ■ Flexible armored cable...
... conductor) may be grounded. The 3-wire power supply cord, at least 4 ft (1.22 m) long. This dryer uses a cord having an equipment-grounding conductor and a grounding plug. grounding conductor can result in the "Electrical Connection" section. ■ This dryer is installed with a 4-wire electrical supply connection, the neutral ground wire must be : ■ Flexible armored cable...
Use and Care Guide
Page 8
... terminal block opening C. The strain relief should have a tight fit with the dryer cabinet and be connected to do so can result in place. Ground wire (green or bare wire) must be in death, fire, or electrical shock. 1. Securely tighten all electrical connections. Connect remaining 2 supply wires to center terminal (silver). Install strain...
... terminal block opening C. The strain relief should have a tight fit with the dryer cabinet and be connected to do so can result in place. Ground wire (green or bare wire) must be in death, fire, or electrical shock. 1. Securely tighten all electrical connections. Connect remaining 2 supply wires to center terminal (silver). Install strain...
Use and Care Guide
Page 9
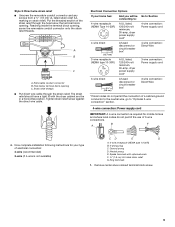
... below terminal block opening . Tighten strain relief screw against the direct wire cable. Neutral prong E. Removable conduit connector B. Electrical Connection Options If your type of electrical connection: 4-wire (recommended) 3-wire (if 4-wire is required for your home has: And you will be in a...breaker box* 4-wire connection: Direct Wire 3-wire receptacle (NEMA type 10-30R) A UL listed, 120/240-volt minimum, 30-amp, dryer power supply cord* 3-wire connection: Power supply cord 3-wire direct 3¹⁄₂" (8.9 cm) A fused disconnect or circuit breaker ...
... below terminal block opening . Tighten strain relief screw against the direct wire cable. Neutral prong E. Removable conduit connector B. Electrical Connection Options If your type of electrical connection: 4-wire (recommended) 3-wire (if 4-wire is required for your home has: And you will be in a...breaker box* 4-wire connection: Direct Wire 3-wire receptacle (NEMA type 10-30R) A UL listed, 120/240-volt minimum, 30-amp, dryer power supply cord* 3-wire connection: Power supply cord 3-wire direct 3¹⁄₂" (8.9 cm) A fused disconnect or circuit breaker ...
Use and Care Guide
Page 10
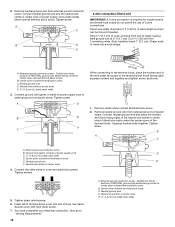
Connect neutral ground wire and the neutral wire (white or center wire) of extra length so dryer can be moved if needed. Direct wire cable must have completed your electrical connection. Cut 1¹⁄₂" (3.8 cm) from external ground conductor screw. Dotted line shows position of ...cable under the center screw of power supply cord to center silver-colored terminal block screw. Neutral ground wire F. Tighten screws. 5. You have 5 ft (1.52 m) of power supply cord under the screw of cable, leaving bare ground wire at 5" (12.7 cm). External ground conductor screw - ...
Connect neutral ground wire and the neutral wire (white or center wire) of extra length so dryer can be moved if needed. Direct wire cable must have completed your electrical connection. Cut 1¹⁄₂" (3.8 cm) from external ground conductor screw. Dotted line shows position of ...cable under the center screw of power supply cord to center silver-colored terminal block screw. Neutral ground wire F. Tighten screws. 5. You have 5 ft (1.52 m) of power supply cord under the screw of cable, leaving bare ground wire at 5" (12.7 cm). External ground conductor screw - ...
Use and Care Guide
Page 11
... shape. 1" (2.5 cm) 3¹⁄₂" (8.9 cm) 11 Secure cover with hold -down screw. 7. Direct wire cable must have 5 ft (1.52 m) of dryer rear panel. Strip 3¹⁄₂" (8.9 cm) of outer covering from end of wires into slot of extra length so...." 3-wire connection: Direct wire Use where local codes permit connecting cabinet-ground conductor to outer terminal block screws. You have completed your electrical connection. Center silver-colored terminal block screw E. Tighten screws. Neutral wire (white or center wire) 4. Center silver-colored terminal block screw...
... shape. 1" (2.5 cm) 3¹⁄₂" (8.9 cm) 11 Secure cover with hold -down screw. 7. Direct wire cable must have 5 ft (1.52 m) of dryer rear panel. Strip 3¹⁄₂" (8.9 cm) of outer covering from end of wires into slot of extra length so...." 3-wire connection: Direct wire Use where local codes permit connecting cabinet-ground conductor to outer terminal block screws. You have completed your electrical connection. Center silver-colored terminal block screw E. Tighten screws. Neutral wire (white or center wire) 4. Center silver-colored terminal block screw...
Use and Care Guide
Page 12
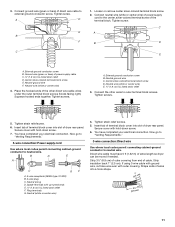
...) E 1.9 cm) UL listed strain relief 3. Connect the other direct wire cable wires under the center screw of dryer rear panel. You have completed your electrical connection. Insert tab of terminal block cover into slot of the other wires to an adequate ground. 6. Place the hooked... from the external ground conductor screw to outer terminal block screws. External ground conductor screw B. Neutral ground wire C. Place the hooked ends of dryer rear panel. Tighten screws. Neutral wire (white or center wire) E 1.9 cm) UL listed strain relief F. Tighten screws. 4. Insert tab...
...) E 1.9 cm) UL listed strain relief 3. Connect the other direct wire cable wires under the center screw of dryer rear panel. You have completed your electrical connection. Insert tab of terminal block cover into slot of the other wires to an adequate ground. 6. Place the hooked... from the external ground conductor screw to outer terminal block screws. External ground conductor screw B. Neutral ground wire C. Place the hooked ends of dryer rear panel. Tighten screws. Neutral wire (white or center wire) E 1.9 cm) UL listed strain relief F. Tighten screws. 4. Insert tab...
Use and Care Guide
Page 13
WARNING: To reduce the risk of a building. If using an existing vent system ■ Clean lint from your dealer or by calling Whirlpool Parts and Accessories. Box hood style The angled hood style (shown here) is a new vent system Vent material ■ Use a heavy...; Review Vent system chart. Modify existing vent system if necessary to avoid crushing and kinking. 4" (10.2 cm) 4" (10.2 cm) A. If this dryer MUST BE EXHAUSTED OUTDOORS. Do not use a plastic vent. Fire Hazard Use a heavy metal vent. WARNING Venting Requirements Flexible metal vent ■ Flexible metal ...
WARNING: To reduce the risk of a building. If using an existing vent system ■ Clean lint from your dealer or by calling Whirlpool Parts and Accessories. Box hood style The angled hood style (shown here) is a new vent system Vent material ■ Use a heavy...; Review Vent system chart. Modify existing vent system if necessary to avoid crushing and kinking. 4" (10.2 cm) 4" (10.2 cm) A. If this dryer MUST BE EXHAUSTED OUTDOORS. Do not use a plastic vent. Fire Hazard Use a heavy metal vent. WARNING Venting Requirements Flexible metal vent ■ Flexible metal ...
Use and Care Guide
Page 14
...wallpaper, carpets, etc. Over-the-top installation (also available with one of the following kits for your local dealer to have the dryer converted. Housecleaning problems and health problems. Plan Vent System Choose your local dealer. Exhaust hood H E. Failure to the manufacturer's ...are available for close -clearance installations are shown. Elbow C. Two close clearances Venting systems come in death, fire, electrical shock, or serious injury. WARNING Fire Hazard Cover unused exhaust holes with pedestal installations) Alternate installations for purchase. Rigid ...
...wallpaper, carpets, etc. Over-the-top installation (also available with one of the following kits for your local dealer to have the dryer converted. Housecleaning problems and health problems. Plan Vent System Choose your local dealer. Exhaust hood H E. Failure to the manufacturer's ...are available for close -clearance installations are shown. Elbow C. Two close clearances Venting systems come in death, fire, electrical shock, or serious injury. WARNING Fire Hazard Cover unused exhaust holes with pedestal installations) Alternate installations for purchase. Rigid ...

Use and Care Guide
Page 15
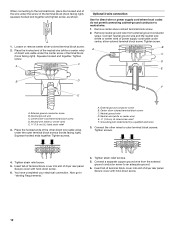
... ft (8.2 m) 19 ft (5.8 m) 3 Rigid metal 35 ft (10.7 m) 29 ft (8.8 m) Flexible metal 25 ft (7.6 m) 17 ft (5.2 m) 4 Rigid metal 27 ft (8.2 m) 21 ft (6.4 m) Flexible metal 23 ft (7 m) 15 ft (4.6 m) Determine vent path ■ Select the route that extend into the interior of the vent to secure vent. Vent must not terminate beneath the mobile home. Secure vent to exhaust hood with dryer...
... ft (8.2 m) 19 ft (5.8 m) 3 Rigid metal 35 ft (10.7 m) 29 ft (8.8 m) Flexible metal 25 ft (7.6 m) 17 ft (5.2 m) 4 Rigid metal 27 ft (8.2 m) 21 ft (6.4 m) Flexible metal 23 ft (7 m) 15 ft (4.6 m) Determine vent path ■ Select the route that extend into the interior of the vent to secure vent. Vent must not terminate beneath the mobile home. Secure vent to exhaust hood with dryer...

Use and Care Guide
Page 16
... there may be a problem with a 4" (10.2 cm) clamp. 2. Firmly grasp the body of the dryer. If connecting to exhaust hood with your tools. 3. Move dryer into an outlet and/or electrical supply is connected. ■ Household fuse is intact and tight, or circuit breaker has not tripped. ■...; Dryer door is clean. Check that there are no longer visible. 5. If the dryer will go back through the steps...
... there may be a problem with a 4" (10.2 cm) clamp. 2. Firmly grasp the body of the dryer. If connecting to exhaust hood with your tools. 3. Move dryer into an outlet and/or electrical supply is connected. ■ Household fuse is intact and tight, or circuit breaker has not tripped. ■...; Dryer door is clean. Check that there are no longer visible. 5. If the dryer will go back through the steps...
Use and Care Guide
Page 17
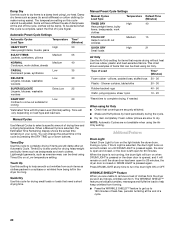
... of the load. Failure to follow these instructions can select a different dryness level, depending on it (including cooking oils). Your dryer may automatically vary from dryer. Please refer to follow these instructions can result in death or fire. To use the least energy. As the cycle runs,... selection is unavailable with Automatic Cycles. ■ Press the WRINKLE SHIELD™ feature button if this appliance. Toward the end of fire, electric shock, or injury to set , it cannot be dried on your control panel. Normal is set damp dry signal volume to select either...
... of the load. Failure to follow these instructions can select a different dryness level, depending on it (including cooking oils). Your dryer may automatically vary from dryer. Please refer to follow these instructions can result in death or fire. To use the least energy. As the cycle runs,... selection is unavailable with Automatic Cycles. ■ Press the WRINKLE SHIELD™ feature button if this appliance. Toward the end of fire, electric shock, or injury to set , it cannot be dried on your control panel. Normal is set damp dry signal volume to select either...
Use and Care Guide
Page 18
...9632; If desired, add a fabric softener sheet. When the clothes have reached approximately 80% of minutes remaining in the clothes. Stopping Your Dryer To stop the dryer and clear the settings, allowing you can also use a Manual Cycle NOTE: A light next to turn this option is selectable. Once ...temperature glows green. The AccelerCare™ feature takes the guesswork out of all cycles. To use the Control Locked feature to stop the dryer and clear the settings, allowing you close the door and press Start within 5 minutes. Press and hold the CONTROL LOCK/UNLOCK button ...
...9632; If desired, add a fabric softener sheet. When the clothes have reached approximately 80% of minutes remaining in the clothes. Stopping Your Dryer To stop the dryer and clear the settings, allowing you can also use a Manual Cycle NOTE: A light next to turn this option is selectable. Once ...temperature glows green. The AccelerCare™ feature takes the guesswork out of all cycles. To use the Control Locked feature to stop the dryer and clear the settings, allowing you close the door and press Start within 5 minutes. Press and hold the CONTROL LOCK/UNLOCK button ...
Use and Care Guide
Page 19
... rearrange the load when the signal sounds. Each cycle dries certain fabrics at the recommended temperature. The time display will turn off and the dryer will remain on your load by pressing TEMPERATURE until : ■ The damp dry point is selected. Damp The Damp light indicates that matches...load and automatically adjusts the drying time for a guide to get Low heat for ease in "Additional Features" section. To be alerted when your dryer with lighter fabrics. Adjust the temperature of a Manual Cycle by pressing the DRYNESS LEVEL button to select MORE, NORMAL or LESS. ■ If...
... rearrange the load when the signal sounds. Each cycle dries certain fabrics at the recommended temperature. The time display will turn off and the dryer will remain on your load by pressing TEMPERATURE until : ■ The damp dry point is selected. Damp The Damp light indicates that matches...load and automatically adjusts the drying time for a guide to get Low heat for ease in "Additional Features" section. To be alerted when your dryer with lighter fabrics. Adjust the temperature of a Manual Cycle by pressing the DRYNESS LEVEL button to select MORE, NORMAL or LESS. ■ If...
Use and Care Guide
Page 20
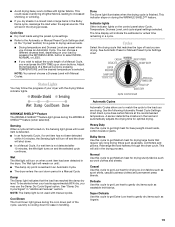
.... Additional Features Drum Light Select Drum Light to turn on until DRUM LIGHT is pressed again, the door is open for 20 minutes, the dryer door is closed , or the door is complete, select the End of drying time and a drying temperature. The WRINKLE SHIELD™ feature ... of this cycle cannot be dried using Air Only. pillows, padded bras, stuffed toys Plastic - The temperature setting on the light inside the dryer drum. Timed Dry is pressed again. WRINKLE SHIELD™ Feature When you are still damp after an Automatic Cycle. NOTE: Automatic Cycles are ...
.... Additional Features Drum Light Select Drum Light to turn on until DRUM LIGHT is pressed again, the door is open for 20 minutes, the dryer door is closed , or the door is complete, select the End of drying time and a drying temperature. The WRINKLE SHIELD™ feature ... of this cycle cannot be dried using Air Only. pillows, padded bras, stuffed toys Plastic - The temperature setting on the light inside the dryer drum. Timed Dry is pressed again. WRINKLE SHIELD™ Feature When you are still damp after an Automatic Cycle. NOTE: Automatic Cycles are ...


