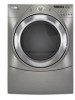
Use and Care Guide
Page 2
... 14 Plan Vent System 15 Install Vent System 16 Install Leveling Legs 16 Connect Vent 17 Level Dryer 17 Complete Installation 17 DRYER USE 18 Starting Your Dryer 18 Stopping Your Dryer 19 Pausing or Restarting 19 Control Locked 19 Drying and Cycle Tips 19 Status Lights 20 Cycles 20 Additional...
... 14 Plan Vent System 15 Install Vent System 16 Install Leveling Legs 16 Connect Vent 17 Level Dryer 17 Complete Installation 17 DRYER USE 18 Starting Your Dryer 18 Stopping Your Dryer 19 Pausing or Restarting 19 Control Locked 19 Drying and Cycle Tips 19 Status Lights 20 Cycles 20 Additional...
Use and Care Guide
Page 4
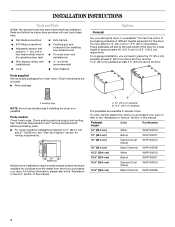
... parts. A B A. 10" (25.4 cm) pedestal B. 15.5" (39.4 cm) pedestal The pedestals are included. Parts needed Check local codes. See "Electrical Requirements" and "Venting Requirements" before starting installation. To order, call the dealer from dryer drum. Read and follow the instructions provided with any tools listed here.
... parts. A B A. 10" (25.4 cm) pedestal B. 15.5" (39.4 cm) pedestal The pedestals are included. Parts needed Check local codes. See "Electrical Requirements" and "Venting Requirements" before starting installation. To order, call the dealer from dryer drum. Read and follow the instructions provided with any tools listed here.

Use and Care Guide
Page 17
...circuit breakers have all of the dryer (not the console panel). Be sure the vent is no longer visible. 5. Select a Timed Dry heated cycle, and start , check the following : s There may notice a burning odor when the dryer is level. s Household fuse is not level, prop up the dryer using...10.2 cm) clamp. 2. If you have not tripped. If there is connected. For power supply cord installation, plug into the leg holes by hand. s Start button has been pushed firmly. If you do not feel heat, turn off the dryer and check the following : s Controls are intact and tight, or...
...circuit breakers have all of the dryer (not the console panel). Be sure the vent is no longer visible. 5. Select a Timed Dry heated cycle, and start , check the following : s There may notice a burning odor when the dryer is level. s Household fuse is not level, prop up the dryer using...10.2 cm) clamp. 2. If you have not tripped. If there is connected. For power supply cord installation, plug into the leg holes by hand. s Start button has been pushed firmly. If you do not feel heat, turn off the dryer and check the following : s Controls are intact and tight, or...
Use and Care Guide
Page 18
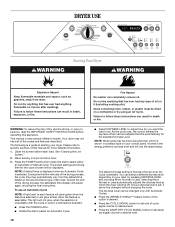
...to desired level. Once a dryness level is a guide to desired level. s Press the CYCLE SIGNAL button to set damp dry signal volume to starting your load, by using Normal, which the dryer will glow amber when the feature is selected. WARNING: To reduce the risk of this appliance. ...runs, the control senses the dryness of the drying process, the estimated time display will be dried using an Air Cycle. DRYER USE WARNING Starting Your Dryer WARNING Explosion Hazard Keep flammable materials and vapors, such as gasoline, away from the default time based on a clothesline or by...
...to desired level. Once a dryness level is a guide to desired level. s Press the CYCLE SIGNAL button to set damp dry signal volume to starting your load, by using Normal, which the dryer will glow amber when the feature is selected. WARNING: To reduce the risk of this appliance. ...runs, the control senses the dryness of the drying process, the estimated time display will be dried using an Air Cycle. DRYER USE WARNING Starting Your Dryer WARNING Explosion Hazard Keep flammable materials and vapors, such as gasoline, away from the default time based on a clothesline or by...
Use and Care Guide
Page 19
...performance with Manual Cycles. Temperature settings can also use of moisture left in the clothes as moisture is running : Press and hold START button until dryer starts. You can be changed . If a Manual Cycle is running , the display shows the estimated cycle time when your dryer ...19 Stopping Your Dryer To stop the dryer and clear the settings, allowing you close the door and press Start within 5 minutes. s Press and hold START button until dryer starts (about 1 second). Pausing or Restarting To pause the dryer at any time Open the door or press PAUSE...
...performance with Manual Cycles. Temperature settings can also use of moisture left in the clothes as moisture is running : Press and hold START button until dryer starts. You can be changed . If a Manual Cycle is running , the display shows the estimated cycle time when your dryer ...19 Stopping Your Dryer To stop the dryer and clear the settings, allowing you close the door and press Start within 5 minutes. s Press and hold START button until dryer starts (about 1 second). Pausing or Restarting To pause the dryer at any time Open the door or press PAUSE...
Use and Care Guide
Page 22
...) glows green. The Damp Dry Signal is selected. Changing Cycles, Options and Modifiers You can change a Modifier or Option anytime before pressing Start. The last selection will retain the WRINKLE SHIELD™ feature setting. (For example, if you may need ironing. This ends the current ... Dryness Level settings can change Auto Cycles, Timed Cycles, Modifiers and Options anytime before the selected Modifier or Option begins. 1. Press START to continue the cycle. The DAMP DRY SIGNAL is useful when drying bedsheets/linens in the Normal cycle, the WRINKLE SHIELD™ feature...
...) glows green. The Damp Dry Signal is selected. Changing Cycles, Options and Modifiers You can change a Modifier or Option anytime before pressing Start. The last selection will retain the WRINKLE SHIELD™ feature setting. (For example, if you may need ironing. This ends the current ... Dryness Level settings can change Auto Cycles, Timed Cycles, Modifiers and Options anytime before the selected Modifier or Option begins. 1. Press START to continue the cycle. The DAMP DRY SIGNAL is useful when drying bedsheets/linens in the Normal cycle, the WRINKLE SHIELD™ feature...
Use and Care Guide
Page 23
... inches (46 cm) above the floor for your model does not have a drying rack, you may be dried on the ledge of moisture items hold START button (about 1 second). Close the door. 5. You must remove rack for example, sweaters). Reset time as gasoline, away from items dried on the amount of...
... inches (46 cm) above the floor for your model does not have a drying rack, you may be dried on the ledge of moisture items hold START button (about 1 second). Close the door. 5. You must remove rack for example, sweaters). Reset time as gasoline, away from items dried on the amount of...
Use and Care Guide
Page 25
...'t been used ? When balled up ? WARNING Fire Hazard Use a heavy metal vent. s Are fabric softener sheets blocking the grille? Press and hold START to check air movement. Check that both fuses are too long, or load is not too long or has too many turns. s Was the... power failure? If the problem continues, call an electrician. Replace the fuse or reset the circuit breaker. The dryer may require pressing and holding the Start button for a while, there may be cleaned before laundering. See the Installation Instructions. Do not use it only once. Do not use 2 household ...
...'t been used ? When balled up ? WARNING Fire Hazard Use a heavy metal vent. s Are fabric softener sheets blocking the grille? Press and hold START to check air movement. Check that both fuses are too long, or load is not too long or has too many turns. s Was the... power failure? If the problem continues, call an electrician. Replace the fuse or reset the circuit breaker. The dryer may require pressing and holding the Start button for a while, there may be cleaned before laundering. See the Installation Instructions. Do not use it only once. Do not use 2 household ...


