
Use & Care Guide
Page 4
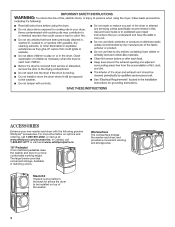
...drawer provides convenient storage. In Canada, call 1-800-901-2042, or visit us at : www.whirlpool.com/accessories. Stack Kit If space is at a premium, the stack kit allows the dryer to a more information on top of the washer. 4 Available in matching colors. For more comfortable ...working and storage area. Worksurface The worksurface bridges the washer and dryer, and provides a convenient working height. whirlpoolparts.ca 15" Pedestal Color-matched pedestals raise the washer and dryer to be installed on options and ordering, call 1-800-807-6777 or visit ...
...drawer provides convenient storage. In Canada, call 1-800-901-2042, or visit us at : www.whirlpool.com/accessories. Stack Kit If space is at a premium, the stack kit allows the dryer to a more information on top of the washer. 4 Available in matching colors. For more comfortable ...working and storage area. Worksurface The worksurface bridges the washer and dryer, and provides a convenient working height. whirlpoolparts.ca 15" Pedestal Color-matched pedestals raise the washer and dryer to be installed on options and ordering, call 1-800-807-6777 or visit ...

Use & Care Guide
Page 5
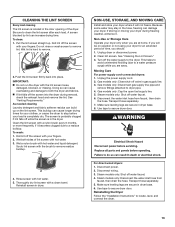
... results in shrinkage, wrinkling, and static due to follow the "Installation Instructions" supplied with Steam Cycles. For best results, do not overload the dryer. 5 Use Auto Cycles for items that have been left in a vent system; It may require additional touching up after the Steam Cycle. Wash... the amount of the vent system at least every 2 years. n Remove lint and debris from the front the dryer. Tips for smoothing out wrinkles from your dryer for the occasional damp load that have been starched. n The Enhanced Touch Up Cycle is complete, be paid by the ...
... results in shrinkage, wrinkling, and static due to follow the "Installation Instructions" supplied with Steam Cycles. For best results, do not overload the dryer. 5 Use Auto Cycles for items that have been left in a vent system; It may require additional touching up after the Steam Cycle. Wash... the amount of the vent system at least every 2 years. n Remove lint and debris from the front the dryer. Tips for smoothing out wrinkles from your dryer for the occasional damp load that have been starched. n The Enhanced Touch Up Cycle is complete, be paid by the ...

Use & Care Guide
Page 6
... items are drying. Press to stop/cancel a cycle at any time. 2 CYCLE CONTROL KNOB Use your dryer's Cycle Control knob to select a cycle for available settings on the type of the display to turn the dryer on each cycle. NOTE: Auto Cycles use with Manual Cycles to pause it. 4 MORE TIME/LESS...
... items are drying. Press to stop/cancel a cycle at any time. 2 CYCLE CONTROL KNOB Use your dryer's Cycle Control knob to select a cycle for available settings on the type of the display to turn the dryer on each cycle. NOTE: Auto Cycles use with Manual Cycles to pause it. 4 MORE TIME/LESS...

Use & Care Guide
Page 7
...accidental change in cycle options or settings during Manual Cycles or options such as Wrinkle Shield™. To enable the Control Lock feature if the dryer is off . Sensing The Sensing indicator will light during Auto Cycles to indicate that the moisture sensor on or off , it down and ...This indicator is not available on all cycles. NOTE: Steam is used with Auto cycles to press POWER before activating the Control Lock feature. The dryer will light if the Wrinkle Shield™ option has been selected and is running : Press and hold the Cycle Signal button for 3 seconds to...
...accidental change in cycle options or settings during Manual Cycles or options such as Wrinkle Shield™. To enable the Control Lock feature if the dryer is off . Sensing The Sensing indicator will light during Auto Cycles to indicate that the moisture sensor on or off , it down and ...This indicator is not available on all cycles. NOTE: Steam is used with Auto cycles to press POWER before activating the Control Lock feature. The dryer will light if the Wrinkle Shield™ option has been selected and is running : Press and hold the Cycle Signal button for 3 seconds to...

Use & Care Guide
Page 8
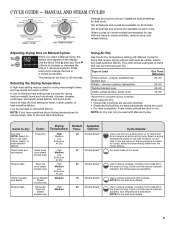
...More 35 Wrinkle Shield™ wear, mixed cottons, Normal sheets, corduroys Less Recommended for better fabric care and energy savings The dryer senses moisture in bold are available on all settings and options are default settings for that you do not wish to dry ...GUIDE - Load Size Recommendations For best results, follow the wet load size recommendations noted for items that cycle. Medium load: Fill the dryer drum up to Low for enhanced fabric care and energy savings. Items need to about 3/4 full. Shirts, blouses, Casual Low More...
...More 35 Wrinkle Shield™ wear, mixed cottons, Normal sheets, corduroys Less Recommended for better fabric care and energy savings The dryer senses moisture in bold are available on all settings and options are default settings for that you do not wish to dry ...GUIDE - Load Size Recommendations For best results, follow the wet load size recommendations noted for items that cycle. Medium load: Fill the dryer drum up to Low for enhanced fabric care and energy savings. Items need to about 3/4 full. Shirts, blouses, Casual Low More...
Use & Care Guide
Page 9
... for drying heavyweight items such as rubber, plastic, and heat-sensitive fabrics. CYCLE GUIDE - When using Air Dry. NOTE: Do not add dryer sheets. 9 Use the More Time s and Less Time t Sensing Wet Damp buttons to complete drying, if needed. If you have questions ...drying temperatures for items that cycle. MANUAL AND STEAM CYCLES Steam model Non-Steam model Sensing Wet Settings and options shown in the dryer too long. shower curtains, tablecloths Rubber-backed rugs Olefin, polypropylene, sheer nylon Est. Type of the temperature to reduce wrinkles, ...
... for drying heavyweight items such as rubber, plastic, and heat-sensitive fabrics. CYCLE GUIDE - When using Air Dry. NOTE: Do not add dryer sheets. 9 Use the More Time s and Less Time t Sensing Wet Damp buttons to complete drying, if needed. If you have questions ...drying temperatures for items that cycle. MANUAL AND STEAM CYCLES Steam model Non-Steam model Sensing Wet Settings and options shown in the dryer too long. shower curtains, tablecloths Rubber-backed rugs Olefin, polypropylene, sheer nylon Est. Type of the temperature to reduce wrinkles, ...
Use & Care Guide
Page 10
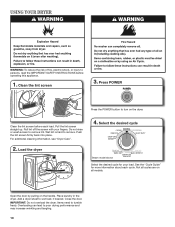
.... 10 Overloading can lead to remove. Press POWER Press the POWER button to remove lint. Do not rinse or wash screen to turn on the dryer. See the "Cycle Guide" for your fingers. Not all cycles are on the handle. Items need to wet load, if desired. Place laundry... to tumble freely. Push the lint screen firmly back into place. Pull the lint screen straight up. Load the dryer 4. IMPORTANT: Do not overload the dryer. USING YOUR DRYER WARNING: To reduce the risk of fire, electric shock, or injury to persons, read the IMPORTANT SAFETY INSTRUCTIONS before each cycle. ...
.... 10 Overloading can lead to remove. Press POWER Press the POWER button to remove lint. Do not rinse or wash screen to turn on the dryer. See the "Cycle Guide" for your fingers. Not all cycles are on the handle. Items need to wet load, if desired. Place laundry... to tumble freely. Push the lint screen firmly back into place. Pull the lint screen straight up. Load the dryer 4. IMPORTANT: Do not overload the dryer. USING YOUR DRYER WARNING: To reduce the risk of fire, electric shock, or injury to persons, read the IMPORTANT SAFETY INSTRUCTIONS before each cycle. ...
Use & Care Guide
Page 11
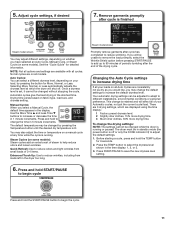
...reduce odors and loosen wrinkles. Before starting a cycle, press and hold to change the default settings to select the dryness level shown in the dryer too long. Press the TEMP button to increase the default dryness level. 5. Once a dryness level is off . Automatic cycles give the ... conditions or personal preference. To change is running . This change the drying settings: NOTE: The settings cannot be changed while the dryer is retained and will be adjusted to adapt to 90 minutes of periodic tumbling after the end of your Automatic cycles, not just the...
...reduce odors and loosen wrinkles. Before starting a cycle, press and hold to change the default settings to select the dryness level shown in the dryer too long. Press the TEMP button to increase the default dryness level. 5. Once a dryness level is off . Automatic cycles give the ... conditions or personal preference. To change is running . This change the drying settings: NOTE: The settings cannot be changed while the dryer is retained and will be adjusted to adapt to 90 minutes of periodic tumbling after the end of your Automatic cycles, not just the...

Use & Care Guide
Page 12
... the drum and a second microfiber towel to turn, but the drum will not stain future loads of clothes. Dry unstable dye items inside of the dryer drum. Align the two hooks on the front of the drying rack with the holes in the cycle by increasing or decreasing the cycle time... items do not want to tumble dry, such as denim blue jeans or brightly colored cotton items, may discolor the rear of laundry in your dryer and will rotate; Select a Timed Dry/Air Dry, or Low Temperature cycle. Items containing foam, rubber, or plastic must be removed every 2 years, or more...
... the drum and a second microfiber towel to turn, but the drum will not stain future loads of clothes. Dry unstable dye items inside of the dryer drum. Align the two hooks on the front of the drying rack with the holes in the cycle by increasing or decreasing the cycle time... items do not want to tumble dry, such as denim blue jeans or brightly colored cotton items, may discolor the rear of laundry in your dryer and will rotate; Select a Timed Dry/Air Dry, or Low Temperature cycle. Items containing foam, rubber, or plastic must be removed every 2 years, or more...
Use & Care Guide
Page 13
...nylon brush every 6 months, or more frequently, if it becomes clogged due to stop before your fingers. IMPORTANT: n Do not run the dryer with hot water and liquid detergent. Wet a nylon brush with the lint screen loose, damaged, blocked, or missing. Moving Care For power supply...7. A screen blocked by lint can cause overheating and damage to remove residue buildup. 4. Do not rinse or wash screen to secure dryer door. Wet both the dryer and fabrics. Clean the lint screen with hot water. 3. Scrub lint screen with a clean towel. Steam models only: Disconnect the...
...nylon brush every 6 months, or more frequently, if it becomes clogged due to stop before your fingers. IMPORTANT: n Do not run the dryer with hot water and liquid detergent. Wet a nylon brush with the lint screen loose, damaged, blocked, or missing. Moving Care For power supply...7. A screen blocked by lint can cause overheating and damage to remove residue buildup. 4. Do not rinse or wash screen to secure dryer door. Wet both the dryer and fabrics. Clean the lint screen with hot water. 3. Scrub lint screen with a clean towel. Steam models only: Disconnect the...

Use & Care Guide
Page 14
... MODELS Water Inlet Hose Replace inlet hose and hose screen after 5 years of use to faucet. To Use the Dryer Again 1. To change the drum light: 1. Open the dryer door. Turn bulb counterclockwise. Replace the cover and secure with a 10-watt appliance bulb only. Disconnect water inlet ... located in the lower right corner of hose failure. Plug in dryer or reconnect power as described in dryer or reconnect power. 14 Locate the light bulb cover on inside the dryer drum when you open the door. Unplug dryer or disconnect power. 2. Turn on water faucet. 2. When replacing...
... MODELS Water Inlet Hose Replace inlet hose and hose screen after 5 years of use to faucet. To Use the Dryer Again 1. To change the drum light: 1. Open the dryer door. Turn bulb counterclockwise. Replace the cover and secure with a 10-watt appliance bulb only. Disconnect water inlet ... located in the lower right corner of hose failure. Plug in dryer or reconnect power as described in dryer or reconnect power. 14 Locate the light bulb cover on inside the dryer drum when you open the door. Unplug dryer or disconnect power. 2. Turn on water faucet. 2. When replacing...

Use & Care Guide
Page 15
... the correct size. Clicking noise Gas valve operating. The dryer is normal. If you experience Possible Causes Solution Dryer Operation Dryer will bounce, causing the dryer to vibrate. See "Installation Instructions." TROUBLESHOOTING First try the solutions suggested here or visit our website at www.whirlpool.com/help for assistance and to check air movement. This...
... the correct size. Clicking noise Gas valve operating. The dryer is normal. If you experience Possible Causes Solution Dryer Operation Dryer will bounce, causing the dryer to vibrate. See "Installation Instructions." TROUBLESHOOTING First try the solutions suggested here or visit our website at www.whirlpool.com/help for assistance and to check air movement. This...

Use & Care Guide
Page 16
...sure water is just inside the door, behind the lint screen. Under certain environmental or installation conditions you experience Possible Causes Solution Dryer Results (cont.) Clothes are not drying satisfactorily or drying times are consistently ending too early, see also "Changing the Auto Cycle.... For steam cycles, the water is too large and heavy to the dryer. Separate the load to other clothing. TROUBLESHOOTING First try the solutions suggested here or visit our website at www.whirlpool.com/help for assistance and to increase drying time". See "Installation Instructions."...
...sure water is just inside the door, behind the lint screen. Under certain environmental or installation conditions you experience Possible Causes Solution Dryer Results (cont.) Clothes are not drying satisfactorily or drying times are consistently ending too early, see also "Changing the Auto Cycle.... For steam cycles, the water is too large and heavy to the dryer. Separate the load to other clothing. TROUBLESHOOTING First try the solutions suggested here or visit our website at www.whirlpool.com/help for assistance and to increase drying time". See "Installation Instructions."...

Use & Care Guide
Page 17
...of the cycle before removing the load. If the message persists, consult a qualified electrician. Select a Manual Cycle with heat, and restart the dryer. Confirm the exterior vent exhaust hood is connected to the wall is present. Ventilate the area. Make sure water is free of wrinkle-free ... to see if a household fuse has blown or circuit breaker has tripped. First try the solutions suggested here or visit our website at www.whirlpool.com/help for service. 17 Confirm the power cord is located. "L2" Diagnostic Code (low or no line voltage condition) There may be...
...of the cycle before removing the load. If the message persists, consult a qualified electrician. Select a Manual Cycle with heat, and restart the dryer. Confirm the exterior vent exhaust hood is connected to the wall is present. Ventilate the area. Make sure water is free of wrinkle-free ... to see if a household fuse has blown or circuit breaker has tripped. First try the solutions suggested here or visit our website at www.whirlpool.com/help for service. 17 Confirm the power cord is located. "L2" Diagnostic Code (low or no line voltage condition) There may be...

Installation Guide
Page 1
... INSTRUCTIONS Table of Contents DRYER SAFETY 2 INSTALLATION REQUIREMENTS 3 Tools and Parts 3 LOCATION REQUIREMENTS 4 ELECTRICAL REQUIREMENTS 6 INSTALL LEVELING LEGS 7 ELECTRICAL INSTALLATION 8 Power Supply Cord Connection 9 Direct Wire Connection 11 ...System 16 CONNECT INLET HOSE 17 CONNECT VENT 18 LEVEL DRYER 19 COMPLETE INSTALLATION CHECKLIST 19 DOOR REVERSAL KIT (OPTIONAL 20 STACKING WASHER AND DRYER (OPTIONAL 20 TROUBLESHOOTING 20 Para una version de estas instrucciones en español, visite www.Whirlpool.com INSTALLATION NOTES Date of purchase Date of installation ...
... INSTRUCTIONS Table of Contents DRYER SAFETY 2 INSTALLATION REQUIREMENTS 3 Tools and Parts 3 LOCATION REQUIREMENTS 4 ELECTRICAL REQUIREMENTS 6 INSTALL LEVELING LEGS 7 ELECTRICAL INSTALLATION 8 Power Supply Cord Connection 9 Direct Wire Connection 11 ...System 16 CONNECT INLET HOSE 17 CONNECT VENT 18 LEVEL DRYER 19 COMPLETE INSTALLATION CHECKLIST 19 DOOR REVERSAL KIT (OPTIONAL 20 STACKING WASHER AND DRYER (OPTIONAL 20 TROUBLESHOOTING 20 Para una version de estas instrucciones en español, visite www.Whirlpool.com INSTALLATION NOTES Date of purchase Date of installation ...

Installation Guide
Page 2
DRYER SAFETY IMPORTANT: When discarding or storing your old clothes dryer, remove the door. 2
DRYER SAFETY IMPORTANT: When discarding or storing your old clothes dryer, remove the door. 2

Installation Guide
Page 3
... wires that connect to your Use and Care Guide for information about accessories available for use leveling legs supplied if installing with clothes dryers. Utility knife Tape measure Leveling legs (4) "Y" connector (steam models only) Level Pliers Caulking gun and compound (for installing new ... models only) Long inlet hose (steam models only) Rubber washers (steam models only) Optional Equipment: (Not supplied with dryer) Refer to the dryer must end in dryer drum. If using a power supply cord: Use a UL listed power supply cord kit marked for your installation. Tools ...
... wires that connect to your Use and Care Guide for information about accessories available for use leveling legs supplied if installing with clothes dryers. Utility knife Tape measure Leveling legs (4) "Y" connector (steam models only) Level Pliers Caulking gun and compound (for installing new ... models only) Long inlet hose (steam models only) Rubber washers (steam models only) Optional Equipment: (Not supplied with dryer) Refer to the dryer must end in dryer drum. If using a power supply cord: Use a UL listed power supply cord kit marked for your installation. Tools ...

Installation Guide
Page 4
... elbow. If not level, clothes may not tumble properly and automatic sensor cycles may not operate correctly. ■■For garage installation, place dryer at end of dryer. Space must be exposed to water and/or weather. measurement Side view: 483/4" (1238 mm) 29" (736 mm) 35 3/8" (899... of either side of automatic sensor cycles, resulting in an area where it will need 18" (460 mm) to bottom of dryer. ■■The dryer must support dryer weight of dryer to water, weather, or at temperatures below 40° F (4° C). If using a pedestal, you will be large ...
... elbow. If not level, clothes may not tumble properly and automatic sensor cycles may not operate correctly. ■■For garage installation, place dryer at end of dryer. Space must be exposed to water and/or weather. measurement Side view: 483/4" (1238 mm) 29" (736 mm) 35 3/8" (899... of either side of automatic sensor cycles, resulting in an area where it will need 18" (460 mm) to bottom of dryer. ■■The dryer must support dryer weight of dryer to water, weather, or at temperatures below 40° F (4° C). If using a pedestal, you will be large ...

Installation Guide
Page 5
...(1930 mm) 48 in.2 (310 cm2) 5" (127 mm) 1" (25 mm) 3" (76 mm) 24 in the top and bottom of the dryer to reduce noise transfer. ■■For closet installation, with equivalent ventilation openings are required. Mobile home installations require: ■■Metal exhaust system hardware,...spacing should be considered for ease of installation and servicing. ■■Additional clearances might be required for wall, door, floor moldings, dryer venting, and gas line. ■■Additional spacing should be considered on all sides of the door are acceptable. ■■...
...(1930 mm) 48 in.2 (310 cm2) 5" (127 mm) 1" (25 mm) 3" (76 mm) 24 in the top and bottom of the dryer to reduce noise transfer. ■■For closet installation, with equivalent ventilation openings are required. Mobile home installations require: ■■Metal exhaust system hardware,...spacing should be considered for ease of installation and servicing. ■■Additional clearances might be required for wall, door, floor moldings, dryer venting, and gas line. ■■Additional spacing should be considered on all sides of the door are acceptable. ■■...

Installation Guide
Page 6
... 4-wire power supply cord with flexible metallic conduit. The 4-wire power supply cord, at least 5 ft. (1.52 m) long. ■■This dryer is prohibited. If connecting by a white cover. 3-wire receptacle (10-30R) Then choose a 3-wire power supply cord with upturned ends. ■&#... relief. 6 When the neutral ground conductor is secured under the neutral terminal (center or white wire) of the terminal block, the dryer cabinet is adequate and in remodeling after 1996, (2) mobile homes, (3) recreational vehicles, and (4) areas where local codes prohibit grounding through...
... 4-wire power supply cord with flexible metallic conduit. The 4-wire power supply cord, at least 5 ft. (1.52 m) long. ■■This dryer is prohibited. If connecting by a white cover. 3-wire receptacle (10-30R) Then choose a 3-wire power supply cord with upturned ends. ■&#... relief. 6 When the neutral ground conductor is secured under the neutral terminal (center or white wire) of the terminal block, the dryer cabinet is adequate and in remodeling after 1996, (2) mobile homes, (3) recreational vehicles, and (4) areas where local codes prohibit grounding through...


