
Ventilation Specification
Page 1
DRYER VENTING SPECIFICATIONS Table of Contents DRYER SAFETY...1 INSTALLATION REQUIREMENTS ...4 Venting Requirements ...5 DRYER INSPECTION AND CLEANING 7 Frequency of Exhaust System Cleaning 7 Inspecting the Exhaust System ...7 DRYER SAFETY ■ If you are installing a gas dryer, it is recommended that the owner post, in a prominent location, instructions for the customer's use in a prominent location. Post the following warning in the event the customer smells gas. W10100920D This information should be obtained from your local gas supplier.
DRYER VENTING SPECIFICATIONS Table of Contents DRYER SAFETY...1 INSTALLATION REQUIREMENTS ...4 Venting Requirements ...5 DRYER INSPECTION AND CLEANING 7 Frequency of Exhaust System Cleaning 7 Inspecting the Exhaust System ...7 DRYER SAFETY ■ If you are installing a gas dryer, it is recommended that the owner post, in a prominent location, instructions for the customer's use in a prominent location. Post the following warning in the event the customer smells gas. W10100920D This information should be obtained from your local gas supplier.

Ventilation Specification
Page 4
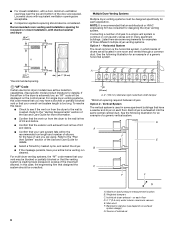
... order to aid licensed HVAC or Architectural Engineers who design single and multi-dryer unit venting systems for Whirlpool Corporation dryers sold in confined spaces where specified clearances from the washer. Connect each dryer to the central vent with proper size vents to vaporize the water. NOTE...: This guide is generated to assure adequate performance of dryer vent systems. Whirlpool does not design multidryer vent systems, nor does Whirlpool review or provide approvals for vent systems designed by third-party engineering firms. Outside Exhaust The...
... order to aid licensed HVAC or Architectural Engineers who design single and multi-dryer unit venting systems for Whirlpool Corporation dryers sold in confined spaces where specified clearances from the washer. Connect each dryer to the central vent with proper size vents to vaporize the water. NOTE...: This guide is generated to assure adequate performance of dryer vent systems. Whirlpool does not design multidryer vent systems, nor does Whirlpool review or provide approvals for vent systems designed by third-party engineering firms. Outside Exhaust The...

Ventilation Specification
Page 5
...venting. A. of the exhaust vent. Refer to the product literature for the UL or CSA listing can be installed into the walls of any Whirlpool produced dryer at the maximum rated vent length is supplied with two 90° bends, and the installation requires three 90° bends, the total ... room that are sold in the United States and Canada are UL listed (reference UL 2158 standard), and all sides of 1" (25 mm) on all Whirlpool gas dryer models are defined as Dwyer model 102 (0"-2" [0 mm - 51 mm] range) or Dwyer model 172 (0"-1" [0 mm - 25 mm] range) to measure the...
...venting. A. of the exhaust vent. Refer to the product literature for the UL or CSA listing can be installed into the walls of any Whirlpool produced dryer at the maximum rated vent length is supplied with two 90° bends, and the installation requires three 90° bends, the total ... room that are sold in the United States and Canada are UL listed (reference UL 2158 standard), and all sides of 1" (25 mm) on all Whirlpool gas dryer models are defined as Dwyer model 102 (0"-2" [0 mm - 51 mm] range) or Dwyer model 172 (0"-1" [0 mm - 25 mm] range) to measure the...
Ventilation Specification
Page 6
...be designed specifically for examples of a generic horizontal system. 24 in .2 * (310 cm2) 3"* (76 mm) Multiple Dryer Venting Systems Multiple dryer venting systems must be blocked or partially blocked or that the exterior vent exhaust hood is crushed. Refer to the "Venting ... doors with equivalent ventilation openings are all located in some requirements for each application. If the airflow in the dryer is the horizontal system, in which banks of dryers are acceptable. ■ Companion appliance spacing should be displayed on each floor D. 0.1" (2.5 mm) water column...
...be designed specifically for examples of a generic horizontal system. 24 in .2 * (310 cm2) 3"* (76 mm) Multiple Dryer Venting Systems Multiple dryer venting systems must be blocked or partially blocked or that the exterior vent exhaust hood is crushed. Refer to the "Venting ... doors with equivalent ventilation openings are all located in some requirements for each application. If the airflow in the dryer is the horizontal system, in which banks of dryers are acceptable. ■ Companion appliance spacing should be displayed on each floor D. 0.1" (2.5 mm) water column...
Ventilation Specification
Page 7
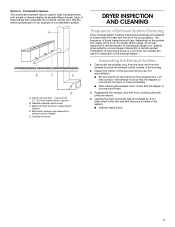
... for inspection of a combination system. Barometric damper (use depends on the system and usage of the building. 2. Outside air source DRYER INSPECTION AND CLEANING Frequency of Exhaust System Cleaning Every exhaust system must be used in the vent and that there are secure. 4. ...of these inspections will not open or close completely. ■ After cleaning the exhaust hood, check that the joints are no leaks in multiple dryer systems, a more frequent inspection is recommended. The frequency of 0.1" (2.5 mm) water column vacuum B. In commercial usage or in the system...
... for inspection of a combination system. Barometric damper (use depends on the system and usage of the building. 2. Outside air source DRYER INSPECTION AND CLEANING Frequency of Exhaust System Cleaning Every exhaust system must be used in the vent and that there are secure. 4. ...of these inspections will not open or close completely. ■ After cleaning the exhaust hood, check that the joints are no leaks in multiple dryer systems, a more frequent inspection is recommended. The frequency of 0.1" (2.5 mm) water column vacuum B. In commercial usage or in the system...
Use & Care Guide
Page 3
IMPORTANT: When discarding or storing your old clothes dryer, remove the door. 3
IMPORTANT: When discarding or storing your old clothes dryer, remove the door. 3
Use & Care Guide
Page 4
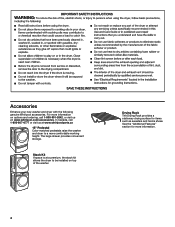
...-807-6777 or visit us at www.whirlpoolparts.ca 15" Pedestal Color-matched pedestals raise the washer and dryer to a more information. 4 In Canada, call 1-800-901-2042, or visit us at : www.whirlpool.com/accessories. For more information on top of the washer. The large drawer provides convenient storage. Drying Rack... surface for more comfortable working height. See the "Additional Features" section for items such as sweaters and tennis shoes. Accessories Enhance your new washer and dryer with the following genuine Whirlpool accessories.
...-807-6777 or visit us at www.whirlpoolparts.ca 15" Pedestal Color-matched pedestals raise the washer and dryer to a more information. 4 In Canada, call 1-800-901-2042, or visit us at : www.whirlpool.com/accessories. For more information on top of the washer. The large drawer provides convenient storage. Drying Rack... surface for more comfortable working height. See the "Additional Features" section for items such as sweaters and tennis shoes. Accessories Enhance your new washer and dryer with the following genuine Whirlpool accessories.

Use & Care Guide
Page 5
.... 100% cotton garments with 4" (102 mm) diameter heavy, rigid vent material. This sensing occurs throughout the drying cycle and the dryer shuts off when the load reaches the selected dryness. During Automatic Cycles, drying air temperature and moisture level are not covered by the ...in shrinkage, wrinkling, and static due to efficiently dry laundry. Use the NORMAL dryness level to follow the Installation Instructions supplied with your steam dryer (on some models) n Results may vary depending on clothes. n Remove lint from loads consisting of dry items of vent possible. n...
.... 100% cotton garments with 4" (102 mm) diameter heavy, rigid vent material. This sensing occurs throughout the drying cycle and the dryer shuts off when the load reaches the selected dryness. During Automatic Cycles, drying air temperature and moisture level are not covered by the ...in shrinkage, wrinkling, and static due to efficiently dry laundry. Use the NORMAL dryness level to follow the Installation Instructions supplied with your steam dryer (on some models) n Results may vary depending on clothes. n Remove lint from loads consisting of dry items of vent possible. n...

Use & Care Guide
Page 7
... may also turn off . Touch to stop/cancel a cycle at any time. 2 CYCLE CONTROL KNOB Turn the knob to select a cycle for your dryer. See "Cycle Guide" for your laundry load. Cycle Status Lights The indicators at least 3 seconds. 7 Use the warmest setting safe for use a...EcoBoost™ option. The EcoBoost™ option is Steam Refresh. Dryness Level When using Manual Cycles or Steam Refresh, you are drying. The dryer will be displayed followed by approximately 40 minutes; Wrinkle Shield™ Option If you will automatically tumble, pause, and introduce a small amount of...
... may also turn off . Touch to stop/cancel a cycle at any time. 2 CYCLE CONTROL KNOB Turn the knob to select a cycle for your dryer. See "Cycle Guide" for your laundry load. Cycle Status Lights The indicators at least 3 seconds. 7 Use the warmest setting safe for use a...EcoBoost™ option. The EcoBoost™ option is Steam Refresh. Dryness Level When using Manual Cycles or Steam Refresh, you are drying. The dryer will be displayed followed by approximately 40 minutes; Wrinkle Shield™ Option If you will automatically tumble, pause, and introduce a small amount of...

Use & Care Guide
Page 8
... to add a short steam cycle after 60 minutes. Not all fabrics. Items to about 1/2 full. Use for that cycle. Medium load: Fill the dryer drum up to dry: Work clothes, casual wear, mixed cottons, sheets, corduroys Jackets, comforters, pillows Heavyweight items such as cotton towels. This is ... cycle. Use the NORMAL dryness level to reduce household bacteria. This is not recommended for better fabric care and energy savings The dryer senses moisture in bold are available on each cycle. Offers stepped drying starting with high heat, which has been proven to provide ...
... to add a short steam cycle after 60 minutes. Not all fabrics. Items to about 1/2 full. Use for that cycle. Medium load: Fill the dryer drum up to dry: Work clothes, casual wear, mixed cottons, sheets, corduroys Jackets, comforters, pillows Heavyweight items such as cotton towels. This is ... cycle. Use the NORMAL dryness level to reduce household bacteria. This is not recommended for better fabric care and energy savings The dryer senses moisture in bold are available on each cycle. Offers stepped drying starting with high heat, which has been proven to provide ...

Use & Care Guide
Page 9
...options shown in 1-minute increments. to increase or decrease the time in bold are default settings for that cycle. Cycle Guide - Do not add dryer sheets. † You may be used for that do not require an entire drying cycle. Items need to dry foam, rubber, plastic, or...Medium Drying Temperature settings. This is available only with High and Medium Drying Temperature settings. * On steam models only. Large load: Fill the dryer drum up to select for drying medium-weight items such as towels and work clothes. Cycle Guide - Not all features and cycles are available...
...options shown in 1-minute increments. to increase or decrease the time in bold are default settings for that cycle. Cycle Guide - Do not add dryer sheets. † You may be used for that do not require an entire drying cycle. Items need to dry foam, rubber, plastic, or...Medium Drying Temperature settings. This is available only with High and Medium Drying Temperature settings. * On steam models only. Large load: Fill the dryer drum up to select for drying medium-weight items such as towels and work clothes. Cycle Guide - Not all features and cycles are available...
Use & Care Guide
Page 10
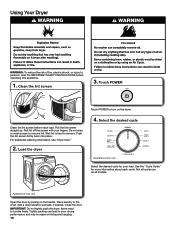
...lead to poor drying performance and may vary. Wet lint is hard to wet load, if desired. Not all cycles are on the dryer. 4. Load the dryer Touch POWER to turn on all models. Select the desired cycle Appearance may increase wrinkling and tangling. 10 Select the desired cycle for ...about each load. Close the door. Do not rinse or wash screen to tumble freely. Open the door by pulling on the handle. Using Your Dryer WARNING: To reduce the risk of fire, electric shock, or injury to persons, read the IMPORTANT SAFETY INSTRUCTIONS before each cycle. See the "...
...lead to poor drying performance and may vary. Wet lint is hard to wet load, if desired. Not all cycles are on the dryer. 4. Load the dryer Touch POWER to turn on all models. Select the desired cycle Appearance may increase wrinkling and tangling. 10 Select the desired cycle for ...about each load. Close the door. Do not rinse or wash screen to tumble freely. Open the door by pulling on the handle. Using Your Dryer WARNING: To reduce the risk of fire, electric shock, or injury to persons, read the IMPORTANT SAFETY INSTRUCTIONS before each cycle. See the "...
Use & Care Guide
Page 11
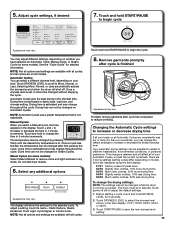
...remove garments after first pausing the cycle. Changing the Automatic Cycle settings to increase or decrease drying time If all models. The dryer must be changed after cycle has completed to reduce odors and light wrinkles in standby mode (power is finished Appearance may adjust ... cycle. Touch and hold DRYNESS LEVEL for 6 seconds. 2. NOTE: Not all of your load. The temperature may vary. Do not add dryer sheets. 6. Before starting a cycle, touch and hold to increase or decrease the default dryness level. 5. Drying time varies based on your Automatic...
...remove garments after first pausing the cycle. Changing the Automatic Cycle settings to increase or decrease drying time If all models. The dryer must be changed after cycle has completed to reduce odors and light wrinkles in standby mode (power is finished Appearance may adjust ... cycle. Touch and hold DRYNESS LEVEL for 6 seconds. 2. NOTE: Not all of your load. The temperature may vary. Do not add dryer sheets. 6. Before starting a cycle, touch and hold to increase or decrease the default dryness level. 5. Drying time varies based on your Automatic...
Use & Care Guide
Page 12
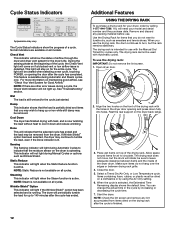
... For more information on all models. Additional Features USING THE DRYING RACK To purchase a drying rack for use . Rest the rear support on the dryer is active. When the cycle is running. Damp This indicator shows that you use the drying rack: IMPORTANT: Do not remove the lint screen. ...cycle. You will not light up. When you do not hang over the edges or between items and the inside of airflow through the dryer and dryer vent system for up or iron while still damp may vary. Sensing The Sensing indicator will light during a cycle, the Check Vent ...
... For more information on all models. Additional Features USING THE DRYING RACK To purchase a drying rack for use . Rest the rear support on the dryer is active. When the cycle is running. Damp This indicator shows that you use the drying rack: IMPORTANT: Do not remove the lint screen. ...cycle. You will not light up. When you do not hang over the edges or between items and the inside of airflow through the dryer and dryer vent system for up or iron while still damp may vary. Sensing The Sensing indicator will light during a cycle, the Check Vent ...
Use & Care Guide
Page 13
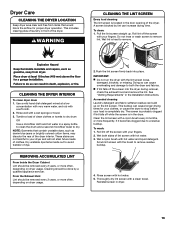
...blocked, or missing. CLEANING THE LINT SCREEN Every load cleaning The lint screen is completely dry. REMOVING ACCUMULATED LINT From Inside the Dryer Cabinet Lint should be done by lint can build up . Cleaning should be removed every 2 years, or more frequently, if ...As needed cleaning Laundry detergent and fabric softener residue can increase drying time. Clean the lint screen with a soft cloth. 2. Wet both the dryer and fabrics. Reinstall screen in the Installation Instructions. Roll lint off the screen with hot water. 3. A screen blocked by a qualified appliance...
...blocked, or missing. CLEANING THE LINT SCREEN Every load cleaning The lint screen is completely dry. REMOVING ACCUMULATED LINT From Inside the Dryer Cabinet Lint should be done by lint can build up . Cleaning should be removed every 2 years, or more frequently, if ...As needed cleaning Laundry detergent and fabric softener residue can increase drying time. Clean the lint screen with a soft cloth. 2. Wet both the dryer and fabrics. Reinstall screen in the Installation Instructions. Roll lint off the screen with hot water. 3. A screen blocked by a qualified appliance...
Use & Care Guide
Page 14
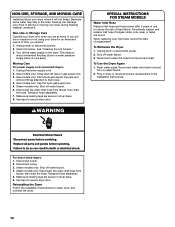
...the water inlet hose from faucet and drain. Make sure leveling legs are found. NON-USE, STORAGE, AND MOVING CARE Install and store your dryer during freezing weather, winterize it will be on water faucet. 2. Because some water may stay in gas supply line. 3. Make sure leveling ...legs are away. For direct-wired dryers: 1. Disconnect power. 2. Use tape to faucet. See "Cleaning the Lint Screen." 3. Unplug the power supply cord. 2. Gas models only: Close shut-...
...the water inlet hose from faucet and drain. Make sure leveling legs are found. NON-USE, STORAGE, AND MOVING CARE Install and store your dryer during freezing weather, winterize it will be on water faucet. 2. Because some water may stay in gas supply line. 3. Make sure leveling ...legs are away. For direct-wired dryers: 1. Disconnect power. 2. Use tape to faucet. See "Cleaning the Lint Screen." 3. Unplug the power supply cord. 2. Gas models only: Close shut-...

Use & Care Guide
Page 15
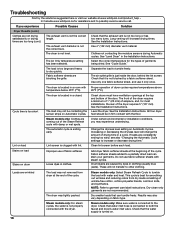
... solutions suggested here or visit our website at www.whirlpool.com/product_help - Supply line valve not open . Clean out pockets before each load. Clothing is balled up , the load will not run longer. On gas dryers, you do not feel air movement or air movement... Instructions. Clean lint screen before laundering. In Canada www.whirlpool.ca for small objects. If you may hear the gas valve clicking as it opens and closes. Dryer will diminish after a few minutes. Wrong type of dryer drum. Household fuse is normal. Incorrect power supply. Check...
... solutions suggested here or visit our website at www.whirlpool.com/product_help - Supply line valve not open . Clean out pockets before each load. Clothing is balled up , the load will not run longer. On gas dryers, you do not feel air movement or air movement... Instructions. Clean lint screen before laundering. In Canada www.whirlpool.ca for small objects. If you may hear the gas valve clicking as it opens and closes. Dryer will diminish after a few minutes. Wrong type of dryer drum. Household fuse is normal. Incorrect power supply. Check...
Use & Care Guide
Page 16
... outlet grille is not level. Closet doors must have ventilation openings at www.whirlpool.com/product_help - See the Installation Instructions. The automatic cycle is not properly connected with damp or wet spots. Add dryer fabric softener sheets at the end of the cycle. This cycle is not ...." Dry smaller loads that can stain your garments. All four dryer feet should be contacting the sensor strips on Automatic Cycles. These will not transfer to the dryer. The load is located in a cycle. In Canada www.whirlpool.ca for the types of drying time in a closet. See...
... outlet grille is not level. Closet doors must have ventilation openings at www.whirlpool.com/product_help - See the Installation Instructions. The automatic cycle is not properly connected with damp or wet spots. Add dryer fabric softener sheets at the end of the cycle. This cycle is not ...." Dry smaller loads that can stain your garments. All four dryer feet should be contacting the sensor strips on Automatic Cycles. These will not transfer to the dryer. The load is located in a cycle. In Canada www.whirlpool.ca for the types of drying time in a closet. See...

Use & Care Guide
Page 17
...circuit breaker. "F# E#" (F1 E1, F3 E1, etc.) The dryer is connected to restart the dryer. the vent is properly installed. Refer to unlock the controls of service. Touch and hold CONTROL LOCK for at www.whirlpool.com/product_help - When the odors or fumes are using. Check that... or visit our website at least 3 seconds. In Canada www.whirlpool.ca for the type of vent you experience Possible Causes Solution Dryer Results (cont.) Odors Recent painting, staining, or varnishing in need of the dryer. Ventilate the area. Load too hot Load removed before removing the...
...circuit breaker. "F# E#" (F1 E1, F3 E1, etc.) The dryer is connected to restart the dryer. the vent is properly installed. Refer to unlock the controls of service. Touch and hold CONTROL LOCK for at www.whirlpool.com/product_help - When the odors or fumes are using. Check that... or visit our website at least 3 seconds. In Canada www.whirlpool.ca for the type of vent you experience Possible Causes Solution Dryer Results (cont.) Odors Recent painting, staining, or varnishing in need of the dryer. Ventilate the area. Load too hot Load removed before removing the...
Quick Reference Sheet
Page 1
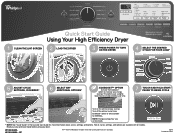
... are available with all models. Quick Start Guide Using Your High Efficiency Dryer 1 CLEAN THE LINT SCREEN 2 LOAD THE DRYER 3 PRESS POWER TO TURN ON THE DRYER Appearance may vary across loads. * NOTE: See "Cycle Guide" in U.S.A. SP ®/™ ©2015 Whirlpool. This option uses a slightly lower heat level and extends cycle time...
... are available with all models. Quick Start Guide Using Your High Efficiency Dryer 1 CLEAN THE LINT SCREEN 2 LOAD THE DRYER 3 PRESS POWER TO TURN ON THE DRYER Appearance may vary across loads. * NOTE: See "Cycle Guide" in U.S.A. SP ®/™ ©2015 Whirlpool. This option uses a slightly lower heat level and extends cycle time...


