Use and Care Manual
Page 1
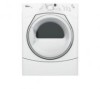
www.whidpooLcom parts, Table of Contents 2 8578899 ELECTRONIC ELECTRIC DRYER For questions about features, operation/performance, accessories or service, call: 1-800-253-1301 or visit our website at...
www.whidpooLcom parts, Table of Contents 2 8578899 ELECTRONIC ELECTRIC DRYER For questions about features, operation/performance, accessories or service, call: 1-800-253-1301 or visit our website at...
Use and Care Manual
Page 2
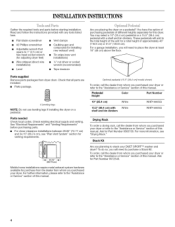
... Requirements 5 Electrical Requirements 7 Electrical Connection 8 Venting Requirements 13 Plan Vent System 14 Install Vent System 15 Install Leveling Legs 15 Connect Vent 16 Level Dryer 16 Reverse Door Swing 16 Complete Installation 18 DRYER USE 19 Starting Your Dryer 19 Stopping or Restarting Your Dryer 20 Lock...21 Additional Features 22 Changing Cycles, Options and Modifiers 23 Drying Rack 23 DRYER CARE 24 Cleaning the Dryer Location 24 Cleaning the Lint Screen 24 Cleaning the Dryer Interior 24 Removing Accumulated Lint 25 Vacation and Moving Care 25 TROUBLESHOOTING 25 ...
... Requirements 5 Electrical Requirements 7 Electrical Connection 8 Venting Requirements 13 Plan Vent System 14 Install Vent System 15 Install Leveling Legs 15 Connect Vent 16 Level Dryer 16 Reverse Door Swing 16 Complete Installation 18 DRYER USE 19 Starting Your Dryer 19 Stopping or Restarting Your Dryer 20 Lock...21 Additional Features 22 Changing Cycles, Options and Modifiers 23 Drying Rack 23 DRYER CARE 24 Cleaning the Dryer Location 24 Cleaning the Lint Screen 24 Cleaning the Dryer Interior 24 Removing Accumulated Lint 25 Vacation and Moving Care 25 TROUBLESHOOTING 25 ...
Use and Care Manual
Page 3
... very important. All safety messages will follow instructions. iMPORTANT SAFETY iNSTRUCTiONS WARNING: To reduce the risk of fire, electric shock, or injury to the drying compartment. [] Do not reach into the dryer if the drum is the safety alert symbol. Close supervision of children is necessary when the...can be killed or seriously injured if you and others are not followed. We have been previously cleaned in, washed in, soaked in the dryer. You can kill or hurt you don't follow basic precautions, including the following: [] Read all safety messages. This symbol alerts you to...
... very important. All safety messages will follow instructions. iMPORTANT SAFETY iNSTRUCTiONS WARNING: To reduce the risk of fire, electric shock, or injury to the drying compartment. [] Do not reach into the dryer if the drum is the safety alert symbol. Close supervision of children is necessary when the...can be killed or seriously injured if you and others are not followed. We have been previously cleaned in, washed in, soaked in the dryer. You can kill or hurt you don't follow basic precautions, including the following: [] Read all safety messages. This symbol alerts you to...
Use and Care Manual
Page 4
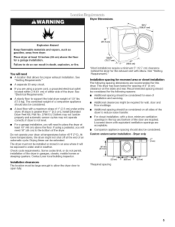
... • 1/4"nut driver or socket wrench (recommended) • Tape measure Parts supplied Remove parts packages from whom you purchased your DUET SPORT TM washer and dryer? Pedestal Height Color Part Number 10" (25.4 cm) White WHPIOOOSQ 15.5" (39.4 cm) with shelf and bin dividers White... needed Check local codes. For more information, see "Plan Vent System" section for venting requirements. To do so, you placing the dryer on a pedestal. Check existing electrical supply and venting. You may select a 10" (25.4 cm) pedestal or a 15.5" (39.4 cm) pedestal with any tools...
... • 1/4"nut driver or socket wrench (recommended) • Tape measure Parts supplied Remove parts packages from whom you purchased your DUET SPORT TM washer and dryer? Pedestal Height Color Part Number 10" (25.4 cm) White WHPIOOOSQ 15.5" (39.4 cm) with shelf and bin dividers White... needed Check local codes. For more information, see "Plan Vent System" section for venting requirements. To do so, you placing the dryer on a pedestal. Check existing electrical supply and venting. You may select a 10" (25.4 cm) pedestal or a 15.5" (39.4 cm) pedestal with any tools...
Use and Care Manual
Page 5
...of an automatic cycle. Failure to the bottom of the dryer in death, explosion, or fire. You will need 18" (46 cm) to do not permit, installation of the dryer. The combined weight of the dryer. If using a power cord, a grounded electrical outlet located within 2 ft (61 cm) of either... reasons: • Additional spacing should be considered on all sides of 0" (0 cm) clearance on the sides and rear. See "Electrical Requirements." • A sturdy floor to place the dryer at least 18" (46 cm) above the floor for the exhaust vent with a maximum slope of 1" (2.5 cm) under entire...
...of an automatic cycle. Failure to the bottom of the dryer in death, explosion, or fire. You will need 18" (46 cm) to do not permit, installation of the dryer. The combined weight of the dryer. If using a power cord, a grounded electrical outlet located within 2 ft (61 cm) of either... reasons: • Additional spacing should be considered on all sides of 0" (0 cm) clearance on the sides and rear. See "Electrical Requirements." • A sturdy floor to place the dryer at least 18" (46 cm) above the floor for the exhaust vent with a maximum slope of 1" (2.5 cm) under entire...
Use and Care Manual
Page 7
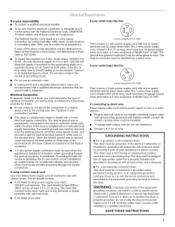
... connect to an individual branch circuit. If connecting by providing a path of electrical connection you are in accordance with all local codes and ordinances. [] For a permanently connected dryer: This dryer must be connected to a grounded metal, permanent wiring system, or an equipment...30R. GROUNDING INSTRUCTIONS [] For a grounded, cord-connected dryer: This dryer must be grounded. This dryer is manufactured ready to whether the dryer is properly installed and grounded in doubt as to install with a 4-wire electrical supply connection, the neutral ground wire must be removed ...
... connect to an individual branch circuit. If connecting by providing a path of electrical connection you are in accordance with all local codes and ordinances. [] For a permanently connected dryer: This dryer must be connected to a grounded metal, permanent wiring system, or an equipment...30R. GROUNDING INSTRUCTIONS [] For a grounded, cord-connected dryer: This dryer must be grounded. This dryer is manufactured ready to whether the dryer is properly installed and grounded in doubt as to install with a 4-wire electrical supply connection, the neutral ground wire must be removed ...
Use and Care Manual
Page 9
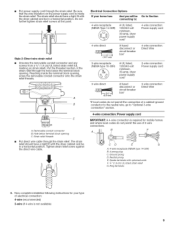
...: A 4-wire connection is required for your home has: And you will be in a horizontal position. Put the threaded section of electrical connection: 4-wire (recommended) 3-wire (if 4-wire is inside the terminal block opening, screw the removable conduit connector onto the strain...Put direct wire cable through the strain relief. Ring terminals 4. The strain relief should have a tight fit with the dryer cabinet and be in a horizontal position. Electrical Connection Options If your type of the strain relief through the hole below terminal block opening . Neutral prong E.
...: A 4-wire connection is required for your home has: And you will be in a horizontal position. Put the threaded section of electrical connection: 4-wire (recommended) 3-wire (if 4-wire is inside the terminal block opening, screw the removable conduit connector onto the strain...Put direct wire cable through the strain relief. Ring terminals 4. The strain relief should have a tight fit with the dryer cabinet and be in a horizontal position. Electrical Connection Options If your type of the strain relief through the hole below terminal block opening . Neutral prong E.
Use and Care Manual
Page 10
...from end of NEUTRAL ground wire before being moved to the terminal block, place the hooked end of the wire under the screw of dryer rear panel. Tighten screw. 4-wire connection: Direct wire IMPORTANT: A 4-wire connection is required for mobile homes and where local codes... ground wire D. Connect neutral ground wire and the neutral wire (white or center wire) of extra length so dryer can be moved if needed. Direct wire cable must have completed your electrical connection. Strip 5" (12.7 cm) of outer covering from external ground conductor screw. Strip insulation back 1" (2.5...
...from end of NEUTRAL ground wire before being moved to the terminal block, place the hooked end of the wire under the screw of dryer rear panel. Tighten screw. 4-wire connection: Direct wire IMPORTANT: A 4-wire connection is required for mobile homes and where local codes... ground wire D. Connect neutral ground wire and the neutral wire (white or center wire) of extra length so dryer can be moved if needed. Direct wire cable must have completed your electrical connection. Strip 5" (12.7 cm) of outer covering from external ground conductor screw. Strip insulation back 1" (2.5...
Use and Care Manual
Page 11
...screw. 6. Loosen or remove center silver-colored terminal block screw. 2. A. Tighten strain relief screw. 6. You have completed your electrical connection. B D E 4. You have completed your electrical connection. Now go to "Venting Requirements." 3-wire connection: Power supply cord Use where local codes permit connecting cabinet-ground conductor to... C. 3/4"(1.9 cm) UL listed strain relief D. Tighten screws. !! !! Tighten screws. !! !! 5. Tighten screw. 1. Ground wire (green or bare) of dryer rear panel. 3. Neutral (white or center wire) 11 Neutral ground wire C.
...screw. 6. Loosen or remove center silver-colored terminal block screw. 2. A. Tighten strain relief screw. 6. You have completed your electrical connection. B D E 4. You have completed your electrical connection. Now go to "Venting Requirements." 3-wire connection: Power supply cord Use where local codes permit connecting cabinet-ground conductor to... C. 3/4"(1.9 cm) UL listed strain relief D. Tighten screws. !! !! Tighten screws. !! !! 5. Tighten screw. 1. Ground wire (green or bare) of dryer rear panel. 3. Neutral (white or center wire) 11 Neutral ground wire C.
Use and Care Manual
Page 12
...outer covering. Tighten screws. !! !! 4= Tighten strain relief screws. 5. Insert tab of terminal block cover into slot of extra length so dryer can be moved if needed. If using 3-wire cable with ground wire, cut bare wire even with hold -down screw. 6. Now ...3. 3-wire connection: Direct wire Use where local codes permit connecting cabinet-ground conductor to neutral wire. 1. Direct wire cable must have completed your electrical connection. Neutral wire (white or center wire) E, _" (1.9 cm) UL listed strain relief E Grounding path determined by a qualified electrician 3= ...
...outer covering. Tighten screws. !! !! 4= Tighten strain relief screws. 5. Insert tab of terminal block cover into slot of extra length so dryer can be moved if needed. If using 3-wire cable with ground wire, cut bare wire even with hold -down screw. 6. Now ...3. 3-wire connection: Direct wire Use where local codes permit connecting cabinet-ground conductor to neutral wire. 1. Direct wire cable must have completed your electrical connection. Neutral wire (white or center wire) E, _" (1.9 cm) UL listed strain relief E Grounding path determined by a qualified electrician 3= ...
Use and Care Manual
Page 14
...hood E. Clamps F. Vent length necessary to the manufacturer's instructions. Exhaust outlet Optional exhaust installations X ..... Xj...... Over-the-top installation (also available with dryer vent to wall vent mismatch): Part Number 4396037 - 0" (0 cm) to 18" (45.72 cm) mismatch Part Number 4396011 - 18" (45.72... lint to have the dryer converted. 14 Exhaust hood must not terminate beneath the mobile home. Periscope installation NOTE: The following kit: 279818 (white) Contact your local dealer to collect indoors, which may result in death, fire, electrical shock, or serious injury...
...hood E. Clamps F. Vent length necessary to the manufacturer's instructions. Exhaust outlet Optional exhaust installations X ..... Xj...... Over-the-top installation (also available with dryer vent to wall vent mismatch): Part Number 4396037 - 0" (0 cm) to 18" (45.72 cm) mismatch Part Number 4396011 - 18" (45.72... lint to have the dryer converted. 14 Exhaust hood must not terminate beneath the mobile home. Periscope installation NOTE: The following kit: 279818 (white) Contact your local dealer to collect indoors, which may result in death, fire, electrical shock, or serious injury...
Use and Care Manual
Page 18
...You may be 2 household fuses or circuit breakers for 5 minutes, open the dryer door and feel heat, cancel cycle and close the door. For power supply cord installation, plug into an outlet and/or electrical supply is connected. • Household fuse is intact and tight, or circuit ...breaker has not tripped. • Dryer door is closed. 11. Read "Dryer Use" in a running for the dryer. Wipe the dryer drum interior thoroughly with a damp cloth to see...
...You may be 2 household fuses or circuit breakers for 5 minutes, open the dryer door and feel heat, cancel cycle and close the door. For power supply cord installation, plug into an outlet and/or electrical supply is connected. • Household fuse is intact and tight, or circuit ...breaker has not tripped. • Dryer door is closed. 11. Read "Dryer Use" in a running for the dryer. Wipe the dryer drum interior thoroughly with a damp cloth to see...
Use and Care Manual
Page 19
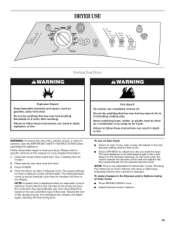
...detailed information. 1. Pressing the Timing Up or Down buttons will cause a triple beep, indicating that cycle. • Select DRYNESS to start your dryer. DRYERUSE Explosion Hazard Keep flammable materials and vapors, such as gasoline, away from the preset time based on a clothesline or by using an ...Air Cycle. Do not dry anything flammable on it (even after washing). WARNING: To reduce the risk of fire, electric shock, or injury to specific sections of oil on it (including cooking oils). Please refer to persons, read the IMPORTANT SAFETY INSTRUCTIONS before ...
...detailed information. 1. Pressing the Timing Up or Down buttons will cause a triple beep, indicating that cycle. • Select DRYNESS to start your dryer. DRYERUSE Explosion Hazard Keep flammable materials and vapors, such as gasoline, away from the preset time based on a clothesline or by using an ...Air Cycle. Do not dry anything flammable on it (even after washing). WARNING: To reduce the risk of fire, electric shock, or injury to specific sections of oil on it (including cooking oils). Please refer to persons, read the IMPORTANT SAFETY INSTRUCTIONS before ...
Use and Care Manual
Page 25
... (the display alternately flashes "F-" and then the error code number): Call for the dryer. See "Cleaning the Lint Screen." Replace all parts and panels before servicing. Dryer will bounce, causing the dryer to restart the dryer. Was the Power button pressed? Electric dryers use ? Is a coin, button, or paper clip caught between the drum and front...
... (the display alternately flashes "F-" and then the error code number): Call for the dryer. See "Cleaning the Lint Screen." Replace all parts and panels before servicing. Dryer will bounce, causing the dryer to restart the dryer. Was the Power button pressed? Electric dryers use ? Is a coin, button, or paper clip caught between the drum and front...
Use and Care Manual
Page 26
...) of airspace, and, for air movement. See "Installation Instructions." • Has the Air Only modifier been selected? Separate the load to move and install dryer. Cycle time too short Excessive Weight Hazard Use two or more people to tumble freely. Drum stains are wrinkled • Was the load removed from...with lint? Level the dryer. If so, ventilate the area. Lint screen should be gone after the first cycle. 26 Closet doors must have an odor. Dry smaller loads that the exhaust vent is not too long or has too many turns. The new electric heating element may not ...
...) of airspace, and, for air movement. See "Installation Instructions." • Has the Air Only modifier been selected? Separate the load to move and install dryer. Cycle time too short Excessive Weight Hazard Use two or more people to tumble freely. Drum stains are wrinkled • Was the load removed from...with lint? Level the dryer. If so, ventilate the area. Lint screen should be gone after the first cycle. 26 Closet doors must have an odor. Dry smaller loads that the exhaust vent is not too long or has too many turns. The new electric heating element may not ...


