Use and Care Manual
Page 1
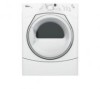
ELECTRONIC ELECTRIC DRYER For questions about features, operation/performance, accessories or service, call: 1-800-253-1301 or visit our website at... www.whidpooLcom parts, Table of Contents 2 8578899
ELECTRONIC ELECTRIC DRYER For questions about features, operation/performance, accessories or service, call: 1-800-253-1301 or visit our website at... www.whidpooLcom parts, Table of Contents 2 8578899
Use and Care Manual
Page 2
... Requirements 5 Electrical Requirements 7 Electrical Connection 8 Venting Requirements 13 Plan Vent System 14 Install Vent System 15 Install Leveling Legs 15 Connect Vent 16 Level Dryer 16 Reverse Door Swing 16 Complete Installation 18 DRYER USE 19 Starting Your Dryer 19 Stopping or Restarting Your Dryer 20 Lock... Tips 20 Status Lights 21 Cycles 21 Additional Features 22 Changing Cycles, Options and Modifiers 23 Drying Rack 23 DRYER CARE 24 Cleaning the Dryer Location 24 Cleaning the Lint Screen 24 Cleaning the Dryer Interior 24 Removing Accumulated Lint 25 Vacation and ...
... Requirements 5 Electrical Requirements 7 Electrical Connection 8 Venting Requirements 13 Plan Vent System 14 Install Vent System 15 Install Leveling Legs 15 Connect Vent 16 Level Dryer 16 Reverse Door Swing 16 Complete Installation 18 DRYER USE 19 Starting Your Dryer 19 Stopping or Restarting Your Dryer 20 Lock... Tips 20 Status Lights 21 Cycles 21 Additional Features 22 Changing Cycles, Options and Modifiers 23 Drying Rack 23 DRYER CARE 24 Cleaning the Dryer Location 24 Cleaning the Lint Screen 24 Cleaning the Dryer Interior 24 Removing Accumulated Lint 25 Vacation and ...
Use and Care Manual
Page 20
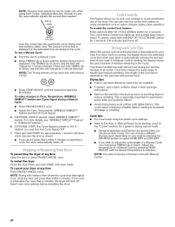
... displayed is interrupted for 3 seconds. Press and hold START for your settings to Time, Temperature, WRINKLE SHIELD TM feature and Cycle Signal during the last few minutes of the dryer. If an Auto Cycle is closed. • If you to lock your load. To use of all cycles.... STEP) The Cycle Signal is especially important for 3 seconds. NOTE: Drying will shut off. Press TIMING Up or Down until dryer starts. This feature allows you do not press Start within 5 minutes. You can choose a different dryness level, depending on the load size and dryness ...
... displayed is interrupted for 3 seconds. Press and hold START for your settings to Time, Temperature, WRINKLE SHIELD TM feature and Cycle Signal during the last few minutes of the dryer. If an Auto Cycle is closed. • If you to lock your load. To use of all cycles.... STEP) The Cycle Signal is especially important for 3 seconds. NOTE: Drying will shut off. Press TIMING Up or Down until dryer starts. This feature allows you do not press Start within 5 minutes. You can choose a different dryness level, depending on the load size and dryness ...
Use and Care Manual
Page 21
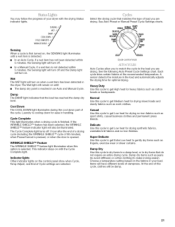
... Complete This light illuminates when a drying cycle is reached in the dryer. If the WRINKLE SHIELD TM feature has been selected, the WRINKLE SHIELD TM feature indicator light will remain on the fabrics in your dryer with the Cycle Complete light. See the following Auto Preset Cycle Settings... certain fabrics at the recommended temperature. This indicator stays on . Super Delicate Use this cycle to gently dry items such as sport shirts, casual business clothes and permanent press blends. Select the drying cycle that matches the type of load you to match the...
... Complete This light illuminates when a drying cycle is reached in the dryer. If the WRINKLE SHIELD TM feature has been selected, the WRINKLE SHIELD TM feature indicator light will remain on the fabrics in your dryer with the Cycle Complete light. See the following Auto Preset Cycle Settings... certain fabrics at the recommended temperature. This indicator stays on . Super Delicate Use this cycle to gently dry items such as sport shirts, casual business clothes and permanent press blends. Select the drying cycle that matches the type of load you to match the...
Use and Care Manual
Page 22
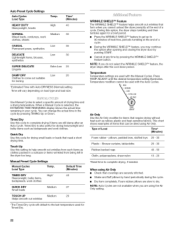
... Dry Use this setting to select a specific amount of a cycle. • During the WRINKLE SHIELD TM feature, you do not select the WRINKLE SHIELD TM feature, the dryer stops after an Auto Cycle. Touch Up Use this cycle to come out suitable for drying small loads or ...When using the Air Only setting. 22 NOTE: Auto Cycles are securely stitched. • Shake and fluff pillows by pressing the WRINKLE SHIELD TM feature button. Type of Load Time* (Minutes) Foam rubber - Press TEMP ADJUST until the desired temperature setting illuminates. Shower curtains, tablecloths 20 -...
... Dry Use this setting to select a specific amount of a cycle. • During the WRINKLE SHIELD TM feature, you do not select the WRINKLE SHIELD TM feature, the dryer stops after an Auto Cycle. Touch Up Use this cycle to come out suitable for drying small loads or ...When using the Air Only setting. 22 NOTE: Auto Cycles are securely stitched. • Shake and fluff pillows by pressing the WRINKLE SHIELD TM feature button. Type of Load Time* (Minutes) Foam rubber - Press TEMP ADJUST until the desired temperature setting illuminates. Shower curtains, tablecloths 20 -...
Use and Care Manual
Page 23
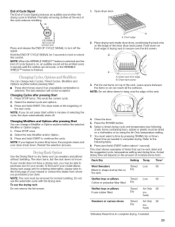
...START to continue the cycle, NOTE: If you may be emitted every 5 minutes until the clothes are removed, or the WRINKLE SHIELD TM feature is finished. Leave space between the items so air can change Auto Cycles, Timed Cycles, Modifiers and Options anytime before the selected Modifier ... selection will be able to complete drying. Changing Modifiers and Options after pressing Start 1. Select the new Modifier and/or Option. 3. Dryer rack front edge B. Dryer back panel 3. Put the wet items on Dry the rack. This chart shows examples of items that can change a Modifier or Option...
...START to continue the cycle, NOTE: If you may be emitted every 5 minutes until the clothes are removed, or the WRINKLE SHIELD TM feature is finished. Leave space between the items so air can change Auto Cycles, Timed Cycles, Modifiers and Options anytime before the selected Modifier ... selection will be able to complete drying. Changing Modifiers and Options after pressing Start 1. Select the new Modifier and/or Option. 3. Dryer rack front edge B. Dryer back panel 3. Put the wet items on Dry the rack. This chart shows examples of items that can change a Modifier or Option...
Use and Care Manual
Page 27
...9991 and follow the instructions below. This information will fit right and work right because they are made with : • Features and specifications on our full line of appliances • Installation information • Use and maintenance procedures • Accessory and...(Spanish speaking, hearing impaired, limited vision, etc.) • Referrals to local dealers, repair parts distributors, and service companies Whirlpool designated service technicians are trained to your appliance. ASSISTANCEOR SERVICE Before calling for assistance or service, please check "Troubleshooting." It ...
...9991 and follow the instructions below. This information will fit right and work right because they are made with : • Features and specifications on our full line of appliances • Installation information • Use and maintenance procedures • Accessory and...(Spanish speaking, hearing impaired, limited vision, etc.) • Referrals to local dealers, repair parts distributors, and service companies Whirlpool designated service technicians are trained to your appliance. ASSISTANCEOR SERVICE Before calling for assistance or service, please check "Troubleshooting." It ...