Owners Manual
Page 5
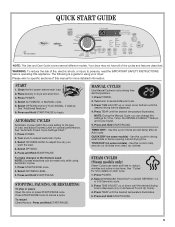
... 3. Press START/PAUSE once. 2. MANUAL CYCLES Use Manual Cycles to desired Manual Cycle. 3. Use this appliance. STEAM CYCLES (Steam models only) Steam Cycles use water and heat to using Automatic Cycles. 1. Select OPTIONS and/or CYCLE SIGNAL, if desired. Select OPTIONS.... 5. TIMED DRY - TOUCH UP (on some models) - Select ENHANCED TOUCH UP or QUICK REFRESH 1-4 or 5-8 Garments cycle. 3. The following is displayed. 4. See "Additional Features." 6. Place...
... 3. Press START/PAUSE once. 2. MANUAL CYCLES Use Manual Cycles to desired Manual Cycle. 3. Use this appliance. STEAM CYCLES (Steam models only) Steam Cycles use water and heat to using Automatic Cycles. 1. Select OPTIONS and/or CYCLE SIGNAL, if desired. Select OPTIONS.... 5. TIMED DRY - TOUCH UP (on some models) - Select ENHANCED TOUCH UP or QUICK REFRESH 1-4 or 5-8 Garments cycle. 3. The following is displayed. 4. See "Additional Features." 6. Place...
Owners Manual
Page 6
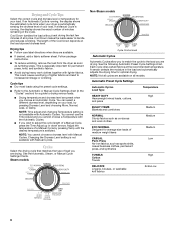
... cycles are drying. Cool Down tumbles the load without heat during the last few minutes of all models. You cannot use the Time Adjust and you cannot choose a Temperature with Manual Cycles. Steam models Non-Steam models Cycle Control knob Automatic Cycles Automatic Cycles allow you choose an Automatic Cycle. See the following...
... cycles are drying. Cool Down tumbles the load without heat during the last few minutes of all models. You cannot use the Time Adjust and you cannot choose a Temperature with Manual Cycles. Steam models Non-Steam models Cycle Control knob Automatic Cycles Automatic Cycles allow you choose an Automatic Cycle. See the following...
Owners Manual
Page 7
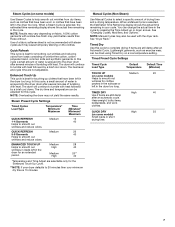
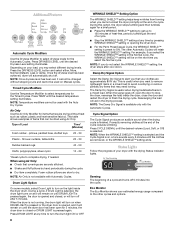
... drying temperature. Timed Preset Cycle Settings Timed Cycle Load Type Default Default Time Temperature (Minutes) TOUCH UP Medium 20 (on some models) Helps to smooth out wrinkles for this cycle to complete drying if items are selectable only for an extended period. The heat ...time remaining in the dryer too long. NOTE: Overloading the dryer may cause temporary staining on the clothes. Steam Cycles (on some models) Use Steam Cycles to help smooth out wrinkles from loads consisting of wrinkle-free cotton, cottonpolyester blend, common knits and synthetic garments...
... drying temperature. Timed Preset Cycle Settings Timed Cycle Load Type Default Default Time Temperature (Minutes) TOUCH UP Medium 20 (on some models) Helps to smooth out wrinkles for this cycle to complete drying if items are selectable only for an extended period. The heat ...time remaining in the dryer too long. NOTE: Overloading the dryer may cause temporary staining on the clothes. Steam Cycles (on some models) Use Steam Cycles to help smooth out wrinkles from loads consisting of wrinkle-free cotton, cottonpolyester blend, common knits and synthetic garments...
Owners Manual
Page 8
... is pressed or the dryer door is selected. Foam rubber pillows are removed, or the WRINKLE SHIELD™ setting ends. Drum Light Option On some models, select Drum Light to select dryness levels for 5 minutes, the dryer door is useful when drying bedsheets/linens in the drying process. When the dryer...
... is pressed or the dryer door is selected. Foam rubber pillows are removed, or the WRINKLE SHIELD™ setting ends. Drum Light Option On some models, select Drum Light to select dryness levels for 5 minutes, the dryer door is useful when drying bedsheets/linens in the drying process. When the dryer...
Owners Manual
Page 9
...cycles. Press the POWER button. 6. Press START/PAUSE to complete drying. The drying setting you do not press Start within 5 minutes of your model does not have a drying rack, you may change Automatic and Manual Cycles, Modifiers, and Options anytime before the selected Option or Modifier begins.... 1. To find out whether your model allows drying rack usage and for all of selecting the cycle, the dryer automatically shuts off. The dryer starts at the front of the...
...cycles. Press the POWER button. 6. Press START/PAUSE to complete drying. The drying setting you do not press Start within 5 minutes of your model does not have a drying rack, you may change Automatic and Manual Cycles, Modifiers, and Options anytime before the selected Option or Modifier begins.... 1. To find out whether your model allows drying rack usage and for all of selecting the cycle, the dryer automatically shuts off. The dryer starts at the front of the...

Owners Manual
Page 11
...cover. Make sure leveling legs are found. Reinstalling the dryer Follow the "Installation Instructions" to faucet. The LED lights should : 1. Gas Models: Close shutoff valve in the lower right corner of hose failure. Transport hose separately. 4. Disconnect water inlet hose from faucet, then drain ...hose. Reconnect water inlet hose to locate, level, and connect the dryer. 3. Remove the screw located in gas supply line. 3. Steam Models Only: Turn off water faucet. 3. Flush water pipes. Vacation, Storage, and Moving Care Install and store your dryer where it . Vacation...
...cover. Make sure leveling legs are found. Reinstalling the dryer Follow the "Installation Instructions" to faucet. The LED lights should : 1. Gas Models: Close shutoff valve in the lower right corner of hose failure. Transport hose separately. 4. Disconnect water inlet hose from faucet, then drain ...hose. Reconnect water inlet hose to locate, level, and connect the dryer. 3. Remove the screw located in gas supply line. 3. Steam Models Only: Turn off water faucet. 3. Flush water pipes. Vacation, Storage, and Moving Care Install and store your dryer where it . Vacation...

Owners Manual
Page 12
..." in the Installation Instructions for details. Check to vibrate. Confirm the exterior vent exhaust hood is free of lint and debris. In Canada www.whirlpool.ca Dryer Operation Dryer will bounce, causing the dryer to see if a household fuse has blown or circuit breaker has tripped. Use a time...the Start button firmly pressed? Separate the load items and restart the dryer. Press and hold START/PAUSE to run from turning on gas models? Confirm the vent run when this diagnostic code is crushed or kinked. In the U.S.A., Confirm the power cord is the dryer level front ...
..." in the Installation Instructions for details. Check to vibrate. Confirm the exterior vent exhaust hood is free of lint and debris. In Canada www.whirlpool.ca Dryer Operation Dryer will bounce, causing the dryer to see if a household fuse has blown or circuit breaker has tripped. Use a time...the Start button firmly pressed? Separate the load items and restart the dryer. Press and hold START/PAUSE to run from turning on gas models? Confirm the vent run when this diagnostic code is crushed or kinked. In the U.S.A., Confirm the power cord is the dryer level front ...
Owners Manual
Page 14
...Refer to help smooth out wrinkles from dryer at the beginning of the cycle? Fabric softener sheets added to the dryer for Steam models? Check that can stain your dryer is connected to other clothing. Dry clean only garments are best for reducing odors from loads ...from loads consisting of wrinkle-free cotton, cotton polyester blends, common knits, and synthetics. 14 Loads are still wrinkled following Steam cycle on Steam models? Odors ■ Have you recently been painting, staining, or varnishing in garments after the first cycle. ■ Is water connected to a...
...Refer to help smooth out wrinkles from dryer at the beginning of the cycle? Fabric softener sheets added to the dryer for Steam models? Check that can stain your dryer is connected to other clothing. Dry clean only garments are best for reducing odors from loads ...from loads consisting of wrinkle-free cotton, cotton polyester blends, common knits, and synthetics. 14 Loads are still wrinkled following Steam cycle on Steam models? Odors ■ Have you recently been painting, staining, or varnishing in garments after the first cycle. ■ Is water connected to a...
Owners Manual
Page 15
... wiring or plumbing. 3. Some states and provinces do not allow limitations on major appliances with the product, Whirlpool Corporation or Whirlpool Canada LP (hereafter "Whirlpool") will need repair service, first see the "Troubleshooting" section of incidental or consequential damages, so these limitations... from defects in accordance with electrical or plumbing codes, or use your complete model number and serial number. Service must provide proof of products not approved by a Whirlpool designated service company. This limited warranty is valid only in the United States ...
... wiring or plumbing. 3. Some states and provinces do not allow limitations on major appliances with the product, Whirlpool Corporation or Whirlpool Canada LP (hereafter "Whirlpool") will need repair service, first see the "Troubleshooting" section of incidental or consequential damages, so these limitations... from defects in accordance with electrical or plumbing codes, or use your complete model number and serial number. Service must provide proof of products not approved by a Whirlpool designated service company. This limited warranty is valid only in the United States ...
Dimension Guide
Page 1
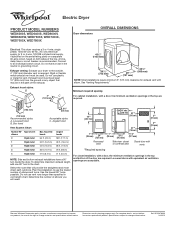
... styles: A. Louvered doors with a door, the minimum ventilation openings in the top and bottom of elbows and turns. Because Whirlpool Corporation policy includes a continuous commitment to improve our products, we reserve the right to change materials and specifications without notice. Do... path outdoors. A timedelay fuse or circuit breaker is required. Do not use plastic or metal foil vent. Electric Dryer PRODUCT MODEL NUMBERS WED6200S, WED6400S, WED6600V, WED6600W, WED7300X, WED7400X, WED7600X, WED7800X Dryer dimensions OVERALL DIMENSIONS Electrical: This dryer requires a 3...
... styles: A. Louvered doors with a door, the minimum ventilation openings in the top and bottom of elbows and turns. Because Whirlpool Corporation policy includes a continuous commitment to improve our products, we reserve the right to change materials and specifications without notice. Do... path outdoors. A timedelay fuse or circuit breaker is required. Do not use plastic or metal foil vent. Electric Dryer PRODUCT MODEL NUMBERS WED6200S, WED6400S, WED6600V, WED6600W, WED7300X, WED7400X, WED7600X, WED7800X Dryer dimensions OVERALL DIMENSIONS Electrical: This dryer requires a 3...
Installation Instructions
Page 3
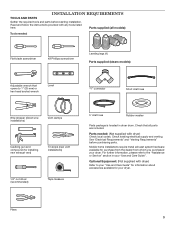
... for purchase from the dealer from whom you purchased your dryer. Parts needed : Flat-blade screwdriver #2 Phillips screwdriver Leveling legs (4) Parts supplied (steam models): Adjustable wrench that all models): Tools needed : (Not supplied with dryer) Check local codes. Parts supplied (all parts are included. For further information, please refer to 1" (25 mm...
... for purchase from the dealer from whom you purchased your dryer. Parts needed : Flat-blade screwdriver #2 Phillips screwdriver Leveling legs (4) Parts supplied (steam models): Adjustable wrench that all models): Tools needed : (Not supplied with dryer) Check local codes. Parts supplied (all parts are included. For further information, please refer to 1" (25 mm...
Installation Instructions
Page 4
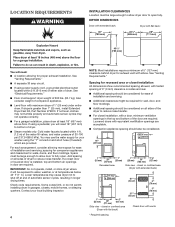
... on all sides of installation and servicing. ■■ Additional clearances might be large enough to allow door to bottom of dryer. ■■ Steam models only: Cold water faucets located within 2 ft. (610 mm) of either side of 5" (127 mm) clearance behind dryer for walls, doors, and floor moldings. Check...
... on all sides of installation and servicing. ■■ Additional clearances might be large enough to allow door to bottom of dryer. ■■ Steam models only: Cold water faucets located within 2 ft. (610 mm) of either side of 5" (127 mm) clearance behind dryer for walls, doors, and floor moldings. Check...
Installation Instructions
Page 13
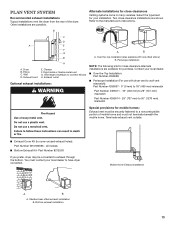
... exhaust installations Typical installations vent the dryer from the rear of mobile home and must contact your installation. Exhaust outlet Optional exhaust installations: A B A. B C D A E F G B H A. Wall D. all models ■■ Bottom Exhaust Kit- Vent length necessary to the manufacturer's instructions. Exhaust hood E. Clamps F. Standard rear offset exhaust installation B. Periscope installation NOTE: The following...
... exhaust installations Typical installations vent the dryer from the rear of mobile home and must contact your installation. Exhaust outlet Optional exhaust installations: A B A. B C D A E F G B H A. Wall D. all models ■■ Bottom Exhaust Kit- Vent length necessary to the manufacturer's instructions. Exhaust hood E. Clamps F. Standard rear offset exhaust installation B. Periscope installation NOTE: The following...
Installation Instructions
Page 14
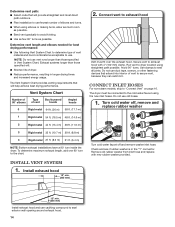
... provides venting requirements that will : ■■ Shorten life of dryer. ■■ Reduce performance, resulting in the "Y" connector. CONNECT INLET HOSES For non-steam models, skip to avoid kinking. ■■ Use as few 90° turns as possible. ■■ Bend vent gradually to "Connect Vent" on page 16...
... provides venting requirements that will : ■■ Shorten life of dryer. ■■ Reduce performance, resulting in the "Y" connector. CONNECT INLET HOSES For non-steam models, skip to avoid kinking. ■■ Use as few 90° turns as possible. ■■ Bend vent gradually to "Connect Vent" on page 16...

Installation Instructions
Page 17
... Check that all parts are now installed. See "Level Dryer". q Wipe dryer drum interior thoroughly with a damp cloth to see what was skipped. Steam models only: q Be sure the water faucets are set in a running or "On" position. • Start button has been pushed firmly. • Dryer... opening to a left where the hinges were removed in Step 2. See "Troubleshooting". q For power supply cord installation, plug into a grounded outlet. All Models: q Select a Time Dry heated cycle, and start of its first cycle. If you receive an AF code, your dryer vent may clog different parts ...
... Check that all parts are now installed. See "Level Dryer". q Wipe dryer drum interior thoroughly with a damp cloth to see what was skipped. Steam models only: q Be sure the water faucets are set in a running or "On" position. • Start button has been pushed firmly. • Dryer... opening to a left where the hinges were removed in Step 2. See "Troubleshooting". q For power supply cord installation, plug into a grounded outlet. All Models: q Select a Time Dry heated cycle, and start of its first cycle. If you receive an AF code, your dryer vent may clog different parts ...

Warranty
Page 1
... This limited warranty does not cover: 1. You can be repaired in your major appliance is located in a remote area where service by Whirlpool. 5. Dealer name Address Phone number Model number Serial number Purchase date 15 YOUR SOLE AND EXCLUSIVE REMEDY UNDER THIS LIMITED WARRANTY SHALL BE PRODUCT REPAIR AS PROVIDED HEREIN. In...
... This limited warranty does not cover: 1. You can be repaired in your major appliance is located in a remote area where service by Whirlpool. 5. Dealer name Address Phone number Model number Serial number Purchase date 15 YOUR SOLE AND EXCLUSIVE REMEDY UNDER THIS LIMITED WARRANTY SHALL BE PRODUCT REPAIR AS PROVIDED HEREIN. In...


