Owners Manual
Page 2
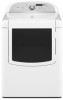
DRYER SAFETY Your safety and the safety of injury, and tell you what the potential hazard is the safety alert symbol. WARNING You can be killed ...
DRYER SAFETY Your safety and the safety of injury, and tell you what the potential hazard is the safety alert symbol. WARNING You can be killed ...
Owners Manual
Page 3
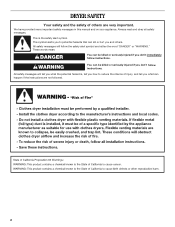
... that you smell gas" instructions. 3 Installation and service must be electrically grounded in accordance with local codes, or in this or any electrical switch; The dryer must be performed by smell. WARNING: Gas leaks cannot always be detected by a qualified installer, service agency, or the gas supplier. For more information, contact...
... that you smell gas" instructions. 3 Installation and service must be electrically grounded in accordance with local codes, or in this or any electrical switch; The dryer must be performed by smell. WARNING: Gas leaks cannot always be detected by a qualified installer, service agency, or the gas supplier. For more information, contact...
Owners Manual
Page 4
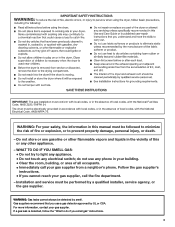
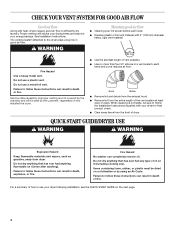
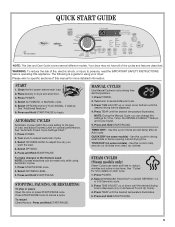
...). Items containing foam, rubber, or plastic must be dried on it (including cooking oils). Do not use a plastic vent. QUICK START GUIDE/DRYER USE WARNING WARNING Explosion Hazard Keep flammable materials and vapors, such as gasoline, away from the entire length of vent possible. ■ Use no...curve reduces air flow. Failure to follow these instructions can result in death, explosion, or fire. Failure to use your dryer for final product check. ■ Clear away items from the front of dryer. CHECK YOUR VENT SYSTEM FOR GOOD AIR FLOW Good air flow Along with heat...
...). Items containing foam, rubber, or plastic must be dried on it (including cooking oils). Do not use a plastic vent. QUICK START GUIDE/DRYER USE WARNING WARNING Explosion Hazard Keep flammable materials and vapors, such as gasoline, away from the entire length of vent possible. ■ Use no...curve reduces air flow. Failure to follow these instructions can result in death, explosion, or fire. Failure to use your dryer for final product check. ■ Clear away items from the front of dryer. CHECK YOUR VENT SYSTEM FOR GOOD AIR FLOW Good air flow Along with heat...
Owners Manual
Page 5
...Turn knob to using Automatic Cycles. 1. Press START/PAUSE once. 2. Use this cycle to cancel a cycle. Use this cycle for more detailed information. Your dryer may not have all of fire, electric shock, or injury to adjust how dry you can be made only while using your.../PAUSE. Press START/PAUSE twice to help smooth out wrinkles from clean, dry clothes. MANUAL CYCLES Use Manual Cycles to reduce wrinkles and odors in dryer and shut door. 3. STEAM CYCLES (Steam models only) Steam Cycles use water and heat to set a drying time and temperature. 1. Place laundry ...
...Turn knob to using Automatic Cycles. 1. Press START/PAUSE once. 2. Use this cycle to cancel a cycle. Use this cycle for more detailed information. Your dryer may not have all of fire, electric shock, or injury to adjust how dry you can be made only while using your.../PAUSE. Press START/PAUSE twice to help smooth out wrinkles from clean, dry clothes. MANUAL CYCLES Use Manual Cycles to reduce wrinkles and odors in dryer and shut door. 3. STEAM CYCLES (Steam models only) Steam Cycles use water and heat to set a drying time and temperature. 1. Place laundry ...
Owners Manual
Page 6
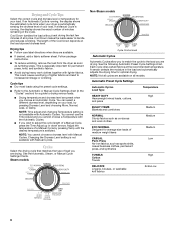
... tips ■ Follow care label directions when they are available on all models. Follow package instructions. ■ To reduce wrinkling, remove the load from the dryer as soon as corduroys and work clothes together with Manual Cycles. This could cause overdrying of all cycles are available. ■ If desired, add a fabric... the Automatic or Manual Cycle Settings chart (in the cycle. Drying and Cycle Tips Select the correct cycle and dryness level or temperature for your dryer is selected.
... tips ■ Follow care label directions when they are available on all models. Follow package instructions. ■ To reduce wrinkling, remove the load from the dryer as soon as corduroys and work clothes together with Manual Cycles. This could cause overdrying of all cycles are available. ■ If desired, add a fabric... the Automatic or Manual Cycle Settings chart (in the cycle. Drying and Cycle Tips Select the correct cycle and dryness level or temperature for your dryer is selected.
Owners Manual
Page 7
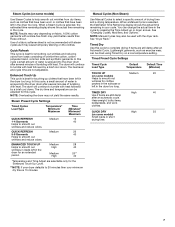
...drying time. 7 In this cycle to complete drying if items are selectable only for the Enhanced Touch Up Cycle. **NOTE: If your dryer defaults to smooth out wrinkles and reduce odors. QUICK REFRESH 5-8 Garments Helps to 20 minutes then your cycle. See "Changing Cycles, Modifiers... temperature. The dry time and temperature can change the actual time in the cycle by a brief cool down arrows. NOTE: Overloading the dryer may cause temporary staining on a low temperature setting. Manual Cycles (Non-Steam) Use Manual Cycles to select a specific amount of wrinkle-free...
...drying time. 7 In this cycle to complete drying if items are selectable only for the Enhanced Touch Up Cycle. **NOTE: If your dryer defaults to smooth out wrinkles and reduce odors. QUICK REFRESH 5-8 Garments Helps to 20 minutes then your cycle. See "Changing Cycles, Modifiers... temperature. The dry time and temperature can change the actual time in the cycle by a brief cool down arrows. NOTE: Overloading the dryer may cause temporary staining on a low temperature setting. Manual Cycles (Non-Steam) Use Manual Cycles to select a specific amount of wrinkle-free...
Owners Manual
Page 8
... of heat-free, periodic tumbling at any time by hand periodically during the cycle. ■ Dry item completely. During this option, the dryer stops tumbling and then tumbles again for items that may select different drying levels. NOTE: If you select the WRINKLE SHIELD™ setting in...to the other Automatic Cycles will aid in a mixed load. NOTE: Temperature modifiers cannot be dried using Air Only: ■ Check that your dryer with the Automatic Cycles. Press DRUM LIGHT at the end of a cycle and turns off , open for the Automatic Cycles. For example, if...
... of heat-free, periodic tumbling at any time by hand periodically during the cycle. ■ Dry item completely. During this option, the dryer stops tumbling and then tumbles again for items that may select different drying levels. NOTE: If you select the WRINKLE SHIELD™ setting in...to the other Automatic Cycles will aid in a mixed load. NOTE: Temperature modifiers cannot be dried using Air Only: ■ Check that your dryer with the Automatic Cycles. Press DRUM LIGHT at the end of a cycle and turns off , open for the Automatic Cycles. For example, if...
Owners Manual
Page 9
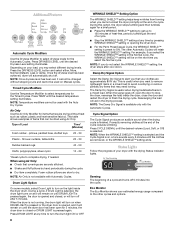
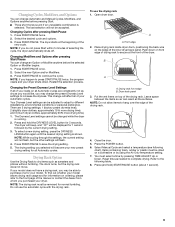
...again until the desired drying setting is running. 2. If your model does not have a drying rack, you purchased your Automatic cycles. Dryer back panel 3. Select the desired cycle and options. 3. Changing Modifiers and Options after pressing Start/Pause 1. The Dryness Level settings ...cannot be accepted. Place drying rack inside dryer drum, positioning the back wire on all of the drying rack. 4. NOTE: Do not allow items to different installations, environmental conditions ...
...again until the desired drying setting is running. 2. If your model does not have a drying rack, you purchased your Automatic cycles. Dryer back panel 3. Select the desired cycle and options. 3. Changing Modifiers and Options after pressing Start/Pause 1. The Dryness Level settings ...cannot be accepted. Place drying rack inside dryer drum, positioning the back wire on all of the drying rack. 4. NOTE: Do not allow items to different installations, environmental conditions ...
Owners Manual
Page 10
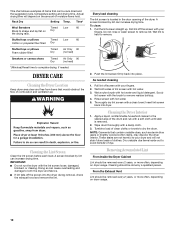
... with the brush to your fingers. 2. From the Exhaust Vent Lint should be removed every 2 years, or more often, depending on dryer usage. Cleaning the Lint Screen Clean the lint screen before each load. Time* Wool Sweaters Timed Low 60 Block to remove. 2. Pull...a liquid, nonflammable household cleaner to both sides of moisture items hold. Cleaning should be done by a qualified person. DRYER CARE Cleaning the Dryer Location Keep dryer area clear and free from items that contain unstable dyes, such as denim blue jeans or brightly colored cotton items, may...
... with the brush to your fingers. 2. From the Exhaust Vent Lint should be removed every 2 years, or more often, depending on dryer usage. Cleaning the Lint Screen Clean the lint screen before each load. Time* Wool Sweaters Timed Low 60 Block to remove. 2. Pull...a liquid, nonflammable household cleaner to both sides of moisture items hold. Cleaning should be done by a qualified person. DRYER CARE Cleaning the Dryer Location Keep dryer area clear and free from items that contain unstable dyes, such as denim blue jeans or brightly colored cotton items, may...

Owners Manual
Page 11
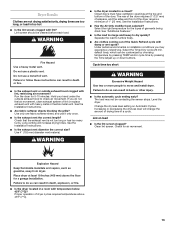
... death or electrical shock. 1. Steam models only: Disconnect the water inlet hose from faucet, then drain the hose. Unplug dryer or disconnect power. 2. Unplug dryer or disconnect power. 2. Remove the cover. Steam models only: Disconnect the water inlet hose from faucet, then drain the ... and panels before servicing. however, if replacement is used. Vacation, Storage, and Moving Care Install and store your dryer where it . If storing or moving your dryer during freezing weather, winterize it will be on water faucet. 2. If you should not require changing; Gas Models:...
... death or electrical shock. 1. Steam models only: Disconnect the water inlet hose from faucet, then drain the hose. Unplug dryer or disconnect power. 2. Unplug dryer or disconnect power. 2. Remove the cover. Steam models only: Disconnect the water inlet hose from faucet, then drain the ... and panels before servicing. however, if replacement is used. Vacation, Storage, and Moving Care Install and store your dryer where it . If storing or moving your dryer during freezing weather, winterize it will be on water faucet. 2. If you should not require changing; Gas Models:...

Owners Manual
Page 12
...In Canada www.whirlpool.ca Dryer Operation Dryer will bounce, causing the dryer to vibrate. Replace the fuse or reset the circuit breaker. The dryer may require pressing and holding the Start/Pause button for the dryer. Separate the load items and restart the dryer. The drum ...Clean lint screen. Refer to "Electrical Connection" in the Installation Instructions for details. Select a Timed Dry heated cycle, and restart the dryer. Refer to "Plan Vent System" in the Installation Instructions for details. There may be a problem with a qualified electrician. ■ ...
...In Canada www.whirlpool.ca Dryer Operation Dryer will bounce, causing the dryer to vibrate. Replace the fuse or reset the circuit breaker. The dryer may require pressing and holding the Start/Pause button for the dryer. Separate the load items and restart the dryer. The drum ...Clean lint screen. Refer to "Electrical Connection" in the Installation Instructions for details. Select a Timed Dry heated cycle, and restart the dryer. Refer to "Plan Vent System" in the Installation Instructions for details. There may be a problem with a qualified electrician. ■ ...
Owners Manual
Page 13
...and/or cycle time by pressing the Time Adjust up or down buttons. Failure to check air movement. Check for air movement. ■ Is the dryer located in death or fire. ■ Is the exhaust vent or outside exhaust hood to follow these instructions can result in a room with lint, ...restricting air movement? Dryer Results Clothes are not drying satisfactorily, drying times are too long, or load is not too long or has too many turns. See the Installation...
...and/or cycle time by pressing the Time Adjust up or down buttons. Failure to check air movement. Check for air movement. ■ Is the dryer located in death or fire. ■ Is the exhaust vent or outside exhaust hood to follow these instructions can result in a room with lint, ...restricting air movement? Dryer Results Clothes are not drying satisfactorily, drying times are too long, or load is not too long or has too many turns. See the Installation...
Owners Manual
Page 14
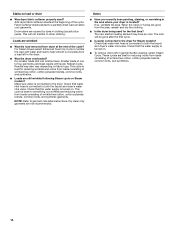
...9632; Have you recently been painting, staining, or varnishing in garments after the first cycle. ■ Is water connected to both the faucet and dryer's water inlet valve. If so, ventilate the area. When the odors or fumes are not recommended. The new electric heating element may also vary ... sheets added to four garments yield best results with water and heat to other clothing. Loads are caused by dyes in the dryer. ■ Was the dryer overloaded? Check that water inlet hose is best for smoothing out wrinkles and reducing odors from loads consisting of wrinkle-free cotton,...
...9632; Have you recently been painting, staining, or varnishing in garments after the first cycle. ■ Is water connected to both the faucet and dryer's water inlet valve. If so, ventilate the area. When the odors or fumes are not recommended. The new electric heating element may also vary ... sheets added to four garments yield best results with water and heat to other clothing. Loads are caused by dyes in the dryer. ■ Was the dryer overloaded? Check that water inlet hose is best for smoothing out wrinkles and reducing odors from loads consisting of wrinkle-free cotton,...
Dimension Guide
Page 1
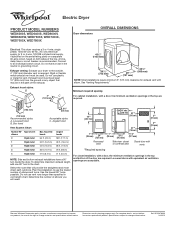
... clearance for planning purposes only. Louvered hood B. Use the fewest 90° turns possible. Louvered doors with product. Because Whirlpool Corporation policy includes a continuous commitment to improve our products, we reserve the right to change materials and specifications without notice. Ref...Plan the installation to the outside. 4" (102 mm) diameter vent is recommended. To determine maximum exhaust length, add one 90° turn inside the dryer. For closet installation, with vents 3 Rigid metal 35 ft. (10.7 m) 29 ft. (8.8 m) *Required spacing 4 Rigid metal 27 ft. ...
... clearance for planning purposes only. Louvered hood B. Use the fewest 90° turns possible. Louvered doors with product. Because Whirlpool Corporation policy includes a continuous commitment to improve our products, we reserve the right to change materials and specifications without notice. Ref...Plan the installation to the outside. 4" (102 mm) diameter vent is recommended. To determine maximum exhaust length, add one 90° turn inside the dryer. For closet installation, with vents 3 Rigid metal 35 ft. (10.7 m) 29 ft. (8.8 m) *Required spacing 4 Rigid metal 27 ft. ...
Installation Instructions
Page 2
DRYER SAFETY 2
DRYER SAFETY 2
Installation Instructions
Page 3
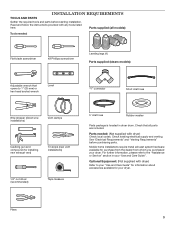
... (all parts are included. Check that opens to your "Use and Care Guide" for information about accessories available for your dryer. Pliers 3 Mobile home installations require metal exhuast system hardware available for installing new exhaust vent) Tin snips (new vent installations...) 1/4" nut driver (recommended) Tape measure 5' inlet hose Rubber washer Parts package is located in your dryer. Optional Equipment: (Not supplied with dryer) Refer to 1" (25 mm) or hex-head socket wrench Level "Y" connector Short inlet hose Wire stripper (direct wire...
... (all parts are included. Check that opens to your "Use and Care Guide" for information about accessories available for your dryer. Pliers 3 Mobile home installations require metal exhuast system hardware available for installing new exhaust vent) Tin snips (new vent installations...) 1/4" nut driver (recommended) Tape measure 5' inlet hose Rubber washer Parts package is located in your dryer. Optional Equipment: (Not supplied with dryer) Refer to 1" (25 mm) or hex-head socket wrench Level "Y" connector Short inlet hose Wire stripper (direct wire...
Installation Instructions
Page 4
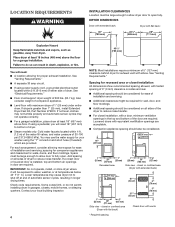
... (25 mm) 30" (783 mm) 5" (127 mm) Side view - You may not operate correctly. ■■ For a garage installation, place dryer at end of installation and servicing; If not level, clothes may not tumble properly and automatic sensor cycles may use the water supply for walls...clearances for your local building inspector. 4 NOTE: Most installations require a minimum of 20-100 psi (137.9-689.6 kPa). closet or confined area (Dryer with vents * Required spacing See "Venting Requirements." ■■ A separate 30 amp circuit. ■■ If using a pedestal, you will...
... (25 mm) 30" (783 mm) 5" (127 mm) Side view - You may not operate correctly. ■■ For a garage installation, place dryer at end of installation and servicing; If not level, clothes may not tumble properly and automatic sensor cycles may use the water supply for walls...clearances for your local building inspector. 4 NOTE: Most installations require a minimum of 20-100 psi (137.9-689.6 kPa). closet or confined area (Dryer with vents * Required spacing See "Venting Requirements." ■■ A separate 30 amp circuit. ■■ If using a pedestal, you will...
Installation Instructions
Page 5
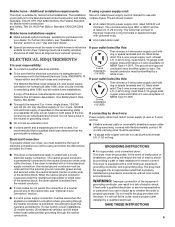
... shock. ELECTRICAL REQUIREMENTS It is your dealer. The neutral ground conductor is equipped with all local codes and ordinances. If the dryer is installed in accordance with a cord having an equipmentgrounding conductor and a grounding plug. Do not modify the plug provided with ... HUD Part 280) or Standard CAN/CSA-Z240 MH. GROUNDING INSTRUCTIONS � For a grounded, cord-connected dryer: This dryer must be plugged into dryer. The plug must conform to introduce outside air into an appropriate outlet that the electrical connection is prohibited. latest...
... shock. ELECTRICAL REQUIREMENTS It is your dealer. The neutral ground conductor is equipped with all local codes and ordinances. If the dryer is installed in accordance with a cord having an equipmentgrounding conductor and a grounding plug. Do not modify the plug provided with ... HUD Part 280) or Standard CAN/CSA-Z240 MH. GROUNDING INSTRUCTIONS � For a grounded, cord-connected dryer: This dryer must be plugged into dryer. The plug must conform to introduce outside air into an appropriate outlet that the electrical connection is prohibited. latest...

Installation Instructions
Page 6
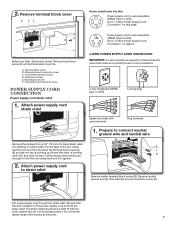
... connection type Power supply cord 4-wire receptacle (NEMA Type 14-30R): Go to Power Supply Cord Connection. Now stand the dryer on cardboard. 2. Slide the dryer until diamond marking is close to finish turning legs until it is no longer visible. NOTE: If local codes do not ...a power supply cord or a direct wire connection. 6 Screw legs into leg holes by hand, use a large flat piece of cardboard from dryer carton; Prepare dryer for electrical connection and to connect the exhaust vent. 4-wire direct connection: Go to Direct Wire Connection. 3-wire direct connection: Go to "Optional...
... connection type Power supply cord 4-wire receptacle (NEMA Type 14-30R): Go to Power Supply Cord Connection. Now stand the dryer on cardboard. 2. Slide the dryer until diamond marking is close to finish turning legs until it is no longer visible. NOTE: If local codes do not ...a power supply cord or a direct wire connection. 6 Screw legs into leg holes by hand, use a large flat piece of cardboard from dryer carton; Prepare dryer for electrical connection and to connect the exhaust vent. 4-wire direct connection: Go to Direct Wire Connection. 3-wire direct connection: Go to "Optional...
Installation Instructions
Page 7
... clamp sections (C) together. 2. Center terminal block screw D. Put the tabs of 3-wire connections. 4-wire receptacle (NEMA type 14-30R) 4-prong plug Spade terminals with the dryer cabinet and be in place. Put power supply cord through the strain relief. Neutral ground wire F. Prepare to "4-Wire Power Supply Cord Connection" on the...
... clamp sections (C) together. 2. Center terminal block screw D. Put the tabs of 3-wire connections. 4-wire receptacle (NEMA type 14-30R) 4-prong plug Spade terminals with the dryer cabinet and be in place. Put power supply cord through the strain relief. Neutral ground wire F. Prepare to "4-Wire Power Supply Cord Connection" on the...


