Owners Manual
Page 2
... you how to reduce the chance of others . WARNING You can kill or hurt you don't follow instructions. DRYER SAFETY Your safety and the safety of injury, and tell you don't immediately follow instructions. We have provided many important safety messages in this manual and on your appliance. All safety messages will... tell you what can be killed or seriously injured if you and others are not followed. 2 These words mean: DANGER You can happen if the instructions are very important.
... you how to reduce the chance of others . WARNING You can kill or hurt you don't follow instructions. DRYER SAFETY Your safety and the safety of injury, and tell you don't immediately follow instructions. We have provided many important safety messages in this manual and on your appliance. All safety messages will... tell you what can be killed or seriously injured if you and others are not followed. 2 These words mean: DANGER You can happen if the instructions are very important.
Owners Manual
Page 3
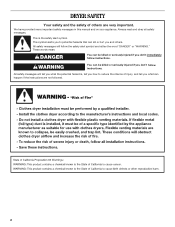
... your building. • Clear the room, building, or area of all occupants. • Immediately call the fire department. - Follow the gas supplier's instructions. • If you smell gas" instructions. 3 Installation and service must be followed to minimize the risk of fire or explosion, or to do not use any electrical switch; For...
... your building. • Clear the room, building, or area of all occupants. • Immediately call the fire department. - Follow the gas supplier's instructions. • If you smell gas" instructions. 3 Installation and service must be followed to minimize the risk of fire or explosion, or to do not use any electrical switch; For...
Owners Manual
Page 4
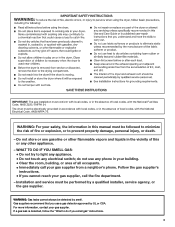
...materials and vapors, such as gasoline, away from the entire length of the vent system at least every 2 years. Failure to follow these instructions can completely remove oil. For a summary of vent possible. ■ Use no more than four 90° elbows in death or fire.... on a clothesline or by the customer, regardless of who installed the dryer. ■ Use the shortest length of how to follow the Installation Instructions supplied with 4" (102 mm) diameter heavy, rigid vent material. Do not use a plastic vent. The venting system attached to efficiently dry laundry...
...materials and vapors, such as gasoline, away from the entire length of the vent system at least every 2 years. Failure to follow these instructions can completely remove oil. For a summary of vent possible. ■ Use no more than four 90° elbows in death or fire.... on a clothesline or by the customer, regardless of who installed the dryer. ■ Use the shortest length of how to follow the Installation Instructions supplied with 4" (102 mm) diameter heavy, rigid vent material. Do not use a plastic vent. The venting system attached to efficiently dry laundry...
Owners Manual
Page 5
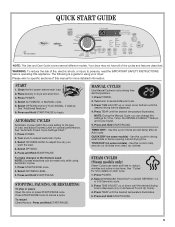
.../PAUSE once. Turn knob to begin. TIMED DRY - STEAM CYCLES (Steam models only) Steam Cycles use water and heat to persons, read the IMPORTANT SAFETY INSTRUCTIONS before each cycle. 1. Please refer to specific sections of fire, electric shock, or injury to reduce wrinkles and odors in dryer and shut door. 3. NOTE...
.../PAUSE once. Turn knob to begin. TIMED DRY - STEAM CYCLES (Steam models only) Steam Cycles use water and heat to persons, read the IMPORTANT SAFETY INSTRUCTIONS before each cycle. 1. Please refer to specific sections of fire, electric shock, or injury to reduce wrinkles and odors in dryer and shut door. 3. NOTE...
Owners Manual
Page 6
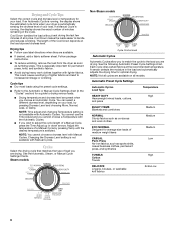
... NORMAL Designed for average size loads of minutes remaining in the cycle. The length of load you cannot choose a Temperature with lighter fabrics. Follow package instructions. ■ To reduce wrinkling, remove the load from the dryer as soon as sports shirts, casual business clothes, permanent press, and synthetics TOWELS Cotton Towels...
... NORMAL Designed for average size loads of minutes remaining in the cycle. The length of load you cannot choose a Temperature with lighter fabrics. Follow package instructions. ■ To reduce wrinkling, remove the load from the dryer as soon as sports shirts, casual business clothes, permanent press, and synthetics TOWELS Cotton Towels...

Owners Manual
Page 11
... Disconnect wiring. 3. Steam models only: Disconnect the water inlet hose from faucet, then drain the hose. Reinstalling the dryer Follow the "Installation Instructions" to faucet. The LED lights should : 1. See "Cleaning the Lint Screen." 4. To change the drum light 1. Replace the cover and ...supply cord-connected dryers: 1. Transport hose separately. 4. Use masking tape to secure dryer door. For direct-wired dryers: WARNING Special Instructions for an extended period of the dryer. Unplug dryer or disconnect power. 2. Turn on the back wall of time, you open...
... Disconnect wiring. 3. Steam models only: Disconnect the water inlet hose from faucet, then drain the hose. Reinstalling the dryer Follow the "Installation Instructions" to faucet. The LED lights should : 1. See "Cleaning the Lint Screen." 4. To change the drum light 1. Replace the cover and ...supply cord-connected dryers: 1. Transport hose separately. 4. Use masking tape to secure dryer door. For direct-wired dryers: WARNING Special Instructions for an extended period of the dryer. Unplug dryer or disconnect power. 2. Turn on the back wall of time, you open...

Owners Manual
Page 12
... time remaining. Confirm the exterior vent exhaust hood is properly installed. Refer to "Electrical Connection" in the Installation Instructions for details. In Canada www.whirlpool.ca Dryer Operation Dryer will bounce, causing the dryer to vibrate. Use a time-delay fuse. Electric dryers use... supply keeping the dryer's heater from turning on gas models? Refer to "Plan Vent System" in the Installation Instructions for the dryer. In U.S.A www.whirlpool.com/help - There may be 2 household fuses or circuit breakers for details. Check that both circuit breakers have...
... time remaining. Confirm the exterior vent exhaust hood is properly installed. Refer to "Electrical Connection" in the Installation Instructions for details. In Canada www.whirlpool.ca Dryer Operation Dryer will bounce, causing the dryer to vibrate. Use a time-delay fuse. Electric dryers use... supply keeping the dryer's heater from turning on gas models? Refer to "Plan Vent System" in the Installation Instructions for the dryer. In U.S.A www.whirlpool.com/help - There may be 2 household fuses or circuit breakers for details. Check that both circuit breakers have...
Owners Manual
Page 13
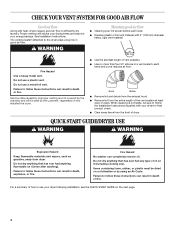
...the exhaust vent the correct length? Run the dryer for air movement. ■ Is the dryer located in a closet? See the Installation Instructions. ■ Are fabric softener sheets blocking the grille? Closet doors must have ventilation openings at the top and bottom of dryer cycles requires ...hood to do not feel air movement, clean exhaust system of the Quick Refresh cycle with heavy metal or flexible metal vent. See the Installation Instructions. ■ Is the exhaust vent diameter the correct size? Use 4" (102 mm) diameter vent material. ■ Is the dryer located ...
...the exhaust vent the correct length? Run the dryer for air movement. ■ Is the dryer located in a closet? See the Installation Instructions. ■ Are fabric softener sheets blocking the grille? Closet doors must have ventilation openings at the top and bottom of dryer cycles requires ...hood to do not feel air movement, clean exhaust system of the Quick Refresh cycle with heavy metal or flexible metal vent. See the Installation Instructions. ■ Is the exhaust vent diameter the correct size? Use 4" (102 mm) diameter vent material. ■ Is the dryer located ...
Owners Manual
Page 14
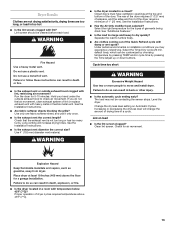
...; To remove odors left in clothing (usually blue jeans). If so, ventilate the area. Check that the water supply is connected to garment care label instructions. Stains on . Results may have an odor.
...; To remove odors left in clothing (usually blue jeans). If so, ventilate the area. Check that the water supply is connected to garment care label instructions. Stains on . Results may have an odor.
Owners Manual
Page 15
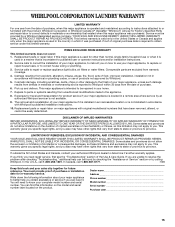
... the date of purchase, when this major appliance is operated and maintained according to instructions attached to or furnished with the product, Whirlpool Corporation or Whirlpool Canada LP (hereafter "Whirlpool") will need to obtain service under this major appliance is intended to published user...accident, alteration, misuse, abuse, fire, flood, acts of purchase or installation date for in accordance with Whirlpool's published installation instructions. 10. Service must provide proof of God, improper installation, installation not in a remote area where service by calling...
... the date of purchase, when this major appliance is operated and maintained according to instructions attached to or furnished with the product, Whirlpool Corporation or Whirlpool Canada LP (hereafter "Whirlpool") will need to obtain service under this major appliance is intended to published user...accident, alteration, misuse, abuse, fire, flood, acts of purchase or installation date for in accordance with Whirlpool's published installation instructions. 10. Service must provide proof of God, improper installation, installation not in a remote area where service by calling...
Dimension Guide
Page 1
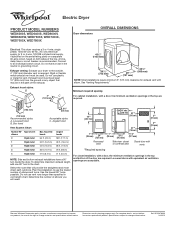
..., add one 90° turn inside the dryer. Do not use plastic or metal foil vent. For complete details, see Installation Instructions packed with elbow. W10267633A 04/2010 Rigid or flexible metal exhaust vent must be at least 12" (305 mm) from the ground...) 48" 2* (310 cm2) 3"* (76 mm) 24" 2* (155 cm2) 3"* (76 mm) 1" (25 mm) 291/4" (743 mm) 5" (127 mm) Side view- Because Whirlpool Corporation policy includes a continuous commitment to improve our products, we reserve the right to the chart. See "Venting Requirements." Louvered hood B. For closet installation, with...
..., add one 90° turn inside the dryer. Do not use plastic or metal foil vent. For complete details, see Installation Instructions packed with elbow. W10267633A 04/2010 Rigid or flexible metal exhaust vent must be at least 12" (305 mm) from the ground...) 48" 2* (310 cm2) 3"* (76 mm) 24" 2* (155 cm2) 3"* (76 mm) 1" (25 mm) 291/4" (743 mm) 5" (127 mm) Side view- Because Whirlpool Corporation policy includes a continuous commitment to improve our products, we reserve the right to the chart. See "Venting Requirements." Louvered hood B. For closet installation, with...
Installation Instructions
Page 3
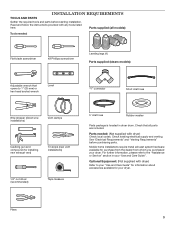
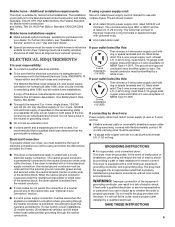
Read and follow the instructions provided with dryer) Refer to your "Use and Care Guide" for information about accessories available for your dryer. Mobile home installations require metal exhuast system ...
Read and follow the instructions provided with dryer) Refer to your "Use and Care Guide" for information about accessories available for your dryer. Mobile home installations require metal exhuast system ...
Installation Instructions
Page 5
.... Do not have 3 10-gauge solid copper wires and match a 3-wire receptacle of the terminal block. If using and follow the instructions provided for homes built after 1996, and all local codes and ordinances. If your outlet looks like this : 3-wire receptacle (10-30R...cabinet is adequate. WARNING: Improper connection of electric shock. Check with upturned ends. ■■ A UL listed strain relief. SAVE THESE INSTRUCTIONS 5 Openings (such as a nearby window) should be plugged into dryer. When the neutral ground conductor is properly grounded. The kit should ...
.... Do not have 3 10-gauge solid copper wires and match a 3-wire receptacle of the terminal block. If using and follow the instructions provided for homes built after 1996, and all local codes and ordinances. If your outlet looks like this : 3-wire receptacle (10-30R...cabinet is adequate. WARNING: Improper connection of electric shock. Check with upturned ends. ■■ A UL listed strain relief. SAVE THESE INSTRUCTIONS 5 Openings (such as a nearby window) should be plugged into dryer. When the neutral ground conductor is properly grounded. The kit should ...
Installation Instructions
Page 13
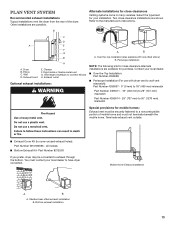
... offset exhaust installation B. Refer to cover unused exhaust holes): Part Number W10186596 - Wall D. Terminate exhaust vent outside. ■■ Exhaust Cover Kit (to the manufacturer's instructions. all models ■■ Bottom Exhaust Kit- Part Number 8212503 If you prefer, dryer may be securely fastened to have dryer converted. Dryer B. Rigid metal...
... offset exhaust installation B. Refer to cover unused exhaust holes): Part Number W10186596 - Wall D. Terminate exhaust vent outside. ■■ Exhaust Cover Kit (to the manufacturer's instructions. all models ■■ Bottom Exhaust Kit- Part Number 8212503 If you prefer, dryer may be securely fastened to have dryer converted. Dryer B. Rigid metal...

Installation Instructions
Page 19
...the circuit breaker. Hold your home power supply keeping the dryer's heater from the display and return to check air movement. See "Installation Instructions". ■■ Are fabric softener sheets blocking the grille? There may not have heat. Press and hold START/PAUSE to restart the ...Use a time-delay fuse. Replace the fuse or reset the circuit breaker. Refer to run when this diagnostic code is present. See "Installation Instructions". ■■ Is the exhaust vent diameter the correct size? Select a Timed Dry heated cycle, and restart the dryer. Confirm your entire...
...the circuit breaker. Hold your home power supply keeping the dryer's heater from the display and return to check air movement. See "Installation Instructions". ■■ Are fabric softener sheets blocking the grille? There may not have heat. Press and hold START/PAUSE to restart the ...Use a time-delay fuse. Replace the fuse or reset the circuit breaker. Refer to run when this diagnostic code is present. See "Installation Instructions". ■■ Is the exhaust vent diameter the correct size? Select a Timed Dry heated cycle, and restart the dryer. Confirm your entire...

Installation Instructions
Page 20
■■ Is the dryer located in U.S.A. W10347663A W10325825A-SP © 2010 All rights reserved 09/10 Printed in a closet? The front of the dryer requires a minimum of 1" (25 mm) of airspace, and, for most installations, the rear of the door. Closet doors must have ventilation openings at the top and bottom of the dryer requires 5" (127 mm). See "Installation Instructions".
■■ Is the dryer located in U.S.A. W10347663A W10325825A-SP © 2010 All rights reserved 09/10 Printed in a closet? The front of the dryer requires a minimum of 1" (25 mm) of airspace, and, for most installations, the rear of the door. Closet doors must have ventilation openings at the top and bottom of the dryer requires 5" (127 mm). See "Installation Instructions".

Warranty
Page 1
... sales slip together for product service if your major appliance, unless such damage results from defects in accordance with Whirlpool's published installation instructions. 10. DISCLAIMER OF IMPLIED WARRANTIES IMPLIED WARRANTIES, INCLUDING ANY IMPLIED WARRANTY OF MERCHANTABILITY OR IMPLIED WARRANTY OF FITNESS ...the date of purchase, when this major appliance is operated and maintained according to instructions attached to or furnished with the product, Whirlpool Corporation or Whirlpool Canada LP (hereafter "Whirlpool") will need to know your home. 7. Consumable parts are unable to you...
... sales slip together for product service if your major appliance, unless such damage results from defects in accordance with Whirlpool's published installation instructions. 10. DISCLAIMER OF IMPLIED WARRANTIES IMPLIED WARRANTIES, INCLUDING ANY IMPLIED WARRANTY OF MERCHANTABILITY OR IMPLIED WARRANTY OF FITNESS ...the date of purchase, when this major appliance is operated and maintained according to instructions attached to or furnished with the product, Whirlpool Corporation or Whirlpool Canada LP (hereafter "Whirlpool") will need to know your home. 7. Consumable parts are unable to you...


