
Owners Manual
Page 4
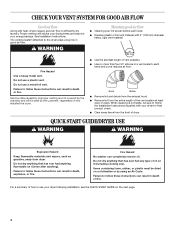
... to follow these instructions can result in death, explosion, or fire. When cleaning is complete, be paid by using an Air Cycle. Fire Hazard No washer can result in death or fire. For a summary of vent possible. ■ Use no more than four 90° elbows in a vent system; The venting...
... to follow these instructions can result in death, explosion, or fire. When cleaning is complete, be paid by using an Air Cycle. Fire Hazard No washer can result in death or fire. For a summary of vent possible. ■ Use no more than four 90° elbows in a vent system; The venting...
Installation Instructions
Page 3
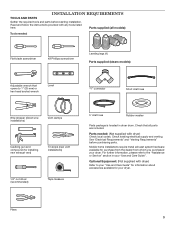
... installations) Vent clamps Caulking gun and compound (for installing new exhaust vent) Tin snips (new vent installations) 1/4" nut driver (recommended) Tape measure 5' inlet hose Rubber washer Parts package is located in your "Use and Care Guide". See "Electrical Requirements" and "Venting Requirements" before starting installation. Optional Equipment: (Not supplied with dryer...
... installations) Vent clamps Caulking gun and compound (for installing new exhaust vent) Tin snips (new vent installations) 1/4" nut driver (recommended) Tape measure 5' inlet hose Rubber washer Parts package is located in your "Use and Care Guide". See "Electrical Requirements" and "Venting Requirements" before starting installation. Optional Equipment: (Not supplied with dryer...
Installation Instructions
Page 4
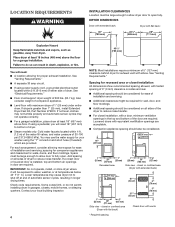
... limit, or do not permit, installing dryer in door are provided. If using the "Y" connector and short hose (if needed) which are required. Contact your washer using a pedestal, you will be exposed to reduce noise transfer. ■■ For closet installation, with tested spacing of 0" (0 mm) clearance on sides and rear...
... limit, or do not permit, installing dryer in door are provided. If using the "Y" connector and short hose (if needed) which are required. Contact your washer using a pedestal, you will be exposed to reduce noise transfer. ■■ For closet installation, with tested spacing of 0" (0 mm) clearance on sides and rear...
Installation Instructions
Page 14
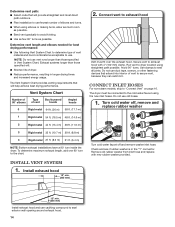
... room as possible. ■■ Bend vent gradually to seal exterior wall opening around exhaust hood. 14 Run vent to exhaust hood with new rubber washer provided. 12" min. (305 mm) Install exhaust hood and use old hoses. 1. NOTE: Do not use fewest number of vent to "Connect Vent" ...possible. Use clamps to exhaust hood Vent must be connected to the chart. Turn cold water off, remove and replace rubber washer Turn cold water faucet off and remove washer inlet hose. CONNECT INLET HOSES For non-steam models, skip to secure vent, because they can catch lint. Determine vent ...
... room as possible. ■■ Bend vent gradually to seal exterior wall opening around exhaust hood. 14 Run vent to exhaust hood with new rubber washer provided. 12" min. (305 mm) Install exhaust hood and use old hoses. 1. NOTE: Do not use fewest number of vent to "Connect Vent" ...possible. Use clamps to exhaust hood Vent must be connected to the chart. Turn cold water off, remove and replace rubber washer Turn cold water faucet off and remove washer inlet hose. CONNECT INLET HOSES For non-steam models, skip to secure vent, because they can catch lint. Determine vent ...
Installation Instructions
Page 15
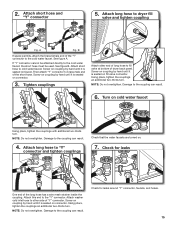
... a wire mesh strainer inside the coupling. NOTE: Do not overtighten. Turn on . 7. B If space permits, attach the brass female end of the short hose. Attach washer cold inlet hose to other end of long hose to the coupling can result. 6. Screw on coupling by hand until it is seated on connector. 3. 2.
... a wire mesh strainer inside the coupling. NOTE: Do not overtighten. Turn on . 7. B If space permits, attach the brass female end of the short hose. Attach washer cold inlet hose to other end of long hose to the coupling can result. 6. Screw on coupling by hand until it is seated on connector. 3. 2.


