
W10240504
Page 2
...indicator. Timed Dry Adjust "-" or "+" button: press once to turn off its respective display segment. PAGE 2 WHIRLPOOL CONTROL PANEL (features and appearances may vary between models) POWER button: press once to turn off the seven-segment display. Pressing "Normal" also turns off indicator. ...once to turn off each button once to turn off its respective indicator. Key Activation & Encoder Test for Service Diagnostic Mode, Whirlpool Models Pressing each modifier button once to standby mode. Figure 1a - Press each "HOW TO DRY" button turns off its respective indicator...
...indicator. Timed Dry Adjust "-" or "+" button: press once to turn off its respective display segment. PAGE 2 WHIRLPOOL CONTROL PANEL (features and appearances may vary between models) POWER button: press once to turn off the seven-segment display. Pressing "Normal" also turns off indicator. ...once to turn off each button once to turn off its respective indicator. Key Activation & Encoder Test for Service Diagnostic Mode, Whirlpool Models Pressing each modifier button once to standby mode. Figure 1a - Press each "HOW TO DRY" button turns off its respective indicator...

W10240504
Page 3
... to turn off the status LEDs. Rotating the cycle selector knob turns off each corresponding cycle indicator. (Features and appearances vary between models) POWER button: press once to turn off indicator. Timed Dry Adjust "+" button: press once to standby mode. Option buttons: press... 3 START/PAUSE button: press once to turn off its respective indicator. Key Activation & Encoder Test for Service Diagnostic Mode, Maytag Models Press each button once to turn off the seven-segment display. DO NOT REMOVE OR DESTROY MAYTAG CONTROL PANEL (features and appearances may...
... to turn off the status LEDs. Rotating the cycle selector knob turns off each corresponding cycle indicator. (Features and appearances vary between models) POWER button: press once to turn off indicator. Timed Dry Adjust "+" button: press once to standby mode. Option buttons: press... 3 START/PAUSE button: press once to turn off its respective indicator. Key Activation & Encoder Test for Service Diagnostic Mode, Maytag Models Press each button once to turn off the seven-segment display. DO NOT REMOVE OR DESTROY MAYTAG CONTROL PANEL (features and appearances may...

W10240504
Page 4
... once to turn off indicator. PAGE 4 KENMORE CONTROL PANEL (features and appearances may vary between models). Key Activation & Encoder Test for Service Diagnostic Mode, Kenmore Models Press each modifier button once to turn off its respective display segment. Option buttons: press each ...corresponding cycle indicator. (Features and appearances vary between models) POWER button: press once to standby mode. Figure 1c - Rotating the cycle selector knob turns off indicator. Press twice...
... once to turn off indicator. PAGE 4 KENMORE CONTROL PANEL (features and appearances may vary between models). Key Activation & Encoder Test for Service Diagnostic Mode, Kenmore Models Press each modifier button once to turn off its respective display segment. Option buttons: press each ...corresponding cycle indicator. (Features and appearances vary between models) POWER button: press once to standby mode. Figure 1c - Rotating the cycle selector knob turns off indicator. Press twice...
W10240504
Page 6
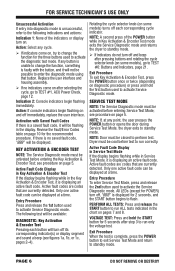
..., page 21. Only one active fault code can be displayed at a time. All LEDs (except for POWER) turn off each button will turn on some models), go to TEST #1, ACU Power Check, page 12. Replace the user interface and housing assembly. If no saved fault code, "888" will be... displayed. If there is no indicators come on some models) turns off and beep after step 3 to run ALL tests indicated in the chart on pages 7 and 8. Active Fault Code Display in Service Test Mode...
..., page 21. Only one active fault code can be displayed at a time. All LEDs (except for POWER) turn off each button will turn on some models), go to TEST #1, ACU Power Check, page 12. Replace the user interface and housing assembly. If no saved fault code, "888" will be... displayed. If there is no indicators come on some models) turns off and beep after step 3 to run ALL tests indicated in the chart on pages 7 and 8. Active Fault Code Display in Service Test Mode...
W10240504
Page 10
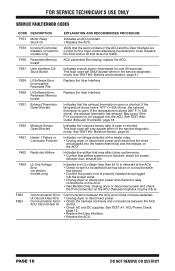
...8226; Replace the User Interface. • Replace the ACU. F2E1 User Interface (UI) Stuck Button Indicates a stuck button (depressed for the dryer model displaying the fault/error code. May occur if the P14 connector is above 250° F (< 500 ohms), the exhaust thermistor has shorted. See... into the power outlet. • Unplug dryer or disconnect power and check the relay connections on the ACU. • Gas Models Only: Unplug dryer or disconnect power and check the P14 connection on the ACU (harness loopback on electric has tripped. F2E5 UI...
...8226; Replace the User Interface. • Replace the ACU. F2E1 User Interface (UI) Stuck Button Indicates a stuck button (depressed for the dryer model displaying the fault/error code. May occur if the P14 connector is above 250° F (< 500 ohms), the exhaust thermistor has shorted. See... into the power outlet. • Unplug dryer or disconnect power and check the relay connections on the ACU. • Gas Models Only: Unplug dryer or disconnect power and check the P14 connection on the ACU (harness loopback on electric has tripped. F2E5 UI...
W10240504
Page 12
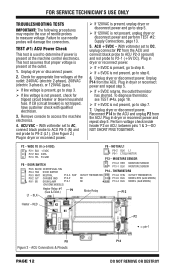
... If 120VAC is not present, go to step 6. 6. THERMISTORS OUTLET THERMISTOR NC NC P14-6 R/W OUTLET THERMISTOR P14-5 BLK MODEL RTN (GAS MODEL) P14-4 BLK MODEL (GAS MODEL) Motor Relay P13 Heater - Unplug dryer or disconnect power. 2. ACU VAC - Perform voltage check inside header P2 on ACU, between... step 7. 7. P8-4 TAN DOOR SWITCH P8-3 WHT NEUTRAL P14-3 R/W P8-2 G/Y CHASSIS GND P14-2 P8-1 BR DRUM LAMP P14-1 (ON SOME MODELS) Heater Relay #1 (Gas & Elect.) P9 L1 - ACU Connectors & Pinouts PAGE 12 DO NOT REMOVE OR DESTROY Unplug P14 from the ACU. Unplug ...
... If 120VAC is not present, go to step 6. 6. THERMISTORS OUTLET THERMISTOR NC NC P14-6 R/W OUTLET THERMISTOR P14-5 BLK MODEL RTN (GAS MODEL) P14-4 BLK MODEL (GAS MODEL) Motor Relay P13 Heater - Unplug dryer or disconnect power. 2. ACU VAC - Perform voltage check inside header P2 on ACU, between... step 7. 7. P8-4 TAN DOOR SWITCH P8-3 WHT NEUTRAL P14-3 R/W P8-2 G/Y CHASSIS GND P14-2 P8-1 BR DRUM LAMP P14-1 (ON SOME MODELS) Heater Relay #1 (Gas & Elect.) P9 L1 - ACU Connectors & Pinouts PAGE 12 DO NOT REMOVE OR DESTROY Unplug P14 from the ACU. Unplug ...

W10240504
Page 26
... Valve, Gas Dryer Lt. FOR SERVICE TECHNICIAN'S USE ONLY COMPONENT LOCATIONS • ACU (beneath console) • User Interface (UI) Door Switch (Location may vary between models) • Drum Light Assembly • Thermal Cut-off • High Limit Thermostat • Heater Assembly • Motor Assembly • Thermal Fuse • Outlet Thermistor •...
... Valve, Gas Dryer Lt. FOR SERVICE TECHNICIAN'S USE ONLY COMPONENT LOCATIONS • ACU (beneath console) • User Interface (UI) Door Switch (Location may vary between models) • Drum Light Assembly • Thermal Cut-off • High Limit Thermostat • Heater Assembly • Motor Assembly • Thermal Fuse • Outlet Thermistor •...
W11040073A Whirlpool Agora Dryer
Page 7
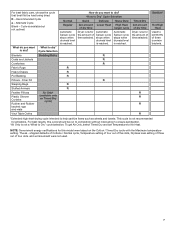
... drying cycle intended to dry? Cycle is reached. Automatic Sensor cycle stops when dryness level is not a "What to No Heat. For best results, this model were based on Timed Dry cycle) Normal Regular Automatic Sensor cycle stops when dryness level is not recommended for the amount of four dots, and...
... drying cycle intended to dry? Cycle is reached. Automatic Sensor cycle stops when dryness level is not a "What to No Heat. For best results, this model were based on Timed Dry cycle) Normal Regular Automatic Sensor cycle stops when dryness level is not recommended for the amount of four dots, and...
W11040073A Whirlpool Agora Dryer
Page 8
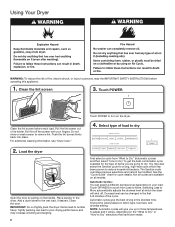
... tightly pack the dryer. Push the lint screen firmly back into place. Tightly packing can select a different dryness level depending on the dryer. 4. Not all models. Clean the lint screen 3. Place laundry in the shortest time. You may increase wrinkling and tangling. 8 First select a cycle from Less to Dry" selections that...
... tightly pack the dryer. Push the lint screen firmly back into place. Tightly packing can select a different dryness level depending on the dryer. 4. Not all models. Clean the lint screen 3. Place laundry in the shortest time. You may increase wrinkling and tangling. 8 First select a cycle from Less to Dry" selections that...

W11040073A Whirlpool Agora Dryer
Page 11
.... 4. For direct-wired dryers: 1. Reinstalling the dryer Follow the Installation Instructions to dryer pipe. 4. Unplug dryer or disconnect power. 2. Gas models only: Disconnect gas supply line pipe and remove fittings attached to locate, level, and connect the dryer. 11 Replace the cover and secure with...5. Use tape to secure dryer door. Plug into a grounded outlet or reconnect power. Unplug the power supply cord. 2. Disconnect power. 2. Gas models only: Close shut-off valve in dryer base. 6. Remove the cover. 3. NON-USE, STORAGE, AND MOVING CARE Non-use or storage care ...
.... 4. For direct-wired dryers: 1. Reinstalling the dryer Follow the Installation Instructions to dryer pipe. 4. Unplug dryer or disconnect power. 2. Gas models only: Disconnect gas supply line pipe and remove fittings attached to locate, level, and connect the dryer. 11 Replace the cover and secure with...5. Use tape to secure dryer door. Plug into a grounded outlet or reconnect power. Unplug the power supply cord. 2. Disconnect power. 2. Gas models only: Close shut-off valve in dryer base. 6. Remove the cover. 3. NON-USE, STORAGE, AND MOVING CARE Non-use or storage care ...
W11040073A Whirlpool Agora Dryer
Page 14
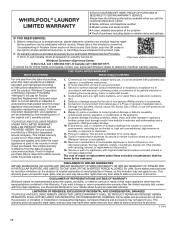
...or consequential damages, so these excluded circumstances shall be addressed without service. Before contacting us to : https://www.whirlpool.com/product_help Whirlpool Customer eXperience Center In the U.S.A. Please take a few minutes to you want a longer or more comprehensive ... or replacement of God, or use with original model/serial numbers removed, altered, or not easily determined. WHIRLPOOL® LAUNDRY LIMITED WARRANTY ATTACH YOUR RECEIPT HERE. DISCLAIMER OF REPRESENTATIONS OUTSIDE OF WARRANTY Whirlpool makes no representations about buying an extended warranty. ...
...or consequential damages, so these excluded circumstances shall be addressed without service. Before contacting us to : https://www.whirlpool.com/product_help Whirlpool Customer eXperience Center In the U.S.A. Please take a few minutes to you want a longer or more comprehensive ... or replacement of God, or use with original model/serial numbers removed, altered, or not easily determined. WHIRLPOOL® LAUNDRY LIMITED WARRANTY ATTACH YOUR RECEIPT HERE. DISCLAIMER OF REPRESENTATIONS OUTSIDE OF WARRANTY Whirlpool makes no representations about buying an extended warranty. ...

W11040073A Whirlpool Agora Dryer
Page 1
...discretion replace the product. Commercial, non-residential, multiple-family use, or use with the product, Whirlpool Corporation or Whirlpool Canada LP (hereafter "Whirlpool") will be borne by a Whirlpool designated service company. In-home instruction on the right to you . Cosmetic damage including scratches,... date of purchase, when this major appliance, you call the Customer eXperience Center: n Name, address, and telephone number n Model number and serial number n A clear, detailed description of the problem n Proof of incidental or consequential damages, so these excluded...
...discretion replace the product. Commercial, non-residential, multiple-family use, or use with the product, Whirlpool Corporation or Whirlpool Canada LP (hereafter "Whirlpool") will be borne by a Whirlpool designated service company. In-home instruction on the right to you . Cosmetic damage including scratches,... date of purchase, when this major appliance, you call the Customer eXperience Center: n Name, address, and telephone number n Model number and serial number n A clear, detailed description of the problem n Proof of incidental or consequential damages, so these excluded...

Ventilation Specification
Page 4
...and 913. 2. UL 2158 Electric Clothes Dryer Standard references venting requirements. 4. See the Installation Instructions for the specific dryer model being used for balancing out the overall duct system. ■ Design the central duct system for sufficient capacity to handle... System Requirements Venting systems for exhausting a dryer outdoors are other codes requiring dryers to remove moisture from laundry area. 3. Whirlpool Corporation provides required airflow and back pressure specifications, measured at the connection to walls, floors, picture hangers, and cause condensation...
...and 913. 2. UL 2158 Electric Clothes Dryer Standard references venting requirements. 4. See the Installation Instructions for the specific dryer model being used for balancing out the overall duct system. ■ Design the central duct system for sufficient capacity to handle... System Requirements Venting systems for exhausting a dryer outdoors are other codes requiring dryers to remove moisture from laundry area. 3. Whirlpool Corporation provides required airflow and back pressure specifications, measured at the connection to walls, floors, picture hangers, and cause condensation...

Ventilation Specification
Page 5
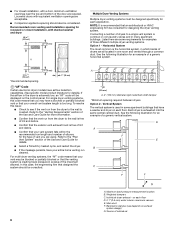
... the allowable vent system length by 10 ft (3.0 m) (from 40 ft [12.2 m] to 30 ft [9.1 m]). Codes Agency Approvals All Whirlpool electric dryer models, including "long vent dryers," Turbo Vent™ dryers and combo washer/dryer units that a dryer is 230 CFM. measure back pressure from product...■ Additional clearances might be found on or adjacent to the serial label on the product. The designation for each model, or on the Whirlpool.com website. Refer to the product literature for the venting system. Recommended room venting and spacing for non-stacked installations ...
... the allowable vent system length by 10 ft (3.0 m) (from 40 ft [12.2 m] to 30 ft [9.1 m]). Codes Agency Approvals All Whirlpool electric dryer models, including "long vent dryers," Turbo Vent™ dryers and combo washer/dryer units that a dryer is 230 CFM. measure back pressure from product...■ Additional clearances might be found on or adjacent to the serial label on the product. The designation for each model, or on the Whirlpool.com website. Refer to the product literature for the venting system. Recommended room venting and spacing for non-stacked installations ...
Ventilation Specification
Page 6
...9632; Select a Timed Dry heated cycle, and restart the dryer. ■ If the message persists, have airflow detection capabilities. (See specific model product literature for the type of the Use and Care Guide for designing the dryer venting system. NOTE: It is free of lint and ...number of a generic horizontal system. 24 in.2 * (155 cm2) *Recommended spacing. 3"* (76 mm) 1"* (25 mm) "AF" Code Certain electronic dryer models have your overall vent system length is extremely low, an "AF" code will be consulted. Main duct F. Source of the door are acceptable. ■ Companion...
...9632; Select a Timed Dry heated cycle, and restart the dryer. ■ If the message persists, have airflow detection capabilities. (See specific model product literature for the type of the Use and Care Guide for designing the dryer venting system. NOTE: It is free of lint and ...number of a generic horizontal system. 24 in.2 * (155 cm2) *Recommended spacing. 3"* (76 mm) 1"* (25 mm) "AF" Code Certain electronic dryer models have your overall vent system length is extremely low, an "AF" code will be consulted. Main duct F. Source of the door are acceptable. ■ Companion...


