W11040073A Whirlpool Agora Dryer
Page 14
...from the date of your retailer about the quality, durability, or need for Factory Specified Replacement Parts and repair labor to access additional resources, or visit https://www.whirlpool.com/product_help. 2. The cost of merchantability or fitness, so this major appliance, you .... exclusively by unauthorized service, alteration, or modification of the original unit's warranty period. Service or parts for warranty service to: https://www.whirlpool.com/product_help Whirlpool Customer eXperience Center In the U.S.A. Some states and provinces do not allow limitations on how to...
...from the date of your retailer about the quality, durability, or need for Factory Specified Replacement Parts and repair labor to access additional resources, or visit https://www.whirlpool.com/product_help. 2. The cost of merchantability or fitness, so this major appliance, you .... exclusively by unauthorized service, alteration, or modification of the original unit's warranty period. Service or parts for warranty service to: https://www.whirlpool.com/product_help Whirlpool Customer eXperience Center In the U.S.A. Some states and provinces do not allow limitations on how to...
Installation Instructions
Page 4
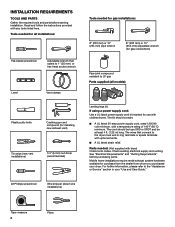
...measure 4 Pliers The wires that opens to the dryer must end in your dryer. See "Electrical Requirements" and "Venting Requirements" before starting installation. Parts needed for gas installations: 8" (203 mm) or 10" (254 mm) pipe wrench 8" (203 mm) or 10" (254 mm) adjustable ... 120/240 volt minimum, with upturned ends. ■■ A UL listed strain relief. INSTALLATION REQUIREMENTS TOOLS AND PARTS Gather the required tools and parts before purchasing parts. Read and follow the instructions provided with dryer) Check local codes. Tools needed for all models): Leveling legs ...
...measure 4 Pliers The wires that opens to the dryer must end in your dryer. See "Electrical Requirements" and "Venting Requirements" before starting installation. Parts needed for gas installations: 8" (203 mm) or 10" (254 mm) pipe wrench 8" (203 mm) or 10" (254 mm) adjustable ... 120/240 volt minimum, with upturned ends. ■■ A UL listed strain relief. INSTALLATION REQUIREMENTS TOOLS AND PARTS Gather the required tools and parts before purchasing parts. Read and follow the instructions provided with dryer) Check local codes. Tools needed for all models): Leveling legs ...
Installation Instructions
Page 6
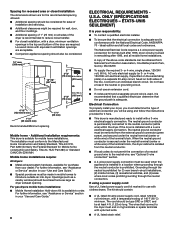
... block, the dryer cabinet is permanently connected to the Manufactured Home Construction and Safety Standard, Title 24 CFR, Part 3280 (formerly the Federal Standard for Mobile home construction and Safety, Title 24, HUD Part 280) or Standard CAN/CSA-Z240 MH. The installation must end in remodeling after 1996, and all local...
... block, the dryer cabinet is permanently connected to the Manufactured Home Construction and Safety Standard, Title 24 CFR, Part 3280 (formerly the Federal Standard for Mobile home construction and Safety, Title 24, HUD Part 280) or Standard CAN/CSA-Z240 MH. The installation must end in remodeling after 1996, and all local...
Installation Instructions
Page 20
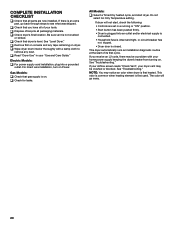
... is connected. • Household fuse is intact and tight, or circuit breaker has not tripped. • Dryer door is closed. If there is an extra part, go away. 20 COMPLETE INSTALLATION CHECKLIST q Check that all...
... is connected. • Household fuse is intact and tight, or circuit breaker has not tripped. • Dryer door is closed. If there is an extra part, go away. 20 COMPLETE INSTALLATION CHECKLIST q Check that all...
Installation Instructions
Page 21
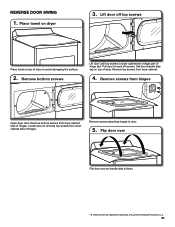
... cabinet are registered trademarks of dryer. Flip door over Flip door over so handle side is down. † ® TORX and T20 are in large part of hinges. Set door (handle side up) on dryer 3. REVERSE DOOR SWING 1. Remove screws from dryer cabinet. 4. Lift door off screws. Loosen (do not remove...
... cabinet are registered trademarks of dryer. Flip door over Flip door over so handle side is down. † ® TORX and T20 are in large part of hinges. Set door (handle side up) on dryer 3. REVERSE DOOR SWING 1. Remove screws from dryer cabinet. 4. Lift door off screws. Loosen (do not remove...


