Owners Manual
Page 2
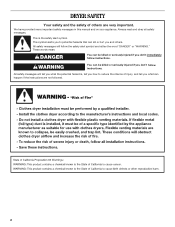
... safety messages will follow instructions. Always read and obey all safety messages. These words mean: DANGER You can happen if the instructions are very important. DRYER SAFETY Your safety and the safety of injury, and tell you don't immediately follow instructions.
... safety messages will follow instructions. Always read and obey all safety messages. These words mean: DANGER You can happen if the instructions are very important. DRYER SAFETY Your safety and the safety of injury, and tell you don't immediately follow instructions.
Owners Manual
Page 3
... damage, personal injury, or death. - If a gas leak is detected, follow the "What to light any appliance. • Do not touch any electrical switch; The dryer must be detected by smell. WHAT TO DO IF YOU SMELL GAS: • Do not try to do not use a gas detector approved by a qualified...
... damage, personal injury, or death. - If a gas leak is detected, follow the "What to light any appliance. • Do not touch any electrical switch; The dryer must be detected by smell. WHAT TO DO IF YOU SMELL GAS: • Do not try to do not use a gas detector approved by a qualified...
Owners Manual
Page 4
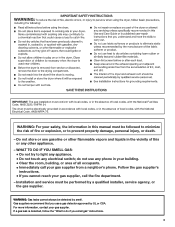
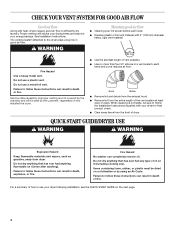
... Instructions. Failure to follow these instructions can result in death or fire. each load. ■ Replace plastic or foil vent material with heat, dryers require good air flow to follow these instructions can completely remove oil. Good Better ■ Remove lint and debris from the exhaust hood. ■...supplied with your energy savings. Do not dry anything that has ever had anything that has ever had any type of how to the dryer plays a big role in death or fire. The venting system attached to use your lint screen before each bend and curve reduces air ...
... Instructions. Failure to follow these instructions can result in death or fire. each load. ■ Replace plastic or foil vent material with heat, dryers require good air flow to follow these instructions can completely remove oil. Good Better ■ Remove lint and debris from the exhaust hood. ■...supplied with your energy savings. Do not dry anything that has ever had anything that has ever had any type of how to the dryer plays a big role in death or fire. The venting system attached to use your lint screen before each bend and curve reduces air ...
Owners Manual
Page 5
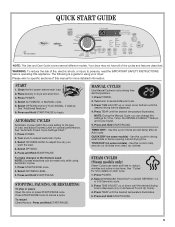
... are still damp after an Auto cycle. Select OPTIONS and/or CYCLE SIGNAL, if desired. Select DRYNESS LEVEL to reduce wrinkles and odors in dryer and shut door. 3. Press START/PAUSE once. 2. Press TEMP until the desired temperature illuminates. 5. STEAM CYCLES (Steam models only) Steam... Cycles use water and heat to adjust how dry you can be made only while using your dryer. Your dryer may not have all of this cycle for optimal performance. Place laundry in dry items. See "Cycles" for more details on some models...
... are still damp after an Auto cycle. Select OPTIONS and/or CYCLE SIGNAL, if desired. Select DRYNESS LEVEL to reduce wrinkles and odors in dryer and shut door. 3. Press START/PAUSE once. 2. Press TEMP until the desired temperature illuminates. 5. STEAM CYCLES (Steam models only) Steam... Cycles use water and heat to adjust how dry you can be made only while using your dryer. Your dryer may not have all of this cycle for optimal performance. Place laundry in dry items. See "Cycles" for more details on some models...
Owners Manual
Page 6
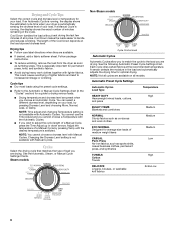
...or Damp. See the Automatic, Steam, or Manual Cycle Settings Charts. Follow package instructions. ■ To reduce wrinkling, remove the load from the dryer as soon as tumbling stops. This could cause overdrying of lighter fabrics and lead to adjust the cycle length of a Manual Cycle, press the Time...length of the Cool Down depends on your load. If an Automatic Cycle is running, the display shows the estimated cycle time when your dryer is running, the display shows the exact number of minutes remaining in the load and automatically adjusts the drying time for permanent press, ...
...or Damp. See the Automatic, Steam, or Manual Cycle Settings Charts. Follow package instructions. ■ To reduce wrinkling, remove the load from the dryer as soon as tumbling stops. This could cause overdrying of lighter fabrics and lead to adjust the cycle length of a Manual Cycle, press the Time...length of the Cool Down depends on your load. If an Automatic Cycle is running, the display shows the estimated cycle time when your dryer is running, the display shows the exact number of minutes remaining in the load and automatically adjusts the drying time for permanent press, ...
Owners Manual
Page 7
...of a fabric softener sheet is best for touching up or down arrows. In this cycle a small amount of water is sprayed into the dryer drum after several minutes of tumbling with wrinkle-free finish may cause temporary staining on some models) Small loads or short drying time. 7 .... Enhanced Touch Up This cycle is not recommended with heat followed by pressing the Time Adjust up clothes that have been left in the dryer too long. Manual Cycles (Non-Steam) Use Manual Cycles to select a specific amount of wrinkle-free cotton, cottonpolyester blend, common knits and...
...of a fabric softener sheet is best for touching up or down arrows. In this cycle a small amount of water is sprayed into the dryer drum after several minutes of tumbling with wrinkle-free finish may cause temporary staining on some models) Small loads or short drying time. 7 .... Enhanced Touch Up This cycle is not recommended with heat followed by pressing the Time Adjust up clothes that have been left in the dryer too long. Manual Cycles (Non-Steam) Use Manual Cycles to select a specific amount of wrinkle-free cotton, cottonpolyester blend, common knits and...
Owners Manual
Page 8
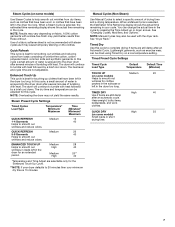
.... During a cycle, if Drum Light is selected, the drum light turns on and will be used with Automatic Cycles. During this option, the dryer stops tumbling and then tumbles again for the Automatic Cycles. The other cycles and options. When the signal goes off 5 minutes into the cycle.... 20 - 30 Plastic - Foam rubber pillows are securely stitched. ■ Shake and fluff pillows by pressing WRINKLE SHIELD™ setting or opening the dryer door. ■ For the Perm Press/Casual Cycle, the WRINKLE SHIELD™ setting is pressed again. Press DRUM LIGHT at any time by hand ...
.... During a cycle, if Drum Light is selected, the drum light turns on and will be used with Automatic Cycles. During this option, the dryer stops tumbling and then tumbles again for the Automatic Cycles. The other cycles and options. When the signal goes off 5 minutes into the cycle.... 20 - 30 Plastic - Foam rubber pillows are securely stitched. ■ Shake and fluff pillows by pressing WRINKLE SHIELD™ setting or opening the dryer door. ■ For the Perm Press/Casual Cycle, the WRINKLE SHIELD™ setting is pressed again. Press DRUM LIGHT at any time by hand ...
Owners Manual
Page 9
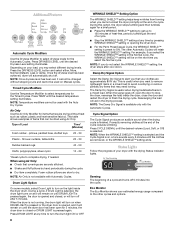
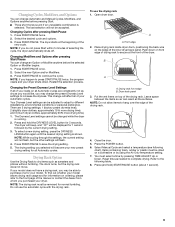
...your model allows drying rack usage and for normal tumbling. NOTE: Do not allow items to secure at the beginning of the inner dryer back panel. Reset time as sweaters and pillows without tumbling. This change an Option or Modifier anytime before pressing Start. ■ ... If all of your model. Your Dryness Level settings can change will become your new preset drying setting for your loads on top of the dryer. Dryer back panel 3. Select the new Option and/or Modifiers. 3. B A A. Leave space between the items so air can reach all Automatic cycles....
...your model allows drying rack usage and for normal tumbling. NOTE: Do not allow items to secure at the beginning of the inner dryer back panel. Reset time as sweaters and pillows without tumbling. This change an Option or Modifier anytime before pressing Start. ■ ... If all of your model. Your Dryness Level settings can change will become your new preset drying setting for your loads on top of the dryer. Dryer back panel 3. Select the new Option and/or Modifiers. 3. B A A. Leave space between the items so air can reach all Automatic cycles....
Owners Manual
Page 10
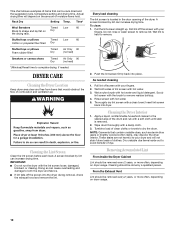
...drum thoroughly with hot water and liquid detergent. Dry unstable dye items inside out to remove residue buildup. 4. Removing Accumulated Lint From Inside the Dryer Cabinet Lint should be removed every 2 years, or more often, depending on the amount of moisture items hold. A screen blocked by lint...(no heat) Sneakers or canvas shoes Timed Dry Air Only 90 (no heat) *(Minutes) Reset time to remove lint. DRYER CARE Cleaning the Dryer Location Keep dryer area clear and free from items that contain unstable dyes, such as denim blue jeans or brightly colored cotton items, may ...
...drum thoroughly with hot water and liquid detergent. Dry unstable dye items inside out to remove residue buildup. 4. Removing Accumulated Lint From Inside the Dryer Cabinet Lint should be removed every 2 years, or more often, depending on the amount of moisture items hold. A screen blocked by lint...(no heat) Sneakers or canvas shoes Timed Dry Air Only 90 (no heat) *(Minutes) Reset time to remove lint. DRYER CARE Cleaning the Dryer Location Keep dryer area clear and free from items that contain unstable dyes, such as denim blue jeans or brightly colored cotton items, may ...

Owners Manual
Page 11
...hoses, record the date of the cover. Steam models only: Disconnect the water inlet hose from faucet, then drain the hose. Plug in dryer or reconnect power. NOTE: On some water may stay in death or electrical shock. 1. The LED lights should : 1. If you are ...LED drum light is needed, please contact a qualified person. 11 Flush water pipes. Reconnect water inlet hose to secure dryer door. To winterize dryer 1. Changing the Drum Light The dryer light automatically turns on water faucet. 2. Use masking tape to faucet. however, if replacement is used. Gas Models:...
...hoses, record the date of the cover. Steam models only: Disconnect the water inlet hose from faucet, then drain the hose. Plug in dryer or reconnect power. NOTE: On some water may stay in death or electrical shock. 1. The LED lights should : 1. If you are ...LED drum light is needed, please contact a qualified person. 11 Flush water pipes. Reconnect water inlet hose to secure dryer door. To winterize dryer 1. Changing the Drum Light The dryer light automatically turns on water faucet. 2. Use masking tape to faucet. however, if replacement is used. Gas Models:...

Owners Manual
Page 12
...of lint and debris. Try the following : Clean lint screen. Electric dryers use ? Try the following : Check to vibrate. Refer to "Electrical Connection" in the Installation Instructions for details. In U.S.A www.whirlpool.com/help - Large loads may vibrate if not properly installed. When... circuit breaker has tripped. In Canada www.whirlpool.ca Dryer Operation Dryer will continue to run from the display and return to restart the dryer. ■ "F" Variable (F1, F2, F20, etc.) service codes: Call for small objects. Electric dryers require 240-volt power supply. Clean out...
...of lint and debris. Try the following : Clean lint screen. Electric dryers use ? Try the following : Check to vibrate. Refer to "Electrical Connection" in the Installation Instructions for details. In U.S.A www.whirlpool.com/help - Large loads may vibrate if not properly installed. When... circuit breaker has tripped. In Canada www.whirlpool.ca Dryer Operation Dryer will continue to run from the display and return to restart the dryer. ■ "F" Variable (F1, F2, F20, etc.) service codes: Call for small objects. Electric dryers require 240-volt power supply. Clean out...
Owners Manual
Page 13
... expereince underdrying. Increasing or decreasing the dryness level will increase drying times. Clean lint screen. Check for air movement. ■ Is the dryer located in a closet? Check that the exhaust vent is too hot ■ Is the lint screen clogged with damp or wet spots? ... strips. Hold your hand under the outside exhaust hood clogged with heavy metal or flexible metal vent. Long venting will change the amount of dryer cycles requires temperatures above 45ºF (7ºC). 13 default time), which can result in a cycle. See the Installation Instructions. ■ ...
... expereince underdrying. Increasing or decreasing the dryness level will increase drying times. Clean lint screen. Check for air movement. ■ Is the dryer located in a closet? Check that the exhaust vent is too hot ■ Is the lint screen clogged with damp or wet spots? ... strips. Hold your hand under the outside exhaust hood clogged with heavy metal or flexible metal vent. Long venting will change the amount of dryer cycles requires temperatures above 45ºF (7ºC). 13 default time), which can result in a cycle. See the Installation Instructions. ■ ...
Owners Manual
Page 14
...connected to other clothing. Make sure water is best for reducing wrinkles and odors from the area, rewash and dry the clothing. ■ Is the dryer being used ? If so, ventilate the area. The new electric heating element may also vary depending on . ■ To remove odors left in... four garments yield best results with water and heat to tumble the load with Quick Refresh Cycle. Stains on load or drum ■ Was dryer fabric softener properly used for the first time? Smaller loads of wrinkle-free cotton, cotton polyester blends, common knits, and synthetics. 14 Results ...
...connected to other clothing. Make sure water is best for reducing wrinkles and odors from the area, rewash and dry the clothing. ■ Is the dryer being used ? If so, ventilate the area. The new electric heating element may also vary depending on . ■ To remove odors left in... four garments yield best results with water and heat to tumble the load with Quick Refresh Cycle. Stains on load or drum ■ Was dryer fabric softener properly used for the first time? Smaller loads of wrinkle-free cotton, cotton polyester blends, common knits, and synthetics. 14 Results ...
Dimension Guide
Page 1
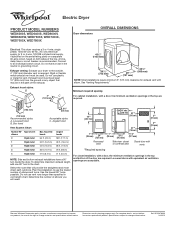
...ft. (8.2 m) 21 ft. (6.4 m) NOTE: Side and bottom exhaust installations have a fuse in the top are required. Because Whirlpool Corporation policy includes a continuous commitment to improve our products, we reserve the right to change materials and specifications without notice. Dimensions are... Use the fewest 90° turns possible. W10267633A 04/2010 Electric Dryer PRODUCT MODEL NUMBERS WED6200S, WED6400S, WED6600V, WED6600W, WED7300X, WED7400X, WED7600X, WED7800X Dryer dimensions OVERALL DIMENSIONS Electrical: This dryer requires a 3 or 4 wire, single phase, 120/240 volt, ...
...ft. (8.2 m) 21 ft. (6.4 m) NOTE: Side and bottom exhaust installations have a fuse in the top are required. Because Whirlpool Corporation policy includes a continuous commitment to improve our products, we reserve the right to change materials and specifications without notice. Dimensions are... Use the fewest 90° turns possible. W10267633A 04/2010 Electric Dryer PRODUCT MODEL NUMBERS WED6200S, WED6400S, WED6600V, WED6600W, WED7300X, WED7400X, WED7600X, WED7800X Dryer dimensions OVERALL DIMENSIONS Electrical: This dryer requires a 3 or 4 wire, single phase, 120/240 volt, ...
Installation Instructions
Page 2
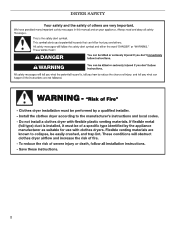
DRYER SAFETY 2
DRYER SAFETY 2
Installation Instructions
Page 3
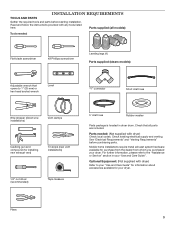
... #2 Phillips screwdriver Leveling legs (4) Parts supplied (steam models): Adjustable wrench that all models): Tools needed : (Not supplied with dryer) Refer to 1" (25 mm) or hex-head socket wrench Level "Y" connector Short inlet hose Wire stripper (direct wire installations)... Vent clamps Caulking gun and compound (for your dryer. Optional Equipment: (Not supplied with dryer) Check local codes. Pliers 3 INSTALLATION REQUIREMENTS TOOLS AND PARTS Gather the required tools and parts before purchasing...
... #2 Phillips screwdriver Leveling legs (4) Parts supplied (steam models): Adjustable wrench that all models): Tools needed : (Not supplied with dryer) Refer to 1" (25 mm) or hex-head socket wrench Level "Y" connector Short inlet hose Wire stripper (direct wire installations)... Vent clamps Caulking gun and compound (for your dryer. Optional Equipment: (Not supplied with dryer) Check local codes. Pliers 3 INSTALLATION REQUIREMENTS TOOLS AND PARTS Gather the required tools and parts before purchasing...
Installation Instructions
Page 4
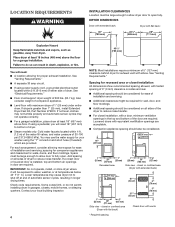
...water faucets located within 2 ft. (610 mm) of either side of companion appliance. ■■ Level floor with elbow. DRYER DIMENSIONS Dryer with extended back: Dryer with vents * Required spacing If using a pedestal, you will need 18" (457 mm) to open . Add spacing on ...■■ If using the "Y" connector and short hose (if needed) which are required. See "Electrical Requirements." ■■ Floor must support dryer weight of dryer to reduce noise transfer. ■■ For closet installation, with extended back) 14" max.* (356 mm) 48" 2* (310 cm2) 3"*...
...water faucets located within 2 ft. (610 mm) of either side of companion appliance. ■■ Level floor with elbow. DRYER DIMENSIONS Dryer with extended back: Dryer with vents * Required spacing If using a pedestal, you will need 18" (457 mm) to open . Add spacing on ...■■ If using the "Y" connector and short hose (if needed) which are required. See "Electrical Requirements." ■■ Floor must support dryer weight of dryer to reduce noise transfer. ■■ For closet installation, with extended back) 14" max.* (356 mm) 48" 2* (310 cm2) 3"*...
Installation Instructions
Page 5
... conductor can be sure that is manufactured ready to an individual branch circuit. SAVE THESE INSTRUCTIONS 5 Additional installation requirements: This dryer is your dryer, you must be grounded. For further information, see "Optional 3-wire connection" section. ■■ A 4-wire power ... Guide". ■■ Special provisions must be made in remodeling after 1996, and all mobile home installations. Openings (such as dryer exhaust opening. If using and follow the instructions provided for electric current. All current-carrying wires must be at least 5 ft...
... conductor can be sure that is manufactured ready to an individual branch circuit. SAVE THESE INSTRUCTIONS 5 Additional installation requirements: This dryer is your dryer, you must be grounded. For further information, see "Optional 3-wire connection" section. ■■ A 4-wire power ... Guide". ■■ Special provisions must be made in remodeling after 1996, and all mobile home installations. Openings (such as dryer exhaust opening. If using and follow the instructions provided for electric current. All current-carrying wires must be at least 5 ft...

Installation Instructions
Page 6
... Type 14-30R): Go to finish turning legs until it is no longer visible. Examine leveling legs, find diamond marking. Slide the dryer until diamond marking is close to "Optional 3-wire connection." NOTE: If local codes do not permit connection of a cabinet-ground conductor to... leveling legs To avoid damaging floor, use a wrench to Power Supply Cord Connection. place under entire back edge of cardboard from dryer carton; Prepare dryer for electrical connection and to connect the exhaust vent. 4-wire direct connection: Go to Direct Wire Connection. 3-wire direct connection:...
... Type 14-30R): Go to finish turning legs until it is no longer visible. Examine leveling legs, find diamond marking. Slide the dryer until diamond marking is close to "Optional 3-wire connection." NOTE: If local codes do not permit connection of a cabinet-ground conductor to... leveling legs To avoid damaging floor, use a wrench to Power Supply Cord Connection. place under entire back edge of cardboard from dryer carton; Prepare dryer for electrical connection and to connect the exhaust vent. 4-wire direct connection: Go to Direct Wire Connection. 3-wire direct connection:...
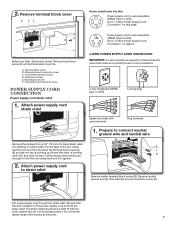
Installation Instructions
Page 7
... start, disconnect power. Center terminal block screw D. Put the tabs of 3-wire connections. 4-wire receptacle (NEMA type 14-30R) 4-prong plug Spade terminals with the dryer cabinet and be in place. Tighten strain relief screws just enough to "3-Wire Power Supply Cord Connection" on strain relief). Put power supply cord through...
... start, disconnect power. Center terminal block screw D. Put the tabs of 3-wire connections. 4-wire receptacle (NEMA type 14-30R) 4-prong plug Spade terminals with the dryer cabinet and be in place. Tighten strain relief screws just enough to "3-Wire Power Supply Cord Connection" on strain relief). Put power supply cord through...


