Owners Manual
Page 4
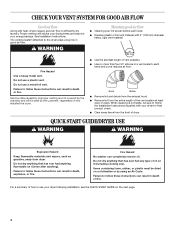
... in death, explosion, or fire. each load. ■ Replace plastic or foil vent material with 4" (102 mm) diameter heavy, rigid vent material. Fire Hazard No washer can result in death or fire. CHECK YOUR VENT SYSTEM FOR GOOD AIR FLOW Good air flow Along with your dryer following installation, see the...
... in death, explosion, or fire. each load. ■ Replace plastic or foil vent material with 4" (102 mm) diameter heavy, rigid vent material. Fire Hazard No washer can result in death or fire. CHECK YOUR VENT SYSTEM FOR GOOD AIR FLOW Good air flow Along with your dryer following installation, see the...
Installation Instructions
Page 3
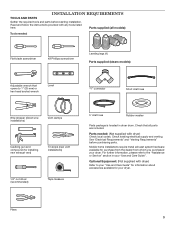
... Care Guide" for information about accessories available for installing new exhaust vent) Tin snips (new vent installations) 1/4" nut driver (recommended) Tape measure 5' inlet hose Rubber washer Parts package is located in your "Use and Care Guide". Check existing electrical supply and venting.
... Care Guide" for information about accessories available for installing new exhaust vent) Tin snips (new vent installations) 1/4" nut driver (recommended) Tape measure 5' inlet hose Rubber washer Parts package is located in your "Use and Care Guide". Check existing electrical supply and venting.
Installation Instructions
Page 4
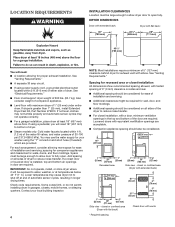
... water, weather, or at least 18" (457 mm) above floor. Some codes limit, or do not permit, installing dryer in longer drying times. Contact your washer using the "Y" connector and short hose (if needed) which are required. closet or confined area (Dryer with maximum slope of companion appliance. ■■ Level...
... water, weather, or at least 18" (457 mm) above floor. Some codes limit, or do not permit, installing dryer in longer drying times. Contact your washer using the "Y" connector and short hose (if needed) which are required. closet or confined area (Dryer with maximum slope of companion appliance. ■■ Level...
Installation Instructions
Page 14
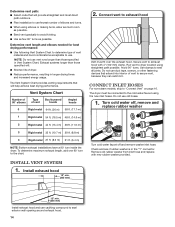
...requirements that will help achieve best drying performance. Install exhaust hood 12" min. (305 mm) 2. Secure vent to exhaust hood with new rubber washer provided. 12" min. (305 mm) Install exhaust hood and use duct tape, screws, or other fastening devices that extend into interior of ... SYSTEM 1. To determine maximum exhaust length, add one 90° turn inside the dryer. Check and see if rubber washer is in Vent System Chart. Remove old rubber washer from inlet hose and replace with 4" (102 mm) clamp. Determine vent length and elbows needed for best drying performance:...
...requirements that will help achieve best drying performance. Install exhaust hood 12" min. (305 mm) 2. Secure vent to exhaust hood with new rubber washer provided. 12" min. (305 mm) Install exhaust hood and use duct tape, screws, or other fastening devices that extend into interior of ... SYSTEM 1. To determine maximum exhaust length, add one 90° turn inside the dryer. Check and see if rubber washer is in Vent System Chart. Remove old rubber washer from inlet hose and replace with 4" (102 mm) clamp. Determine vent length and elbows needed for best drying performance:...
Installation Instructions
Page 15
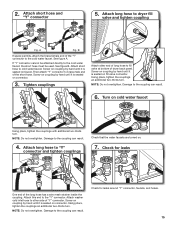
A Fig. See figure A. Then attach "Y" connector to brass male end of "Y" connector. Screw on coupling by hand until it is seated on connector. Attach washer cold inlet hose to the cold water faucet. Attach short hose and "Y" connector 5. Attach short hose to the coupling can result. Tighten couplings Attach other ...
A Fig. See figure A. Then attach "Y" connector to brass male end of "Y" connector. Screw on coupling by hand until it is seated on connector. Attach washer cold inlet hose to the cold water faucet. Attach short hose and "Y" connector 5. Attach short hose to the coupling can result. Tighten couplings Attach other ...


