
Use and Care Guide
Page 8
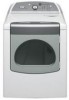
...or Off) is selected. WRINKLE SHIELD™ Setting Option The WRINKLE SHIELD™ setting helps keep wrinkles from forming when you cannot unload the dryer promptly at the end of a cycle. Promptly removing clothes at the end of the cycle reduces wrinkling. Status Lights Follow the progress of ...8482; setting at any time by pressing WRINKLE SHIELD™ setting or opening the dryer door. ■ For the Perm Press/Casual Cycle, the WRINKLE SHIELD™ setting is not detected after cool down part of time remaining. During this option is finished. Cool Down The Cool Down ...
...or Off) is selected. WRINKLE SHIELD™ Setting Option The WRINKLE SHIELD™ setting helps keep wrinkles from forming when you cannot unload the dryer promptly at the end of a cycle. Promptly removing clothes at the end of the cycle reduces wrinkling. Status Lights Follow the progress of ...8482; setting at any time by pressing WRINKLE SHIELD™ setting or opening the dryer door. ■ For the Perm Press/Casual Cycle, the WRINKLE SHIELD™ setting is not detected after cool down part of time remaining. During this option is finished. Cool Down The Cool Down ...
Use and Care Guide
Page 11
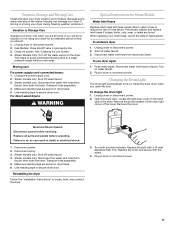
... some water may stay in the hoses, freezing can result in death or electrical shock. 1. Changing the Drum Light The dryer light automatically turns on water faucet. 2. Open the dryer door. Disconnect power. 2. Make sure leveling legs are found. Turn bulb counterclockwise... level, and connect the dryer. 3. Remove the screw located in dryer base. 6. Transport hose separately. 5. Transport hose separately. 4. Plug in dryer or reconnect power. 11 Replace all parts and panels before servicing. Vacation or Storage Care Operate your dryer during freezing weather, winterize ...
... some water may stay in the hoses, freezing can result in death or electrical shock. 1. Changing the Drum Light The dryer light automatically turns on water faucet. 2. Open the dryer door. Disconnect power. 2. Make sure leveling legs are found. Turn bulb counterclockwise... level, and connect the dryer. 3. Remove the screw located in dryer base. 6. Transport hose separately. 5. Transport hose separately. 4. Plug in dryer or reconnect power. 11 Replace all parts and panels before servicing. Vacation or Storage Care Operate your dryer during freezing weather, winterize ...
Use and Care Guide
Page 15
...excluded from warranty coverage. 4. If you . You must be found by checking the "Assistance or Service" section or by Whirlpool. 5. Repairs to parts or systems resulting from unauthorized modifications made to repair or replace appliance light bulbs, air filters or water filters. EXCLUSION OF ...major appliance, to replace or repair house fuses, or to use of products not approved by calling Whirlpool. Replacement parts or repair labor on major appliances with electrical or plumbing codes, or use your major appliance is located in accordance with original model/serial numbers ...
...excluded from warranty coverage. 4. If you . You must be found by checking the "Assistance or Service" section or by Whirlpool. 5. Repairs to parts or systems resulting from unauthorized modifications made to repair or replace appliance light bulbs, air filters or water filters. EXCLUSION OF ...major appliance, to replace or repair house fuses, or to use of products not approved by calling Whirlpool. Replacement parts or repair labor on major appliances with electrical or plumbing codes, or use your major appliance is located in accordance with original model/serial numbers ...


