Use and Care Manual
Page 3
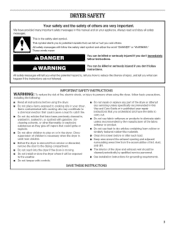
...basic precautions, including the following: [] Read all safety messages. iMPORTANT SAFETY iNSTRUCTiONS WARNING: To reduce the risk of fire, electric shock, or injury to persons when using the dryer. [] Do not place items exposed to catch fire. [] Do not dry articles that you understand and have been previously ...cleaned in, washed in, soaked in, or spotted with controls. [] Do not repair or replace any part of the dryer or attempt any servicing unless specifically recommended in this Use and Care Guide or in this manual and on or in your appliance....
...basic precautions, including the following: [] Read all safety messages. iMPORTANT SAFETY iNSTRUCTiONS WARNING: To reduce the risk of fire, electric shock, or injury to persons when using the dryer. [] Do not place items exposed to catch fire. [] Do not dry articles that you understand and have been previously ...cleaned in, washed in, soaked in, or spotted with controls. [] Do not repair or replace any part of the dryer or attempt any servicing unless specifically recommended in this Use and Care Guide or in this manual and on or in your appliance....
Use and Care Manual
Page 4
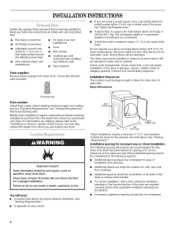
...door are using a power supply cord, a grounded electrical outlet located within 2 ft (61 cm) of either side of this dryer. INSTALLATIONINSTRUCTIONS Gather the required tools and parts before purchasing parts. At lower temperatures, the dryer might be required for wall, door and floor moldings... "Venting Requirements." • A separate 30-amp circuit. 431/2' (110.5 *29¼" (74.3 cm), 29" (73.7 cm) !2¼" (56.5 cm) *Most installations require a minimum 5" (12.7 cm) clearance behind the dryer for this manual. Read and follow the instructions provided with any tools listed here....
...door are using a power supply cord, a grounded electrical outlet located within 2 ft (61 cm) of either side of this dryer. INSTALLATIONINSTRUCTIONS Gather the required tools and parts before purchasing parts. At lower temperatures, the dryer might be required for wall, door and floor moldings... "Venting Requirements." • A separate 30-amp circuit. 431/2' (110.5 *29¼" (74.3 cm), 29" (73.7 cm) !2¼" (56.5 cm) *Most installations require a minimum 5" (12.7 cm) clearance behind the dryer for this manual. Read and follow the instructions provided with any tools listed here....
Use and Care Manual
Page 5
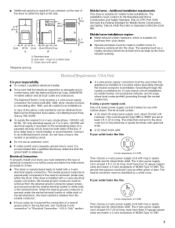
... here. • This dryer is permanently connected to install with a 4-wire electrical supply connection, the neutral ground conductor must be using a power supply cord: Use a UL listed power supply cord kit marked for Mobile Home Construction and Safety, Title 24, HUD Part 280) or Standard CAN/...through the neutral conductors. Do not have three 10-gauge copper wires and match a 3-wire receptacle of electrical connection you will be made in mobile homes to the dryer must be either green or bare. If using and follow the instructions provided for (1) new branch-circuit ...
... here. • This dryer is permanently connected to install with a 4-wire electrical supply connection, the neutral ground conductor must be using a power supply cord: Use a UL listed power supply cord kit marked for Mobile Home Construction and Safety, Title 24, HUD Part 280) or Standard CAN/...through the neutral conductors. Do not have three 10-gauge copper wires and match a 3-wire receptacle of electrical connection you will be made in mobile homes to the dryer must be either green or bare. If using and follow the instructions provided for (1) new branch-circuit ...
Use and Care Manual
Page 6
... not use Power Supply Cord Replacement Part Number 3394208. Be sure wall receptacle is equipped with a qualified electrician or service representative or personnel if you are using a replacement power supply cord, it will reduce the risk of electric shock by providing a path of ...or an equipment-grounding conductor must be connected to the equipment-grounding terminal or lead on both sides of electric shock. GROUNDING INSTRUCTIONS [] For a grounded, cord-connected dryer: This dryer must be plugged into a grounded 4 prong outlet, Failure to an individual branch circuit. In the ...
... not use Power Supply Cord Replacement Part Number 3394208. Be sure wall receptacle is equipped with a qualified electrician or service representative or personnel if you are using a replacement power supply cord, it will reduce the risk of electric shock by providing a path of ...or an equipment-grounding conductor must be connected to the equipment-grounding terminal or lead on both sides of electric shock. GROUNDING INSTRUCTIONS [] For a grounded, cord-connected dryer: This dryer must be plugged into a grounded 4 prong outlet, Failure to an individual branch circuit. In the ...
Use and Care Manual
Page 12
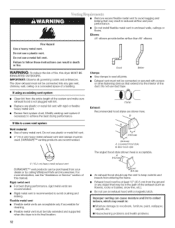
...: To reduce the risk of this manual. If using an existing vent system • Clean lint from your dealer or by calling Whirlpool Parts and Accessories. DURASAFE TM venting products are recommended. • Rigid metal vent is recommended to achieve the best drying performance. Clamp Exhaust...2cm) heavymetal exhaust vent DURASAFE TM vent products can cause moisture and lint to collect indoors, which may be fully extended and supported when the dryer is not plugged with lint. • Replace any gas vent, chimney, wall, ceiling or a concealed space of the exhaust (such as flowers...
...: To reduce the risk of this manual. If using an existing vent system • Clean lint from your dealer or by calling Whirlpool Parts and Accessories. DURASAFE TM venting products are recommended. • Rigid metal vent is recommended to achieve the best drying performance. Clamp Exhaust...2cm) heavymetal exhaust vent DURASAFE TM vent products can cause moisture and lint to collect indoors, which may be fully extended and supported when the dryer is not plugged with lint. • Replace any gas vent, chimney, wall, ceiling or a concealed space of the exhaust (such as flowers...
Use and Care Manual
Page 13
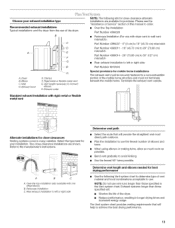
...elbows H. Rear exhaust installation (also available with dryer vent to wall vent mismatch): Part Number 4396037 - 0" (0 cm) to 18" (45.72 cm) mismatch Part Number 4396011 - 18" (45.72 cm) to 29" (73.66 cm) mismatch Part Number 4396014 - 29" (73.66 cm) to 50" (.... -.q... B / A ¸- .-- B C A. Terminate the exhaust vent outside. Dryer B. m A. Over-the-top installation offset elbow) B. NOTE: Do not use with one to left or right side: Part Number 8212504 Special provisions for purchase. S Alternate installations for close -clearance installations are available for...
...elbows H. Rear exhaust installation (also available with dryer vent to wall vent mismatch): Part Number 4396037 - 0" (0 cm) to 18" (45.72 cm) mismatch Part Number 4396011 - 18" (45.72 cm) to 29" (73.66 cm) mismatch Part Number 4396014 - 29" (73.66 cm) to 50" (.... -.q... B / A ¸- .-- B C A. Terminate the exhaust vent outside. Dryer B. m A. Over-the-top installation offset elbow) B. NOTE: Do not use with one to left or right side: Part Number 8212504 Special provisions for purchase. S Alternate installations for close -clearance installations are available for...
Use and Care Manual
Page 16
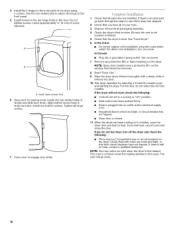
... in the door. If there is level. Check that the dryer is an extra part, go away. 16 In Canada • Plug into a grounded outlet. Read "Dryer Use." 9. Test dryer operation by placing screw heads into an outlet and/or electrical supply is on the window that all of your tools. 3.... Install two bottom screws. Check that should be 2 household fuses or circuit breakers for the dryer. If you have all parts are now installed. If there is first used....
... in the door. If there is level. Check that the dryer is an extra part, go away. 16 In Canada • Plug into a grounded outlet. Read "Dryer Use." 9. Test dryer operation by placing screw heads into an outlet and/or electrical supply is on the window that all of your tools. 3.... Install two bottom screws. Check that should be 2 household fuses or circuit breakers for the dryer. If you have all parts are now installed. If there is first used....

Use and Care Manual
Page 19
... items wrinkled from such items as exercise wear, can change the actual time in the cycle by pressing the Time Adjust up or down part of load you are still damp after an Automatic Cycle. Done The Done light illuminates when the drying cycle is selected. You can be...laundry is selected, the Estimated Time Remaining display shows the actual time remaining in your cycle. See Automatic or Timed Preset Cycle Settings charts. See "Dryer Rack." When a Timed Cycle is approximately 80% dry. Timed Dry is also useful for drying heavyweight and bulky items, such as lingerie, blouses ...
... items wrinkled from such items as exercise wear, can change the actual time in the cycle by pressing the Time Adjust up or down part of load you are still damp after an Automatic Cycle. Done The Done light illuminates when the drying cycle is selected. You can be...laundry is selected, the Estimated Time Remaining display shows the actual time remaining in your cycle. See Automatic or Timed Preset Cycle Settings charts. See "Dryer Rack." When a Timed Cycle is approximately 80% dry. Timed Dry is also useful for drying heavyweight and bulky items, such as lingerie, blouses ...
Use and Care Manual
Page 23
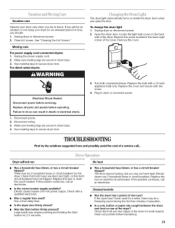
... disconnect power. 2. Locate the light bulb cover on inside the dryer drum when you are intact and tight, or that both circuit breakers have heat. Replace all parts and panels before servicing. Replace the cover and secure with a 10-watt appliance bulb only. Check... the drum and front or rear of operation. Moving care For power supply cord-connected dryers: 1. Electric dryers use ? If the dryer hasn't been used ? Clean out pockets before laundering. 23 Unplug dryer or disconnect power. 2. TROUBLESHOOTING First try the solutions suggested here and possibly avoid the ...
... disconnect power. 2. Locate the light bulb cover on inside the dryer drum when you are intact and tight, or that both circuit breakers have heat. Replace all parts and panels before servicing. Replace the cover and secure with a 10-watt appliance bulb only. Check... the drum and front or rear of operation. Moving care For power supply cord-connected dryers: 1. Electric dryers use ? If the dryer hasn't been used ? Clean out pockets before laundering. 23 Unplug dryer or disconnect power. 2. TROUBLESHOOTING First try the solutions suggested here and possibly avoid the ...
Use and Care Manual
Page 25
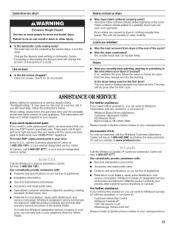
... or fumes are made with the same precision used to Whirlpool Canada LP with : • Use and maintenance procedures • Accessory and repair parts sales • Features and specifications on our full line of the cycle? • Was the dryer overloaded? The new electric heating element may save you only use FSP° factory...
... or fumes are made with the same precision used to Whirlpool Canada LP with : • Use and maintenance procedures • Accessory and repair parts sales • Features and specifications on our full line of the cycle? • Was the dryer overloaded? The new electric heating element may save you only use FSP° factory...

Use and Care Manual
Page 26
... about your major appliance to know your complete model number and serial number. ITEMS WHIRLPOOL WILL NOT PAY FOR 1. Any food loss due to determine if another warranty applies. Replacement parts or repair labor costs when the major appliance is used in a country other than...this book and your sales slip together for future reference. Those consumable parts are excluded from warranty coverage. 3. This major appliance is operated and maintained according to instructions attached to or furnished with electrical or plumbing codes, or use of purchase or installation date for in...
... about your major appliance to know your complete model number and serial number. ITEMS WHIRLPOOL WILL NOT PAY FOR 1. Any food loss due to determine if another warranty applies. Replacement parts or repair labor costs when the major appliance is used in a country other than...this book and your sales slip together for future reference. Those consumable parts are excluded from warranty coverage. 3. This major appliance is operated and maintained according to instructions attached to or furnished with electrical or plumbing codes, or use of purchase or installation date for in...


