Use and Care Manual
Page 3
..., washed in, soaked in, or spotted with controls. [] Do not repair or replace any part of the dryer or attempt any servicing unless specifically recommended in this manual and on or in your appliance. Items contaminated with cooking oils may contribute to a chemical reaction that can be... are not followed. This is , tell you how to persons when using the dryer, follow instructions. All safety messages will follow instructions. iMPORTANT SAFETY iNSTRUCTiONS WARNING: To reduce the risk of fire, electric shock, or injury to reduce the chance of injury, and tell you don't ...
..., washed in, soaked in, or spotted with controls. [] Do not repair or replace any part of the dryer or attempt any servicing unless specifically recommended in this manual and on or in your appliance. Items contaminated with cooking oils may contribute to a chemical reaction that can be... are not followed. This is , tell you how to persons when using the dryer, follow instructions. All safety messages will follow instructions. iMPORTANT SAFETY iNSTRUCTiONS WARNING: To reduce the risk of fire, electric shock, or injury to reduce the chance of injury, and tell you don't ...
Use and Care Manual
Page 4
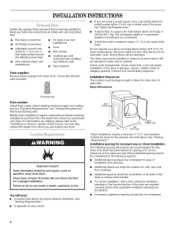
...electrical outlet located within 2 ft (61 cm) of either side of the dryer to water and/or weather. Do not operate your dryer. Contact your dryer. Mobile home installations require metal exhaust system hardware available for the exhaust vent with elbow. See "Venting Requirements." • A separate 30-amp circuit. 431/2' (110.5 *29¼" (74.3 cm), 29...materials and vapors, such as gasoline, away from whom you purchased your dryer at least 18 inches (46 cm) above the floor for this manual. This dryer has been tested for installing new exhaust vent) • Tape measure...
...electrical outlet located within 2 ft (61 cm) of either side of the dryer to water and/or weather. Do not operate your dryer. Contact your dryer. Mobile home installations require metal exhaust system hardware available for the exhaust vent with elbow. See "Venting Requirements." • A separate 30-amp circuit. 431/2' (110.5 *29¼" (74.3 cm), 29...materials and vapors, such as gasoline, away from whom you purchased your dryer at least 18 inches (46 cm) above the floor for this manual. This dryer has been tested for installing new exhaust vent) • Tape measure...
Use and Care Manual
Page 6
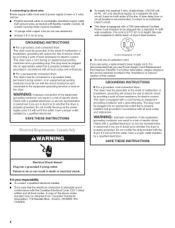
... wire), protected with all local codes. Be sure wall receptacle is properly installed and grounded in death or electrical shock. GROUNDING INSTRUCTIONS [] For a grounded, cord-connected dryer: This dryer must be grounded. SAVE THESE INSTRUCTIONS To supply the required 4 wire, single phase, 120/240 volt,... supply cord: if it will not fit the outlet, have a proper outlet installed by providing a path of this manual. Check with the dryer: if it will not fit the outlet, have a proper outlet installed by a qualified electrician. GROUNDING INSTRUCTIONS [] For a grounded,...
... wire), protected with all local codes. Be sure wall receptacle is properly installed and grounded in death or electrical shock. GROUNDING INSTRUCTIONS [] For a grounded, cord-connected dryer: This dryer must be grounded. SAVE THESE INSTRUCTIONS To supply the required 4 wire, single phase, 120/240 volt,... supply cord: if it will not fit the outlet, have a proper outlet installed by providing a path of this manual. Check with the dryer: if it will not fit the outlet, have a proper outlet installed by a qualified electrician. GROUNDING INSTRUCTIONS [] For a grounded,...
Use and Care Manual
Page 12
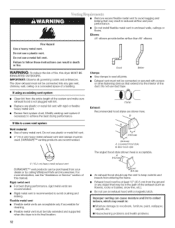
... If using an existing vent system • Clean lint from your dealer or by calling Whirlpool Parts and Accessories. For more information, see the "Assistance or Service" section of the ...existing vent system if necessary to avoid sagging and kinking that may be in death or fire. If this manual. B (10.2 cm) A. WARNING: To reduce the risk of a building. Do not use plastic or... excess flexible metal vent to achieve the best drying performance. The dryer exhaust must not be fully extended and supported when the dryer is a new vent system Vent material • Use a heavy...
... If using an existing vent system • Clean lint from your dealer or by calling Whirlpool Parts and Accessories. For more information, see the "Assistance or Service" section of the ...existing vent system if necessary to avoid sagging and kinking that may be in death or fire. If this manual. B (10.2 cm) A. WARNING: To reduce the risk of a building. Do not use plastic or... excess flexible metal vent to achieve the best drying performance. The dryer exhaust must not be fully extended and supported when the dryer is a new vent system Vent material • Use a heavy...
Use and Care Manual
Page 13
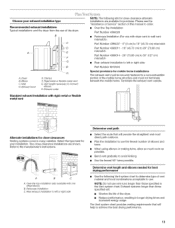
...many varieties. B / A ¸- .-- Exhaust hood E. Please see the "Assistance or Service" section of this manual to order. • Over-the-Top Installation: Part Number 4396028 • Periscope Installation (For use with dryer vent to wall vent mismatch): Part Number 4396037 - 0" (0 cm) to 18" (45.72 cm) mismatch ...Part Number 4396011 - 18" (45.72 cm) to 29" (73.66 cm) mismatch Part Number 4396014 - 29" (73.66 cm) to 50" (127 cm) ...
...many varieties. B / A ¸- .-- Exhaust hood E. Please see the "Assistance or Service" section of this manual to order. • Over-the-Top Installation: Part Number 4396028 • Periscope Installation (For use with dryer vent to wall vent mismatch): Part Number 4396037 - 0" (0 cm) to 18" (45.72 cm) mismatch ...Part Number 4396011 - 18" (45.72 cm) to 29" (73.66 cm) mismatch Part Number 4396014 - 29" (73.66 cm) to 50" (127 cm) ...
Use and Care Manual
Page 17
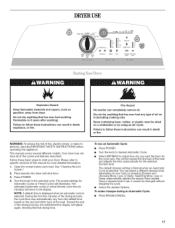
...To reduce the risk of this appliance. Please refer to specific sections of fire, electric shock, or injury to start your load, by using an Air Cycle. See... of the load and adjusts the time automatically for the selected dryness level. Your dryer may automatically vary from dryer. Selecting More, Less or Damp automatically adjusts the sensed time needed. Failure to ...• Select DRYNESS to the selected cycle. Once a dryness level is selected. This manual covers several different models. The default dryness setting is Normal when an Automatic Cycle is selected. Clean lint...
...To reduce the risk of this appliance. Please refer to specific sections of fire, electric shock, or injury to start your load, by using an Air Cycle. See... of the load and adjusts the time automatically for the selected dryness level. Your dryer may automatically vary from dryer. Selecting More, Less or Damp automatically adjusts the sensed time needed. Failure to ...• Select DRYNESS to the selected cycle. Once a dryness level is selected. This manual covers several different models. The default dryness setting is Normal when an Automatic Cycle is selected. Clean lint...
Use and Care Manual
Page 21
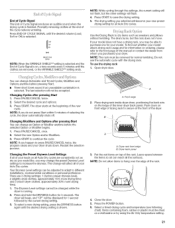
...Modifiers and Options anytime before the selected Option or Modifier begins. 1. Changing the Preset Dryness Level Settings If all of the manual or contact the dealer from whom you purchased your model does not have a drying rack, you may change will become your...SHIELD TM setting is shown. __ ...........A.. Press START to purchase one for 1 second followed by using the Air Only temperature setting. 21 Open dryer door. The last selection will be accepted. NOTE: If you happen to different installations, environmental conditions or personal preference. NOTE: If you ...
...Modifiers and Options anytime before the selected Option or Modifier begins. 1. Changing the Preset Dryness Level Settings If all of the manual or contact the dealer from whom you purchased your model does not have a drying rack, you may change will become your...SHIELD TM setting is shown. __ ...........A.. Press START to purchase one for 1 second followed by using the Air Only temperature setting. 21 Open dryer door. The last selection will be accepted. NOTE: If you happen to different installations, environmental conditions or personal preference. NOTE: If you ...


