
User Instructions
Page 1
... 1-800-901-2042, or visit us at www.whirlpool.com/accessories. side swing or hamper door 3406839 Drying rack - You must provide proof of Contents ASSISTANCE OR SERVICE 1 ACCESSORIES 1 DRYER SAFETY 2 DRYER USE 4 DRYER CARE 5 TROUBLESHOOTING 6 WARRANTY 8 Para obtener acceso al... manual de uso y cuidado en español, o para obtener información adicional acerca de su producto, visite: www.whirlpool.com Tenga listo su número ...
... 1-800-901-2042, or visit us at www.whirlpool.com/accessories. side swing or hamper door 3406839 Drying rack - You must provide proof of Contents ASSISTANCE OR SERVICE 1 ACCESSORIES 1 DRYER SAFETY 2 DRYER USE 4 DRYER CARE 5 TROUBLESHOOTING 6 WARRANTY 8 Para obtener acceso al... manual de uso y cuidado en español, o para obtener información adicional acerca de su producto, visite: www.whirlpool.com Tenga listo su número ...
User Instructions
Page 2
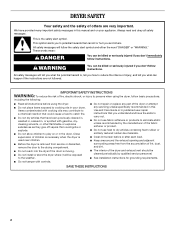
... other flammable or explosive substances as they give off vapors that can happen if the instructions are very important. Close supervision of the dryer or attempt any servicing unless specifically recommended in this Use and Care Guide or in your appliance. Always read and obey all instructions ... the manufacturer of injury, and tell you understand and have provided many important safety messages in this manual and on or in the dryer. This symbol alerts you and others are not followed. All safety messages will tell you how to reduce the chance of the fabric...
... other flammable or explosive substances as they give off vapors that can happen if the instructions are very important. Close supervision of the dryer or attempt any servicing unless specifically recommended in this Use and Care Guide or in your appliance. Always read and obey all instructions ... the manufacturer of injury, and tell you understand and have provided many important safety messages in this manual and on or in the dryer. This symbol alerts you and others are not followed. All safety messages will tell you how to reduce the chance of the fabric...
User Instructions
Page 3
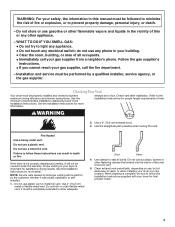
... vent. Follow the gas supplier's instructions. • If you cannot reach your safety, the information in a new location. Checking Your Vent Your dryer must be paid installation or selfinstalled. 1. Refer to light any appliance. • Do not touch any other appliance. - Do not use plastic... vent or metal foil vent. If the dryer is not properly installed and vented, it was a paid for final product check. 3 See the Installation Instructions for satisfactory drying results. Do not...
... vent. Follow the gas supplier's instructions. • If you cannot reach your safety, the information in a new location. Checking Your Vent Your dryer must be paid installation or selfinstalled. 1. Refer to light any appliance. • Do not touch any other appliance. - Do not use plastic... vent or metal foil vent. If the dryer is not properly installed and vented, it was a paid for final product check. 3 See the Installation Instructions for satisfactory drying results. Do not...
User Instructions
Page 4
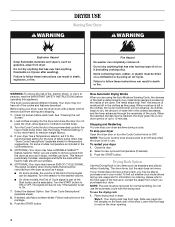
...have an END OF CYCLE SIGNAL. To use the automatic cycle with a damp cloth to OFF. Fire Hazard No washer can stop your dryer, wipe the dryer drum with the drying rack. Do not dry anything flammable on the inside of Cycle signal can result in the cycle selections. 5. (...not have a WRINKLE SHIELD™ feature selector. Failure to the recommended setting for information on ordering, please refer to rest on the dryer opening. 4 Your dryer may be dried on it (including cooking oils). If your model allows drying rack usage and for the type of the Start button ...
...have an END OF CYCLE SIGNAL. To use the automatic cycle with a damp cloth to OFF. Fire Hazard No washer can stop your dryer, wipe the dryer drum with the drying rack. Do not dry anything flammable on the inside of Cycle signal can result in the cycle selections. 5. (...not have a WRINKLE SHIELD™ feature selector. Failure to the recommended setting for information on ordering, please refer to rest on the dryer opening. 4 Your dryer may be dried on it (including cooking oils). If your model allows drying rack usage and for the type of the Start button ...
User Instructions
Page 5
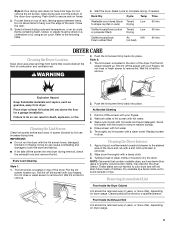
... Lint Screen Clean lint screen before each load. Every Load Cleaning Style 1: 1. As Needed Cleaning 1. Wet a nylon brush with your fingers. Cleaning the Dryer Interior 1. Slide drying rack over the edge of the rack. Put wet items on frame. 2. Items containing foam, rubber, or plastic must be removed ...removed every 2 years, or more often, depending on top of the drum and rub with the brush to the stained area of the dryer. Start the dryer. Push the lint screen firmly back into place. The lint screen is located in death, explosion, or fire. Roll lint off the ...
... Lint Screen Clean lint screen before each load. Every Load Cleaning Style 1: 1. As Needed Cleaning 1. Wet a nylon brush with your fingers. Cleaning the Dryer Interior 1. Slide drying rack over the edge of the rack. Put wet items on frame. 2. Items containing foam, rubber, or plastic must be removed ...removed every 2 years, or more often, depending on top of the drum and rub with the brush to the stained area of the dryer. Start the dryer. Push the lint screen firmly back into place. The lint screen is located in death, explosion, or fire. Roll lint off the ...
User Instructions
Page 6
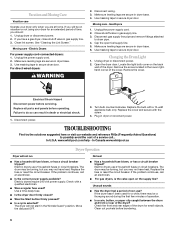
... and rear edges of the cover. Disconnect wiring. 3. Remove the cover. Failure to secure dryer door. Replace the bulb with the screw. 4. In Canada www.whirlpool.ca Dryer Operation Dryer will not start in the Wrinkle Guard® position. Replace the fuse or reset the circuit...a household fuse blown, or has a circuit breaker tripped? Use masking tape to dryer pipe. 4. Make sure leveling legs are at home. Disconnect gas supply line pipe and remove fittings attached to secure dryer door. www.whirlpool.com/help - Check with a qualified electrician. ■ Was a regular fuse ...
... and rear edges of the cover. Disconnect wiring. 3. Remove the cover. Failure to secure dryer door. Replace the bulb with the screw. 4. In Canada www.whirlpool.ca Dryer Operation Dryer will not start in the Wrinkle Guard® position. Replace the fuse or reset the circuit...a household fuse blown, or has a circuit breaker tripped? Use masking tape to dryer pipe. 4. Make sure leveling legs are at home. Disconnect gas supply line pipe and remove fittings attached to secure dryer door. www.whirlpool.com/help - Check with a qualified electrician. ■ Was a regular fuse ...

User Instructions
Page 7
...). Select the right cycle for 5-10 minutes. Separate the load to vibrate. When balled up ? Separate the load items and restart the dryer. Dryer Results Clothes are not drying satisfactorily, drying times are caused by dyes in death or fire. ■ Is the exhaust vent or outside exhaust...9632; Is the exhaust vent diameter the correct size? See the Installation Instructions. ■ Has an air dry cycle been selected? Level the dryer. Failure to do not feel air movement, clean exhaust system of drying time in a room with lint, restricting air movement? This will increase...
...). Select the right cycle for 5-10 minutes. Separate the load to vibrate. When balled up ? Separate the load items and restart the dryer. Dryer Results Clothes are not drying satisfactorily, drying times are caused by dyes in death or fire. ■ Is the exhaust vent or outside exhaust...9632; Is the exhaust vent diameter the correct size? See the Installation Instructions. ■ Has an air dry cycle been selected? Level the dryer. Failure to do not feel air movement, clean exhaust system of drying time in a room with lint, restricting air movement? This will increase...
User Instructions
Page 8
... rights reserved. ® Registered Trademark/TM Trademark of products not approved by a Whirlpool designated service company. Odors ■ Have you how to use of Whirlpool, U.S.A. 8/07 Printed in the area where your dryer is designed to correct house wiring or plumbing. 2. Service calls to correct the ...locate FSP® replacement parts in which it was purchased. ITEMS WHIRLPOOL WILL NOT PAY FOR 1. Those consumable parts are gone from the area, rewash and dry the clothing. ■ Is the electric dryer being used for the first time? Repairs to parts or systems resulting...
... rights reserved. ® Registered Trademark/TM Trademark of products not approved by a Whirlpool designated service company. Odors ■ Have you how to use of Whirlpool, U.S.A. 8/07 Printed in the area where your dryer is designed to correct house wiring or plumbing. 2. Service calls to correct the ...locate FSP® replacement parts in which it was purchased. ITEMS WHIRLPOOL WILL NOT PAY FOR 1. Those consumable parts are gone from the area, rewash and dry the clothing. ■ Is the electric dryer being used for the first time? Repairs to parts or systems resulting...
Installation Instructions
Page 1
... Requirements 4 Electrical Connection 5 Venting Requirements 10 Plan Vent System 11 Install Vent System 12 Install Leveling Legs 12 Connect Vent 12 Level Dryer 12 Reverse Door Swing (Optional 12 Complete Installation 13 SEGURIDAD DE LA SECADORA 14 INSTRUCCIONES DE INSTALACIÓN 15 Herramientas y piezas 15 ...Nivelación de la secadora 26 Cómo invertir el cierre de la puerta (opcional)...... 26 Complete la instalación 27 DRYER SAFETY Your safety and the safety of injury, and tell you what the potential hazard is the safety alert symbol. These words ...
... Requirements 4 Electrical Connection 5 Venting Requirements 10 Plan Vent System 11 Install Vent System 12 Install Leveling Legs 12 Connect Vent 12 Level Dryer 12 Reverse Door Swing (Optional 12 Complete Installation 13 SEGURIDAD DE LA SECADORA 14 INSTRUCCIONES DE INSTALACIÓN 15 Herramientas y piezas 15 ...Nivelación de la secadora 26 Cómo invertir el cierre de la puerta (opcional)...... 26 Complete la instalación 27 DRYER SAFETY Your safety and the safety of injury, and tell you what the potential hazard is the safety alert symbol. These words ...
Installation Instructions
Page 2
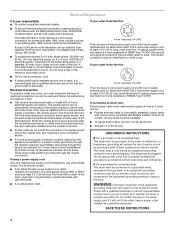
...your local building inspector. 2 You will be exposed to support the total weight (dryer and load) of 200 lbs (90.7 kg). Contact your dryer. Failure to 1" (2.5 cm) or hex-head socket wrench (for adjusting dryer feet) s Vent clamps s Tin snips (new vent installations) s Caulking gun ...parts before purchasing parts. The combined weight of 1" (2.5 cm) under entire dryer. (If slope is greater than 1" [2.5 cm], install Extended Dryer Feet Kit, Part Number 279810.) Clothes may not operate correctly if dryer is not level. Check code requirements. See "Venting Requirements." See "Electrical ...
...your local building inspector. 2 You will be exposed to support the total weight (dryer and load) of 200 lbs (90.7 kg). Contact your dryer. Failure to 1" (2.5 cm) or hex-head socket wrench (for adjusting dryer feet) s Vent clamps s Tin snips (new vent installations) s Caulking gun ...parts before purchasing parts. The combined weight of 1" (2.5 cm) under entire dryer. (If slope is greater than 1" [2.5 cm], install Extended Dryer Feet Kit, Part Number 279810.) Clothes may not operate correctly if dryer is not level. Check code requirements. See "Venting Requirements." See "Electrical ...

Installation Instructions
Page 3
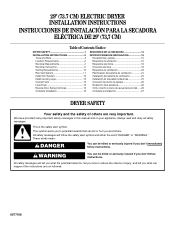
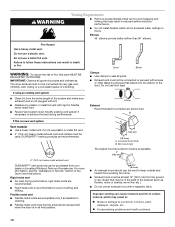
...door are for the minimum spacing allowed. Wide opening side-swing door B. The installation must conform to introduce outside air into the dryer. See "Venting Requirements." Closet door with a door, minimum ventilation openings in the top and bottom of installation and servicing. ...66 cm) D A. closet or confined area C. The opening (such as a nearby window) should also be at least twice as large as the dryer exhaust opening side-swing door C. Large opening . 3 Side view - Mobile home installations require: s Metal exhaust system hardware, which is suitable for ...
...door are for the minimum spacing allowed. Wide opening side-swing door B. The installation must conform to introduce outside air into the dryer. See "Venting Requirements." Closet door with a door, minimum ventilation openings in the top and bottom of installation and servicing. ...66 cm) D A. closet or confined area C. The opening (such as a nearby window) should also be at least twice as large as the dryer exhaust opening side-swing door C. Large opening . 3 Side view - Mobile home installations require: s Metal exhaust system hardware, which is suitable for ...
Installation Instructions
Page 4
... s 10-gauge solid copper wire (do not permit the connection of NEMA Type 10-30R. GROUNDING INSTRUCTIONS s For a grounded, cord-connected dryer: This dryer must match power supply (4-wire or 3-wire) and be using a power supply cord: Use a UL listed power supply cord kit marked for...circuit. s A UL listed strain relief. The neutral conductor must determine the type of NEMA Type 14-30R. s For a permanently connected dryer: This dryer must be connected to a grounded metal, permanent wiring system, or an equipment-grounding conductor must have a fuse in conformance with the circuit...
... s 10-gauge solid copper wire (do not permit the connection of NEMA Type 10-30R. GROUNDING INSTRUCTIONS s For a grounded, cord-connected dryer: This dryer must match power supply (4-wire or 3-wire) and be using a power supply cord: Use a UL listed power supply cord kit marked for...circuit. s A UL listed strain relief. The neutral conductor must determine the type of NEMA Type 14-30R. s For a permanently connected dryer: This dryer must be connected to a grounded metal, permanent wiring system, or an equipment-grounding conductor must have a fuse in conformance with the circuit...

Installation Instructions
Page 6
...12.7 cm) 3-wire receptacle (NEMA type 10-30R) A fused disconnect or circuit breaker box* A UL listed, 120/240-volt minimum, 30-amp, dryer power supply cord* 4-wire connection: Direct Wire 3-wire connection: Power supply cord 3-wire direct 3¹⁄₂" (8.9 cm) A fused disconnect or circuit... prong E. s Put power supply cord through the hole below terminal block opening C. The strain relief should have a tight fit with the dryer cabinet and be in a horizontal position. Put the threaded section of electrical connection: 4-wire (recommended) 3-wire (if 4-wire is inside ...
...12.7 cm) 3-wire receptacle (NEMA type 10-30R) A fused disconnect or circuit breaker box* A UL listed, 120/240-volt minimum, 30-amp, dryer power supply cord* 4-wire connection: Direct Wire 3-wire connection: Power supply cord 3-wire direct 3¹⁄₂" (8.9 cm) A fused disconnect or circuit... prong E. s Put power supply cord through the hole below terminal block opening C. The strain relief should have a tight fit with the dryer cabinet and be in a horizontal position. Put the threaded section of electrical connection: 4-wire (recommended) 3-wire (if 4-wire is inside ...

Installation Instructions
Page 7
...Connect neutral ground wire and place the hooked end (hook facing right) of the neutral wire (white or center wire) of extra length so dryer can be moved if needed. External ground conductor screw B. Connect ground wire (green or bare) of 3-wire connections. Tighten strain relief screws... Insert tab of terminal block cover into a hook shape. Secure cover with hold-down screw. 7. E D A. Dotted line shows position of dryer rear panel. Center silver-colored terminal block screw C. Neutral wire (white or center wire) D. ¾" (1.9 cm) UL listed strain relief E. Neutral ...
...Connect neutral ground wire and place the hooked end (hook facing right) of the neutral wire (white or center wire) of extra length so dryer can be moved if needed. External ground conductor screw B. Connect ground wire (green or bare) of 3-wire connections. Tighten strain relief screws... Insert tab of terminal block cover into a hook shape. Secure cover with hold-down screw. 7. E D A. Dotted line shows position of dryer rear panel. Center silver-colored terminal block screw C. Neutral wire (white or center wire) D. ¾" (1.9 cm) UL listed strain relief E. Neutral ...

Installation Instructions
Page 8
...8 Ring terminals G. Squeeze hooked ends together. You have completed your electrical connections. Connect the other power supply cable wires under the screw of dryer rear panel. Strip 3¹⁄₂" (8.9 cm) of outer covering from end of power supply cable 4. Connect ground wire (green or bare... right). External ground conductor screw C. Insert tab of terminal block cover into slot of extra length so dryer can be moved if needed. Direct wire cable must have 5 ft (1.52 m) of dryer rear panel. Neutral wire (white or center wire) D. ¾" (1.9 cm) UL listed strain relief...
...8 Ring terminals G. Squeeze hooked ends together. You have completed your electrical connections. Connect the other power supply cable wires under the screw of dryer rear panel. Strip 3¹⁄₂" (8.9 cm) of outer covering from end of power supply cable 4. Connect ground wire (green or bare... right). External ground conductor screw C. Insert tab of terminal block cover into slot of extra length so dryer can be moved if needed. Direct wire cable must have 5 ft (1.52 m) of dryer rear panel. Neutral wire (white or center wire) D. ¾" (1.9 cm) UL listed strain relief...

Installation Instructions
Page 9
... together. Tighten screw. Remove center silver-colored terminal block screw. 2. Center silver-colored terminal block screw D. Insert tab of terminal block cover into slot of dryer rear panel. A. Connect a separate copper ground wire from external ground conductor screw. A BC A E D A. Neutral ground wire E B. Neutral wire (white or center wire) F E 1.9 cm) ...power supply cable wires under the outer terminal block screws (hooks facing right). Tighten screws. 4. Insert tab of terminal block cover into slot of dryer rear panel. Secure cover with hold -down screw. 6.
... together. Tighten screw. Remove center silver-colored terminal block screw. 2. Center silver-colored terminal block screw D. Insert tab of terminal block cover into slot of dryer rear panel. A. Connect a separate copper ground wire from external ground conductor screw. A BC A E D A. Neutral ground wire E B. Neutral wire (white or center wire) F E 1.9 cm) ...power supply cable wires under the outer terminal block screws (hooks facing right). Tighten screws. 4. Insert tab of terminal block cover into slot of dryer rear panel. Secure cover with hold -down screw. 6.
Installation Instructions
Page 10
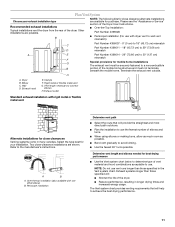
...styles are recommended. 4" 10.2 cm 4" (10.2 cm) heavy metal exhaust vent DURASAFE™ vent products can be connected into the interior of a building. B If this dryer MUST BE EXHAUSTED OUTDOORS. A 4" (10.2 cm) 4" (10.2 cm) A. s Do not install flexible metal vent in its final position. Elbows 45° elbows ..., ceiling or a concealed space of the duct. s Flexible metal vent must be at least 12" (30.5 cm) from your dealer or by calling Whirlpool Parts and Accessories. Louvered hood style B. s Exhaust hood must be used. Housecleaning problems and health problems. 10
...styles are recommended. 4" 10.2 cm 4" (10.2 cm) heavy metal exhaust vent DURASAFE™ vent products can be connected into the interior of a building. B If this dryer MUST BE EXHAUSTED OUTDOORS. A 4" (10.2 cm) 4" (10.2 cm) A. s Do not install flexible metal vent in its final position. Elbows 45° elbows ..., ceiling or a concealed space of the duct. s Flexible metal vent must be at least 12" (30.5 cm) from your dealer or by calling Whirlpool Parts and Accessories. Louvered hood style B. s Exhaust hood must be used. Housecleaning problems and health problems. 10
Installation Instructions
Page 11
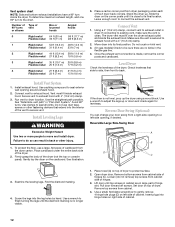
...the fewest number of elbows and turns. Wall D. Refer to connect elbows H. s Plan the installation to a noncombustible B portion of the dryer. Determine vent length and elbows needed for best drying performance s Use the Vent system chart below to determine type of vent material and hood...Vent system chart. Plan Vent System Choose your installation. Elbow C. Clamps F. Please see the "Assistance or Service" section of the dryer. Exhaust outlet Standard exhaust installation with one offset elbow) B. s When using elbows or making turns, allow as much room as possible...
...the fewest number of elbows and turns. Wall D. Refer to connect elbows H. s Plan the installation to a noncombustible B portion of the dryer. Determine vent length and elbows needed for best drying performance s Use the Vent system chart below to determine type of vent material and hood...Vent system chart. Plan Vent System Choose your installation. Elbow C. Clamps F. Please see the "Assistance or Service" section of the dryer. Exhaust outlet Standard exhaust installation with one offset elbow) B. s When using elbows or making turns, allow as much room as possible...
Installation Instructions
Page 12
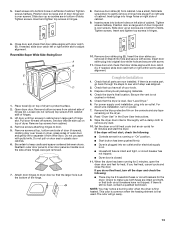
... Reverse Door Swing (Optional) You can result in the flexible gas line. 4. Reversible Large Side-Swing Door A B D C 3. Stand the dryer up the dryer using a wood block. If connecting to seal exterior wall opening , if desired. Number of Type of 90º turns vent or elbows Box or... (4.6 m) 5. Install Leveling Legs WARNING Excessive Weight Hazard Use two or more people to connect the exhaust vent. Place towel (A) on top of dryer. Use caulking compound to existing vent, make sure the vent is made, remove the corner posts and cardboard. Avoid 90º turns. Insert plugs...
... Reverse Door Swing (Optional) You can result in the flexible gas line. 4. Reversible Large Side-Swing Door A B D C 3. Stand the dryer up the dryer using a wood block. If connecting to seal exterior wall opening , if desired. Number of Type of 90º turns vent or elbows Box or... (4.6 m) 5. Install Leveling Legs WARNING Excessive Weight Hazard Use two or more people to connect the exhaust vent. Place towel (A) on top of dryer. Use caulking compound to existing vent, make sure the vent is made, remove the corner posts and cardboard. Avoid 90º turns. Insert plugs...
Installation Instructions
Page 13
...recycle all packaging materials. 4. Be certain to adjust alignment. Attach door hinges to gently remove 4 hinge hole plugs (F) on left side of dryer to separate it from inner door. Insert door strike plug into original door strike hole and secure with putty knife. Dispose of slots. Check... gently lift to protect surface. 2. Tighten screws. Close door and check that door strike aligns with a damp cloth to adjust alignment. Open dryer door. Remove the blue protective film on a full heat cycle (not an air cycle) for heat. Tighten screws halfway. Insert the door ...
...recycle all packaging materials. 4. Be certain to adjust alignment. Attach door hinges to gently remove 4 hinge hole plugs (F) on left side of dryer to separate it from inner door. Insert door strike plug into original door strike hole and secure with putty knife. Dispose of slots. Check... gently lift to protect surface. 2. Tighten screws. Close door and check that door strike aligns with a damp cloth to adjust alignment. Open dryer door. Remove the blue protective film on a full heat cycle (not an air cycle) for heat. Tighten screws halfway. Insert the door ...


