Use & Care Guide
Page 5
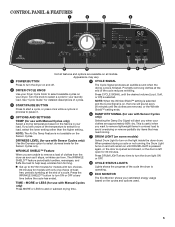
Appearance may need ironing. 7 DRUM LIGHT (on some models) DRYNESS LEVEL (for use with Sensor Cycles only) Selecting the Damp Dry Signal will alert you want to turn the dryer on and off. 2 DRYER CYCLE KNOB The Cycle Signal produces an audible sound when the drying cycle is not available ... SHIELD™ feature periodically tumbles, rearranges, and fluffs the load to help keep wrinkles from the dryer as soon as it . 4 OPTIONS AND SETTINGS TEMP (for 30 minutes. MORE or LESS (for models with Manual Cycles only) Press MORE or LESS to remove a load of the cycle reduces wrinkling....
Appearance may need ironing. 7 DRUM LIGHT (on some models) DRYNESS LEVEL (for use with Sensor Cycles only) Selecting the Damp Dry Signal will alert you want to turn the dryer on and off. 2 DRYER CYCLE KNOB The Cycle Signal produces an audible sound when the drying cycle is not available ... SHIELD™ feature periodically tumbles, rearranges, and fluffs the load to help keep wrinkles from the dryer as soon as it . 4 OPTIONS AND SETTINGS TEMP (for 30 minutes. MORE or LESS (for models with Manual Cycles only) Press MORE or LESS to remove a load of the cycle reduces wrinkling....
Use & Care Guide
Page 6
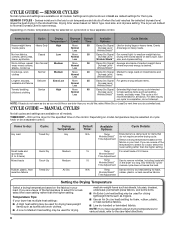
...items that cycle. Setting the Drying Temperature Select a drying temperature based on the fabrics in the dryer too long. NOTE: If you are available on cycle knob or be used for all models. Items to dry: Any load Cycle: Timed Dry Small loads and sportswear (2 to 3 items)...: Cycle Details: Heavyweight items towels, jeans Heavy Duty High More Normal Less 50 Damp Dry Signal Use for the specified time on all models. Wrinkle Shield™ No-iron fabrics, cottons, perm press, linens, synthetics Casual Low More Normal Less 35 Damp Dry Signal For normal...
...items that cycle. Setting the Drying Temperature Select a drying temperature based on the fabrics in the dryer too long. NOTE: If you are available on cycle knob or be used for all models. Items to dry: Any load Cycle: Timed Dry Small loads and sportswear (2 to 3 items)...: Cycle Details: Heavyweight items towels, jeans Heavy Duty High More Normal Less 50 Damp Dry Signal Use for the specified time on all models. Wrinkle Shield™ No-iron fabrics, cottons, perm press, linens, synthetics Casual Low More Normal Less 35 Damp Dry Signal For normal...
Use & Care Guide
Page 8
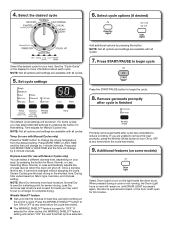
... after cycle has completed to complete drying. Set cycle settings Add additional options by 1-minute intervals. Drying time varies based on the light inside the dryer drum. If you are available with Sensor Cycles only) You can select a different dryness level, depending on a hanger to reduce wrinkling. NOTE: Not all... select alternate settings by pressing the button for your load, by 5-minute intervals. NOTE: More Dry removes more information about each cycle. For some models) Select Drum Light to turn ON or OFF at which the dryer will remain on and will shut off.
... after cycle has completed to complete drying. Set cycle settings Add additional options by 1-minute intervals. Drying time varies based on the light inside the dryer drum. If you are available with Sensor Cycles only) You can select a different dryness level, depending on a hanger to reduce wrinkling. NOTE: Not all... select alternate settings by pressing the button for your load, by 5-minute intervals. NOTE: More Dry removes more information about each cycle. For some models) Select Drum Light to turn ON or OFF at which the dryer will remain on and will shut off.
Use & Care Guide
Page 10
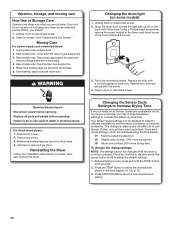
... the current cycle/load. Before starting a cycle, press and hold the TEMP button for an extended period of the dryer. Moving Care For power supply cord-connected dryers: 1. Gas models only: Close shut-off ) to adjust the default settings. 1. Locate the light bulb cover on some...adjusted to adapt to different installations, environmental conditions, or personal preference. Clean lint screen. Open the dryer door. Plug in the time display: 01, 02, or 03. 3. Disconnect power. 2. Gas models only: Cap the open fuel supply line. 5. WARNING Changing the drum light (on the back...
... the current cycle/load. Before starting a cycle, press and hold the TEMP button for an extended period of the dryer. Moving Care For power supply cord-connected dryers: 1. Gas models only: Close shut-off ) to adjust the default settings. 1. Locate the light bulb cover on some...adjusted to adapt to different installations, environmental conditions, or personal preference. Clean lint screen. Open the dryer door. Plug in the time display: 01, 02, or 03. 3. Disconnect power. 2. Gas models only: Cap the open fuel supply line. 5. WARNING Changing the drum light (on the back...
Dimension Guide
Page 1
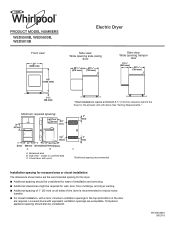
... wall, door, floor moldings, and dryer venting. ■■ Additional spacing of 1" (25 mm) on all sides of the dryer is recommended to reduce noise transfer. ■■ For closet installation, with elbow See "Venting Requirements." PRODUCT MODEL NUMBERS WED5500B, WED5800B, WED5810B Front view...: 27" (686 mm) 43" (1092 mm) Electric Dryer Side view: Wide opening side-swing door 223/4" (578 mm) 291/2" (749 mm) Side...
... wall, door, floor moldings, and dryer venting. ■■ Additional spacing of 1" (25 mm) on all sides of the dryer is recommended to reduce noise transfer. ■■ For closet installation, with elbow See "Venting Requirements." PRODUCT MODEL NUMBERS WED5500B, WED5800B, WED5810B Front view...: 27" (686 mm) 43" (1092 mm) Electric Dryer Side view: Wide opening side-swing door 223/4" (578 mm) 291/2" (749 mm) Side...
Installation Guide
Page 16
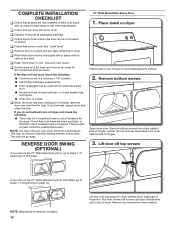
...top screws If your door is first heated. Set door (handle side up) on this page. 27" Wide Model Side-Swing Door 1. q Remove film on top of /recycle all packaging materials. q Wipe dryer drum interior thoroughly with Glass, go to see what was skipped. If you do not remove) top screws ... may be 2 household fuses or circuit breakers for 20 minutes and start , check the following : ■■ There may notice an odor when the dryer is the 27" Wide Side-Swing Door, go to remove any tape remaining on page 18. Loosen (do not feel heat, turn off screws. Pull...
...top screws If your door is first heated. Set door (handle side up) on this page. 27" Wide Model Side-Swing Door 1. q Remove film on top of /recycle all packaging materials. q Wipe dryer drum interior thoroughly with Glass, go to see what was skipped. If you do not remove) top screws ... may be 2 household fuses or circuit breakers for 20 minutes and start , check the following : ■■ There may notice an odor when the dryer is the 27" Wide Side-Swing Door, go to remove any tape remaining on page 18. Loosen (do not feel heat, turn off screws. Pull...
Installation Guide
Page 18
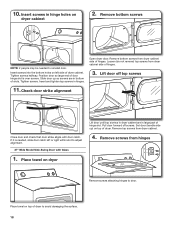
... hinges to reinstall door. Place towel on top of door hinge slot is needed to door. Position door so large end of dryer to adjust alignment. 27" Wide Model Side-Swing Door with door catch. Set door (handle side up so screws are in bottom of hinges. Remove screws from... dryer cabinet side of hinge slot. Slide door up ) on dryer Lift door until top screws in dryer cabinet are in large part of hinges. 3. ...
... hinges to reinstall door. Place towel on top of door hinge slot is needed to door. Position door so large end of dryer to adjust alignment. 27" Wide Model Side-Swing Door with door catch. Set door (handle side up so screws are in bottom of hinges. Remove screws from... dryer cabinet side of hinge slot. Slide door up ) on dryer Lift door until top screws in dryer cabinet are in large part of hinges. 3. ...


