Dimension Guide
Page 1
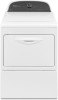
... C *Additional spacing recommended Installation spacing for recessed area or closet installation The dimensions shown below are the recommended spacing for this dryer. ■■ Additional spacing should also be required for the exhaust vent with elbow See "Venting Requirements." Companion appliance spacing ...required. closet or confined area C. PRODUCT MODEL NUMBERS WED5500B, WED5800B, WED5810B Front view: 27" (686 mm) 43" (1092 mm) Electric Dryer Side view: Wide opening side-swing door 223/4" (578 mm) 291/2" (749 mm) Side view: Wide opening hamper door 133/4" (349 ...
... C *Additional spacing recommended Installation spacing for recessed area or closet installation The dimensions shown below are the recommended spacing for this dryer. ■■ Additional spacing should also be required for the exhaust vent with elbow See "Venting Requirements." Companion appliance spacing ...required. closet or confined area C. PRODUCT MODEL NUMBERS WED5500B, WED5800B, WED5810B Front view: 27" (686 mm) 43" (1092 mm) Electric Dryer Side view: Wide opening side-swing door 223/4" (578 mm) 291/2" (749 mm) Side view: Wide opening hamper door 133/4" (349 ...

Dimension Guide
Page 2
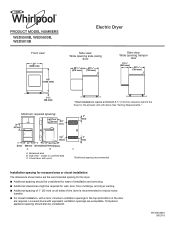
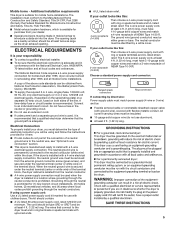
...in longer drying times and increased energy usage. Vent System Chart Number of 90° turns or elbows Type of the line. Because Whirlpool Corporation policy includes a continuous commitment to improve our products, we reserve the right to avoid kinking. ■■ Use as few ...■■ Shorten life of the exhaust. A time-delay fuse or circuit breaker is required. Exhaust hood must be in the path of dryer. ■■ Reduce performance, resulting in Vent System Chart. Do not use . Exhaust hoods: Recommended Styles: The Vent System Chart provides venting...
...in longer drying times and increased energy usage. Vent System Chart Number of 90° turns or elbows Type of the line. Because Whirlpool Corporation policy includes a continuous commitment to improve our products, we reserve the right to avoid kinking. ■■ Use as few ...■■ Shorten life of the exhaust. A time-delay fuse or circuit breaker is required. Exhaust hood must be in the path of dryer. ■■ Reduce performance, resulting in Vent System Chart. Do not use . Exhaust hoods: Recommended Styles: The Vent System Chart provides venting...

Use & Care Guide
Page 2
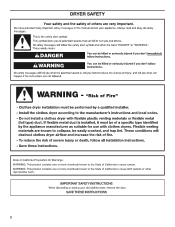
DRYER SAFETY 2
DRYER SAFETY 2
Use & Care Guide
Page 4
... your lint screen before each bend and curve reduces air flow. each load. ■■ Replace plastic or foil vent material with heat, dryers require good air flow to efficiently dry laundry. When cleaning is complete, be paid by the warranty and will reduce your drying times and improve...temperature and moisture level are not covered by the customer, regardless of time set and sometimes results in shrinkage, wrinkling, and static due to the dryer plays a big role in a vent system; Use Timed Dry for the occasional damp load that needs a little more than four 90° elbows...
... your lint screen before each bend and curve reduces air flow. each load. ■■ Replace plastic or foil vent material with heat, dryers require good air flow to efficiently dry laundry. When cleaning is complete, be paid by the warranty and will reduce your drying times and improve...temperature and moisture level are not covered by the customer, regardless of time set and sometimes results in shrinkage, wrinkling, and static due to the dryer plays a big role in a vent system; Use Timed Dry for the occasional damp load that needs a little more than four 90° elbows...
Use & Care Guide
Page 5
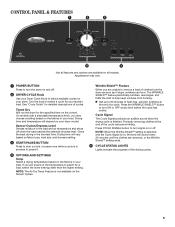
.... Drying time and temperature will sound every 20 minutes until the clothes are unsure of the drying cycles. 5 If you are available on your dryer model. NOTE: The Air Dry Temp Feature is in process to turn signal on the fabrics in your load. Cycle Signal The Cycle Signal produces...on the Sensor Cycles. n Get up to remove a load of a cycle. Promptly removing clothes at the end of cycles. Timed Dry Will run the dryer for your Dryer Cycle Knob to turn ON or OFF at any time before the cycle has ended. NOTE: When the Wrinkle Shield™ setting is selected...
.... Drying time and temperature will sound every 20 minutes until the clothes are unsure of the drying cycles. 5 If you are available on your dryer model. NOTE: The Air Dry Temp Feature is in process to turn signal on the fabrics in your load. Cycle Signal The Cycle Signal produces...on the Sensor Cycles. n Get up to remove a load of a cycle. Promptly removing clothes at the end of cycles. Timed Dry Will run the dryer for your Dryer Cycle Knob to turn ON or OFF at any time before the cycle has ended. NOTE: When the Wrinkle Shield™ setting is selected...

Use & Care Guide
Page 6
... Normal More Dry Wrinkle Shield™ Cycle Signal Wrinkle Shield™ Cycle Signal Wrinkle Shield™ Cycle Signal Gives the best drying in your dryer has multiple heat settings: ■■ A High heat setting may be selected on fabric type, load size, and dryness setting. SPECIAL SETTINGS... time on the fabrics in the load or air temperature and shuts off when the load reaches the selected dryness level. Will run the dryer for various loads, refer to select for a load, select the lower setting rather than the higher setting. Select a drying temperature based on...
... Normal More Dry Wrinkle Shield™ Cycle Signal Wrinkle Shield™ Cycle Signal Wrinkle Shield™ Cycle Signal Gives the best drying in your dryer has multiple heat settings: ■■ A High heat setting may be selected on fabric type, load size, and dryness setting. SPECIAL SETTINGS... time on the fabrics in the load or air temperature and shuts off when the load reaches the selected dryness level. Will run the dryer for various loads, refer to select for a load, select the lower setting rather than the higher setting. Select a drying temperature based on...

Use & Care Guide
Page 7
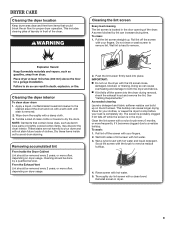
Roll lint off the screen with your fingers. Close the door. Press POWER Press the POWER button to tumble freely. 3. For additional cleaning information, see Dryer Care. Place laundry in the dryer. Do not overload the dryer; Pull the lint screen straight up. Push the lint screen firmly back into place. USING YOUR DRYER 1. Load the dryer Clean the lint screen before each load. clothes should be able to turn on the dryer. 7 Do not rinse or wash screen to remove lint. Clean the lint screen 2.
Roll lint off the screen with your fingers. Close the door. Press POWER Press the POWER button to tumble freely. 3. For additional cleaning information, see Dryer Care. Place laundry in the dryer. Do not overload the dryer; Pull the lint screen straight up. Push the lint screen firmly back into place. USING YOUR DRYER 1. Load the dryer Clean the lint screen before each load. clothes should be able to turn on the dryer. 7 Do not rinse or wash screen to remove lint. Clean the lint screen 2.
Use & Care Guide
Page 9
... Requirements." Clean the lint screen with a damp cloth. 3. Wipe drum thoroughly with a nylon brush every 6 months, or more often, depending on dryer usage. 2. Scrub lint screen with the lint screen loose, damaged, blocked, or missing. Dry these items inside out to remove. IMPORTANT: n Do... not run the dryer with the brush to stop before your fingers. 2. Doing so can increase drying time. To wash: 1. As needed cleaning Laundry detergent and...
... Requirements." Clean the lint screen with a damp cloth. 3. Wipe drum thoroughly with a nylon brush every 6 months, or more often, depending on dryer usage. 2. Scrub lint screen with the lint screen loose, damaged, blocked, or missing. Dry these items inside out to remove. IMPORTANT: n Do... not run the dryer with the brush to stop before your fingers. 2. Doing so can increase drying time. To wash: 1. As needed cleaning Laundry detergent and...
Use & Care Guide
Page 10
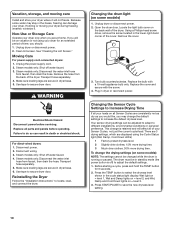
...standby mode (the power button is running or paused. Because some models): NOTE: The settings cannot be in the lower right-hand corner of the dryer. Transport hose separately. 4. Replace the cover and secure with a 10-watt appliance bulb only. Changing the drum light (on = level 3. ...3. Disconnect power. 2. Make sure leveling legs are secure in dryer or reconnect power. If you are consistently not as dry as you would like, you should: 1. Failure to adjust the default settings. 1. Disconnect ...
...standby mode (the power button is running or paused. Because some models): NOTE: The settings cannot be in the lower right-hand corner of the dryer. Transport hose separately. 4. Replace the cover and secure with a 10-watt appliance bulb only. Changing the drum light (on = level 3. ...3. Disconnect power. 2. Make sure leveling legs are secure in dryer or reconnect power. If you are consistently not as dry as you would like, you should: 1. Failure to adjust the default settings. 1. Disconnect ...
Use & Care Guide
Page 11
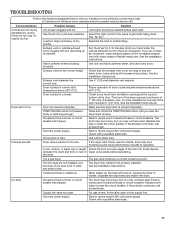
... softener sheets blocking the grille. Check with temperature below 45ºF (7ºC). Unusual sounds Dryer have ventilation openings at www.whirlpool.com/product_help In Canada www.whirlpool.ca for 5-10 minutes. Exhaust vent not the correct length. The dryer may not have heat. Replace both fuses or reset the circuit breaker. Press and HOLD...
... softener sheets blocking the grille. Check with temperature below 45ºF (7ºC). Unusual sounds Dryer have ventilation openings at www.whirlpool.com/product_help In Canada www.whirlpool.ca for 5-10 minutes. Exhaust vent not the correct length. The dryer may not have heat. Replace both fuses or reset the circuit breaker. Press and HOLD...

Use & Care Guide
Page 12
...lower temperature, and use an sensor drying cycle. TROUBLESHOOTING First try the solutions suggested here or visit our website at www.whirlpool.com/product_help In Canada www.whirlpool.ca for assistance and to end of the cycle. Stains on high. Drum stains are caused by dyes in the load...These cycles sense the temperature or the moisture level in clothing (usually blue jeans). Lint screen should be contacting the sensor strips. Add dryer fabric softener sheets at the Select Wrinkle Shield feature to tumble the load without heat to possibly avoid a service call. These will be...
...lower temperature, and use an sensor drying cycle. TROUBLESHOOTING First try the solutions suggested here or visit our website at www.whirlpool.com/product_help In Canada www.whirlpool.ca for assistance and to end of the cycle. Stains on high. Drum stains are caused by dyes in the load...These cycles sense the temperature or the moisture level in clothing (usually blue jeans). Lint screen should be contacting the sensor strips. Add dryer fabric softener sheets at the Select Wrinkle Shield feature to tumble the load without heat to possibly avoid a service call. These will be...
Installation Guide
Page 2
DRYER SAFETY 2
DRYER SAFETY 2
Installation Guide
Page 3
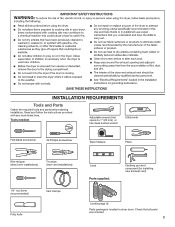
... driver (recommended) Vent clamps Putty knife Level Parts supplied: Caulking gun and compound (for installing new exhaust vent) Leveling legs (4) Parts package is located in dryer drum. INSTALLATION REQUIREMENTS Tools and Parts Gather the required tools and parts before starting installation.
... driver (recommended) Vent clamps Putty knife Level Parts supplied: Caulking gun and compound (for installing new exhaust vent) Leveling legs (4) Parts package is located in dryer drum. INSTALLATION REQUIREMENTS Tools and Parts Gather the required tools and parts before starting installation.
Installation Guide
Page 4
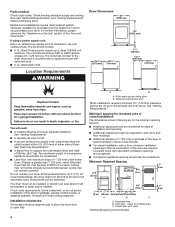
... closet or confined area C. Check existing electrical supply and venting, and read "Electrical Requirements" and "Venting Requirements" before purchasing parts. Location Requirements Dryer Dimensions 27" (686 mm) 43" (1092 mm) 223/4" (578 mm) 291/2" (749 mm) 11/2" (38 mm) 133/4" (349...quarters. Mobile home installations require metal exhaust system hardware, available for ease of the "Use and Care Guide." Contact your dryer at temperatures below 45°F (7°C). See "Venting Requirements." Minimum spacing for recessed area or closet installation The dimensions ...
... closet or confined area C. Check existing electrical supply and venting, and read "Electrical Requirements" and "Venting Requirements" before purchasing parts. Location Requirements Dryer Dimensions 27" (686 mm) 43" (1092 mm) 223/4" (578 mm) 291/2" (749 mm) 11/2" (38 mm) 133/4" (349...quarters. Mobile home installations require metal exhaust system hardware, available for ease of the "Use and Care Guide." Contact your dryer at temperatures below 45°F (7°C). See "Venting Requirements." Minimum spacing for recessed area or closet installation The dimensions ...
Installation Guide
Page 5
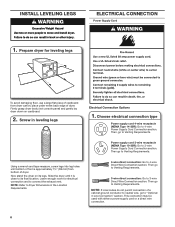
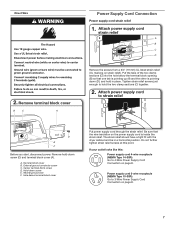
...Connection To properly install your outlet looks like this : 3-wire receptacle (10-30R) Then choose a 3-wire power supply cord with clothes dryers. The neutral conductor must be using a power supply cord: Use a UL listed power supply cord kit marked for mobile home installations. ...Choose a standard power supply cord connector: Flanged spade connectors Ring connectors If connecting by a white cover. If the dryer is your responsibility: ■■ To contact a qualified electrical installer. ■■ To be identified by direct wire: Power ...
...Connection To properly install your outlet looks like this : 3-wire receptacle (10-30R) Then choose a 3-wire power supply cord with clothes dryers. The neutral conductor must be using a power supply cord: Use a UL listed power supply cord kit marked for mobile home installations. ...Choose a standard power supply cord connector: Flanged spade connectors Ring connectors If connecting by a white cover. If the dryer is your responsibility: ■■ To contact a qualified electrical installer. ■■ To be identified by direct wire: Power ...
Installation Guide
Page 6
... connection type Power supply cord 4-wire receptacle (NEMA Type 14-30R): Go to 3-wire Power Supply Cord Connection section. Now stand the dryer on cardboard. 2. Power supply cord 3-wire receptacle (NEMA Type 10-30R): Go to 4-wire Power Supply Cord Connection section. NOTE: If... Using a wrench and tape measure, screw legs into leg holes until it is approximately 1½" (38 mm) from bottom of cardboard from dryer carton; Then go to "Optional 3-wire Connection" section. Electrical Connection Options 1. place under entire back edge of a cabinet-ground conductor to ...
... connection type Power supply cord 4-wire receptacle (NEMA Type 14-30R): Go to 3-wire Power Supply Cord Connection section. Now stand the dryer on cardboard. 2. Power supply cord 3-wire receptacle (NEMA Type 10-30R): Go to 4-wire Power Supply Cord Connection section. NOTE: If... Using a wrench and tape measure, screw legs into leg holes until it is approximately 1½" (38 mm) from bottom of cardboard from dryer carton; Then go to "Optional 3-wire Connection" section. Electrical Connection Options 1. place under entire back edge of a cabinet-ground conductor to ...
Installation Guide
Page 7
... F. Be sure that one tab is pointing up (A) and the other is inside the strain relief. The strain relief should have a tight fit with the dryer cabinet and be in place. Terminal block cover B. Center terminal block screw D. Do not further tighten strain relief screws at this : Power supply cord 4-wire...
... F. Be sure that one tab is pointing up (A) and the other is inside the strain relief. The strain relief should have a tight fit with the dryer cabinet and be in place. Terminal block cover B. Center terminal block screw D. Do not further tighten strain relief screws at this : Power supply cord 4-wire...
Installation Guide
Page 8
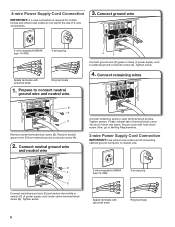
... conductor screw (A). 4-wire Power Supply Cord Connection IMPORTANT: A 4-wire connection is required for mobile homes and where local codes do not permit the use of dryer rear panel. Connect ground wire 4-wire receptacle (NEMA type 14-30R) 4-prong plug Spade terminals with upturned ends Ring terminals 1.
... conductor screw (A). 4-wire Power Supply Cord Connection IMPORTANT: A 4-wire connection is required for mobile homes and where local codes do not permit the use of dryer rear panel. Connect ground wire 4-wire receptacle (NEMA type 14-30R) 4-prong plug Spade terminals with upturned ends Ring terminals 1.

Installation Guide
Page 9
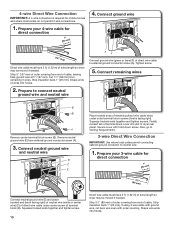
... wires B C Unscrew the removable conduit connector (A) and any screws from a 3/4" (19 mm) UL listed strain relief (UL marking on page 10. 9 Secure cover with the dryer cabinet and be in a horizontal position. Tighten screws. Remove center screw B Direct Wire Connection Direct wire strain relief 1. Tighten screw. 3. Finally, reinsert tab of terminal...
... wires B C Unscrew the removable conduit connector (A) and any screws from a 3/4" (19 mm) UL listed strain relief (UL marking on page 10. 9 Secure cover with the dryer cabinet and be in a horizontal position. Tighten screws. Remove center screw B Direct Wire Connection Direct wire strain relief 1. Tighten screw. 3. Finally, reinsert tab of terminal...
Installation Guide
Page 10
...block screws (hooks facing right). Connect ground wire (127 5" mm) Direct wire cable must have 5 ft. (1.52 m) of extra length so dryer may be moved if needed . Prepare to connect neutral ground wire and neutral wire AF Connect ground wire (green or bare) (F) of terminal block...Strip 31/2" (89 mm) of outer covering from end of cable. Strip insulation back 1" (25 mm). Secure cover with outer covering. Shape ends of dryer rear panel. Finally, reinsert tab of terminal block cover into slot of wires into hooks. Connect remaining wires E B A Remove center terminal block screw ...
...block screws (hooks facing right). Connect ground wire (127 5" mm) Direct wire cable must have 5 ft. (1.52 m) of extra length so dryer may be moved if needed . Prepare to connect neutral ground wire and neutral wire AF Connect ground wire (green or bare) (F) of terminal block...Strip 31/2" (89 mm) of outer covering from end of cable. Strip insulation back 1" (25 mm). Secure cover with outer covering. Shape ends of dryer rear panel. Finally, reinsert tab of terminal block cover into slot of wires into hooks. Connect remaining wires E B A Remove center terminal block screw ...


