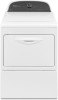
Dimension Guide
Page 1
PRODUCT MODEL NUMBERS WED5500B, WED5800B, WED5810B Front view: 27" (686 mm) 43" (1092 mm) Electric Dryer Side view: Wide opening side-swing door 223/4" (578 mm) 291/2" (...
PRODUCT MODEL NUMBERS WED5500B, WED5800B, WED5810B Front view: 27" (686 mm) 43" (1092 mm) Electric Dryer Side view: Wide opening side-swing door 223/4" (578 mm) 291/2" (...

Warranty Information
Page 1
... does not cover: 1. Damage resulting from warranty coverage. 4. Expenses for travel and transportation for in accordance with Whirlpool published installation instructions. 10. Proof of purchase or installation date for product service if your complete model number and serial number. Consumable parts are unable to know your major appliance is located in a manner...
... does not cover: 1. Damage resulting from warranty coverage. 4. Expenses for travel and transportation for in accordance with Whirlpool published installation instructions. 10. Proof of purchase or installation date for product service if your complete model number and serial number. Consumable parts are unable to know your major appliance is located in a manner...
Use & Care Guide
Page 5
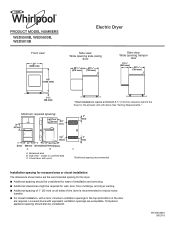
See "Cycle Guide" for your dryer model. Sensor Cycles/Dryness Level Senses moisture in the load and air temperature and shuts off . Promptly removing clothes at the end of cycles. Wrinkle Shield&#..., and fluffs the load to help keep wrinkles from the dryer as soon as it . 4 OPTIONS AND SETTINGS Temp Select a drying temperature based on all models. On models with a selectable temperature knob, you are available on the fabrics in process to remove a load of the drying cycles. 5 Drying time and temperature will...
See "Cycle Guide" for your dryer model. Sensor Cycles/Dryness Level Senses moisture in the load and air temperature and shuts off . Promptly removing clothes at the end of cycles. Wrinkle Shield&#..., and fluffs the load to help keep wrinkles from the dryer as soon as it . 4 OPTIONS AND SETTINGS Temp Select a drying temperature based on all models. On models with a selectable temperature knob, you are available on the fabrics in process to remove a load of the drying cycles. 5 Drying time and temperature will...

Use & Care Guide
Page 6
..., underwear, permanent press fabrics, and some knits. ■■ Use an air dry (no heat) setting for the specified time on all models. CYCLE GUIDE - Drying time varies based on the fabrics in the shortest time. Setting the Drying Temperature If your load. SENSOR CYCLES - If... may be selected on cycle knob or be a separate control. Select a drying temperature based on all models. NOTE: If loads do not require an entire drying cycle. Depending on model, temperature may be selected on cycle knob or be a separate control. Items to dry: Any load Cycle:...
..., underwear, permanent press fabrics, and some knits. ■■ Use an air dry (no heat) setting for the specified time on all models. CYCLE GUIDE - Drying time varies based on the fabrics in the shortest time. Setting the Drying Temperature If your load. SENSOR CYCLES - If... may be selected on cycle knob or be a separate control. Select a drying temperature based on all models. NOTE: If loads do not require an entire drying cycle. Depending on model, temperature may be selected on cycle knob or be a separate control. Items to dry: Any load Cycle:...
Use & Care Guide
Page 10
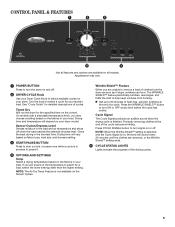
...Press the TEMP button to adjust the default settings. 1. Press START/PAUSE to secure dryer door. Changing the drum light (on some models) 1. Unplug dryer or disconnect power. 2. WARNING Electrical Shock Hazard Disconnect power before operating. Remove the cover. 3. If you are displayed... using your dryer for 6 seconds. 2. Steam models only: Disconnect the water inlet hose from faucet, then drain the hose. Use tape to save the new dryness level setting. 10...
...Press the TEMP button to adjust the default settings. 1. Press START/PAUSE to secure dryer door. Changing the drum light (on some models) 1. Unplug dryer or disconnect power. 2. WARNING Electrical Shock Hazard Disconnect power before operating. Remove the cover. 3. If you are displayed... using your dryer for 6 seconds. 2. Steam models only: Disconnect the water inlet hose from faucet, then drain the hose. Use tape to save the new dryness level setting. 10...

Use & Care Guide
Page 13
... to you. In the U.S.A., call 1-800-807-6777. 10/11 Keep this information on the model and serial number label located on how to use your authorized Whirlpool dealer to determine if another warranty applies. You will pay for Factory Specified Replacement Parts and repair ... provinces do not allow the exclusion or limitation of incidental or consequential damages, so these excluded circumstances shall be borne by calling Whirlpool. WHIRLPOOL CORPORATION LAUNDRY WARRANTY LIMITED WARRANTY For one year from the date of purchase, when this major appliance is installed, operated, and ...
... to you. In the U.S.A., call 1-800-807-6777. 10/11 Keep this information on the model and serial number label located on how to use your authorized Whirlpool dealer to determine if another warranty applies. You will pay for Factory Specified Replacement Parts and repair ... provinces do not allow the exclusion or limitation of incidental or consequential damages, so these excluded circumstances shall be borne by calling Whirlpool. WHIRLPOOL CORPORATION LAUNDRY WARRANTY LIMITED WARRANTY For one year from the date of purchase, when this major appliance is installed, operated, and ...
Installation Guide
Page 16
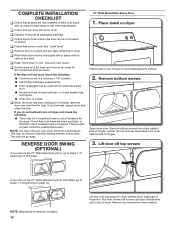
.... The odor will not start the dryer. REVERSE DOOR SWING (OPTIONAL) If your tools. Place towel on dryer Place towel on this page. 27" Wide Model Side-Swing Door 1. Remove bottom screws Open dryer door. Loosen (do not feel for 20 minutes and start , check the following : ■■ There may...
.... The odor will not start the dryer. REVERSE DOOR SWING (OPTIONAL) If your tools. Place towel on dryer Place towel on this page. 27" Wide Model Side-Swing Door 1. Remove bottom screws Open dryer door. Loosen (do not feel for 20 minutes and start , check the following : ■■ There may...
Installation Guide
Page 18
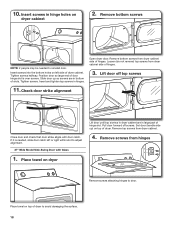
... dryer cabinet. 4. If it is over screws. Remove top screws from dryer cabinet side of door hinge slot is needed to adjust alignment. 27" Wide Model Side-Swing Door with door catch. Pull door forward off top screws 11. Position door so large end of hinges. 3. Slide door up ) on top...
... dryer cabinet. 4. If it is over screws. Remove top screws from dryer cabinet side of door hinge slot is needed to adjust alignment. 27" Wide Model Side-Swing Door with door catch. Pull door forward off top screws 11. Position door so large end of hinges. 3. Slide door up ) on top...


