
Owners Manual
Page 10
... (on some models) 1. Cap the open fuel supply line. 5. Plug into a grounded outlet or reconnect power. Disconnect wiring. 3. Make sure leveling legs are at fuse or breaker box. 2. Turn bulb counterclockwise. For direct-wired dryers: 1. Close shutoff valve in dryer base. 3. Using a Phillips-head screw driver, remove the screw located in the...
... (on some models) 1. Cap the open fuel supply line. 5. Plug into a grounded outlet or reconnect power. Disconnect wiring. 3. Make sure leveling legs are at fuse or breaker box. 2. Turn bulb counterclockwise. For direct-wired dryers: 1. Close shutoff valve in dryer base. 3. Using a Phillips-head screw driver, remove the screw located in the...

Owners Manual
Page 13
...implied warranties of merchantability or fitness, so this limitation may not apply to you. Consumable parts are unable to correct house wiring or plumbing. 3. Some states and provinces do not allow limitations on how to use your major appliance to better help can... for in an inaccessible location or is operated and maintained according to instructions attached to or furnished with the product, Whirlpool Corporation or Whirlpool Canada LP (hereafter "Whirlpool") will need repair service, first see the "Troubleshooting" section of the Use & Care Guide. LIMITATION OF REMEDIES;...
...implied warranties of merchantability or fitness, so this limitation may not apply to you. Consumable parts are unable to correct house wiring or plumbing. 3. Some states and provinces do not allow limitations on how to use your major appliance to better help can... for in an inaccessible location or is operated and maintained according to instructions attached to or furnished with the product, Whirlpool Corporation or Whirlpool Canada LP (hereafter "Whirlpool") will need repair service, first see the "Troubleshooting" section of the Use & Care Guide. LIMITATION OF REMEDIES;...
Dimension Guide
Page 1
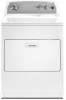
.... Determine the number of the door are for the exhaust vent with a door, the minimum ventilation openings in vent length chart. Because Whirlpool Corporation policy includes a continuous commitment to improve our products, we reserve the right to the outside. 4" (102 mm) diameter vent is... PRODUCT MODEL NUMBERS WED4750X, WED4800X, WED4900X, WED4850X, WED4890X Electrical: This dryer requires a 3 or 4 wire, single phase, 120/240 volt, 60 Hz., AC only electrical supply (or 3 or 4 wire, 120/208 volt electrical supply, if specified on the serial/rating plate) on a separate 30-amp ...
.... Determine the number of the door are for the exhaust vent with a door, the minimum ventilation openings in vent length chart. Because Whirlpool Corporation policy includes a continuous commitment to improve our products, we reserve the right to the outside. 4" (102 mm) diameter vent is... PRODUCT MODEL NUMBERS WED4750X, WED4800X, WED4900X, WED4850X, WED4890X Electrical: This dryer requires a 3 or 4 wire, single phase, 120/240 volt, 60 Hz., AC only electrical supply (or 3 or 4 wire, 120/208 volt electrical supply, if specified on the serial/rating plate) on a separate 30-amp ...
Installation Instructions
Page 2
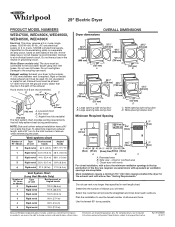
... to potential hazards that can be killed or seriously injured if you and others are not followed. Tools needed: Flat-blade screwdriver 2 #2 Phillips screwdriver Wire stripper (direct wire installations) Tin snips (new vent installations) All safety messages will tell you what can happen if the instructions are very important. All safety messages...
... to potential hazards that can be killed or seriously injured if you and others are not followed. Tools needed: Flat-blade screwdriver 2 #2 Phillips screwdriver Wire stripper (direct wire installations) Tin snips (new vent installations) All safety messages will tell you what can happen if the instructions are very important. All safety messages...

Installation Instructions
Page 3
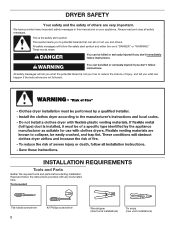
... not shut off at the end of the dryer in dryer drum. Some codes limit, or do not permit, installation of an automatic cycle. The wires that connect to support the total weight (dryer and load) of the Dryer User Instructions. For further information, please reference the "Assistance or Service" section...
... not shut off at the end of the dryer in dryer drum. Some codes limit, or do not permit, installation of an automatic cycle. The wires that connect to support the total weight (dryer and load) of the Dryer User Instructions. For further information, please reference the "Assistance or Service" section...

Installation Instructions
Page 4
... recreational vehicles, and (4) areas where local codes prohibit grounding through the neutral is permanently connected to the neutral wire, see "Optional 3-wire connection" section. ■■ This dryer is suitable for the minimum spacing allowed. ■■ Additional ...4 Additional installation requirements This dryer is manufactured ready to an individual branch circuit. The National Electrical Code requires a 4-wire power supply connection for it is recommended that a qualified electrician determine that the electrical connection is prohibited. Large opening side...
... recreational vehicles, and (4) areas where local codes prohibit grounding through the neutral is permanently connected to the neutral wire, see "Optional 3-wire connection" section. ■■ This dryer is suitable for the minimum spacing allowed. ■■ Additional ...4 Additional installation requirements This dryer is manufactured ready to an individual branch circuit. The National Electrical Code requires a 4-wire power supply connection for it is recommended that a qualified electrician determine that the electrical connection is prohibited. Large opening side...
Installation Instructions
Page 5
... other injury. 1. Failure to the dryer must be : ■■ Flexible armored cable or nonmetallic sheathed copper cable (with ground wire), covered with flexible metallic conduit. Screw in ring terminals or spade terminals with ring or spade terminals and UL listed strain relief. Now... stand the dryer on cardboard. 2. All current-carrying wires must have 3 10-gauge solid copper wires and match a 3-wire receptacle of NEMA Type 14-30 R. place under entire back edge of cardboard from dryer carton; Slide the...
... other injury. 1. Failure to the dryer must be : ■■ Flexible armored cable or nonmetallic sheathed copper cable (with ground wire), covered with flexible metallic conduit. Screw in ring terminals or spade terminals with ring or spade terminals and UL listed strain relief. Now... stand the dryer on cardboard. 2. All current-carrying wires must have 3 10-gauge solid copper wires and match a 3-wire receptacle of NEMA Type 14-30 R. place under entire back edge of cardboard from dryer carton; Slide the...
Installation Instructions
Page 6
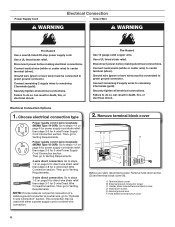
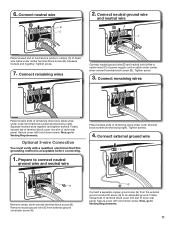
...ul listed 30 amp power supply cord. Disconnect power before making electrical connections. Connect neutral wire (white or center wire) to center terminal (silver). Connect neutral wire (white or center wire) to center terminal (silver). Then, go to green ground connector. This connection may ...C. Hold-down screw (D) and terminal block cover (A). Securely tighten all electrical connections. Electrical Connection Options 1. Power supply cord 3-wire receptacle (NEMA Type 10-30R): Go to Venting Requirements. Then go to steps 1-2 on page 6 for power supply cord strain relief...
...ul listed 30 amp power supply cord. Disconnect power before making electrical connections. Connect neutral wire (white or center wire) to center terminal (silver). Connect neutral wire (white or center wire) to center terminal (silver). Then, go to green ground connector. This connection may ...C. Hold-down screw (D) and terminal block cover (A). Securely tighten all electrical connections. Electrical Connection Options 1. Power supply cord 3-wire receptacle (NEMA Type 10-30R): Go to Venting Requirements. Then go to steps 1-2 on page 6 for power supply cord strain relief...
Installation Instructions
Page 7
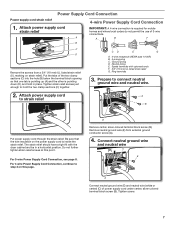
... on the power supply cord is pointing down (D), and hold the two clamp sections (C) together. Attach power supply cord A to hold in a horizontal position. For 3-wire Power Supply Cord Connection, see page 8. Put the tabs of the two clamp sections (C) into the hole (B) below the terminal block opening so that the...
... on the power supply cord is pointing down (D), and hold the two clamp sections (C) together. Attach power supply cord A to hold in a horizontal position. For 3-wire Power Supply Cord Connection, see page 8. Put the tabs of the two clamp sections (C) into the hole (B) below the terminal block opening so that the...
Installation Instructions
Page 8
... 4. Tighten screw. 5. Tighten screws. Tighten screws. Now, go to center, silver-colored terminal block screw (B). Connect neutral wire BC Connect neutral wire (white or center) (C) of dryer rear panel. Finally, reinsert tab of terminal block cover into slot of power supply cord ...Requirements. 8 Spade terminals with hold -down screw. Remove center screw B Connect remaining wires to neutral wire. Now, go to outer terminal block screws. Connect remaining wires 3-wire Power Supply Cord Connection Use where local codes permit connecting cabinet-ground conductor to outer ...
... 4. Tighten screw. 5. Tighten screws. Tighten screws. Now, go to center, silver-colored terminal block screw (B). Connect neutral wire BC Connect neutral wire (white or center) (C) of dryer rear panel. Finally, reinsert tab of terminal block cover into slot of power supply cord ...Requirements. 8 Spade terminals with hold -down screw. Remove center screw B Connect remaining wires to neutral wire. Now, go to outer terminal block screws. Connect remaining wires 3-wire Power Supply Cord Connection Use where local codes permit connecting cabinet-ground conductor to outer ...
Installation Instructions
Page 9
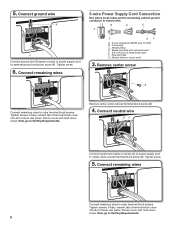
...threaded section of outer covering from remaining 3 wires. Strip 5" (127 mm) of the strain relief through the strain relief. For 3-wire Direct Wire Connection, see page 10. Connect wires to connect neutral ground wire and neutral wire A B E Remove center, silver-colored terminal...cable, leaving bare ground wire at 5" (127 mm). Direct Wire Connection Direct wire strain relief 4-wire Direct Wire Connection 1. Attach direct wire cable to the right, squeeze hooked end together and tighten screw. 5. To connect wires to terminal block, place hooked end of wires into hooks. 4. ...
...threaded section of outer covering from remaining 3 wires. Strip 5" (127 mm) of the strain relief through the strain relief. For 3-wire Direct Wire Connection, see page 10. Connect wires to connect neutral ground wire and neutral wire A B E Remove center, silver-colored terminal...cable, leaving bare ground wire at 5" (127 mm). Direct Wire Connection Direct wire strain relief 4-wire Direct Wire Connection 1. Attach direct wire cable to the right, squeeze hooked end together and tighten screw. 5. To connect wires to terminal block, place hooked end of wires into hooks. 4. ...
Installation Instructions
Page 10
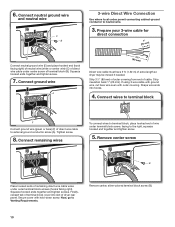
... of extra length so dryer may be moved if needed. Finally, reinsert tab of terminal block cover into hooks. 4. Tighten screw. 8. Now, go to neutral wire. 3. Connect wires to external ground conductor screw (A). 6. Squeeze hooked ends together and tighten screw. 7. Strip 31/2" (89 mm) of outer covering from end of cable. Secure...
... of extra length so dryer may be moved if needed. Finally, reinsert tab of terminal block cover into hooks. 4. Tighten screw. 8. Now, go to neutral wire. 3. Connect wires to external ground conductor screw (A). 6. Squeeze hooked ends together and tighten screw. 7. Strip 31/2" (89 mm) of outer covering from end of cable. Secure...
Installation Instructions
Page 11
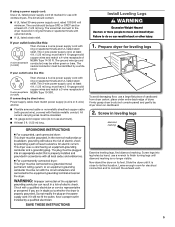
... -down screw. Tighten screw. 7. Squeeze hooked ends together and tighten screws. Now, go to Venting Requirements. Connect neutral ground wire and neutral wire B C Place hooked end of neutral wire (white or center) (C) of remaining wires under center terminal block screw (B). Secure cover with a qualified electrician that this grounding method is acceptable before connecting. 1. Prepare...
... -down screw. Tighten screw. 7. Squeeze hooked ends together and tighten screws. Now, go to Venting Requirements. Connect neutral ground wire and neutral wire B C Place hooked end of neutral wire (white or center) (C) of remaining wires under center terminal block screw (B). Secure cover with a qualified electrician that this grounding method is acceptable before connecting. 1. Prepare...
Installation Instructions
Page 15
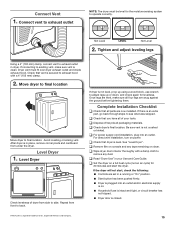
... tightening them. After dryer is secured to back. Repeat from under the dryer. Complete Installation Checklist q Check that vent is in your tools. For direct wire installation, turn on dryer. q Read "Dryer Use" in place, remove corner posts and cardboard from front to exhaust hood with a damp cloth to final location...
... tightening them. After dryer is secured to back. Repeat from under the dryer. Complete Installation Checklist q Check that vent is in your tools. For direct wire installation, turn on dryer. q Read "Dryer Use" in place, remove corner posts and cardboard from front to exhaust hood with a damp cloth to final location...
Warranty
Page 1
... Replacement parts or repair labor if this book and your major appliance, to replace or repair house fuses, or to correct house wiring or plumbing. 3. Service calls to the appliance. 8. Consumable parts are unable to resolve the problem after checking "Troubleshooting," additional help..., when this major appliance is operated and maintained according to instructions attached to or furnished with the product, Whirlpool Corporation or Whirlpool Canada LP (hereafter "Whirlpool") will need to know your major appliance to better help can find this limitation may have other than normal...
... Replacement parts or repair labor if this book and your major appliance, to replace or repair house fuses, or to correct house wiring or plumbing. 3. Service calls to the appliance. 8. Consumable parts are unable to resolve the problem after checking "Troubleshooting," additional help..., when this major appliance is operated and maintained according to instructions attached to or furnished with the product, Whirlpool Corporation or Whirlpool Canada LP (hereafter "Whirlpool") will need to know your major appliance to better help can find this limitation may have other than normal...


