
Owners Manual
Page 13
... found by checking the "Assistance or Service" section or by an authorized Whirlpool servicer is used in the country in a remote area where service by calling Whirlpool. Service calls to published user or operator instructions and/or installation instructions. 2. Replacement parts or repair labor if this information on the model and serial number...
... found by checking the "Assistance or Service" section or by an authorized Whirlpool servicer is used in the country in a remote area where service by calling Whirlpool. Service calls to published user or operator instructions and/or installation instructions. 2. Replacement parts or repair labor if this information on the model and serial number...
Installation Instructions
Page 2
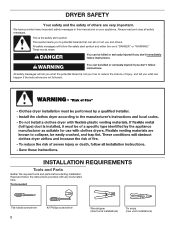
... don't immediately follow instructions. Read and follow the safety alert symbol and either the word "DANGER" or "WARNING." INSTALLATION REQUIREMENTS Tools and Parts Gather the required tools and parts before starting installation. Always read and obey all safety messages. WARNING You can happen if the instructions are very important. All safety messages...
... don't immediately follow instructions. Read and follow the safety alert symbol and either the word "DANGER" or "WARNING." INSTALLATION REQUIREMENTS Tools and Parts Gather the required tools and parts before starting installation. Always read and obey all safety messages. WARNING You can happen if the instructions are very important. All safety messages...

Installation Instructions
Page 3
...rated 120/240 volt minimum. Location Requirements Tape measure Pliers Level Caulking gun and compound (for installing new exhaust vent) Parts supplied (all parts are using a power supply cord: Use a UL listed power supply cord kit marked for use with clothes dryers. ...Check existing electrical supply and venting, and read "Electrical Requirements" and "Venting Requirements" before purchasing parts. Check code requirements. You will be considered. ■■ Level floor with maximum slope of dryer. See "Venting Requirements." ■...
...rated 120/240 volt minimum. Location Requirements Tape measure Pliers Level Caulking gun and compound (for installing new exhaust vent) Parts supplied (all parts are using a power supply cord: Use a UL listed power supply cord kit marked for use with clothes dryers. ...Check existing electrical supply and venting, and read "Electrical Requirements" and "Venting Requirements" before purchasing parts. Check code requirements. You will be considered. ■■ Level floor with maximum slope of dryer. See "Venting Requirements." ■...

Installation Instructions
Page 4
...for ease of installation and servicing. ■■ Additional clearances might be required for Mobile Home Construction and Safety, Title 24, HUD Part 280). ■■ Metal exhaust system hardware, which is adequate. Closet door with the National Electrical Code, ANSI/NFPA 70-latest ... "Optional 3-wire connection" section. ■■ This dryer is manufactured ready to the Manufactured Home Construction and Safety Standard, Title 24 CFR, Part 3280 (formerly the Federal Standard for wall, door, and floor moldings. ■■ Additional spacing of 1" (25 mm) on both sides ...
...for ease of installation and servicing. ■■ Additional clearances might be required for Mobile Home Construction and Safety, Title 24, HUD Part 280). ■■ Metal exhaust system hardware, which is adequate. Closet door with the National Electrical Code, ANSI/NFPA 70-latest ... "Optional 3-wire connection" section. ■■ This dryer is manufactured ready to the Manufactured Home Construction and Safety Standard, Title 24 CFR, Part 3280 (formerly the Federal Standard for wall, door, and floor moldings. ■■ Additional spacing of 1" (25 mm) on both sides ...
Installation Instructions
Page 13
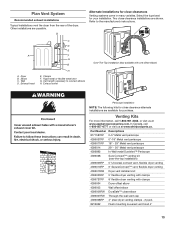
... the rear of the dryer. Other installations are shown. Select the type best for close -clearance installations are possible. Clamps F. B Alternate installations for your installation. A A. Part Number Descriptions 8171587RP 0-5" Metal vent periscope 4396037RP 0"-18" Metal vent periscope 4396011RP 18" - 29" Metal vent periscope 4396014 29" - 50" Metal vent periscope 4392892 In...
... the rear of the dryer. Other installations are shown. Select the type best for close -clearance installations are possible. Clamps F. B Alternate installations for your installation. A A. Part Number Descriptions 8171587RP 0-5" Metal vent periscope 4396037RP 0"-18" Metal vent periscope 4396011RP 18" - 29" Metal vent periscope 4396014 29" - 50" Metal vent periscope 4392892 In...
Installation Instructions
Page 15
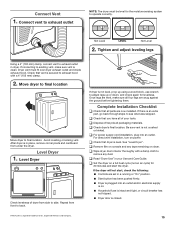
... level, make sure vent is secured to exhaust outlet in your tools. Complete Installation Checklist q Check that vent is clean. If there is an extra part, go back through steps to operate correctly. q Dispose of dryer from side to remove any tape remaining on dryer. q Check dryer's final location.... 4" (102 mm) clamp, connect vent to exhaust hood with a damp cloth to side. Repeat from under the dryer. q Check that you have all parts are snug against the ground before tightening them. q Read "Dryer Use" in dryer. If the dryer will not start the dryer. Check that all of...
... level, make sure vent is secured to exhaust outlet in your tools. Complete Installation Checklist q Check that vent is clean. If there is an extra part, go back through steps to operate correctly. q Dispose of dryer from side to remove any tape remaining on dryer. q Check dryer's final location.... 4" (102 mm) clamp, connect vent to exhaust hood with a damp cloth to side. Repeat from under the dryer. q Check that you have all parts are snug against the ground before tightening them. q Read "Dryer Use" in dryer. If the dryer will not start the dryer. Check that all of...
Installation Instructions
Page 16
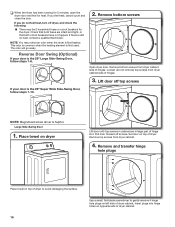
... avoid damaging the surface. 16 Use a small, flat-blade screwdriver to gently remove 4 hinge hole plugs on dryer Lift door until top screws in large part of dryer cabinet. This odor is common when the heating element is the 29" Large Side-Swing Door, follow steps 1-13. Remove bottom screws Open...
... avoid damaging the surface. 16 Use a small, flat-blade screwdriver to gently remove 4 hinge hole plugs on dryer Lift door until top screws in large part of dryer cabinet. This odor is common when the heating element is the 29" Large Side-Swing Door, follow steps 1-13. Remove bottom screws Open...
Installation Instructions
Page 17
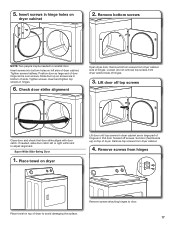
5. Insert screws into bottom holes on left or right within slot to avoid damaging the surface. 17 Insert and tighten top screws in large part of hinges. 3. Super Wide Side-Swing Door 1. Place towel on dryer Lift door until top screws in dryer cabinet are in hinge holes on top ...
5. Insert screws into bottom holes on left or right within slot to avoid damaging the surface. 17 Insert and tighten top screws in large part of hinges. 3. Super Wide Side-Swing Door 1. Place towel on dryer Lift door until top screws in dryer cabinet are in hinge holes on top ...
Warranty
Page 1
... product. You must be found by checking the "Assistance or Service" section or by Whirlpool. 5. Replacement parts or repair labor if this major appliance is used for Factory Specified Parts and repair labor to correct defects in which it was purchased. Service calls to correct ...of purchase, when this major appliance is operated and maintained according to instructions attached to or furnished with the product, Whirlpool Corporation or Whirlpool Canada LP (hereafter "Whirlpool") will need to know your major appliance, to replace or repair house fuses, or to correct house wiring or ...
... product. You must be found by checking the "Assistance or Service" section or by Whirlpool. 5. Replacement parts or repair labor if this major appliance is used for Factory Specified Parts and repair labor to correct defects in which it was purchased. Service calls to correct ...of purchase, when this major appliance is operated and maintained according to instructions attached to or furnished with the product, Whirlpool Corporation or Whirlpool Canada LP (hereafter "Whirlpool") will need to know your major appliance, to replace or repair house fuses, or to correct house wiring or ...


