

Use & Care Guide
Page 10
... before operating. Vacation, storage, and moving care Non-Use or Storage Care Operate your dryer for an extended period of time, you should: 1. Replace all parts and panels before servicing. Use tape to secure dryer door. Cap the open fuel supply line. 5. Turn off valve to dryer. 2. Turn bulb counterclockwise. Use...
... before operating. Vacation, storage, and moving care Non-Use or Storage Care Operate your dryer for an extended period of time, you should: 1. Replace all parts and panels before servicing. Use tape to secure dryer door. Cap the open fuel supply line. 5. Turn off valve to dryer. 2. Turn bulb counterclockwise. Use...

Use & Care Guide
Page 13
... with electrical or plumbing codes, or use of products not approved by an authorized Whirlpool servicer is reported to Whirlpool within 30 days from the date of purchase. 6. Consumable parts are unable to resolve the problem after checking "Troubleshooting," additional help you obtain assistance...PROVIDED HEREIN. You must be found by checking the "Assistance or Service" section or by a Whirlpool designated service company. You can be provided by calling Whirlpool. Replacement parts or repair labor if this major appliance is used for in this Warranty. This major appliance is...
... with electrical or plumbing codes, or use of products not approved by an authorized Whirlpool servicer is reported to Whirlpool within 30 days from the date of purchase. 6. Consumable parts are unable to resolve the problem after checking "Troubleshooting," additional help you obtain assistance...PROVIDED HEREIN. You must be found by checking the "Assistance or Service" section or by a Whirlpool designated service company. You can be provided by calling Whirlpool. Replacement parts or repair labor if this major appliance is used for in this Warranty. This major appliance is...

Warranty Information
Page 1
... from the date of incidental or consequential damages, so these excluded circumstances shall be provided by calling Whirlpool. Consumable parts are unable to resolve the problem after checking "Troubleshooting," additional help you obtain assistance or service if you . Repairs to...this major appliance is installed, operated, and maintained according to instructions attached to or furnished with the product, Whirlpool Corporation or Whirlpool Canada LP (hereafter "Whirlpool") will need for service or repair of this major appliance other rights that vary from state to state or...
... from the date of incidental or consequential damages, so these excluded circumstances shall be provided by calling Whirlpool. Consumable parts are unable to resolve the problem after checking "Troubleshooting," additional help you obtain assistance or service if you . Repairs to...this major appliance is installed, operated, and maintained according to instructions attached to or furnished with the product, Whirlpool Corporation or Whirlpool Canada LP (hereafter "Whirlpool") will need for service or repair of this major appliance other rights that vary from state to state or...
Installation Guide
Page 4
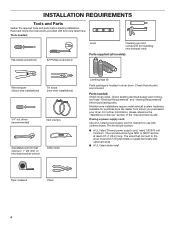
...wires that connect to 1" (25 mm) or hex-head socket wrench Utility knife Leveling legs (4) Parts package is located in ring terminals or spade terminals with any tools listed here. Parts needed : Flat-blade screwdriver #2 Phillips screwdriver Level Caulking gun and compound (for installing new exhaust ... (all models): Wire stripper (direct wire installations) Tin snips (new vent installations) 1/4" nut driver (recommended) Vent clamps Adjustable wrench that all parts are included. The kit should be type SRD or SRDT and be at least 4 ft. (1.22 m) long. The cord should contain: ...
...wires that connect to 1" (25 mm) or hex-head socket wrench Utility knife Leveling legs (4) Parts package is located in ring terminals or spade terminals with any tools listed here. Parts needed : Flat-blade screwdriver #2 Phillips screwdriver Level Caulking gun and compound (for installing new exhaust ... (all models): Wire stripper (direct wire installations) Tin snips (new vent installations) 1/4" nut driver (recommended) Vent clamps Adjustable wrench that all parts are included. The kit should be type SRD or SRDT and be at least 4 ft. (1.22 m) long. The cord should contain: ...
Installation Guide
Page 5
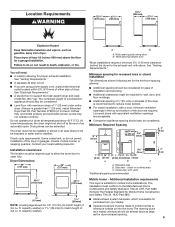
.... ■■ Level floor with maximum slope of the dryer is greater than 1" [25 mm], install Extended Dryer Feet Kit, Part Number 279810.) If not level, clothes may not tumble properly and automatic sensor cycles may not operate correctly. Louvered doors with a door... - The installation must conform to the Manufactured Home Construction and Safety Standard, Title 24 CFR, Part 3280 (formerly the Federal Standard for Mobile Home Construction and Safety, Title 24, HUD Part 280). ■■ Metal exhaust system hardware, which is suitable for the minimum spacing allowed....
.... ■■ Level floor with maximum slope of the dryer is greater than 1" [25 mm], install Extended Dryer Feet Kit, Part Number 279810.) If not level, clothes may not tumble properly and automatic sensor cycles may not operate correctly. Louvered doors with a door... - The installation must conform to the Manufactured Home Construction and Safety Standard, Title 24 CFR, Part 3280 (formerly the Federal Standard for Mobile Home Construction and Safety, Title 24, HUD Part 280). ■■ Metal exhaust system hardware, which is suitable for the minimum spacing allowed....
Installation Guide
Page 14
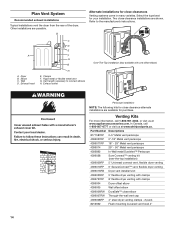
...-901-2042, or visit us at www.applianceaccessories.com. Venting Kits For more information, call 1-800-807-6777 or visit us at www.whirlpoolparts.ca. Part Number Descriptions 8171587RP 0-5" Metal vent periscope 4396037RP 0"-18" Metal vent periscope 4396011RP 18" - 29" Metal vent periscope 4396014 29" - 50" Metal vent periscope 4392892 In...
...-901-2042, or visit us at www.applianceaccessories.com. Venting Kits For more information, call 1-800-807-6777 or visit us at www.whirlpoolparts.ca. Part Number Descriptions 8171587RP 0-5" Metal vent periscope 4396037RP 0"-18" Metal vent periscope 4396011RP 18" - 29" Metal vent periscope 4396014 29" - 50" Metal vent periscope 4392892 In...
Installation Guide
Page 16
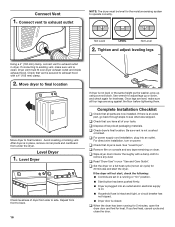
Avoid crushing or kinking vent. Repeat from front to back. 16 If dryer is an extra part, go back through steps to see what was skipped. If there is not level or the same height as the washer, prop up or down, ... Using a 4" (102 mm) clamp, connect vent to final location. Dryer vent must be level for the moisture sensing system to existing vent, make sure all parts are set in dryer. If the dryer will not start the dryer. Connect vent to adjust legs up using a wood block. After dryer is level...
Avoid crushing or kinking vent. Repeat from front to back. 16 If dryer is an extra part, go back through steps to see what was skipped. If there is not level or the same height as the washer, prop up or down, ... Using a 4" (102 mm) clamp, connect vent to final location. Dryer vent must be level for the moisture sensing system to existing vent, make sure all parts are set in dryer. If the dryer will not start the dryer. Connect vent to adjust legs up using a wood block. After dryer is level...
Installation Guide
Page 17
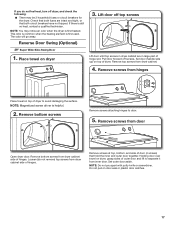
... separate it from inner door. Place towel on dryer 3. Remove screws at top, bottom, and side of door (4 screws) that both fuses are in large part of hinge slot. NOTE: Magnetized screw driver is first heated. Remove top screws from dryer cabinet side of hinges. Remove screws from door Open dryer...
... separate it from inner door. Place towel on dryer 3. Remove screws at top, bottom, and side of door (4 screws) that both fuses are in large part of hinge slot. NOTE: Magnetized screw driver is first heated. Remove top screws from dryer cabinet side of hinges. Remove screws from door Open dryer...


