Installation Guide
Page 2
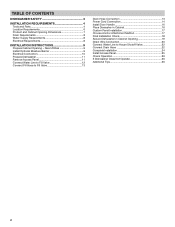
... Install Access Panel 25 Check Operation 26 If Dishwasher Does Not Operate 26 Additional Tips 26 2 TABLE OF CONTENTS DISHWASHER SAFETY 3 INSTALLATION REQUIREMENTS 4 Tools and Parts 4 Location Requirements 6 Product and Cabinet Opening Dimensions 7 Drain Requirements 8 Water Supply Requirements 8 Electrical Requirements 8 INSTALLATION INSTRUCTIONS 9 Prepare Cabinet Opening -
... Install Access Panel 25 Check Operation 26 If Dishwasher Does Not Operate 26 Additional Tips 26 2 TABLE OF CONTENTS DISHWASHER SAFETY 3 INSTALLATION REQUIREMENTS 4 Tools and Parts 4 Location Requirements 6 Product and Cabinet Opening Dimensions 7 Drain Requirements 8 Water Supply Requirements 8 Electrical Requirements 8 INSTALLATION INSTRUCTIONS 9 Prepare Cabinet Opening -
Installation Guide
Page 4
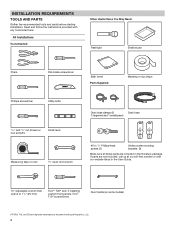
... tools listed here. All Installations Tools Needed: Other Useful Items You May Need: Flashlight Shallow pan Pliers Flat-blade screwdriver Bath towel Parts Supplied: Masking or duct tape Phillips screwdriver Utility knife 5/16" and 1/4" nut drivers or hex sockets Small level Measuring tape or ...hose clamps (2) Drain hose (1 large/red and 1 small/green) #10 x 1/2" Phillips-head screws (2) Undercounter mounting brackets (2) Make sure all these parts are included in the User Guide. 10" adjustable wrench that opens to 11/8" (29 mm) Torx®† T20® and, if installing ...
... tools listed here. All Installations Tools Needed: Other Useful Items You May Need: Flashlight Shallow pan Pliers Flat-blade screwdriver Bath towel Parts Supplied: Masking or duct tape Phillips screwdriver Utility knife 5/16" and 1/4" nut drivers or hex sockets Small level Measuring tape or ...hose clamps (2) Drain hose (1 large/red and 1 small/green) #10 x 1/2" Phillips-head screws (2) Undercounter mounting brackets (2) Make sure all these parts are included in the User Guide. 10" adjustable wrench that opens to 11/8" (29 mm) Torx®† T20® and, if installing ...
Installation Guide
Page 5
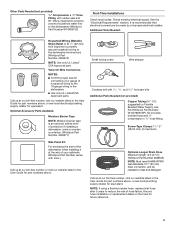
...risk of hose failure. suggested) or Flexible Braided Water Supply Line Kit (Whirlpool Part Number W10278635RP). Screw-Type Clamps 11/2"-2" (38-50 mm) (3 maximum) Optional-Longer Drain Hose Maximum length 12 ft (3.7 m) (Whirlpool Part Number 3385556) NOTE: Must meet AHAM/IAPMO test standards, fit 1" (... Household Wiring (Metallic) Strain Relief to fit 7/8" (22 mm) hole (required to properly secure household wiring to the dishwasher) (Whirlpool Part Number W10685193) First-Time Installations Check local codes. Small tubing cutter Wire stripper Cordless drill with color.) Call us at the end ...
...risk of hose failure. suggested) or Flexible Braided Water Supply Line Kit (Whirlpool Part Number W10278635RP). Screw-Type Clamps 11/2"-2" (38-50 mm) (3 maximum) Optional-Longer Drain Hose Maximum length 12 ft (3.7 m) (Whirlpool Part Number 3385556) NOTE: Must meet AHAM/IAPMO test standards, fit 1" (... Household Wiring (Metallic) Strain Relief to fit 7/8" (22 mm) hole (required to properly secure household wiring to the dishwasher) (Whirlpool Part Number W10685193) First-Time Installations Check local codes. Small tubing cutter Wire stripper Cordless drill with color.) Call us at the end ...

Installation Guide
Page 6
...provide: ■■ Convenient access for loading and unloading dishes. See the "Tools and Parts" section at our toll-free number, visit our website listed in the User Guide for part numbers above, or see local electrical supply retailer for equivalent. If it to freezing, ...for installing underneath a wooden countertop. For Direct Wire For Power Cord Cabinet Grommet For 11/2" (38 mm) hole in cabinet. (Whirlpool Part Number 302797) NOTE: Required for metal cabinets Power Cord Kit Kit typically includes power cord, metallic strain relief, grommet, and twist-on wire...
...provide: ■■ Convenient access for loading and unloading dishes. See the "Tools and Parts" section at our toll-free number, visit our website listed in the User Guide for part numbers above, or see local electrical supply retailer for equivalent. If it to freezing, ...for installing underneath a wooden countertop. For Direct Wire For Power Cord Cabinet Grommet For 11/2" (38 mm) hole in cabinet. (Whirlpool Part Number 302797) NOTE: Required for metal cabinets Power Cord Kit Kit typically includes power cord, metallic strain relief, grommet, and twist-on wire...

Installation Guide
Page 8
...connection with the new dishwasher. NOTE: If replacing an existing dishwasher, it is recommended to install a new water line (see the "Tools and Parts" section at the front of 2 field wiring supply conductors (12 AWG largest size) plus 1 grounding conductor are permitted in the terminal box.... also requires a connection to a hot water supply line. ■■ A hot water line with grounding wire that meets the wiring requirements for part details and orders. DRAIN REQUIREMENTS ■■ A new drain hose is supplied with a maximum length of 12 ft (3.7 m) that meets all current...
...connection with the new dishwasher. NOTE: If replacing an existing dishwasher, it is recommended to install a new water line (see the "Tools and Parts" section at the front of 2 field wiring supply conductors (12 AWG largest size) plus 1 grounding conductor are permitted in the terminal box.... also requires a connection to a hot water supply line. ■■ A hot water line with grounding wire that meets the wiring requirements for part details and orders. DRAIN REQUIREMENTS ■■ A new drain hose is supplied with a maximum length of 12 ft (3.7 m) that meets all current...
Installation Guide
Page 9
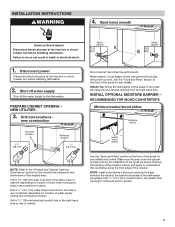
...with grommet included with power cord kit. RECOMMENDED FOR WOOD COUNTERTOPS Moisture barrier/wood shims Moisture barrier Install wood shims See the "Tools and Parts" section at the front of the guide for installation of the shaded area. Remove the backing of the moisture barrier, and apply to ...the "Product and Cabinet Opening Dimensions" section for part details. Wood cabinet Metal cabinet Wood cabinet: Sand the hole until smooth. See the "Tools and Parts" section at the front of the guide for the correct hole placement and dimensions of ...
...with grommet included with power cord kit. RECOMMENDED FOR WOOD COUNTERTOPS Moisture barrier/wood shims Moisture barrier Install wood shims See the "Tools and Parts" section at the front of the guide for installation of the shaded area. Remove the backing of the moisture barrier, and apply to ...the "Product and Cabinet Opening Dimensions" section for part details. Wood cabinet Metal cabinet Wood cabinet: Sand the hole until smooth. See the "Tools and Parts" section at the front of the guide for the correct hole placement and dimensions of ...
Installation Guide
Page 13
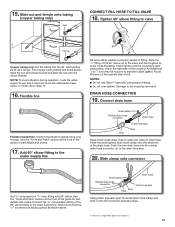
...;† tape with 90° elbow. Connect the 3/8" compression fitting of Chemours. 13 15. See the "Tools and Parts" section at the front of the guide for part details and orders. Slide clamp onto connector Get 3/8" compression x 3/4" hose fitting with compression fittings. ■■ Do ...not over-tighten. See the "Tools and Parts" section at the front of the guide for part details and orders. 17. Small clamp Rubber drain hose connector Stop Stop Drain hose Drain hose stop Stop Place towel...
...;† tape with 90° elbow. Connect the 3/8" compression fitting of Chemours. 13 15. See the "Tools and Parts" section at the front of the guide for part details and orders. Slide clamp onto connector Get 3/8" compression x 3/4" hose fitting with compression fittings. ■■ Do ...not over-tighten. See the "Tools and Parts" section at the front of the guide for part details and orders. 17. Small clamp Rubber drain hose connector Stop Stop Drain hose Drain hose stop Stop Place towel...
Installation Guide
Page 14
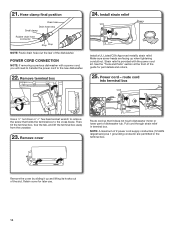
...terminal box. Then, tilt the terminal box, free the tab, and lift the terminal box away from the crossbar. 23. Power cord - Retain cover for part details and orders. 25. 21. Hose clamp final position Drain hose Drain hose stop Small clamp Rubber drain hose connector Stop Stop NOTE: Route drain... hose out the rear of dishwasher tub. See the "Tools and Parts" section at the front of the slot. Remove cover Route cord so that holds the terminal box to the new dishwasher. 22. POWER CORD ...
...terminal box. Then, tilt the terminal box, free the tab, and lift the terminal box away from the crossbar. 23. Power cord - Retain cover for part details and orders. 25. 21. Hose clamp final position Drain hose Drain hose stop Small clamp Rubber drain hose connector Stop Stop NOTE: Route drain... hose out the rear of dishwasher tub. See the "Tools and Parts" section at the front of the slot. Remove cover Route cord so that holds the terminal box to the new dishwasher. 22. POWER CORD ...
Installation Guide
Page 15
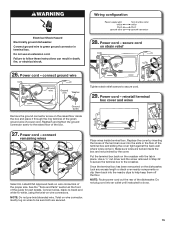
... box. Replace the cover by the cover. Use a 1/4" nut driver and the screw removed in . secure cord on wire connector. See the "Tools and Parts" section at the front of the box. 27. Do not plug cord into an outlet until instructed to the crossbar. Do not use an extension...ground wire of the dishwasher. Power cord - NOTE: Do not pre-twist stranded wire. Connect ground wire to the raised floor of the guide for part details. connect remaining wires Select UL Listed/CSA Approved twist-on the dishwasher, tuck any excess length or slack over nearby components or clip them...
... box. Replace the cover by the cover. Use a 1/4" nut driver and the screw removed in . secure cord on wire connector. See the "Tools and Parts" section at the front of the box. 27. Do not plug cord into an outlet until instructed to the crossbar. Do not use an extension...ground wire of the dishwasher. Power cord - NOTE: Do not pre-twist stranded wire. Connect ground wire to the raised floor of the guide for part details. connect remaining wires Select UL Listed/CSA Approved twist-on the dishwasher, tuck any excess length or slack over nearby components or clip them...
Installation Guide
Page 17
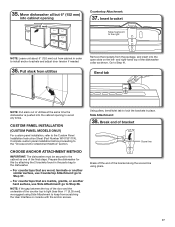
...panel installation, refer to the "Choose Anchor Attachment Method" section. Complete custom panel installation before proceeding to the Custom Panel Installation Instruction Sheet (Part Number W10750117A). For countertops that are marble, granite, or another similar surface, use Side Attachment: go to the cabinet as shown. Move... the scored line using Side Attachment to the dishwasher. - NOTE: Leave unit about 6" (152 mm) out from cabinet in the parts bag to keep from the package, and insert into the open slots on the left- Break end of bracket Score line Break off ...
...panel installation, refer to the "Choose Anchor Attachment Method" section. Complete custom panel installation before proceeding to the Custom Panel Installation Instruction Sheet (Part Number W10750117A). For countertops that are marble, granite, or another similar surface, use Side Attachment: go to the cabinet as shown. Move... the scored line using Side Attachment to the dishwasher. - NOTE: Leave unit about 6" (152 mm) out from cabinet in the parts bag to keep from the package, and insert into the open slots on the left- Break end of bracket Score line Break off ...
Installation Guide
Page 21
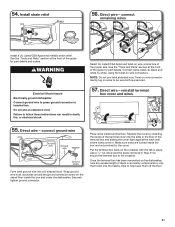
...pre-twist stranded wire. Make sure wires are secured. 57. Once the terminal box has been remounted on wire connectors of the guide for part details and orders. Connect ground wire to green ground connector in Step 51 to secure the terminal box to follow these instructions can result ...dishwasher. Connect wires, black-to-black and white-to help keep them off the floor. 21 Securely tighten ground connector. See the "Tools and Parts" section at the front of the proper size. Direct wire - Wrap ground wire hook clockwise around the ground connector screw on the crossbar with ...
...pre-twist stranded wire. Make sure wires are secured. 57. Once the terminal box has been remounted on wire connectors of the guide for part details and orders. Connect ground wire to green ground connector in Step 51 to secure the terminal box to follow these instructions can result ...dishwasher. Connect wires, black-to-black and white-to help keep them off the floor. 21 Securely tighten ground connector. See the "Tools and Parts" section at the front of the proper size. Direct wire - Wrap ground wire hook clockwise around the ground connector screw on the crossbar with ...

Installation Guide
Page 24
... 2 3 1. NOTE: Do not cut ribbed section. 2. Power supply cord - Check that the power supply wire or cord does not touch dishwasher motor or the lower part of drain hose to air gap and cut , use a 11/2" to 2" (38 to air gap. 60. Use pliers to complete the shortest wash cycle. with...
... 2 3 1. NOTE: Do not cut ribbed section. 2. Power supply cord - Check that the power supply wire or cord does not touch dishwasher motor or the lower part of drain hose to air gap and cut , use a 11/2" to 2" (38 to air gap. 60. Use pliers to complete the shortest wash cycle. with...
Installation Guide
Page 26
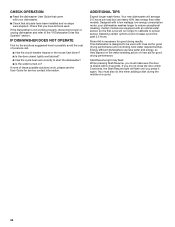
.... CHECK OPERATION ■■ Read the dishwasher User Guide that came with a low wattage, low energy consumption motor, your dishwasher. ■■ Check that all parts have all tools used with an optical water sensor, so the first cycle will run longer to calibrate to optical sensor. If the dishwasher is...
.... CHECK OPERATION ■■ Read the dishwasher User Guide that came with a low wattage, low energy consumption motor, your dishwasher. ■■ Check that all parts have all tools used with an optical water sensor, so the first cycle will run longer to calibrate to optical sensor. If the dishwasher is...
Dimension Guide
Page 1
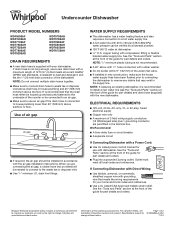
copper tubing with dishwasher. Because Whirlpool Corporation policy includes a continuous commitment to improve our ...A hot water line with 20 to 120 psi (138 to change without notice. See the "Tools and Parts" section at the front of the guide for planning purposes only. Undercounter Dishwasher PRODUCT MODEL NUMBERS WDF560SAF WDF760SAD ... separate circuit If Connecting Dishwasher with a Power Cord: ■■ Use UL Listed power cord kit marked for part details and orders. ■■ Plug into a grounded 3 prong outlet. Outlet must meet all current AHAM/ ...
copper tubing with dishwasher. Because Whirlpool Corporation policy includes a continuous commitment to improve our ...A hot water line with 20 to 120 psi (138 to change without notice. See the "Tools and Parts" section at the front of the guide for planning purposes only. Undercounter Dishwasher PRODUCT MODEL NUMBERS WDF560SAF WDF760SAD ... separate circuit If Connecting Dishwasher with a Power Cord: ■■ Use UL Listed power cord kit marked for part details and orders. ■■ Plug into a grounded 3 prong outlet. Outlet must meet all current AHAM/ ...
Use & Care Guide
Page 1
.... Always read and obey all safety messages. In Canada, visit our website at www.whirlpool.com. Model Number Serial Number Table of Contents DISHWASHER SAFETY 1 WHAT'S NEW IN YOUR DISHWASHER 3 PARTS AND FEATURES 4 QUICK STEPS 5 DISHWASHER USE 6 CYCLE AND OPTION DESCRIPTIONS 8 DISHWASHER FEATURES 10 FILTRATION SYSTEM 12 DISHWASHER CARE 13 TROUBLESHOOTING 14...
.... Always read and obey all safety messages. In Canada, visit our website at www.whirlpool.com. Model Number Serial Number Table of Contents DISHWASHER SAFETY 1 WHAT'S NEW IN YOUR DISHWASHER 3 PARTS AND FEATURES 4 QUICK STEPS 5 DISHWASHER USE 6 CYCLE AND OPTION DESCRIPTIONS 8 DISHWASHER FEATURES 10 FILTRATION SYSTEM 12 DISHWASHER CARE 13 TROUBLESHOOTING 14...
Use & Care Guide
Page 4
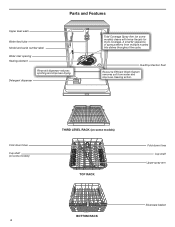
Overfill protection float Resource Efficient Wash System removes soil from multiple nozzles hits dishes throughout the cycle. Parts and Features Upper level wash Water feed tube Model and serial number label Water inlet opening Heating element Rinse aid dispenser reduces spotting and improves ...
Overfill protection float Resource Efficient Wash System removes soil from multiple nozzles hits dishes throughout the cycle. Parts and Features Upper level wash Water feed tube Model and serial number label Water inlet opening Heating element Rinse aid dispenser reduces spotting and improves ...
Use & Care Guide
Page 12
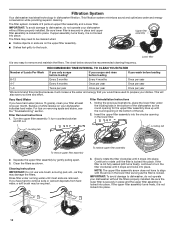
... remove upper filter assembly 2. Continue to dishwasher, do not operate your dishwasher indicates hard water. L N K C LO O CK PUSH DOWN & TURN UNL O CK 12 Buildup of 2 parts an upper filter assembly and a lower filter. Filter Reinstallation Instructions 1. If you have to prepare your dishwasher without the filters properly installed. Clean the filters...
... remove upper filter assembly 2. Continue to dishwasher, do not operate your dishwasher indicates hard water. L N K C LO O CK PUSH DOWN & TURN UNL O CK 12 Buildup of 2 parts an upper filter assembly and a lower filter. Filter Reinstallation Instructions 1. If you have to prepare your dishwasher without the filters properly installed. Clean the filters...
Use & Care Guide
Page 14
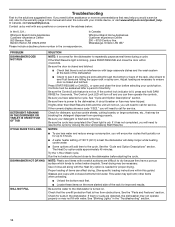
.... See "Cycle and Option Descriptions" section. Try the 1-Hour Wash cycle. Run the hot water at the address below: In the U.S.A.: Whirlpool Brand Home Appliances Customer eXperience Center 553 Benson Road Benton Harbor, MI 49022-2692 Please include a daytime phone number in this guide.) Glasses and... concave bottoms hold SANI RINSE for suds in the "Troubleshooting" section. 14 Use of 120°F (49°C) is on . See the "Parts and Features" section. Controls must be necessary. If it has not completed, you avoid a service call for service. Be sure the cycle has ...
.... See "Cycle and Option Descriptions" section. Try the 1-Hour Wash cycle. Run the hot water at the address below: In the U.S.A.: Whirlpool Brand Home Appliances Customer eXperience Center 553 Benson Road Benton Harbor, MI 49022-2692 Please include a daytime phone number in this guide.) Glasses and... concave bottoms hold SANI RINSE for suds in the "Troubleshooting" section. 14 Use of 120°F (49°C) is on . See the "Parts and Features" section. Controls must be necessary. If it has not completed, you avoid a service call for service. Be sure the cycle has ...
Use & Care Guide
Page 17
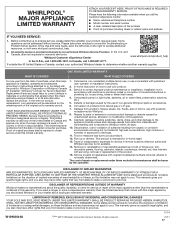
... a longer or more comprehensive warranty than the representations contained in Canada. In-home instruction on how to province. Consumable parts (i.e. Defects or damage caused by unauthorized service, alteration or modification of non-genuine Whirlpool parts or accessories. 6. Cosmetic damage including scratches, dents, chips, and other rights that vary from defects in accordance with...
... a longer or more comprehensive warranty than the representations contained in Canada. In-home instruction on how to province. Consumable parts (i.e. Defects or damage caused by unauthorized service, alteration or modification of non-genuine Whirlpool parts or accessories. 6. Cosmetic damage including scratches, dents, chips, and other rights that vary from defects in accordance with...

Installation Guide
Page 2
TABLE OF CONTENTS DISHWASHER SAFETY 3 INSTALLATION REQUIREMENTS 4 Tools and Parts 4 Location Requirements 6 Product and Cabinet Opening Dimensions 7 Drain Requirements 8 Water Supply Requirements 8 Electrical Requirements 8 INSTALLATION INSTRUCTIONS 9 Prepare Cabinet Opening - New Utilities 9 Install Optional Moisture Barrier 9 ...
TABLE OF CONTENTS DISHWASHER SAFETY 3 INSTALLATION REQUIREMENTS 4 Tools and Parts 4 Location Requirements 6 Product and Cabinet Opening Dimensions 7 Drain Requirements 8 Water Supply Requirements 8 Electrical Requirements 8 INSTALLATION INSTRUCTIONS 9 Prepare Cabinet Opening - New Utilities 9 Install Optional Moisture Barrier 9 ...


