Use & Care Guide
Page 1
... DISHWASHER USER INSTRUCTIONS THANK YOU for additional information. Table of Contents DISHWASHER SAFETY 1 WHAT'S NEW IN YOUR DISHWASHER 3 ENERGY 3 PERFORMANCE 3 PARTS AND FEATURES 4 QUICK STEPS 5 DISHWASHER USE 6 CYCLE AND OPTION DESCRIPTIONS 8 DISHWASHER FEATURES 10 FILTRATION SYSTEM 12 DISHWASHER CARE 13 TROUBLESHOOTING 14 ...model and serial number located near the door on your appliance. In Canada, visit our website at www.whirlpool.ca or call us at www.whirlpool.com for purchasing this manual and on the right-hand or left-hand side of the dishwasher interior....
... DISHWASHER USER INSTRUCTIONS THANK YOU for additional information. Table of Contents DISHWASHER SAFETY 1 WHAT'S NEW IN YOUR DISHWASHER 3 ENERGY 3 PERFORMANCE 3 PARTS AND FEATURES 4 QUICK STEPS 5 DISHWASHER USE 6 CYCLE AND OPTION DESCRIPTIONS 8 DISHWASHER FEATURES 10 FILTRATION SYSTEM 12 DISHWASHER CARE 13 TROUBLESHOOTING 14 ...model and serial number located near the door on your appliance. In Canada, visit our website at www.whirlpool.ca or call us at www.whirlpool.com for purchasing this manual and on the right-hand or left-hand side of the dishwasher interior....
Use & Care Guide
Page 4
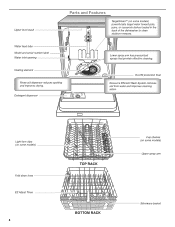
Parts and Features 4
Parts and Features 4
Use & Care Guide
Page 12
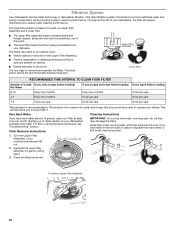
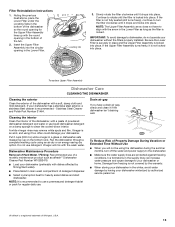
... gently pulling apart. 3. C LO PUSH DOWN & TURN K UNLOCK L O C K PUSH DOWN & TURN L UN O CK To remove Upper Filter Assembly 12 The triple filter system consists of 2 parts, an upper filter assembly and a lower filter. ■ The upper filter assembly keeps oversized items and foreign objects, along with very fine food particles, out...
... gently pulling apart. 3. C LO PUSH DOWN & TURN K UNLOCK L O C K PUSH DOWN & TURN L UN O CK To remove Upper Filter Assembly 12 The triple filter system consists of 2 parts, an upper filter assembly and a lower filter. ■ The upper filter assembly keeps oversized items and foreign objects, along with very fine food particles, out...
Use & Care Guide
Page 13
...dishwasher winterized by filming/hard water). ■ Place tablet in the Lower Filter as long as affresh®† Dishwasher Cleaner Part Number W10282479. ■ Load your dishwasher without the filters properly installed. To Reduce Risk of detergent dispenser. ■ Select cycle...the dishwasher so the round opening in place and the Upper Filter Assembly is locked into place. Dishwasher Maintenance Procedure Removal of Whirlpool, U.S.A. 13 Continue to the dishwasher. ■ Make sure the water supply lines are protected against freezing conditions. Slowly rotate...
...dishwasher winterized by filming/hard water). ■ Place tablet in the Lower Filter as long as affresh®† Dishwasher Cleaner Part Number W10282479. ■ Load your dishwasher without the filters properly installed. To Reduce Risk of detergent dispenser. ■ Select cycle...the dishwasher so the round opening in place and the Upper Filter Assembly is locked into place. Dishwasher Maintenance Procedure Removal of Whirlpool, U.S.A. 13 Continue to the dishwasher. ■ Make sure the water supply lines are protected against freezing conditions. Slowly rotate...

Use & Care Guide
Page 17
...WARRANTY SHALL BE PRODUCT REPAIR AS PROVIDED HEREIN. Repairs to parts or systems to arrange service, please determine whether your product requires repair. This product is provided exclusively by Whirlpool. 7. This warranty gives you specific legal rights, and ...United States or Canada, contact your appliance will pay for service in accordance with products not approved by our authorized Whirlpool Service Providers. Consumable parts (i.e. Proof of household electrical or plumbing (i.e. light bulbs, batteries, air or water filters, preservation solutions, etc.). ...
...WARRANTY SHALL BE PRODUCT REPAIR AS PROVIDED HEREIN. Repairs to parts or systems to arrange service, please determine whether your product requires repair. This product is provided exclusively by Whirlpool. 7. This warranty gives you specific legal rights, and ...United States or Canada, contact your appliance will pay for service in accordance with products not approved by our authorized Whirlpool Service Providers. Consumable parts (i.e. Proof of household electrical or plumbing (i.e. light bulbs, batteries, air or water filters, preservation solutions, etc.). ...

Warranty Information
Page 1
... available. 13. Proof of original purchase date is intended for service or repair of this warranty. Service or parts for warranty service to Whirlpool within 30 days. 9. EXCLUSION OF INCIDENTAL AND CONSEQUENTIAL DAMAGES YOUR SOLE AND EXCLUSIVE REMEDY UNDER THIS LIMITED WARRANTY... results from state to state or province to you . Repairs to parts or systems to correct improper product maintenance or installation, installation not in remote locations where an authorized Whirlpool servicer is installed, operated and maintained according to instructions attached to determine...
... available. 13. Proof of original purchase date is intended for service or repair of this warranty. Service or parts for warranty service to Whirlpool within 30 days. 9. EXCLUSION OF INCIDENTAL AND CONSEQUENTIAL DAMAGES YOUR SOLE AND EXCLUSIVE REMEDY UNDER THIS LIMITED WARRANTY... results from state to state or province to you . Repairs to parts or systems to correct improper product maintenance or installation, installation not in remote locations where an authorized Whirlpool servicer is installed, operated and maintained according to instructions attached to determine...
Installation Guide
Page 2
... the appliance is the safety alert symbol. Care shall be installed to meet all safety messages. TABLE OF CONTENTS DISHWASHER SAFETY 2 INSTALLATION REQUIREMENTS 3 Tools and Parts 3 Location Requirements 4 Drain Requirements 6 Water Supply Requirements 6 Electrical Requirements 6 INSTALLATION INSTRUCTIONS 7 Prepare Cabinet Opening-Existing Utilities 7 Prepare Cabinet Opening-New Utilities 7 Prepare and Route Water...
... the appliance is the safety alert symbol. Care shall be installed to meet all safety messages. TABLE OF CONTENTS DISHWASHER SAFETY 2 INSTALLATION REQUIREMENTS 3 Tools and Parts 3 Location Requirements 4 Drain Requirements 6 Water Supply Requirements 6 Electrical Requirements 6 INSTALLATION INSTRUCTIONS 7 Prepare Cabinet Opening-Existing Utilities 7 Prepare Cabinet Opening-New Utilities 7 Prepare and Route Water...
Installation Guide
Page 3
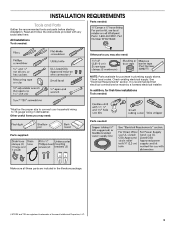
... plumbing supply stores. Other useful items you may need : NOTE: Parts available for first-time installations Tools needed : Make sure all these parts are registered trademarks of Acument Intellectual Properties, LLC. 3 Parts needed: All Installations Tools needed: Other parts you may also need : Parts supplied: Parts needed : *Must be made by a licensed electrical installer. Check existing...
... plumbing supply stores. Other useful items you may need : NOTE: Parts available for first-time installations Tools needed : Make sure all these parts are registered trademarks of Acument Intellectual Properties, LLC. 3 Parts needed: All Installations Tools needed: Other parts you may also need : Parts supplied: Parts needed : *Must be made by a licensed electrical installer. Check existing...

Installation Guide
Page 4
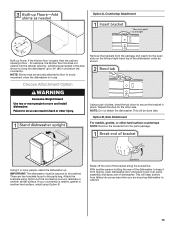
... touch the floor. Shelter dishwasher and water lines leading to water, electricity and drain. Damage from freezing is available from your cabinetry. A moisture barrier accessory (Part Number 4396277) is available from your dealer for installing your dishwasher at the end of your dealer for installing underneath the countertop. ■ square opening...
... touch the floor. Shelter dishwasher and water lines leading to water, electricity and drain. Damage from freezing is available from your cabinetry. A moisture barrier accessory (Part Number 4396277) is available from your dealer for installing your dishwasher at the end of your dealer for installing underneath the countertop. ■ square opening...
Installation Guide
Page 6
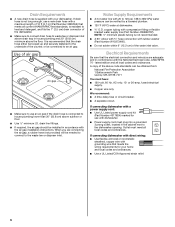
.... Drain Requirements ■ A new drain hose is not recommended. ■ A 90° elbow with ³⁄₄" hose connection with rubber washer (Part Number W10273460). ■ Do not solder within 6" (15.2 cm) of the water inlet valve. If drain hose is not long enough, use an air ...looped up and securely fastened to waste tee or disposer inlet above drain trap in accordance with compression fitting or flexible braided water supply line (Part Number 4396897RP). If connecting dishwasher with a maximum length of the counter, or be installed in house plumbing and 20" (50.8 cm) ...
.... Drain Requirements ■ A new drain hose is not recommended. ■ A 90° elbow with ³⁄₄" hose connection with rubber washer (Part Number W10273460). ■ Do not solder within 6" (15.2 cm) of the water inlet valve. If drain hose is not long enough, use an air ...looped up and securely fastened to waste tee or disposer inlet above drain trap in accordance with compression fitting or flexible braided water supply line (Part Number 4396897RP). If connecting dishwasher with a maximum length of the counter, or be installed in house plumbing and 20" (50.8 cm) ...

Installation Guide
Page 8
... water supply line. 8 This will make water connection easier. Wood cabinet: Sand the hole until smooth. Metal cabinet: Cover hole with grommet included with grommet (Part Number 302797 not provided) Measure overall length of cabinet opening ). Metal cabinet: Cover hole with power supply cord kit. Drill a 1¹⁄₂" (3.8 cm) hole...
... water supply line. 8 This will make water connection easier. Wood cabinet: Sand the hole until smooth. Metal cabinet: Cover hole with grommet included with grommet (Part Number 302797 not provided) Measure overall length of cabinet opening ). Metal cabinet: Cover hole with power supply cord kit. Drill a 1¹⁄₂" (3.8 cm) hole...

Installation Guide
Page 13
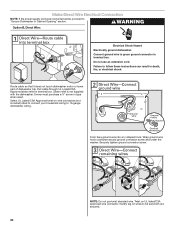
... connectors rated to connect your power supply cord to follow these instructions can result in death, fire, or electrical shock. Twist on wires to lower part of the green ground wire. Failure to 16-gauge dishwasher wiring. Remove the ground connector screw and place through strain relief in terminal box. Gently...
... connectors rated to connect your power supply cord to follow these instructions can result in death, fire, or electrical shock. Twist on wires to lower part of the green ground wire. Failure to 16-gauge dishwasher wiring. Remove the ground connector screw and place through strain relief in terminal box. Gently...
Installation Guide
Page 15
... from tipping, open slots on the left and right-hand top of dishwasher. Remove the brackets from the parts package. There are securing dishwasher to avoid movement when the dishwasher is in the parts bag. With another similar surface. NOTE: Shims must be done later. This will keep it from falling into...
... from tipping, open slots on the left and right-hand top of dishwasher. Remove the brackets from the parts package. There are securing dishwasher to avoid movement when the dishwasher is in the parts bag. With another similar surface. NOTE: Shims must be done later. This will keep it from falling into...
Installation Guide
Page 20
... supply cord was connected earlier, proceed to be sure both are secured. 20 Route cable so that it does not touch dishwasher motor or lower part of dishwasher tub. Securely tighten ground connector screw.
... supply cord was connected earlier, proceed to be sure both are secured. 20 Route cable so that it does not touch dishwasher motor or lower part of dishwasher tub. Securely tighten ground connector screw.

Installation Guide
Page 23
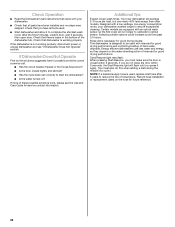
Check that power supply cord does not touch dishwasher motor or lower part of the access panel touches the floor. Plug into a grounded 3 prong outlet. Do not use an adapter. Reconnect Power Using a flat-blade screwdriver, turn the ...
Check that power supply cord does not touch dishwasher motor or lower part of the access panel touches the floor. Plug into a grounded 3 prong outlet. Do not use an adapter. Reconnect Power Using a flat-blade screwdriver, turn the ...
Installation Guide
Page 24
... correctly to start the dishwasher? ■ Is the water turned on? Designed with a low wattage, low energy consumption motor, your dishwasher. ■ Check that all parts have all tools used. ■ Start dishwasher and allow it again. (You must make sure the door is working properly, disconnect power or unplug dishwasher...
... correctly to start the dishwasher? ■ Is the water turned on? Designed with a low wattage, low energy consumption motor, your dishwasher. ■ Check that all parts have all tools used. ■ Start dishwasher and allow it again. (You must make sure the door is working properly, disconnect power or unplug dishwasher...


