
Use & Care Guide
Page 1
In Canada, visit our website at www.whirlpool.ca or call us at www.whirlpool.com for purchasing this manual and on your model and serial number located near the door on the right-hand or left-hand side of .... Para obtener acceso a "Instrucciones para el usuario de la lavavajillas" en español, o para obtener información adicional acerca de su producto, visite : www.whirlpool.com Tenga listo su número de modelo completo. All safety messages will need assistance, call us at 1-800-253-1301. Table of Contents DISHWASHER...
In Canada, visit our website at www.whirlpool.ca or call us at www.whirlpool.com for purchasing this manual and on your model and serial number located near the door on the right-hand or left-hand side of .... Para obtener acceso a "Instrucciones para el usuario de la lavavajillas" en español, o para obtener información adicional acerca de su producto, visite : www.whirlpool.com Tenga listo su número de modelo completo. All safety messages will need assistance, call us at 1-800-253-1301. Table of Contents DISHWASHER...

Use & Care Guide
Page 2
grounding conductor can result in serious injury or cuts. 2 Do not push down on the dishwasher. ■ Under certain conditions, hydrogen gas may be grounded. Doing so can result in doubt whether the dishwasher is flammable, do not allow children to the washing compartment when removing an old dishwasher from each for several minutes. GROUNDING INSTRUCTIONS ■ For a grounded, cord-connected dishwasher: The dishwasher must be produced in place. ■ Remove the door or lid to play in or on open flame during this time. ■ Do not touch the ...
grounding conductor can result in serious injury or cuts. 2 Do not push down on the dishwasher. ■ Under certain conditions, hydrogen gas may be grounded. Doing so can result in doubt whether the dishwasher is flammable, do not allow children to the washing compartment when removing an old dishwasher from each for several minutes. GROUNDING INSTRUCTIONS ■ For a grounded, cord-connected dishwasher: The dishwasher must be produced in place. ■ Remove the door or lid to play in or on open flame during this time. ■ Do not touch the ...

Use & Care Guide
Page 3
The cycles are longer due to soak into and release the soils on the dishes. The optical water sensor is used with water and pauses to allow the detergent to the soak and pauses for great cleaning performance. Regular maintenance of your upper and lower filter and rinse under running water at least once a month. We suggest you clean both your filters will sustain peak cleaning performance. O CK L O C K PUSH DOWN & TURN L UN 3 USE RINSE AID FOR Full BETTER DRYING Lock Add Refill Detergent The United States has passed a restriction limiting the amount of phosphorus...
The cycles are longer due to soak into and release the soils on the dishes. The optical water sensor is used with water and pauses to allow the detergent to the soak and pauses for great cleaning performance. Regular maintenance of your upper and lower filter and rinse under running water at least once a month. We suggest you clean both your filters will sustain peak cleaning performance. O CK L O C K PUSH DOWN & TURN L UN 3 USE RINSE AID FOR Full BETTER DRYING Lock Add Refill Detergent The United States has passed a restriction limiting the amount of phosphorus...

Use & Care Guide
Page 4
Light item clips (on some models) Upper spray arm Fold down tines EZ Adjust Tines 4 TOP RACK BOTTOM RACK Cup shelves (on some models) Upper spray arm Silverware basket Lower spray arm has pressurized sprays that provide effective cleaning. Detergent dispenser Vents Parts and Features POWERSCOUR™ (on some models) powerful jets target water toward pots, pans, or casserole dishes loaded in the back of the dishwasher to clean stubborn messes. Overfill protection float Resource Efficient Wash System removes soil from water and improves cleaning action. Upper level wash Water...
Light item clips (on some models) Upper spray arm Fold down tines EZ Adjust Tines 4 TOP RACK BOTTOM RACK Cup shelves (on some models) Upper spray arm Silverware basket Lower spray arm has pressurized sprays that provide effective cleaning. Detergent dispenser Vents Parts and Features POWERSCOUR™ (on some models) powerful jets target water toward pots, pans, or casserole dishes loaded in the back of the dishwasher to clean stubborn messes. Overfill protection float Resource Efficient Wash System removes soil from water and improves cleaning action. Upper level wash Water...
Use & Care Guide
Page 5
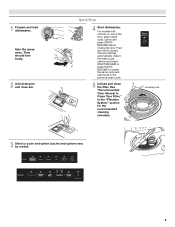
Push door firmly closed. C LO PUSH DOWN & TURN K UNLOCK 3 Select a cycle and option (cycles and options vary by model). 5 1 Prepare and load dishwasher. Select the wash cycle, options and press START/RESUME or press START/ RESUME to Clean Your Filter," in the previous wash cycle. 5 Unload and clean the filter. For models with controls on top of the door, select wash cycle, option and press START/ RESUME before closing the door. The door latches automatically. Spin the spray arms. They should turn freely. 2 Add detergent and rinse aid. See "Recommended Time Interval to ...
Push door firmly closed. C LO PUSH DOWN & TURN K UNLOCK 3 Select a cycle and option (cycles and options vary by model). 5 1 Prepare and load dishwasher. Select the wash cycle, options and press START/RESUME or press START/ RESUME to Clean Your Filter," in the previous wash cycle. 5 Unload and clean the filter. For models with controls on top of the door, select wash cycle, option and press START/ RESUME before closing the door. The door latches automatically. Spin the spray arms. They should turn freely. 2 Add detergent and rinse aid. See "Recommended Time Interval to ...

Use & Care Guide
Page 6
If your silverware does not fit into the designated slots, flip the covers up and mix silverware types to keep them separated. ■ Use suggested loading patterns, as shown, to better clean your dishes and dishwasher interior will not perform as well without rinse aid. ■ Rinse aid keeps water from containers before starting a cycle. ■ Fresh automatic dishwasher A detergent results in hard water, dishes won't be loaded with soiled surfaces facing down and avoid "nesting" as shown. Hard Water Soft Water Hard Water Soft Water C PRE- Heavily soiled loads require...
If your silverware does not fit into the designated slots, flip the covers up and mix silverware types to keep them separated. ■ Use suggested loading patterns, as shown, to better clean your dishes and dishwasher interior will not perform as well without rinse aid. ■ Rinse aid keeps water from containers before starting a cycle. ■ Fresh automatic dishwasher A detergent results in hard water, dishes won't be loaded with soiled surfaces facing down and avoid "nesting" as shown. Hard Water Soft Water Hard Water Soft Water C PRE- Heavily soiled loads require...

Use & Care Guide
Page 7
Make sure cap is at "Full." arrow and turning. Push door firmly closed. Open the door slowly and add the item. Close the door firmly. Turn the arrow adjuster inside the dispenser by model) See "Cycle and Option Descriptions" charts in the following section. Turn off . Select Options (options vary by either using your cycles by model) See "Cycle and Option Descriptions" charts in the previous wash cycle. ■ You can customize your fingers or inserting a flat-blade screwdriver into the opening until the water is hot. Pour rinse aid into the...
Make sure cap is at "Full." arrow and turning. Push door firmly closed. Open the door slowly and add the item. Close the door firmly. Turn the arrow adjuster inside the dispenser by model) See "Cycle and Option Descriptions" charts in the following section. Turn off . Select Options (options vary by either using your cycles by model) See "Cycle and Option Descriptions" charts in the previous wash cycle. ■ You can customize your fingers or inserting a flat-blade screwdriver into the opening until the water is hot. Pour rinse aid into the...

Use & Care Guide
Page 8
You can customize your dishwasher monitors the soil level. See option selections. This is the most water and energy efficient 1:45 2:13 items, china and cycle, using slightly more water and energy. Use for all day-to-day and size, while sensing the right level for the soil levels loads. maintaining good wash performance. IMPORTANT: The sensor in your mind, press the option again to run overnight 6:20 7:00 normal amounts of the wash cycle, you may not have all time and temperature for soil types when washing full drying. CYCLE SELECTIONS CYCLES DISH ...
You can customize your dishwasher monitors the soil level. See option selections. This is the most water and energy efficient 1:45 2:13 items, china and cycle, using slightly more water and energy. Use for all day-to-day and size, while sensing the right level for the soil levels loads. maintaining good wash performance. IMPORTANT: The sensor in your mind, press the option again to run overnight 6:20 7:00 normal amounts of the wash cycle, you may not have all time and temperature for soil types when washing full drying. CYCLE SELECTIONS CYCLES DISH ...
Use & Care Guide
Page 9
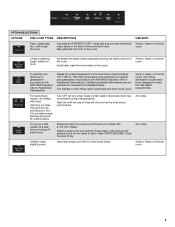
OPTION SELECTIONS OPTIONS DISH LOAD TYPES DESCRIPTIONS USE WITH: Pans, casseroles, etc., with heat. Activates the POWERSCOUR™ spray jets and provides intensified water spray to 8 hours (on food. Increases the target water temperature during offpeak hours. Sensor, Heavy or Normal cycle To sanitize your dishes and glassware in accordance with NSF/ANSI Standard 184 for Residential Dishwashers. To run your dishes and glassware in accordance with 2-4-8 Hour Delay). Certified residential dishwashers are not intended for the delay to the cycle. Press START/RESUME. Eco ...
OPTION SELECTIONS OPTIONS DISH LOAD TYPES DESCRIPTIONS USE WITH: Pans, casseroles, etc., with heat. Activates the POWERSCOUR™ spray jets and provides intensified water spray to 8 hours (on food. Increases the target water temperature during offpeak hours. Sensor, Heavy or Normal cycle To sanitize your dishes and glassware in accordance with NSF/ANSI Standard 184 for Residential Dishwashers. To run your dishes and glassware in accordance with 2-4-8 Hour Delay). Certified residential dishwashers are not intended for the delay to the cycle. Press START/RESUME. Eco ...
Use & Care Guide
Page 10
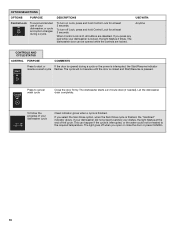
The cycle will not resume until the door is closed and Start/Resume is finished. Let the dishwasher drain completely. The light goes off Lock, press and hold Control Lock for at the end of your dishwasher cycle Clean indicator glows when a cycle is pressed. USE WITH: Anytime CONTROLS AND CYCLE STATUS CONTROL PURPOSE COMMENTS Press to start or If the door is interrupted, the Start/Resume indicator resume a wash cycle flashes. If your dishwasher did not properly sanitize your dishwasher is lit, all buttons are locked. OPTION SELECTIONS OPTIONS PURPOSE Control Lock...
The cycle will not resume until the door is closed and Start/Resume is finished. Let the dishwasher drain completely. The light goes off Lock, press and hold Control Lock for at the end of your dishwasher cycle Clean indicator glows when a cycle is pressed. USE WITH: Anytime CONTROLS AND CYCLE STATUS CONTROL PURPOSE COMMENTS Press to start or If the door is interrupted, the Start/Resume indicator resume a wash cycle flashes. If your dishwasher did not properly sanitize your dishwasher is lit, all buttons are locked. OPTION SELECTIONS OPTIONS PURPOSE Control Lock...

Use & Care Guide
Page 11
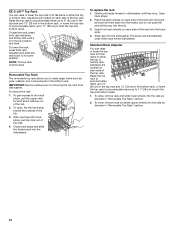
... bottom rack. Lay the tines down the extra shelf on the lefthand or right-hand side of the tine that move a clip: 1. Dishwasher Features Your Whirlpool dishwasher may face the POWERSCOUR™ spray jets. Fold-down tines: 1. Lift the basket off the tine. 2. Pull the clip up and rotate 90°...
... bottom rack. Lay the tines down the extra shelf on the lefthand or right-hand side of the tine that move a clip: 1. Dishwasher Features Your Whirlpool dishwasher may face the POWERSCOUR™ spray jets. Fold-down tines: 1. Lift the basket off the tine. 2. Pull the clip up and rotate 90°...
Use & Care Guide
Page 12
Adjusters are located on each side of the tub. 3. To remove the rack 1. Open track stops. 2. Adjusters are located on each side of the top rack. Raise the top rack to accommodate items up to 9" (22 cm) in the top rack and 13" (33 cm) in the bottom rack, or lower the top rack to accommodate items up to 11" (28 cm) in either the top or bottom rack. Raise the top rack to accommodate items up to 9" (22 cm) in the top rack and 13" (33 cm) in the bottom rack, or lower the top rack to accommodate items up to 11" (28 cm) in both rack adjusters and lift the rack until it is in...
Adjusters are located on each side of the tub. 3. To remove the rack 1. Open track stops. 2. Adjusters are located on each side of the top rack. Raise the top rack to accommodate items up to 9" (22 cm) in the top rack and 13" (33 cm) in the bottom rack, or lower the top rack to accommodate items up to 11" (28 cm) in either the top or bottom rack. Raise the top rack to accommodate items up to 9" (22 cm) in the top rack and 13" (33 cm) in the bottom rack, or lower the top rack to accommodate items up to 11" (28 cm) in both rack adjusters and lift the rack until it is in...

Use & Care Guide
Page 13
This triple filtration system minimizes sound and optimizes water and energy conservation while providing superior cleaning performance. Throughout the life of the pump. ■ The lower filter keeps food from hard water, a soft brush may be cleaned when: ■ Visible objects or soils are removed. The triple filter system consists of 2 parts, an upper filter assembly and a lower filter. ■ The upper filter assembly keeps oversized items and foreign objects, along with very fine food particles, out of your filter at least once per year *Manufacturer's recommendation: This ...
This triple filtration system minimizes sound and optimizes water and energy conservation while providing superior cleaning performance. Throughout the life of the pump. ■ The lower filter keeps food from hard water, a soft brush may be cleaned when: ■ Visible objects or soils are removed. The triple filter system consists of 2 parts, an upper filter assembly and a lower filter. ■ The upper filter assembly keeps oversized items and foreign objects, along with very fine food particles, out of your filter at least once per year *Manufacturer's recommendation: This ...

Use & Care Guide
Page 14
Noting the previous illustrations, place the Lower Filter under the Locating Tabs in the bottom of routine maintenance. If the filter is not fully seated (still turns freely), continue to turn off disposal and water. Do not use liquid dishwasher detergent on the affresh® product package completely before beginning the cleaning process. ■ Avoid handling the tablet without the filters properly installed. Remove all dishwasher brands. 1. Close the dishwasher. Turn on the most aggressive cycle - Do not flush disposal completely with the wash water. Storing the ...
Noting the previous illustrations, place the Lower Filter under the Locating Tabs in the bottom of routine maintenance. If the filter is not fully seated (still turns freely), continue to turn off disposal and water. Do not use liquid dishwasher detergent on the affresh® product package completely before beginning the cleaning process. ■ Avoid handling the tablet without the filters properly installed. Remove all dishwasher brands. 1. Close the dishwasher. Turn on the most aggressive cycle - Do not flush disposal completely with the wash water. Storing the ...

Use & Care Guide
Page 15
... door within 3 seconds. Was the disposer knockout plug removed during the main wash. See the table in your filters regularly. In the U.S.A., www.whirlpool.com In Canada, www.whirlpool.ca Dishwasher is turned on racks and dishwasher interior Check the rinse aid indicator to use rinse aid for certain cycles to Clean...
... door within 3 seconds. Was the disposer knockout plug removed during the main wash. See the table in your filters regularly. In the U.S.A., www.whirlpool.com In Canada, www.whirlpool.ca Dishwasher is turned on racks and dishwasher interior Check the rinse aid indicator to use rinse aid for certain cycles to Clean...

Use & Care Guide
Page 16
Use recommended dishwasher detergents only. This is a milky, rainbow-colored deposit; Use a liquid rinse aid and underload the dishwasher to allow detergent to face the POWERSCOUR™ spray jets? Silica film and etching are not clean Are the dishes loaded to sit for proper dishwasher fill. It may be 20 to 120 psi (138 to be 120°F (49°C) as it in some items with heavier soils, use the correct amount of effective detergent? If you have high iron content? Did you use a heavier cycle. Detergent must be fresh to 828 kPa) for automatic dishwashing. ...
Use recommended dishwasher detergents only. This is a milky, rainbow-colored deposit; Use a liquid rinse aid and underload the dishwasher to allow detergent to face the POWERSCOUR™ spray jets? Silica film and etching are not clean Are the dishes loaded to sit for proper dishwasher fill. It may be 20 to 120 psi (138 to be 120°F (49°C) as it in some items with heavier soils, use the correct amount of effective detergent? If you have high iron content? Did you use a heavier cycle. Detergent must be fresh to 828 kPa) for automatic dishwashing. ...

Use & Care Guide
Page 17
... when this major appliance is operated and maintained according to instructions attached to or furnished with the product, Whirlpool Corporation or Whirlpool Canada LP (hereafter "Whirlpool") will pay for Factory Specified Parts and repair labor to obtain service under these User Instructions and model ...3. In Canada, call 1-800-253-1301. Costs associated with any questions or concerns at the number below : In the U.S.A.: Whirlpool Brand Home Appliances Customer eXperience Center 553 Benson Road Benton Harbor, MI 49022-2692 Please include a daytime phone number in which it ...
... when this major appliance is operated and maintained according to instructions attached to or furnished with the product, Whirlpool Corporation or Whirlpool Canada LP (hereafter "Whirlpool") will pay for Factory Specified Parts and repair labor to obtain service under these User Instructions and model ...3. In Canada, call 1-800-253-1301. Costs associated with any questions or concerns at the number below : In the U.S.A.: Whirlpool Brand Home Appliances Customer eXperience Center 553 Benson Road Benton Harbor, MI 49022-2692 Please include a daytime phone number in which it ...

Use & Care Guide
Page 20
All rights reserved. ® Registered Trademark/TM Trademark of Whirlpool, U.S.A. Whirlpool Canada LP licensee in Canada 6/11 Printed in U.S.A. W10350359B SP PN W10350360B © 2011 Whirlpool Corporation.
All rights reserved. ® Registered Trademark/TM Trademark of Whirlpool, U.S.A. Whirlpool Canada LP licensee in Canada 6/11 Printed in U.S.A. W10350359B SP PN W10350360B © 2011 Whirlpool Corporation.

Installation Guide
Page 2
This is , tell you how to reduce the chance of injury, and tell you what the potential hazard is the safety alert symbol. WARNING You can be killed or seriously injured if you don't immediately follow instructions. You Need to meet all electrical and plumbing national and local codes and ordinances. 2 These words mean: DANGER You can be killed or seriously injured if you don't follow the safety alert symbol and either the word "DANGER" or "WARNING." Do not push down on your appliance. WARNING Tip Over Hazard Do not use dishwasher until latched. ■ Observe...
This is , tell you how to reduce the chance of injury, and tell you what the potential hazard is the safety alert symbol. WARNING You can be killed or seriously injured if you don't immediately follow instructions. You Need to meet all electrical and plumbing national and local codes and ordinances. 2 These words mean: DANGER You can be killed or seriously injured if you don't follow the safety alert symbol and either the word "DANGER" or "WARNING." Do not push down on your appliance. WARNING Tip Over Hazard Do not use dishwasher until latched. ■ Observe...

Installation Guide
Page 3
Read and follow the instructions provided with certain models only Make sure all these parts are included in dishwasher. See "Electrical Requirements" section. In addition, for purchase in the literature package. †®TORX is recommended that electrical connections be the proper size to connect your household wiring to 16-gauge wiring in the literature package. Check local codes. All Installations Tools needed: Parts needed: Other parts you may also need : Parts supplied: NOTE: Parts available for first-time installations Tools needed: Parts needed: Make sure ...
Read and follow the instructions provided with certain models only Make sure all these parts are included in dishwasher. See "Electrical Requirements" section. In addition, for purchase in the literature package. †®TORX is recommended that electrical connections be the proper size to connect your household wiring to 16-gauge wiring in the literature package. Check local codes. All Installations Tools needed: Parts needed: Other parts you may also need : Parts supplied: NOTE: Parts available for first-time installations Tools needed: Parts needed: Make sure ...
