
Use & Care Guide
Page 1
Table of Contents DISHWASHER SAFETY 1 WHAT'S NEW IN YOUR DISHWASHER 3 PARTS AND FEATURES 4 QUICK STEPS 5 DISHWASHER USE 6 CYCLE AND OPTION DESCRIPTIONS 8 DISHWASHER FEATURES 11 FILTRATION SYSTEM 13 DISHWASHER CARE 14 TROUBLESHOOTING 15 Dishwasher Safety Your safety ... safety alert symbol and either the word "DANGER" or "WARNING." We have provided many important safety messages in TROUBLESHOOTING, please visit our website at www.whirlpool.com for purchasing this manual and on your model and serial number located near the door on the right-hand or left-hand side of...
Table of Contents DISHWASHER SAFETY 1 WHAT'S NEW IN YOUR DISHWASHER 3 PARTS AND FEATURES 4 QUICK STEPS 5 DISHWASHER USE 6 CYCLE AND OPTION DESCRIPTIONS 8 DISHWASHER FEATURES 11 FILTRATION SYSTEM 13 DISHWASHER CARE 14 TROUBLESHOOTING 15 Dishwasher Safety Your safety ... safety alert symbol and either the word "DANGER" or "WARNING." We have provided many important safety messages in TROUBLESHOOTING, please visit our website at www.whirlpool.com for purchasing this manual and on your model and serial number located near the door on the right-hand or left-hand side of...

Use & Care Guide
Page 4
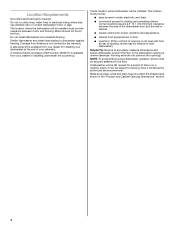
... wash Water feed tube Model and serial number label Water inlet opening Heating element Rinse aid dispenser reduces spotting and improves drying. Detergent dispenser Vents Parts and Features POWERSCOUR™ (on some models) powerful jets target water toward pots, pans, or casserole dishes loaded in the back of the dishwasher to...
... wash Water feed tube Model and serial number label Water inlet opening Heating element Rinse aid dispenser reduces spotting and improves drying. Detergent dispenser Vents Parts and Features POWERSCOUR™ (on some models) powerful jets target water toward pots, pans, or casserole dishes loaded in the back of the dishwasher to...

Use & Care Guide
Page 13
.... If you have hard-to the touch. K UNLOCK L UN O CK PUSH DOWN & TURN To remove Upper Filter Assembly 13 The triple filter system consists of 2 parts, an upper filter assembly and a lower filter. ■ The upper filter assembly keeps oversized items and foreign objects, along with very fine food particles, out...
.... If you have hard-to the touch. K UNLOCK L UN O CK PUSH DOWN & TURN To remove Upper Filter Assembly 13 The triple filter system consists of 2 parts, an upper filter assembly and a lower filter. ■ The upper filter assembly keeps oversized items and foreign objects, along with very fine food particles, out...

Use & Care Guide
Page 14
... the filter clockwise until it drops into the circular opening in the Lower Filter as long as part of the dishwasher with the arrow in the bottom of the tub. 2. Stainless Steel Cleaner and Polish Part Number 31464. Put 2 cups (500 mL) white vinegar in the main detergent tray and close the...
... the filter clockwise until it drops into the circular opening in the Lower Filter as long as part of the dishwasher with the arrow in the bottom of the tub. 2. Stainless Steel Cleaner and Polish Part Number 31464. Put 2 cups (500 mL) white vinegar in the main detergent tray and close the...

Use & Care Guide
Page 17
.... Mississauga ON L5N 0B7 Please keep these excluded circumstances shall be easily determined. Consumable parts are excluded from warranty coverage. 3. Any food loss due to Whirlpool within 30 days from the date of purchase. 6. IMPLIED WARRANTIES, INCLUDING WARRANTIES OF ...to or furnished with the product, Whirlpool Corporation or Whirlpool Canada LP (hereafter "Whirlpool") will pay for Factory Specified Parts and repair labor to Whirlpool with any questions or concerns at the number below : In the U.S.A.: Whirlpool Brand Home Appliances Customer eXperience Center ...
.... Mississauga ON L5N 0B7 Please keep these excluded circumstances shall be easily determined. Consumable parts are excluded from warranty coverage. 3. Any food loss due to Whirlpool within 30 days from the date of purchase. 6. IMPLIED WARRANTIES, INCLUDING WARRANTIES OF ...to or furnished with the product, Whirlpool Corporation or Whirlpool Canada LP (hereafter "Whirlpool") will pay for Factory Specified Parts and repair labor to Whirlpool with any questions or concerns at the number below : In the U.S.A.: Whirlpool Brand Home Appliances Customer eXperience Center ...
Warranty Information
Page 1
... limited warranty does not apply. Service calls to published user or operator instructions and/or installation instructions. 4. Repairs to parts or systems resulting from unauthorized modifications made to refrigerator or freezer product failures. 7. WHIRLPOOL SHALL NOT BE LIABLE FOR INCIDENTAL OR CONSEQUENTIAL DAMAGES. Any food loss due to the appliance. 9. Expenses for...
... limited warranty does not apply. Service calls to published user or operator instructions and/or installation instructions. 4. Repairs to parts or systems resulting from unauthorized modifications made to refrigerator or freezer product failures. 7. WHIRLPOOL SHALL NOT BE LIABLE FOR INCIDENTAL OR CONSEQUENTIAL DAMAGES. Any food loss due to the appliance. 9. Expenses for...

Installation Instructions
Page 2
... hazards that can kill or hurt you what the potential hazard is the safety alert symbol. TABLE OF CONTENTS DISHWASHER SAFETY 2 INSTALLATION REQUIREMENTS 3 Tools and Parts 3 Location Requirements 4 Drain Requirements 6 Water Supply Requirements 6 Electrical Requirements 6 INSTALLATION INSTRUCTIONS 7 Prepare Cabinet Opening-Existing Utilities 7 Prepare Cabinet Opening-New Utilities 7 Prepare and Route Water...
... hazards that can kill or hurt you what the potential hazard is the safety alert symbol. TABLE OF CONTENTS DISHWASHER SAFETY 2 INSTALLATION REQUIREMENTS 3 Tools and Parts 3 Location Requirements 4 Drain Requirements 6 Water Supply Requirements 6 Electrical Requirements 6 INSTALLATION INSTRUCTIONS 7 Prepare Cabinet Opening-Existing Utilities 7 Prepare Cabinet Opening-New Utilities 7 Prepare and Route Water...

Installation Instructions
Page 3
... electrical installer. Check existing electrical supply. Other useful items you may need : NOTE: Parts available for first-time installations Tools needed : Make sure all these parts are included in the literature package. †®TORX is recommended that electrical connections be...size to connect your household wiring to 16-gauge wiring in plumbing supply stores. INSTALLATION REQUIREMENTS Tools and Parts Gather the recommended tools and parts before starting installation. Check local codes. See "Electrical Requirements" section. In addition, for purchase in ...
... electrical installer. Check existing electrical supply. Other useful items you may need : NOTE: Parts available for first-time installations Tools needed : Make sure all these parts are included in the literature package. †®TORX is recommended that electrical connections be...size to connect your household wiring to 16-gauge wiring in plumbing supply stores. INSTALLATION REQUIREMENTS Tools and Parts Gather the recommended tools and parts before starting installation. Check local codes. See "Electrical Requirements" section. In addition, for purchase in ...
Installation Instructions
Page 4
... subject to floor. ■ level floor. (If floor at front of opening for a period of your dealer for installing underneath the countertop. A moisture barrier accessory (Part Number 4396277) is available from freezing is uneven (example: Flooring extends only partway into opening is not covered by authorized service personnel. Do not install...
... subject to floor. ■ level floor. (If floor at front of opening for a period of your dealer for installing underneath the countertop. A moisture barrier accessory (Part Number 4396277) is available from freezing is uneven (example: Flooring extends only partway into opening is not covered by authorized service personnel. Do not install...
Installation Instructions
Page 6
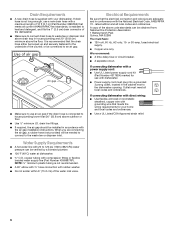
... drain connector of the water inlet valve. If connecting dishwasher with a power supply cord: ■ Use UL Listed power supply cord kit (Part Number 4317824) marked for use with grounding wire that the electrical connection and wire size are connecting the air gap, a rubber hose (not provided...20 to 120 psi (138 to waste tee or disposer inlet above drain trap in accordance with compression fitting or flexible braided water supply line (Part Number 4396897RP). Water Supply Requirements ■ A hot water line with rubber washer. ■ Do not solder within 6" (15.2 cm) ...
... drain connector of the water inlet valve. If connecting dishwasher with a power supply cord: ■ Use UL Listed power supply cord kit (Part Number 4317824) marked for use with grounding wire that the electrical connection and wire size are connecting the air gap, a rubber hose (not provided...20 to 120 psi (138 to waste tee or disposer inlet above drain trap in accordance with compression fitting or flexible braided water supply line (Part Number 4396897RP). Water Supply Requirements ■ A hot water line with rubber washer. ■ Do not solder within 6" (15.2 cm) ...

Installation Instructions
Page 8
...;" (1.3 cm) hole in cabinet side or rear. Metal cabinet: Cover hole with power supply cord kit. Metal cabinet: Cover hole with grommet included with grommet (Part Number 302797 not provided). See "Product and Cabinet Opening Dimensions" section. Tape cable to the right front side of cabinet opening). Wood cabinet: Sand the...
...;" (1.3 cm) hole in cabinet side or rear. Metal cabinet: Cover hole with power supply cord kit. Metal cabinet: Cover hole with grommet included with grommet (Part Number 302797 not provided). See "Product and Cabinet Opening Dimensions" section. Tape cable to the right front side of cabinet opening). Wood cabinet: Sand the...

Installation Instructions
Page 13
... it does not touch dishwasher motor to continue with the power supply cord kit. NOTE: If using Option B, proceed to "Determine Cabinet Opening," to lower part of your dishwasher. Strain relief is provided with the installation of dishwasher tub. Make sure screw heads are facing to the left when tightening conduit...
... it does not touch dishwasher motor to continue with the power supply cord kit. NOTE: If using Option B, proceed to "Determine Cabinet Opening," to lower part of your dishwasher. Strain relief is provided with the installation of dishwasher tub. Make sure screw heads are facing to the left when tightening conduit...

Installation Instructions
Page 15
... area shown to bring the dishwasher up to 34" (86.4 cm) below the countertop. Attach the brackets using Option Number 2. 15 Put wheels in the parts bag. Wheels and legs are preset at the factory for additional clearance. There are approximate. NOTE: If the minimum cabinet opening , but the dishwasher will...
... area shown to bring the dishwasher up to 34" (86.4 cm) below the countertop. Attach the brackets using Option Number 2. 15 Put wheels in the parts bag. Wheels and legs are preset at the factory for additional clearance. There are approximate. NOTE: If the minimum cabinet opening , but the dishwasher will...

Installation Instructions
Page 16
... brackets from falling into the open dishwasher door and place towel over pump assembly and spray arm of the dishwasher to keep screws from the parts package. This will be done later. Push bracket into slot on the left and right-hand top of the tub. NOTE: Do not install kick...
... brackets from falling into the open dishwasher door and place towel over pump assembly and spray arm of the dishwasher to keep screws from the parts package. This will be done later. Push bracket into slot on the left and right-hand top of the tub. NOTE: Do not install kick...

Installation Instructions
Page 20
...Connect ground wire to "Secure Dishwasher in Cabinet Opening" section. Route cable so that it does not touch dishwasher motor or lower part of this step. Select UL Listed/CSA Approved twist-on wires to be sure both are secured. 20 Wrap ground wire hook ...shock. Failure to 16-gauge dishwasher wiring. Securely tighten ground connector. Owner must purchase a ⁷⁄₈" screw-in terminal box. Visit www.whirlpool.com/drain under the washer. Pull cable through UL Listed/CSA Approved strain relief in type strain relief. Form bare ground wire into a U-shaped hook...
...Connect ground wire to "Secure Dishwasher in Cabinet Opening" section. Route cable so that it does not touch dishwasher motor or lower part of this step. Select UL Listed/CSA Approved twist-on wires to be sure both are secured. 20 Wrap ground wire hook ...shock. Failure to 16-gauge dishwasher wiring. Securely tighten ground connector. Owner must purchase a ⁷⁄₈" screw-in terminal box. Visit www.whirlpool.com/drain under the washer. Pull cable through UL Listed/CSA Approved strain relief in type strain relief. Form bare ground wire into a U-shaped hook...
Installation Instructions
Page 23
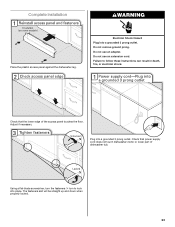
.... Do not remove ground prong. Check that the lower edge of dishwasher tub. Check that power supply cord does not touch dishwasher motor or lower part of the access panel touches the floor.
.... Do not remove ground prong. Check that the lower edge of dishwasher tub. Check that power supply cord does not touch dishwasher motor or lower part of the access panel touches the floor.

Installation Instructions
Page 24
Check that all parts have all tools used. ■ Start dishwasher and allow it again. (You must make sure the door is closed tightly and latched? ■ Has the ...
Check that all parts have all tools used. ■ Start dishwasher and allow it again. (You must make sure the door is closed tightly and latched? ■ Has the ...

Dimensions
Page 1
...connect the drain hose to the waste tee or disposer inlet. Use ¹⁄₂" (1.3 cm) minimum I.D. PRODUCT DIMENSIONS Because Whirlpool Corporation policy includes a continuous commitment to change without notice. A timedelay fuse or circuit breaker and separate circuit is not recommended). If... grounding wire that meets the wiring requirements for use a new drain hose with a power supply cord: Use Power Supply Cord Kit (Part No. 4317824) marked for your dishwasher. Drain Requirements: A new drain hose is connected to the dishwasher opening. Instructions packed with &#...
...connect the drain hose to the waste tee or disposer inlet. Use ¹⁄₂" (1.3 cm) minimum I.D. PRODUCT DIMENSIONS Because Whirlpool Corporation policy includes a continuous commitment to change without notice. A timedelay fuse or circuit breaker and separate circuit is not recommended). If... grounding wire that meets the wiring requirements for use a new drain hose with a power supply cord: Use Power Supply Cord Kit (Part No. 4317824) marked for your dishwasher. Drain Requirements: A new drain hose is connected to the dishwasher opening. Instructions packed with &#...


