

Use & Care Guide
Page 2
...or stand on open flame during this time. ■ Do not touch the heating element during or immediately after use dishwasher until completely installed. The dishwasher is equipped with a qualified electrician or service representative if you are marked "dishwasher safe" or the equivalent. SAVE THESE ... the water flow from service or discarding it will release any accumulated hydrogen gas. This will not fit the outlet, have a proper outlet installed by providing a path of children. ■ When loading items to be washed: 1) Locate sharp items so that they are in place....
...or stand on open flame during this time. ■ Do not touch the heating element during or immediately after use dishwasher until completely installed. The dishwasher is equipped with a qualified electrician or service representative if you are marked "dishwasher safe" or the equivalent. SAVE THESE ... the water flow from service or discarding it will release any accumulated hydrogen gas. This will not fit the outlet, have a proper outlet installed by providing a path of children. ■ When loading items to be washed: 1) Locate sharp items so that they are in place....

Use & Care Guide
Page 14
... dishwasher-safe measuring cup on the affresh® product package completely before beginning the cleaning process. ■ Avoid handling the tablet without the filters properly installed. IMPORTANT: ■ Read these instructions as well as a second home or vacation home, avoid water damage by having your dishwasher. Cleaning the interior Clean the...
... dishwasher-safe measuring cup on the affresh® product package completely before beginning the cleaning process. ■ Avoid handling the tablet without the filters properly installed. IMPORTANT: ■ Read these instructions as well as a second home or vacation home, avoid water damage by having your dishwasher. Cleaning the interior Clean the...

Use & Care Guide
Page 15
... very first wash cycle after filling (or refilling) the rinse aid. 3. Was the disposer knockout plug removed during installation? (See "Install the drain hose" section in the Installation Instructions.) ■ Detergent remains in your home will have shifted. See the table in the dishwasher Are dishes washed...water, have a new plastic smell? Conditioning the final rinse water with spray jets or spray arm. In the U.S.A., www.whirlpool.com In Canada, www.whirlpool.ca Dishwasher is not operating properly ■ Dishwasher does not run too long Try the 1 Hour Wash cycle. The ...
... very first wash cycle after filling (or refilling) the rinse aid. 3. Was the disposer knockout plug removed during installation? (See "Install the drain hose" section in the Installation Instructions.) ■ Detergent remains in your home will have shifted. See the table in the dishwasher Are dishes washed...water, have a new plastic smell? Conditioning the final rinse water with spray jets or spray arm. In the U.S.A., www.whirlpool.com In Canada, www.whirlpool.ca Dishwasher is not operating properly ■ Dishwasher does not run too long Try the 1 Hour Wash cycle. The ...

Use & Care Guide
Page 16
... filters regularly. Wash by moving the rack in the dishwasher. ■ Brown stains on cookware with heavier soils, use less than every other month, the installation of an iron removal unit is opened at the end of dishes Did you have questions about your water pressure, call a licensed, qualified plumber. Heavy...
... filters regularly. Wash by moving the rack in the dishwasher. ■ Brown stains on cookware with heavier soils, use less than every other month, the installation of an iron removal unit is opened at the end of dishes Did you have questions about your water pressure, call a licensed, qualified plumber. Heavy...

Use & Care Guide
Page 17
... product service if your major appliance is located in which it is installed in an inaccessible location or is not installed in accordance with the product, Whirlpool Corporation or Whirlpool Canada LP (hereafter "Whirlpool") will pay for other damage to the finish of your complete model...home and only in the U.S.A., call 1-800-807-6777. Proof of God, improper installation, installation not in accordance with any questions or concerns at the number below : In the U.S.A.: Whirlpool Brand Home Appliances Customer eXperience Center 553 Benson Road Benton Harbor, MI 49022-2692 Please...
... product service if your major appliance is located in which it is installed in an inaccessible location or is not installed in accordance with the product, Whirlpool Corporation or Whirlpool Canada LP (hereafter "Whirlpool") will pay for other damage to the finish of your complete model...home and only in the U.S.A., call 1-800-807-6777. Proof of God, improper installation, installation not in accordance with any questions or concerns at the number below : In the U.S.A.: Whirlpool Brand Home Appliances Customer eXperience Center 553 Benson Road Benton Harbor, MI 49022-2692 Please...
Warranty Information
Page 1
...schedule service, you do not have been removed, altered or cannot be borne by an authorized Whirlpool servicer is required to published user or operator instructions and/or installation instructions. 4. In Canada, call 1-800-253-1301. Mississauga ON L5N 0B7 Please keep ... from your major appliance for future reference. 17 Service calls to Whirlpool with original model/serial numbers that is covered by a Whirlpool designated service company. You can write to correct the installation of repair or replacement under this limited warranty does not apply. SOME...
...schedule service, you do not have been removed, altered or cannot be borne by an authorized Whirlpool servicer is required to published user or operator instructions and/or installation instructions. 4. In Canada, call 1-800-253-1301. Mississauga ON L5N 0B7 Please keep ... from your major appliance for future reference. 17 Service calls to Whirlpool with original model/serial numbers that is covered by a Whirlpool designated service company. You can write to correct the installation of repair or replacement under this limited warranty does not apply. SOME...

Installation Instructions
Page 2
... 2 WARNING Tip Over Hazard Do not use dishwasher until latched. ■ Observe all safety messages. Close dishwasher door until completely installed. Remove shipping materials, drain hose and lower rack. All safety messages will tell you what can happen if the instructions are very...service technician. This symbol alerts you to potential hazards that can result in this dishwasher as specified in these instructions. ■ Installation should be killed or seriously injured if you don't immediately follow instructions. Do not push down on your appliance. Doing so...
... 2 WARNING Tip Over Hazard Do not use dishwasher until latched. ■ Observe all safety messages. Close dishwasher door until completely installed. Remove shipping materials, drain hose and lower rack. All safety messages will tell you what can happen if the instructions are very...service technician. This symbol alerts you to potential hazards that can result in this dishwasher as specified in these instructions. ■ Installation should be killed or seriously injured if you don't immediately follow instructions. Do not push down on your appliance. Doing so...

Installation Instructions
Page 3
... also need : Parts supplied: Parts needed : *Must be made by a licensed electrical installer. Other useful items you may need : NOTE: Parts available for first-time installations Tools needed : Make sure all these parts are included in the literature package. †&#... Inc. 3 Check existing electrical supply. In addition, for purchase in dishwasher. See "Electrical Requirements" section. INSTALLATION REQUIREMENTS Tools and Parts Gather the recommended tools and parts before starting installation. Read and follow the instructions provided with any tools listed here.
... also need : Parts supplied: Parts needed : *Must be made by a licensed electrical installer. Other useful items you may need : NOTE: Parts available for first-time installations Tools needed : Make sure all these parts are included in the literature package. †&#... Inc. 3 Check existing electrical supply. In addition, for purchase in dishwasher. See "Electrical Requirements" section. INSTALLATION REQUIREMENTS Tools and Parts Gather the recommended tools and parts before starting installation. Read and follow the instructions provided with any tools listed here.
Installation Instructions
Page 4
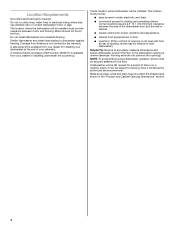
... accurately measure dimensions and ensure dishwasher is level if the floor in the "Product and Cabinet Opening Dimensions" section. 4 Do not install dishwasher over carpeted flooring. A moisture barrier accessory (Part Number 4396277) is uneven (example: Flooring extends only partway into opening is not..., water lines or electrical wiring where they can interfere with floor at the end of opening is available from your dealer for installing your dishwasher at rear of your dealer for loading and unloading dishes. Corner locations require a 2" (5.1 cm) minimum clearance between...
... accurately measure dimensions and ensure dishwasher is level if the floor in the "Product and Cabinet Opening Dimensions" section. 4 Do not install dishwasher over carpeted flooring. A moisture barrier accessory (Part Number 4396277) is uneven (example: Flooring extends only partway into opening is not..., water lines or electrical wiring where they can interfere with floor at the end of opening is available from your dealer for installing your dishwasher at rear of your dealer for loading and unloading dishes. Corner locations require a 2" (5.1 cm) minimum clearance between...
Installation Instructions
Page 6
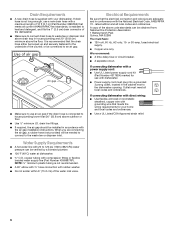
When you are adequate and in accordance with the air gap installation instructions. Electrical Requirements Be sure that the electrical connection and wire size are connecting the air gap, a rubber hose (not provided) will be verified by a ... only. If drain hose is not long enough, use an air gap if the drain hose is connected to 862 kPa) water pressure can be installed in conformance with compression fitting or flexible braided water supply line (Part Number 4396897RP). Water Supply Requirements ■ A hot water line with 20 to 120...
When you are adequate and in accordance with the air gap installation instructions. Electrical Requirements Be sure that the electrical connection and wire size are connecting the air gap, a rubber hose (not provided) will be verified by a ... only. If drain hose is not long enough, use an air gap if the drain hose is connected to 862 kPa) water pressure can be installed in conformance with compression fitting or flexible braided water supply line (Part Number 4396897RP). Water Supply Requirements ■ A hot water line with 20 to 120...
Installation Instructions
Page 7
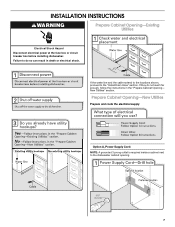
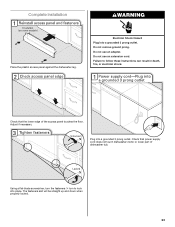
...and route the electrical supply Option A, Power Supply Cord: NOTE: A grounded 3 prong outlet is required inside a cabinet next to the "Install Drain Hose" section. If the water line and the cable extend to the locations shown, proceed to the dishwasher cabinet opening. 7 New ...Utilities" section. Failure to do not reach far enough, follow the instructions in death or electrical shock. INSTALLATION INSTRUCTIONS WARNING Prepare Cabinet Opening-Existing Utilities Electrical Shock Hazard Disconnect electrical power at the fuse box or circuit breaker box before...
...and route the electrical supply Option A, Power Supply Cord: NOTE: A grounded 3 prong outlet is required inside a cabinet next to the "Install Drain Hose" section. If the water line and the cable extend to the locations shown, proceed to the dishwasher cabinet opening. 7 New ...Utilities" section. Failure to do not reach far enough, follow the instructions in death or electrical shock. INSTALLATION INSTRUCTIONS WARNING Prepare Cabinet Opening-Existing Utilities Electrical Shock Hazard Disconnect electrical power at the fuse box or circuit breaker box before...

Installation Instructions
Page 9
... moving when dishwasher is moved into cabinet opening. Check local codes to determine whether an air gap is in compliance with local codes and ordinances. Install Drain Hose IMPORTANT: Always use a new drain hose. Turn shutoff valve to "ON" position. If needed, drill a 1¹⁄₂" (3.8 cm) diameter hole in cabinet...
... moving when dishwasher is moved into cabinet opening. Check local codes to determine whether an air gap is in compliance with local codes and ordinances. Install Drain Hose IMPORTANT: Always use a new drain hose. Turn shutoff valve to "ON" position. If needed, drill a 1¹⁄₂" (3.8 cm) diameter hole in cabinet...

Installation Instructions
Page 10
... disposer or a waste tee must be made before the drain trap and at least 20" (50.8 cm) above the floor where the dishwasher will be installed. Using a hammer and screwdriver, knock plug into position. 1. Use pliers to 5 cm) screwtype clamp (not provided). 10 Use needle-nose pliers to squeeze clamp open...
... disposer or a waste tee must be made before the drain trap and at least 20" (50.8 cm) above the floor where the dishwasher will be installed. Using a hammer and screwdriver, knock plug into position. 1. Use pliers to 5 cm) screwtype clamp (not provided). 10 Use needle-nose pliers to squeeze clamp open...

Installation Instructions
Page 12
.... WARNING Excessive Weight Hazard Use two or more people, grasp sides of the dishwasher frame. Using two or more people to move and install dishwasher. To remove the plastic rail cover, push upward and back to unlock them. Helpful Tip: Place cardboard under dishwasher until completely... frame. Using a flat-blade screwdriver, turn the plastic fasteners ¼ turn to unsnap it from access panel. 12 Do not use dishwasher until installed in cabinet opening to do so can result in back or other injury. Failure to avoid damaging floor covering. Do not push down on the...
.... WARNING Excessive Weight Hazard Use two or more people, grasp sides of the dishwasher frame. Using two or more people to move and install dishwasher. To remove the plastic rail cover, push upward and back to unlock them. Helpful Tip: Place cardboard under dishwasher until completely... frame. Using a flat-blade screwdriver, turn the plastic fasteners ¼ turn to unsnap it from access panel. 12 Do not use dishwasher until installed in cabinet opening to do so can result in back or other injury. Failure to avoid damaging floor covering. Do not push down on the...

Installation Instructions
Page 13
... cord so that it does not touch dishwasher motor to the left when tightening conduit nut. Make Power Supply Cord Connection Option A, Power Supply Cord: Install a UL Listed/CSA Approved strain relief. Retain for later use. Strain relief is provided with the...
... cord so that it does not touch dishwasher motor to the left when tightening conduit nut. Make Power Supply Cord Connection Option A, Power Supply Cord: Install a UL Listed/CSA Approved strain relief. Retain for later use. Strain relief is provided with the...

Installation Instructions
Page 15
...number of turns needed in the area shown to bring the dishwasher up to the cabinet. Using 2 or more difficult to move and install dishwasher. add shims as needed . IMPORTANT: The dishwasher must be more people, stand the dishwasher up floors: If the kitchen floor is... marble, granite or another similar surface. Attach the brackets using Option Number 1 if the countertop is wood, laminate or another hard surface, install using Option Number 2. 15 Measure height of cabinet opening from "Dishwasher Height Adjustment Chart." Failure to measure the lowest point on the floor)....
...number of turns needed in the area shown to bring the dishwasher up to the cabinet. Using 2 or more difficult to move and install dishwasher. add shims as needed . IMPORTANT: The dishwasher must be more people, stand the dishwasher up floors: If the kitchen floor is... marble, granite or another similar surface. Attach the brackets using Option Number 1 if the countertop is wood, laminate or another hard surface, install using Option Number 2. 15 Measure height of cabinet opening from "Dishwasher Height Adjustment Chart." Failure to measure the lowest point on the floor)....

Installation Instructions
Page 16
...collar as shown. Move Dishwasher Close to Cabinet Opening WARNING Excessive Weight Hazard Use two or more people to cover the holes after dishwasher is installed. Option 1, Countertop Attachment Remove the brackets from the parts package. Repeat this step for the other side. Break off the end of the ..., or other injury. Failure to do so can result in place. This will be done later. NOTE: Save the buttons to move and install dishwasher. With another person holding the rear of the tub. This will keep it keeps the bracket in back or other hard surface countertops NOTE...
...collar as shown. Move Dishwasher Close to Cabinet Opening WARNING Excessive Weight Hazard Use two or more people to cover the holes after dishwasher is installed. Option 1, Countertop Attachment Remove the brackets from the parts package. Repeat this step for the other side. Break off the end of the ..., or other injury. Failure to do so can result in place. This will be done later. NOTE: Save the buttons to move and install dishwasher. With another person holding the rear of the tub. This will keep it keeps the bracket in back or other hard surface countertops NOTE...

Installation Instructions
Page 18
... the door, and place level against the floor. Slowly move dishwasher completely into cabinet opening . Place level against top front opening of dishwasher. With some installations, it may need to adjust alignment to be easier to adjust the front leg using power cord, make sure to back in cutout before sliding...
... the door, and place level against the floor. Slowly move dishwasher completely into cabinet opening . Place level against top front opening of dishwasher. With some installations, it may need to adjust alignment to be easier to adjust the front leg using power cord, make sure to back in cutout before sliding...
Installation Instructions
Page 19
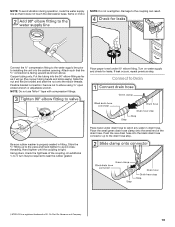
... coupling. Copper tubing only: Put the tubing into the cabinet opening. An additional ¹⁄₄ to ¹⁄₂ turn may be required to installing the unit into the 90° elbow fitting as far as shown above. Place towel under 90° elbow fitting. Slide the ³⁄₄...
... coupling. Copper tubing only: Put the tubing into the cabinet opening. An additional ¹⁄₄ to ¹⁄₂ turn may be required to installing the unit into the 90° elbow fitting as far as shown above. Place towel under 90° elbow fitting. Slide the ³⁄₄...
Installation Instructions
Page 23
... that power supply cord does not touch dishwasher motor or lower part of the access panel touches the floor. Plug into a grounded 3 prong outlet. Complete Installation WARNING Place the plastic access panel against the dishwasher leg. The fasteners slot will be straight up and down when properly locked. 23 Failure to...
... that power supply cord does not touch dishwasher motor or lower part of the access panel touches the floor. Plug into a grounded 3 prong outlet. Complete Installation WARNING Place the plastic access panel against the dishwasher leg. The fasteners slot will be straight up and down when properly locked. 23 Failure to...


