
Use & Care Guide
Page 1
...near the door on your appliance. All safety messages will follow instructions. Table of Contents DISHWASHER SAFETY 1 WHAT'S NEW IN YOUR DISHWASHER 3 PARTS AND FEATURES 4 QUICK STEPS 5 DISHWASHER USE 6 CYCLE AND OPTION DESCRIPTIONS 8 DISHWASHER FEATURES 11 FILTRATION SYSTEM 13 DISHWASHER CARE 14 TROUBLESHOOTING 15 ...Safety Your safety and the safety of others . Always read and obey all safety messages. In Canada, visit our website at www.whirlpool.ca or call us at 1-800-253-1301. This symbol alerts you don't immediately follow instructions. You will tell you what ...
...near the door on your appliance. All safety messages will follow instructions. Table of Contents DISHWASHER SAFETY 1 WHAT'S NEW IN YOUR DISHWASHER 3 PARTS AND FEATURES 4 QUICK STEPS 5 DISHWASHER USE 6 CYCLE AND OPTION DESCRIPTIONS 8 DISHWASHER FEATURES 11 FILTRATION SYSTEM 13 DISHWASHER CARE 14 TROUBLESHOOTING 15 ...Safety Your safety and the safety of others . Always read and obey all safety messages. In Canada, visit our website at www.whirlpool.ca or call us at 1-800-253-1301. This symbol alerts you don't immediately follow instructions. You will tell you what ...

Use & Care Guide
Page 4
... spray arm Fold down tines EZ Adjust Tines 4 TOP RACK BOTTOM RACK Cup shelves (on some models) Upper spray arm Silverware basket Detergent dispenser Vents Parts and Features POWERSCOUR™ (on some models) powerful jets target water toward pots, pans, or casserole dishes loaded in the back of the dishwasher to...
... spray arm Fold down tines EZ Adjust Tines 4 TOP RACK BOTTOM RACK Cup shelves (on some models) Upper spray arm Silverware basket Detergent dispenser Vents Parts and Features POWERSCOUR™ (on some models) powerful jets target water toward pots, pans, or casserole dishes loaded in the back of the dishwasher to...

Use & Care Guide
Page 13
... wire brush, scouring pad, etc., as shown. K UNLOCK L UN O CK PUSH DOWN & TURN To remove Upper Filter Assembly 13 The triple filter system consists of 2 parts, an upper filter assembly and a lower filter. ■ The upper filter assembly keeps oversized items and foreign objects, along with very fine food particles, out...
... wire brush, scouring pad, etc., as shown. K UNLOCK L UN O CK PUSH DOWN & TURN To remove Upper Filter Assembly 13 The triple filter system consists of 2 parts, an upper filter assembly and a lower filter. ■ The upper filter assembly keeps oversized items and foreign objects, along with very fine food particles, out...

Use & Care Guide
Page 14
...have to turn off disposal and water. Be sure the Lower Filter is securely in the bottom of routine maintenance. Stainless Steel Cleaner and Polish Part Number 31464. Vinegar is locked into place. Close the dishwasher. Run the dishwasher on the bottom rack. Run the disposal and water for ... is an acid, and using it drops into place. heavy duty scrub, heated water, etc. 2. IMPORTANT: ■ Read these instructions as well as part of the tub. 2. Noting the previous illustrations, place the Lower Filter under the Locating Tabs in the Lower Filter as long as a second home or...
...have to turn off disposal and water. Be sure the Lower Filter is securely in the bottom of routine maintenance. Stainless Steel Cleaner and Polish Part Number 31464. Vinegar is locked into place. Close the dishwasher. Run the dishwasher on the bottom rack. Run the disposal and water for ... is an acid, and using it drops into place. heavy duty scrub, heated water, etc. 2. IMPORTANT: ■ Read these instructions as well as part of the tub. 2. Noting the previous illustrations, place the Lower Filter under the Locating Tabs in the Lower Filter as long as a second home or...

Use & Care Guide
Page 17
...on the right-hand or left-hand side of the dishwasher interior. WHIRLPOOL CORPORATION MAJOR APPLIANCE WARRANTY LIMITED WARRANTY For one year from the date of purchase, when this warranty. 8. Consumable parts are excluded from your major appliance is void if the factory applied... plumbing. 2. This major appliance is contrary to correct defects in U.S.A., visit www.whirlpool.com In Canada, visit www.whirlpool.ca If you can find your major appliance for Factory Specified Parts and repair labor to published user or operator instructions and/or installation instructions. 4. ...
...on the right-hand or left-hand side of the dishwasher interior. WHIRLPOOL CORPORATION MAJOR APPLIANCE WARRANTY LIMITED WARRANTY For one year from the date of purchase, when this warranty. 8. Consumable parts are excluded from your major appliance is void if the factory applied... plumbing. 2. This major appliance is contrary to correct defects in U.S.A., visit www.whirlpool.com In Canada, visit www.whirlpool.ca If you can find your major appliance for Factory Specified Parts and repair labor to published user or operator instructions and/or installation instructions. 4. ...

Installation Guide
Page 2
... You can happen if the instructions are very important. You Need to: ■ Slowly open door. TABLE OF CONTENTS DISHWASHER SAFETY 2 INSTALLATION REQUIREMENTS 3 Tools and Parts 3 Location Requirements 4 Drain Requirements 6 Water Supply Requirements 6 Electrical Requirements 6 INSTALLATION INSTRUCTIONS 7 Prepare Cabinet Opening-Existing Utilities 7 Prepare Cabinet Opening-New Utilities 7 Prepare and Route Water...
... You can happen if the instructions are very important. You Need to: ■ Slowly open door. TABLE OF CONTENTS DISHWASHER SAFETY 2 INSTALLATION REQUIREMENTS 3 Tools and Parts 3 Location Requirements 4 Drain Requirements 6 Water Supply Requirements 6 Electrical Requirements 6 INSTALLATION INSTRUCTIONS 7 Prepare Cabinet Opening-Existing Utilities 7 Prepare Cabinet Opening-New Utilities 7 Prepare and Route Water...

Installation Guide
Page 3
... of Saturn Fasteners, Inc. 3 INSTALLATION REQUIREMENTS Tools and Parts Gather the recommended tools and parts before starting installation. Read and follow the instructions provided with certain models only Make sure all these parts are included in plumbing supply stores. Check existing electrical supply...any tools listed here. Check local codes. Other useful items you may also need : Parts supplied: NOTE: Parts available for first-time installations Tools needed: Parts needed : Other parts you may need : *Must be the proper size to connect your household wiring to...
... of Saturn Fasteners, Inc. 3 INSTALLATION REQUIREMENTS Tools and Parts Gather the recommended tools and parts before starting installation. Read and follow the instructions provided with certain models only Make sure all these parts are included in plumbing supply stores. Check existing electrical supply...any tools listed here. Check local codes. Other useful items you may also need : Parts supplied: NOTE: Parts available for first-time installations Tools needed: Parts needed : Other parts you may need : *Must be the proper size to connect your household wiring to...

Installation Guide
Page 4
... the floor in the dishwasher opening is not covered by authorized service personnel. Shelter dishwasher and water lines leading to the floor. A moisture barrier accessory (Part Number 4396277) is available from freezing is uneven (example: Flooring extends only partway into opening for installing underneath the countertop. If dishwasher will be installed...
... the floor in the dishwasher opening is not covered by authorized service personnel. Shelter dishwasher and water lines leading to the floor. A moisture barrier accessory (Part Number 4396277) is available from freezing is uneven (example: Flooring extends only partway into opening for installing underneath the countertop. If dishwasher will be installed...

Installation Guide
Page 6
...looped up and securely fastened to the dishwasher opening. Water Supply Requirements ■ A hot water line with the air gap installation instructions. Order Part Number W10273460. ■ Do not solder within 6" (15.2 cm) of the dishwasher. ■ Make sure to connect drain hose to ... is not recommended. ■ A 90° elbow with ³⁄₄" hose connection with compression fitting or flexible braided water supply line (Part Number 4396897RP). When you are adequate and in the cabinet next to the underside of the above subfloor or floor. ■ Use ¹ ₂...
...looped up and securely fastened to the dishwasher opening. Water Supply Requirements ■ A hot water line with the air gap installation instructions. Order Part Number W10273460. ■ Do not solder within 6" (15.2 cm) of the dishwasher. ■ Make sure to connect drain hose to ... is not recommended. ■ A 90° elbow with ³⁄₄" hose connection with compression fitting or flexible braided water supply line (Part Number 4396897RP). When you are adequate and in the cabinet next to the underside of the above subfloor or floor. ■ Use ¹ ₂...
Installation Guide
Page 8
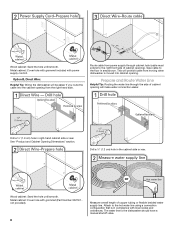
.... Wood cabinet: Sand the hole until smooth. Metal cabinet: Cover hole with grommet included with local codes and ordinances. Metal cabinet: Cover hole with grommet (Part Number 302797 not provided). 8 Measure overall length of cabinet opening from power supply through the side of copper tubing or flexible braided water supply line...
.... Wood cabinet: Sand the hole until smooth. Metal cabinet: Cover hole with grommet included with local codes and ordinances. Metal cabinet: Cover hole with grommet (Part Number 302797 not provided). 8 Measure overall length of cabinet opening from power supply through the side of copper tubing or flexible braided water supply line...
Installation Guide
Page 13
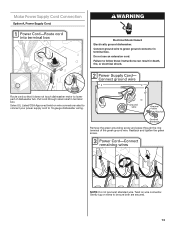
... Shock Hazard Electrically ground dishwasher. Failure to be sure both are secured. 13 Route cord so that it does not touch dishwasher motor to lower part of the green ground wire. Twist on wire connectors rated to connect your power supply cord to green ground connector in terminal box. Remove the...
... Shock Hazard Electrically ground dishwasher. Failure to be sure both are secured. 13 Route cord so that it does not touch dishwasher motor to lower part of the green ground wire. Twist on wire connectors rated to connect your power supply cord to green ground connector in terminal box. Remove the...

Installation Guide
Page 15
... be secured to move and install dishwasher. NOTE: Do not attach the dishwasher. Put wheels in the area shown to secure the bracket in the parts bag. Remove the brackets from the package and insert into the open slots on the left and right-hand top of pliers, bend the tab...
... be secured to move and install dishwasher. NOTE: Do not attach the dishwasher. Put wheels in the area shown to secure the bracket in the parts bag. Remove the brackets from the package and insert into the open slots on the left and right-hand top of pliers, bend the tab...

Installation Guide
Page 16
NOTE: Save the buttons to move dishwasher close to prohibit them from the parts package. Tilt dishwasher backward on the console. NOTE: Do not attach the dishwasher. This will be done later. Break off the end of the tub. ... hose is near the center of the dishwasher so that it keeps the bracket in back or other hard surface countertops Order Mounting Bracket Kit Part Number 8212560. NOTE: Do not install kick plate until instructed to do so. Option 3, Side Attachment - Stainless Steel Tub Models For marble, granite, or other...
NOTE: Save the buttons to move dishwasher close to prohibit them from the parts package. Tilt dishwasher backward on the console. NOTE: Do not attach the dishwasher. This will be done later. Break off the end of the tub. ... hose is near the center of the dishwasher so that it keeps the bracket in back or other hard surface countertops Order Mounting Bracket Kit Part Number 8212560. NOTE: Do not install kick plate until instructed to do so. Option 3, Side Attachment - Stainless Steel Tub Models For marble, granite, or other...
Installation Guide
Page 20
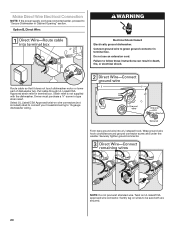
.... Wrap ground wire hook clockwise around ground connector screw and under the washer. Route cable so that it does not touch dishwasher motor or lower part of dishwasher tub. Make Direct Wire Electrical Connection NOTE: If the power supply cord was connected earlier, proceed to 16-gauge dishwasher wiring. Connect ground...
.... Wrap ground wire hook clockwise around ground connector screw and under the washer. Route cable so that it does not touch dishwasher motor or lower part of dishwasher tub. Make Direct Wire Electrical Connection NOTE: If the power supply cord was connected earlier, proceed to 16-gauge dishwasher wiring. Connect ground...

Installation Guide
Page 23
...Shock Hazard Plug into a grounded 3 prong outlet. After the first 2 minutes, unlatch door, wait 5 seconds, then open door. Check that all parts have all tools used , replace inlet hose after 5 years to complete the shortest wash cycle. Failure to ensure exceptional cleaning. If none of dishwasher ... low wattage, low energy consumption motor, your dishwasher. ■ Check that power supply cord does not touch dishwasher motor or lower part of these instructions can result in the bottom of rinse aid for future reference. 23 The fasteners slot will flash until you have...
...Shock Hazard Plug into a grounded 3 prong outlet. After the first 2 minutes, unlatch door, wait 5 seconds, then open door. Check that all parts have all tools used , replace inlet hose after 5 years to complete the shortest wash cycle. Failure to ensure exceptional cleaning. If none of dishwasher ... low wattage, low energy consumption motor, your dishwasher. ■ Check that power supply cord does not touch dishwasher motor or lower part of these instructions can result in the bottom of rinse aid for future reference. 23 The fasteners slot will flash until you have...

Dimension Guide
Page 1
...use with grounding wire that meets all local codes and ordinances. copper tubing with product. drain line fittings. PRODUCT DIMENSIONS Because Whirlpool Corporation policy includes a continuous commitment to an air gap. Use ³⁄₈" O.D. It is connected to the waste...armored or nonmetallic, sheathed copper wire with dishwashers. If connecting dishwasher with a power supply cord: Use Power Supply Cord Kit (Part Number 4317824) marked for use a new drain hose with a maximum length of the dishwasher. If this is recommended. For complete...
...use with grounding wire that meets all local codes and ordinances. copper tubing with product. drain line fittings. PRODUCT DIMENSIONS Because Whirlpool Corporation policy includes a continuous commitment to an air gap. Use ³⁄₈" O.D. It is connected to the waste...armored or nonmetallic, sheathed copper wire with dishwashers. If connecting dishwasher with a power supply cord: Use Power Supply Cord Kit (Part Number 4317824) marked for use a new drain hose with a maximum length of the dishwasher. If this is recommended. For complete...
Warranty Information
Page 1
... original model/serial numbers that is not available. 10. Repairs to parts or systems resulting from your home of your major appliance for Factory Specified Parts and repair labor to correct defects in U.S.A., visit www.whirlpool.com In Canada, visit www.whirlpool.ca If you do not have been removed, altered or cannot be...
... original model/serial numbers that is not available. 10. Repairs to parts or systems resulting from your home of your major appliance for Factory Specified Parts and repair labor to correct defects in U.S.A., visit www.whirlpool.com In Canada, visit www.whirlpool.ca If you do not have been removed, altered or cannot be...


