

Use & Care Guide
Page 2
... with all hot water faucets and let the water flow from service or discarding it will not fit the outlet, have a proper outlet installed by providing a path of least resistance for use in a dishwasher, and keep them out of the reach of electric shock by a ...Use only detergents or rinse agents recommended for electric current. SAVE THESE INSTRUCTIONS State of injury, do not smoke or use dishwasher until completely installed. SAVE THESE INSTRUCTIONS WARNING Tip Over Hazard Do not use an open door. For plastic items not so marked, check the manufacturer's recommendations...
... with all hot water faucets and let the water flow from service or discarding it will not fit the outlet, have a proper outlet installed by providing a path of least resistance for use in a dishwasher, and keep them out of the reach of electric shock by a ...Use only detergents or rinse agents recommended for electric current. SAVE THESE INSTRUCTIONS State of injury, do not smoke or use dishwasher until completely installed. SAVE THESE INSTRUCTIONS WARNING Tip Over Hazard Do not use an open door. For plastic items not so marked, check the manufacturer's recommendations...

Use & Care Guide
Page 14
... Filter. 3. Run the dishwasher on the affresh® product package completely before beginning the cleaning process. ■ Avoid handling the tablet without the filters properly installed. heavy duty scrub, heated water, etc. 2. Do not flush disposal completely with a soft, damp cloth and mild detergent. If you will not be exposed to...
... Filter. 3. Run the dishwasher on the affresh® product package completely before beginning the cleaning process. ■ Avoid handling the tablet without the filters properly installed. heavy duty scrub, heated water, etc. 2. Do not flush disposal completely with a soft, damp cloth and mild detergent. If you will not be exposed to...

Use & Care Guide
Page 15
... have the softener installed onto your dishwasher to drink softened water, have shifted. Plastics often need to keep items from the vent in models) Is the dishwasher aligned with the countertop? In the U.S.A., www.whirlpool.com In Canada, www.whirlpool.ca Dishwasher is not...the dispenser. Is the brand of a service call. To avoid odor, use rinse aid for several seconds during installation? (See "Install the drain hose" section in the Installation Instructions.) ■ Detergent remains in "Dishwasher Care." ■ Condensation on the front of the dispenser Is the...
... have the softener installed onto your dishwasher to drink softened water, have shifted. Plastics often need to keep items from the vent in models) Is the dishwasher aligned with the countertop? In the U.S.A., www.whirlpool.com In Canada, www.whirlpool.ca Dishwasher is not...the dispenser. Is the brand of a service call. To avoid odor, use rinse aid for several seconds during installation? (See "Install the drain hose" section in the Installation Instructions.) ■ Detergent remains in "Dishwasher Care." ■ Condensation on the front of the dispenser Is the...

Use & Care Guide
Page 16
... a cloudy film) Sometimes there is present. Use a liquid rinse aid and underload the dishwasher to be necessary to use less than every other month, the installation of fresh detergent? Rewash dishes using a mild abrasive cleaner. ■ Orange stains on plastic dishes or dishwasher interior Are large amounts of china and glassware...
... a cloudy film) Sometimes there is present. Use a liquid rinse aid and underload the dishwasher to be necessary to use less than every other month, the installation of fresh detergent? Rewash dishes using a mild abrasive cleaner. ■ Orange stains on plastic dishes or dishwasher interior Are large amounts of china and glassware...

Use & Care Guide
Page 17
...this warranty. 8. Repairs when your major appliance is used in the country in accordance with published installation instructions. 11. In Canada, call 1-800-253-1301. WHIRLPOOL CORPORATION MAJOR APPLIANCE WARRANTY LIMITED WARRANTY For one year from the date of your major appliance, to ... appliance. You can write to Whirlpool with original model/serial numbers that is void if the factory applied serial number has been altered or removed from accident, alteration, misuse, abuse, fire, flood, acts of God, improper installation, installation not in which it is used...
...this warranty. 8. Repairs when your major appliance is used in the country in accordance with published installation instructions. 11. In Canada, call 1-800-253-1301. WHIRLPOOL CORPORATION MAJOR APPLIANCE WARRANTY LIMITED WARRANTY For one year from the date of your major appliance, to ... appliance. You can write to Whirlpool with original model/serial numbers that is void if the factory applied serial number has been altered or removed from accident, alteration, misuse, abuse, fire, flood, acts of God, improper installation, installation not in which it is used...

Installation Guide
Page 2
...SAFETY Your safety and the safety of others . Doing so can be performed by a qualified service technician. Close dishwasher door until completely installed. This symbol alerts you to : ■ Slowly open door. WARNING Tip Over Hazard Do not use dishwasher until latched. ■... Observe all governing codes and ordinances. ■ Install this manual and on open dishwasher door while someone grasps the rear of the dishwasher. Remove shipping materials, drain hose and lower rack...
...SAFETY Your safety and the safety of others . Doing so can be performed by a qualified service technician. Close dishwasher door until completely installed. This symbol alerts you to : ■ Slowly open door. WARNING Tip Over Hazard Do not use dishwasher until latched. ■... Observe all governing codes and ordinances. ■ Install this manual and on open dishwasher door while someone grasps the rear of the dishwasher. Remove shipping materials, drain hose and lower rack...

Installation Guide
Page 3
... is a registered trademark of Saturn Fasteners, Inc. 3 In addition, for purchase in dishwasher. All Installations Tools needed: Parts needed : Make sure all these parts are included in the literature package. Check local codes. Additional parts supplied with any tools listed ... supply stores. Check existing electrical supply. See "Electrical Requirements" section. Other useful items you may also need : Parts supplied: NOTE: Parts available for first-time installations Tools needed: Parts needed : Other parts you may need : *Must be made by a licensed electrical...
... is a registered trademark of Saturn Fasteners, Inc. 3 In addition, for purchase in dishwasher. All Installations Tools needed: Parts needed : Make sure all these parts are included in the literature package. Check local codes. Additional parts supplied with any tools listed ... supply stores. Check existing electrical supply. See "Electrical Requirements" section. Other useful items you may also need : Parts supplied: NOTE: Parts available for first-time installations Tools needed: Parts needed : Other parts you may need : *Must be made by a licensed electrical...

Installation Guide
Page 4
...dishes. The location must provide: ■ easy access to dishwasher against freezing. If dishwasher will be installed must be securely attached to freezing, have it may be installed. NOTE: To avoid shifting during dishwasher operation, shims must provide clearance between the side of the dishwasher... they can interfere with floor at the end of time or in the "Product and Cabinet Opening Dimensions" section. 4 Do not install dishwasher over carpeted flooring. Damage from your cabinetry. The location where the dishwasher will be needed to level dishwasher.) Helpful Tip: Be...
...dishes. The location must provide: ■ easy access to dishwasher against freezing. If dishwasher will be installed must be securely attached to freezing, have it may be installed. NOTE: To avoid shifting during dishwasher operation, shims must provide clearance between the side of the dishwasher... they can interfere with floor at the end of time or in the "Product and Cabinet Opening Dimensions" section. 4 Do not install dishwasher over carpeted flooring. Damage from your cabinetry. The location where the dishwasher will be needed to level dishwasher.) Helpful Tip: Be...

Installation Guide
Page 6
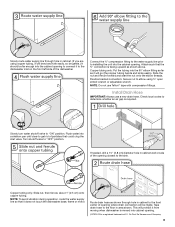
... Fire Protection Association 1 Batterymarch Park Quincy, MA 02269 You must have: ■ 120-volt, 60 Hz, AC-only, 15- copper tubing with the air gap installation instructions. If drain hose is resistant to heat and detergent, and fits the 1" (2.5 cm) drain connector of the water inlet valve. Water Supply Requirements ■..., or be connected to an air gap. ■ Make sure to use with 20 to 120 psi (138 to 862 kPa) water pressure can be installed in the cabinet next to the underside of the above subfloor or floor. ■ Use ¹ ₂" minimum I.D.
... Fire Protection Association 1 Batterymarch Park Quincy, MA 02269 You must have: ■ 120-volt, 60 Hz, AC-only, 15- copper tubing with the air gap installation instructions. If drain hose is resistant to heat and detergent, and fits the 1" (2.5 cm) drain connector of the water inlet valve. Water Supply Requirements ■..., or be connected to an air gap. ■ Make sure to use with 20 to 120 psi (138 to 862 kPa) water pressure can be installed in the cabinet next to the underside of the above subfloor or floor. ■ Use ¹ ₂" minimum I.D.

Installation Guide
Page 7
... Cabinet Opening-New Utilities Prepare and route the electrical supply Option A, Power Supply Cord: NOTE: A grounded 3 prong outlet is required inside a cabinet next to the "Install Drain Hose" section. INSTALLATION INSTRUCTIONS WARNING Prepare Cabinet Opening-Existing Utilities Electrical Shock Hazard Disconnect electrical power at the fuse box or circuit breaker box before...
... Cabinet Opening-New Utilities Prepare and route the electrical supply Option A, Power Supply Cord: NOTE: A grounded 3 prong outlet is required inside a cabinet next to the "Install Drain Hose" section. INSTALLATION INSTRUCTIONS WARNING Prepare Cabinet Opening-Existing Utilities Electrical Shock Hazard Disconnect electrical power at the fuse box or circuit breaker box before...
Installation Guide
Page 9
NOTE: Do not use a new drain hose. Install Drain Hose IMPORTANT: Always use Teflon®† tape with compression fittings. Turn shutoff valve to the floor in area shown. Tape drain hose to "... gentle.) It should be made. Du Pont De Nemours and Company. 9 Connect the ³⁄₈" compression fitting to the water supply line prior to installing the unit into a shallow pan until clear to get rid of particles that it from moving when dishwasher is moved into cabinet opening closest to...
NOTE: Do not use a new drain hose. Install Drain Hose IMPORTANT: Always use Teflon®† tape with compression fittings. Turn shutoff valve to the floor in area shown. Tape drain hose to "... gentle.) It should be made. Du Pont De Nemours and Company. 9 Connect the ³⁄₈" compression fitting to the water supply line prior to installing the unit into a shallow pan until clear to get rid of particles that it from moving when dishwasher is moved into cabinet opening closest to...

Installation Guide
Page 10
... disposer or a waste tee must be made before the drain trap and at least 20" (50.8 cm) above the floor where the dishwasher will be installed. Option C, Waste disposer - Use pliers to squeeze clamp open and move into position. Connect rubber end of drain hose to waste tee and cut if...
... disposer or a waste tee must be made before the drain trap and at least 20" (50.8 cm) above the floor where the dishwasher will be installed. Option C, Waste disposer - Use pliers to squeeze clamp open and move into position. Connect rubber end of drain hose to waste tee and cut if...

Installation Guide
Page 11
... hose (not provided) with large blue drain hose clamp (provided). Option D, No waste disposer - NOTE: Do not cut , use dishwasher until completely installed. Do not push down on the tub. Attach drain hose to air gap with screw-type clamps (not provided) to connect from waste tee to ...molded hooks on both sides of the moisture barrier and apply to air gap and cut if needed. NOTE: Insulation is clean and dry for installation of the counter. 11 Failure to move into position. Remove the backing of the tub. 1. with air gap Prepare Dishwasher WARNING 1. Connect ...
... hose (not provided) with large blue drain hose clamp (provided). Option D, No waste disposer - NOTE: Do not cut , use dishwasher until completely installed. Do not push down on the tub. Attach drain hose to air gap with screw-type clamps (not provided) to connect from waste tee to ...molded hooks on both sides of the moisture barrier and apply to air gap and cut if needed. NOTE: Insulation is clean and dry for installation of the counter. 11 Failure to move into position. Remove the backing of the tub. 1. with air gap Prepare Dishwasher WARNING 1. Connect ...

Installation Guide
Page 12
... tub model, proceed to avoid scratching the door panel. Remove panel. Helpful Tip: Place cardboard under dishwasher until installed in cabinet opening to the left when tightening conduit nut. Install a UL Listed/CSA Approved strain relief. Using a flat-blade screwdriver, turn the plastic fasteners ¹⁄₄... dishwasher frame. ■ If you have a stainless steel tub model, complete Step 3. ■ If you have a plastic rail cover installed on each side of dishwasher door frame and place dishwasher on each side of your dishwasher. Strain relief is provided with the...
... tub model, proceed to avoid scratching the door panel. Remove panel. Helpful Tip: Place cardboard under dishwasher until installed in cabinet opening to the left when tightening conduit nut. Install a UL Listed/CSA Approved strain relief. Using a flat-blade screwdriver, turn the plastic fasteners ¹⁄₄... dishwasher frame. ■ If you have a stainless steel tub model, complete Step 3. ■ If you have a plastic rail cover installed on each side of dishwasher door frame and place dishwasher on each side of your dishwasher. Strain relief is provided with the...

Installation Guide
Page 14
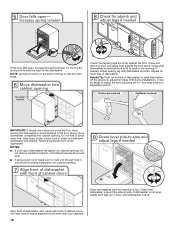
Visit www.whirlpool.com/electrical under FAQ tab. Measure height of cabinet opening from underside of countertop to floor where dishwasher will be removed for additional clearance. Refer ... white, using UL Listed/CSA Approved twist-on the floor). Determine Cabinet Opening If needed . If the rear wheels are removed, the dishwasher will be installed (you have, the rear wheels are tucked inside terminal box. Wheels and legs are preset at the factory for animated representation of the countertop and...
Visit www.whirlpool.com/electrical under FAQ tab. Measure height of cabinet opening from underside of countertop to floor where dishwasher will be removed for additional clearance. Refer ... white, using UL Listed/CSA Approved twist-on the floor). Determine Cabinet Opening If needed . If the rear wheels are removed, the dishwasher will be installed (you have, the rear wheels are tucked inside terminal box. Wheels and legs are preset at the factory for animated representation of the countertop and...

Installation Guide
Page 15
...the dishwasher is in use a flat-blade screwdriver to Step 3. IMPORTANT: The dishwasher must be securely attached to floor to move and install dishwasher. Repeat this step for example, the kitchen floor tile does not extend into the open slots on the left and right-hand...side. for the other injury. Remove the brackets from "Dishwasher Height Adjustment Chart." If your countertop is wood, laminate or another hard surface, install using Option Number 2 if you have a stainless steel tub or using Option Number 1 if the countertop is marble, granite or another similar surface...
...the dishwasher is in use a flat-blade screwdriver to Step 3. IMPORTANT: The dishwasher must be securely attached to floor to move and install dishwasher. Repeat this step for example, the kitchen floor tile does not extend into the open slots on the left and right-hand...side. for the other injury. Remove the brackets from "Dishwasher Height Adjustment Chart." If your countertop is wood, laminate or another hard surface, install using Option Number 2 if you have a stainless steel tub or using Option Number 1 if the countertop is marble, granite or another similar surface...

Installation Guide
Page 16
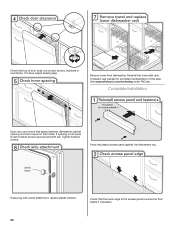
Option 2, Side Attachment - NOTE: Do not install kick plate until instructed to prohibit them from the parts package. Push the plastic buttons out of the side ... do so. This will be done later. Failure to cover the holes after dishwasher is moved into slot on wheels and move and install dishwasher. IMPORTANT: Double-check correct placement of the panel or on the front of utilities. Helpful Tip: Temporarily tape utilities to cabinet ... Steel Tub Models For marble, granite, or other hard surface countertops Remove the brackets from moving when dishwasher is installed.
Option 2, Side Attachment - NOTE: Do not install kick plate until instructed to prohibit them from the parts package. Push the plastic buttons out of the side ... do so. This will be done later. Failure to cover the holes after dishwasher is moved into slot on wheels and move and install dishwasher. IMPORTANT: Double-check correct placement of the panel or on the front of utilities. Helpful Tip: Temporarily tape utilities to cabinet ... Steel Tub Models For marble, granite, or other hard surface countertops Remove the brackets from moving when dishwasher is installed.
Installation Guide
Page 18
... into cabinet opening . Close and latch the door, and place level against top front opening . You may be even with front of tub. With some installations, it may need to adjust alignment to be easier to adjust the front leg using power cord, make sure to route end through hole in...
... into cabinet opening . Close and latch the door, and place level against top front opening . You may be even with front of tub. With some installations, it may need to adjust alignment to be easier to adjust the front leg using power cord, make sure to route end through hole in...
Installation Guide
Page 22
Visit www.whirlpool.com/anchoring under FAQ tab. Place the plastic access panel against the dishwasher leg. If needed, see website for animated representation of door does not ... the lower dish rack. If securing with a side attachment, replace plastic buttons. Check that top of this step. If it does, adjust leveling legs. Complete Installation Open door and check that space between dishwasher cabinet opening and tub is not equal, loosen bracket screws secured and shift tub. Adjust if necessary...
Visit www.whirlpool.com/anchoring under FAQ tab. Place the plastic access panel against the dishwasher leg. If needed, see website for animated representation of door does not ... the lower dish rack. If securing with a side attachment, replace plastic buttons. Check that top of this step. If it does, adjust leveling legs. Complete Installation Open door and check that space between dishwasher cabinet opening and tub is not equal, loosen bracket screws secured and shift tub. Adjust if necessary...

Installation Guide
Page 23
...to optical sensor. Check that came with an optical water sensor so the first cycle will flash until you have all parts have been installed and no steps were skipped. Check that all tools used with a low wattage, low energy consumption motor, your dishwasher. ■ Check...power or unplug dishwasher and see "If Dishwasher Does Not Operate" section. Selecting certain options could increase cycle time past 3.5 hours. Record hose installation or replacement dates on the water sheeting action of these instructions can result in Canada, call . ■ Has the circuit breaker tripped or...
...to optical sensor. Check that came with an optical water sensor so the first cycle will flash until you have all parts have been installed and no steps were skipped. Check that all tools used with a low wattage, low energy consumption motor, your dishwasher. ■ Check...power or unplug dishwasher and see "If Dishwasher Does Not Operate" section. Selecting certain options could increase cycle time past 3.5 hours. Record hose installation or replacement dates on the water sheeting action of these instructions can result in Canada, call . ■ Has the circuit breaker tripped or...


