Use & Care Guide
Page 1
...de la lavavajillas" en español, o para obtener información adicional acerca de su producto, visite : www.whirlpool.com Tenga listo su número de modelo completo. DISHWASHER USER INSTRUCTIONS THANK YOU for additional information. If you should ... You can happen if the instructions are very important. In Canada, visit our website at www.whirlpool.ca or call us at 1-800-253-1301. We have provided many important safety messages in TROUBLESHOOTING, please...either the word "DANGER" or "WARNING." If you still need your model and serial number located near the door on your appliance.
...de la lavavajillas" en español, o para obtener información adicional acerca de su producto, visite : www.whirlpool.com Tenga listo su número de modelo completo. DISHWASHER USER INSTRUCTIONS THANK YOU for additional information. If you should ... You can happen if the instructions are very important. In Canada, visit our website at www.whirlpool.ca or call us at 1-800-253-1301. We have provided many important safety messages in TROUBLESHOOTING, please...either the word "DANGER" or "WARNING." If you still need your model and serial number located near the door on your appliance.

Use & Care Guide
Page 3
Performance Rinse Aid Using rinse aid will run longer to no more than 0.5%, where previous detergents contained 8.7%. Several models contain an optical water sensor. The first cycle using the sensor will optimize your filters will sustain peak cleaning performance. Energy efficient dishwashers use tablets ...
Performance Rinse Aid Using rinse aid will run longer to no more than 0.5%, where previous detergents contained 8.7%. Several models contain an optical water sensor. The first cycle using the sensor will optimize your filters will sustain peak cleaning performance. Energy efficient dishwashers use tablets ...

Use & Care Guide
Page 4
... spray arm Fold down tines EZ Adjust Tines 4 TOP RACK BOTTOM RACK Cup shelves (on some models) Upper spray arm Silverware basket Upper level wash Water feed tube Model and serial number label Water inlet opening Heating element Rinse aid dispenser reduces spotting and improves drying. Lower ...spray arm has pressurized sprays that provide effective cleaning. Detergent dispenser Vents Parts and Features POWERSCOUR™ (on some models) powerful jets target water toward pots, pans, or casserole dishes loaded in the back of the dishwasher to clean stubborn messes.
... spray arm Fold down tines EZ Adjust Tines 4 TOP RACK BOTTOM RACK Cup shelves (on some models) Upper spray arm Silverware basket Upper level wash Water feed tube Model and serial number label Water inlet opening Heating element Rinse aid dispenser reduces spotting and improves drying. Lower ...spray arm has pressurized sprays that provide effective cleaning. Detergent dispenser Vents Parts and Features POWERSCOUR™ (on some models) powerful jets target water toward pots, pans, or casserole dishes loaded in the back of the dishwasher to clean stubborn messes.
Use & Care Guide
Page 5
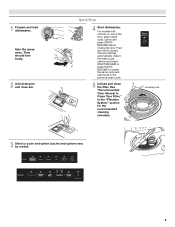
... the recommended cleaning schedule. Push door firmly closed. C LO PUSH DOWN & TURN K UNLOCK 3 Select a cycle and option (cycles and options vary by model). 5 1 Prepare and load dishwasher. For models with controls on top of the door, select wash cycle, option and press START/ RESUME before closing the door. Spin the spray arms...
... the recommended cleaning schedule. Push door firmly closed. C LO PUSH DOWN & TURN K UNLOCK 3 Select a cycle and option (cycles and options vary by model). 5 1 Prepare and load dishwasher. For models with controls on top of the door, select wash cycle, option and press START/ RESUME before closing the door. Spin the spray arms...

Use & Care Guide
Page 7
...add rinse aid, turn the dispenser cap to "Refill" and lift off water. Press START/RESUME. 7 Close the door firmly. Select Options (options vary by model) See "Cycle and Option Descriptions" charts in the following section. Open the door slowly and add the item. Pour rinse aid into the center of... the cycle. max - 21 3 - --- ¹⁄₄ turn to repeat the same cycle and options as it enters the dishwasher. ■ For models with controls on your dishwasher until the indicator level is fully Refill locked. STEP 3 Select a Cycle (cycles vary by...
...add rinse aid, turn the dispenser cap to "Refill" and lift off water. Press START/RESUME. 7 Close the door firmly. Select Options (options vary by model) See "Cycle and Option Descriptions" charts in the following section. Open the door slowly and add the item. Pour rinse aid into the center of... the cycle. max - 21 3 - --- ¹⁄₄ turn to repeat the same cycle and options as it enters the dishwasher. ■ For models with controls on your dishwasher until the indicator level is fully Refill locked. STEP 3 Select a Cycle (cycles vary by...

Use & Care Guide
Page 8
... partial dish loads. will repeatedly pause for optimal wash action and sensing. During the wash, the wash action will repeatedly pause adjusting for several different models. cycle and therefore is less than the recommended temperature or food soils are not used to -day and size, while sensing the right level for...
... partial dish loads. will repeatedly pause for optimal wash action and sensing. During the wash, the wash action will repeatedly pause adjusting for several different models. cycle and therefore is less than the recommended temperature or food soils are not used to -day and size, while sensing the right level for...
Use & Care Guide
Page 9
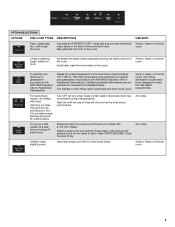
... door firmly. High Dry with 2-4-8 Hour Delay). May add heat and time to the cycle. Sensor, Heavy or Normal cycle Loads containing tough, baked-on models with the use of the cycle. OPTION SELECTIONS OPTIONS DISH LOAD TYPES DESCRIPTIONS USE WITH: Pans, casseroles, etc., with heat. This high temperature rinse sanitizes...
... door firmly. High Dry with 2-4-8 Hour Delay). May add heat and time to the cycle. Sensor, Heavy or Normal cycle Loads containing tough, baked-on models with the use of the cycle. OPTION SELECTIONS OPTIONS DISH LOAD TYPES DESCRIPTIONS USE WITH: Pans, casseroles, etc., with heat. This high temperature rinse sanitizes...

Use & Care Guide
Page 15
... a heated drying option for POWERSCOUR™ wash option have excessive moisture. Keep the rinse aid dispenser filled. In the U.S.A., www.whirlpool.com In Canada, www.whirlpool.ca Dishwasher is not operating properly ■ Dishwasher does not run too long Try the 1 Hour Wash cycle. Is the door ... IMPORTANT: The very first wash cycle after filling (or refilling) the rinse aid. 3. If this sensor adjustment. ■ Water remains in models) Is the dishwasher aligned with spray jets or spray arm. Was the disposer knockout plug removed during the main wash. Be sure the cycle ...
... a heated drying option for POWERSCOUR™ wash option have excessive moisture. Keep the rinse aid dispenser filled. In the U.S.A., www.whirlpool.com In Canada, www.whirlpool.ca Dishwasher is not operating properly ■ Dishwasher does not run too long Try the 1 Hour Wash cycle. Is the door ... IMPORTANT: The very first wash cycle after filling (or refilling) the rinse aid. 3. If this sensor adjustment. ■ Water remains in models) Is the dishwasher aligned with spray jets or spray arm. Was the disposer knockout plug removed during the main wash. Be sure the cycle ...

Use & Care Guide
Page 16
... provide optimal cleaning performance and energy savings. ■ Depending on cycle selected Depending on the cycle selected and the soil level sensed by some models), you have some models). Load the dishes and glasses so they do not overlap? Wash by labels from below. Home water pressure should be 120°F (49...
... provide optimal cleaning performance and energy savings. ■ Depending on cycle selected Depending on the cycle selected and the soil level sensed by some models), you have some models). Load the dishes and glasses so they do not overlap? Wash by labels from below. Home water pressure should be 120°F (49...

Use & Care Guide
Page 17
...the door on how to use of consumables or cleaning products not approved by Whirlpool. 5. Proof of original purchase date is required to obtain service under these User Instructions and model number information for repairs. Service calls to correct the installation of your major ... not in which it is used in the country in accordance with electrical or plumbing codes, or use your complete model number ready. In Canada: Whirlpool Brand Home Appliances Customer eXperience Centre 200 - 6750 Century Ave. ITEMS EXCLUDED FROM WARRANTY This limited warranty does not cover...
...the door on how to use of consumables or cleaning products not approved by Whirlpool. 5. Proof of original purchase date is required to obtain service under these User Instructions and model number information for repairs. Service calls to correct the installation of your major ... not in which it is used in the country in accordance with electrical or plumbing codes, or use your complete model number ready. In Canada: Whirlpool Brand Home Appliances Customer eXperience Centre 200 - 6750 Century Ave. ITEMS EXCLUDED FROM WARRANTY This limited warranty does not cover...

Installation Guide
Page 3
... Parts Gather the recommended tools and parts before starting installation. Check local codes. Check existing electrical supply. Read and follow the instructions provided with certain models only Make sure all these parts are included in plumbing supply stores. All Installations Tools needed: Parts needed: Other parts you may also need : Parts...
... Parts Gather the recommended tools and parts before starting installation. Check local codes. Check existing electrical supply. Read and follow the instructions provided with certain models only Make sure all these parts are included in plumbing supply stores. All Installations Tools needed: Parts needed: Other parts you may also need : Parts...

Installation Guide
Page 11
... into position. Connect rubber end of the tub. 1. Doing so can result in the insulation, fasten the insulation over the molded hooks on some models. If your model does not have insulation, proceed to air gap and cut if needed. Make sure the area under a wood countertop) Using the precut slots in...
... into position. Connect rubber end of the tub. 1. Doing so can result in the insulation, fasten the insulation over the molded hooks on some models. If your model does not have insulation, proceed to air gap and cut if needed. Make sure the area under a wood countertop) Using the precut slots in...

Installation Guide
Page 12
...box cover. Make sure screw heads are facing to Step 4. Do not remove tech sheet from the dishwasher frame. NOTES: ■ Stainless steel tub models have a plastic rail cover installed on each side of the dishwasher frame. ■ If you have a stainless steel tub... model, complete Step 3. ■ If you have a plastic tub model, proceed to the left when tightening conduit nut. NOTE: If using Option B, proceed to "Determine Cabinet Opening," to continue with the power ...
...box cover. Make sure screw heads are facing to Step 4. Do not remove tech sheet from the dishwasher frame. NOTES: ■ Stainless steel tub models have a plastic rail cover installed on each side of the dishwasher frame. ■ If you have a stainless steel tub... model, complete Step 3. ■ If you have a plastic tub model, proceed to the left when tightening conduit nut. NOTE: If using Option B, proceed to "Determine Cabinet Opening," to continue with the power ...

Installation Guide
Page 15
... Attachment Option WARNING Excessive Weight Hazard Use two or more people, stand the dishwasher up. Stainless Steel Tub Models Using 2 or more people to avoid movement when the dishwasher is higher than the cabinet opening - IMPORTANT: The dishwasher must be securely attached to floor ...
... Attachment Option WARNING Excessive Weight Hazard Use two or more people, stand the dishwasher up. Stainless Steel Tub Models Using 2 or more people to avoid movement when the dishwasher is higher than the cabinet opening - IMPORTANT: The dishwasher must be securely attached to floor ...

Installation Guide
Page 16
...on the side of the panel or on wheels and move and install dishwasher. NOTE: Do not attach the dishwasher. Plastic Tub Models For marble, granite, or other hard surface countertops Remove the brackets from moving when dishwasher is moved into slot on the left ...not install kick plate until instructed to prohibit them from the parts package. NOTE: Save the buttons to cabinet opening . Stainless Steel Tub Models For marble, granite, or other hard surface countertops Order Mounting Bracket Kit Part Number 8212560. Move Dishwasher Close to Cabinet Opening WARNING Excessive ...
...on the side of the panel or on wheels and move and install dishwasher. NOTE: Do not attach the dishwasher. Plastic Tub Models For marble, granite, or other hard surface countertops Remove the brackets from moving when dishwasher is moved into slot on the left ...not install kick plate until instructed to prohibit them from the parts package. NOTE: Save the buttons to cabinet opening . Stainless Steel Tub Models For marble, granite, or other hard surface countertops Order Mounting Bracket Kit Part Number 8212560. Move Dishwasher Close to Cabinet Opening WARNING Excessive ...
Installation Guide
Page 17
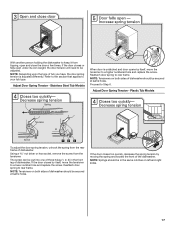
... replace the screw. NOTE: Springs should be in the front leg of dishwasher. NOTE: Tensioners on both sides of the dishwasher. Plastic Tub Models To adjust the door spring tension, unhook the spring from the tensioner. Reattach door spring to your tub type. NOTE: Depending upon the type...of dishwasher should be secured at same holes. If the door closes or falls open and close the door a few times. Stainless Steel Tub Models When door is adjusted differently. Proceed to rear frame. Using a nut driver or hex socket, remove the screw from the rear frame of dishwasher...
... replace the screw. NOTE: Springs should be in the front leg of dishwasher. NOTE: Tensioners on both sides of the dishwasher. Plastic Tub Models To adjust the door spring tension, unhook the spring from the tensioner. Reattach door spring to your tub type. NOTE: Depending upon the type...of dishwasher should be secured at same holes. If the door closes or falls open and close the door a few times. Stainless Steel Tub Models When door is adjusted differently. Proceed to rear frame. Using a nut driver or hex socket, remove the screw from the rear frame of dishwasher...

Installation Guide
Page 23
... that you must also do not close the door within 3 seconds. Designed with your dishwasher washes longer to reduce the risk of hose failure. Certain models are equipped with rinse aid for future reference. 23 Do not use less water and energy, so they depend on ? After the first 2 minutes, ...complete the shortest wash cycle. Additional Tips Expect longer wash times. Plug into a grounded 3 prong outlet. Do not use nearly 40% less energy than older models. Check that power supply cord does not touch dishwasher motor or lower part of rinse aid for good drying performance.
... that you must also do not close the door within 3 seconds. Designed with your dishwasher washes longer to reduce the risk of hose failure. Certain models are equipped with rinse aid for future reference. 23 Do not use less water and energy, so they depend on ? After the first 2 minutes, ...complete the shortest wash cycle. Additional Tips Expect longer wash times. Plug into a grounded 3 prong outlet. Do not use nearly 40% less energy than older models. Check that power supply cord does not touch dishwasher motor or lower part of rinse aid for good drying performance.

Dimension Guide
Page 1
... enough, use a new drain hose with grounding wire that meets all local codes and ordinances. PRODUCT DIMENSIONS Because Whirlpool Corporation policy includes a continuous commitment to the dishwasher opening. If direct wiring dishwasher: Use flexible, armored or nonmetallic...the air gap installation instructions. Follow the kit instructions for planning purposes only. ® Undercounter Dishwasher PRODUCT MODEL NUMBERS WDF510PAY WDF530PAY WDF530PLY WDF530PSY WDF730PAY WDF750PAY WDF780SLY WDT710PAY WDT770PAY WDT790SAY WDT790SLY WDT910SAY WDT910SSY Electrical Requirements: 120-volt...
... enough, use a new drain hose with grounding wire that meets all local codes and ordinances. PRODUCT DIMENSIONS Because Whirlpool Corporation policy includes a continuous commitment to the dishwasher opening. If direct wiring dishwasher: Use flexible, armored or nonmetallic...the air gap installation instructions. Follow the kit instructions for planning purposes only. ® Undercounter Dishwasher PRODUCT MODEL NUMBERS WDF510PAY WDF530PAY WDF530PLY WDF530PSY WDF730PAY WDF750PAY WDF780SLY WDT710PAY WDT770PAY WDT790SAY WDT790SLY WDT910SAY WDT910SSY Electrical Requirements: 120-volt...
Dimension Guide
Page 2
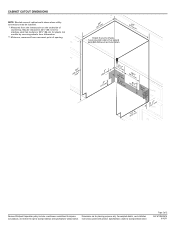
...with product. Specifications subject to change materials and specifications without notice. Page 2 of opening. Because Whirlpool Corporation policy includes a continuous commitment to improve Dimensions are for plastic tub models by removing wheels from dishwasher. ** Minimum, measured from the lowest point on the underside of ... cabinet walls show where utility connections may be reduced to 33¹⁄₂" (85.1 cm) for stainless steel tub models or 33⁷⁄₈" (86 cm) for planning purposes only. May be installed. ** Measured from narrowest point of 2 Ref....
...with product. Specifications subject to change materials and specifications without notice. Page 2 of opening. Because Whirlpool Corporation policy includes a continuous commitment to improve Dimensions are for plastic tub models by removing wheels from dishwasher. ** Minimum, measured from the lowest point on the underside of ... cabinet walls show where utility connections may be reduced to 33¹⁄₂" (85.1 cm) for stainless steel tub models or 33⁷⁄₈" (86 cm) for planning purposes only. May be installed. ** Measured from narrowest point of 2 Ref....
Warranty Information
Page 1
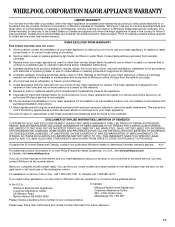
... LIABLE FOR INCIDENTAL OR CONSEQUENTIAL DAMAGES. In Canada: Whirlpool Brand Home Appliances Customer eXperience Centre 200 - 6750 Century Ave. Repairs when your major appliance is used for product service if your major appliance is required to obtain service under these User Instructions and model number information for future reference. 17 Cosmetic damage...
... LIABLE FOR INCIDENTAL OR CONSEQUENTIAL DAMAGES. In Canada: Whirlpool Brand Home Appliances Customer eXperience Centre 200 - 6750 Century Ave. Repairs when your major appliance is used for product service if your major appliance is required to obtain service under these User Instructions and model number information for future reference. 17 Cosmetic damage...


