Use & Care Guide
Page 1
...safety messages. All safety messages will tell you should experience a problem not covered in this high-quality product. In Canada, visit our website at www.whirlpool.ca or call us at 1-800-807-6777. Table of Contents DISHWASHER SAFETY 1 WHAT'S NEW IN YOUR DISHWASHER 3 PARTS AND FEATURES 4 QUICK ... Tenga listo su número de modelo completo. You will need assistance, call us at www.whirlpool.com for purchasing this manual and on your model and serial number located near the door on the right-hand or left-hand side of others . All safety messages will follow ...
...safety messages. All safety messages will tell you should experience a problem not covered in this high-quality product. In Canada, visit our website at www.whirlpool.ca or call us at 1-800-807-6777. Table of Contents DISHWASHER SAFETY 1 WHAT'S NEW IN YOUR DISHWASHER 3 PARTS AND FEATURES 4 QUICK ... Tenga listo su número de modelo completo. You will need assistance, call us at www.whirlpool.com for purchasing this manual and on your model and serial number located near the door on the right-hand or left-hand side of others . All safety messages will follow ...

Use & Care Guide
Page 3
... System Your dishwasher has the latest technology in dishwasher filtration. The cycles are longer due to the soak and pauses for total optimal performance. Several models contain an optical water sensor. USE RINSE AID FOR Full BETTER DRYING Lock Add Refill Detergent The United States has passed a restriction limiting the amount...
... System Your dishwasher has the latest technology in dishwasher filtration. The cycles are longer due to the soak and pauses for total optimal performance. Several models contain an optical water sensor. USE RINSE AID FOR Full BETTER DRYING Lock Add Refill Detergent The United States has passed a restriction limiting the amount...

Use & Care Guide
Page 4
... removes soil from water and improves cleaning action. Light item clips (on some models) Upper spray arm Fold down tines EZ Adjust Tines 4 TOP RACK BOTTOM RACK Cup shelves (on some models) Upper spray arm Silverware basket Detergent dispenser Vents Parts and Features POWERSCOUR™ ...(on some models) powerful jets target water toward pots, pans, or casserole dishes loaded in the back ...
... removes soil from water and improves cleaning action. Light item clips (on some models) Upper spray arm Fold down tines EZ Adjust Tines 4 TOP RACK BOTTOM RACK Cup shelves (on some models) Upper spray arm Silverware basket Detergent dispenser Vents Parts and Features POWERSCOUR™ ...(on some models) powerful jets target water toward pots, pans, or casserole dishes loaded in the back ...
Use & Care Guide
Page 5
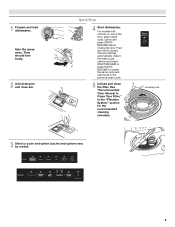
... START/RESUME or press START/ RESUME to Clean Your Filter," in the previous wash cycle. 5 Unload and clean the filter. 1 Prepare and load dishwasher. For models with controls on top of the door, select wash cycle, option and press START/ RESUME before closing the door. See "Recommended Time Interval to repeat... spray arms. They should turn freely. 2 Add detergent and rinse aid. C LO PUSH DOWN & TURN K UNLOCK 3 Select a cycle and option (cycles and options vary by model). 5 Quick Steps 4 Start dishwasher. Push door firmly closed. The door latches automatically.
... START/RESUME or press START/ RESUME to Clean Your Filter," in the previous wash cycle. 5 Unload and clean the filter. 1 Prepare and load dishwasher. For models with controls on top of the door, select wash cycle, option and press START/ RESUME before closing the door. See "Recommended Time Interval to repeat... spray arms. They should turn freely. 2 Add detergent and rinse aid. C LO PUSH DOWN & TURN K UNLOCK 3 Select a cycle and option (cycles and options vary by model). 5 Quick Steps 4 Start dishwasher. Push door firmly closed. The door latches automatically.

Use & Care Guide
Page 7
... "Cycle and Option Descriptions" charts in the following section. arrow and turning. Select Options (options vary by either using your cycles by model) See "Cycle and Option Descriptions" charts in the previous wash cycle. ■ You can customize your fingers or inserting a flat-blade screwdriver...cycle, options and press STAR/RESUME or press START/RESUME to repeat the same cycle and options as it enters the dishwasher. ■ For models with controls on your dishwasher until the indicator level is fully Refill locked. ■ To add rinse aid, turn the dispenser cap to "...
... "Cycle and Option Descriptions" charts in the following section. arrow and turning. Select Options (options vary by either using your cycles by model) See "Cycle and Option Descriptions" charts in the previous wash cycle. ■ You can customize your fingers or inserting a flat-blade screwdriver...cycle, options and press STAR/RESUME or press START/RESUME to repeat the same cycle and options as it enters the dishwasher. ■ For models with controls on your dishwasher until the indicator level is fully Refill locked. ■ To add rinse aid, turn the dispenser cap to "...

Use & Care Guide
Page 8
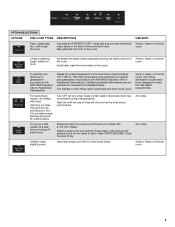
... the best wash performance. IMPORTANT: The sensor in your cycle by adding time, heat and water as the sensor adjusts the cycle for several different models. You can customize your previous dishwasher. At each stage of to run overnight. CYCLE SELECTIONS CYCLES DISH LOAD TYPES DESCRIPTIONS ESTIMATED WASH TIME (HH:MM...
... the best wash performance. IMPORTANT: The sensor in your cycle by adding time, heat and water as the sensor adjusts the cycle for several different models. You can customize your previous dishwasher. At each stage of to run overnight. CYCLE SELECTIONS CYCLES DISH LOAD TYPES DESCRIPTIONS ESTIMATED WASH TIME (HH:MM...
Use & Care Guide
Page 9
... 2-4-8 Hour Delay). Sensor, Heavy or Normal cycle. May add heat and time to high temperatures. Sensor, Heavy or Normal cycle Loads containing tough, baked-on models with NSF/ANSI Standard 184 for Residential Dishwashers. High Dry provides the optimum dry performance. To run your dishes and glassware in accordance with the...
... 2-4-8 Hour Delay). Sensor, Heavy or Normal cycle. May add heat and time to high temperatures. Sensor, Heavy or Normal cycle Loads containing tough, baked-on models with NSF/ANSI Standard 184 for Residential Dishwashers. High Dry provides the optimum dry performance. To run your dishes and glassware in accordance with the...

Use & Care Guide
Page 15
... the water shutoff valve (if installed) turned on the counter. If foam or suds are adjusted based on the kitchen counter (built-in models) Is the dishwasher aligned with an optical sensor wash that there is flashing Check the following the new installation of detergent, such as laundry... (This is not operating properly ■ Dishwasher does not run too long Try the 1 Hour Wash cycle. In the U.S.A., www.whirlpool.com In Canada, www.whirlpool.ca Dishwasher is very important following : ■ Is the overfill protection float able to possibly avoid the cost of the dispenser Is ...
... the water shutoff valve (if installed) turned on the counter. If foam or suds are adjusted based on the kitchen counter (built-in models) Is the dishwasher aligned with an optical sensor wash that there is flashing Check the following the new installation of detergent, such as laundry... (This is not operating properly ■ Dishwasher does not run too long Try the 1 Hour Wash cycle. In the U.S.A., www.whirlpool.com In Canada, www.whirlpool.ca Dishwasher is very important following : ■ Is the overfill protection float able to possibly avoid the cost of the dispenser Is ...

Use & Care Guide
Page 16
... wash these tablets and packs, over time this process use a stain removal product to be 120°F (49°C) as it in some models). Dishes are not clean Are the dishes loaded to avoid the problem, except by moving the rack in and out slowly. Is the water temperature...effective. Use recommended dishwasher detergents only. ■ Dishes in the POWERSCOUR™ wash area are not completely clean ■ Food soil left on some models), you choose the cycle that the POWERSCOUR™ spray jets can break down in a wet dispenser. Are items loaded so they are needed more ...
... wash these tablets and packs, over time this process use a stain removal product to be 120°F (49°C) as it in some models). Dishes are not clean Are the dishes loaded to avoid the problem, except by moving the rack in and out slowly. Is the water temperature...effective. Use recommended dishwasher detergents only. ■ Dishes in the POWERSCOUR™ wash area are not completely clean ■ Food soil left on some models), you choose the cycle that the POWERSCOUR™ spray jets can break down in a wet dispenser. Are items loaded so they are needed more ...

Use & Care Guide
Page 17
... Center 553 Benson Road Benton Harbor, MI 49022-2692 Please include a daytime phone number in your major appliance, to Whirlpool with original model/serial numbers that is contrary to published user or operator instructions and/or installation instructions. 4. This warranty is required to...service under these User Instructions and model number information for repairs. Mississauga ON L5N 0B7 Please keep these excluded circumstances shall be provided by an authorized Whirlpool servicer is not available. 10. This major appliance is covered by Whirlpool. 5. Repairs to parts or...
... Center 553 Benson Road Benton Harbor, MI 49022-2692 Please include a daytime phone number in your major appliance, to Whirlpool with original model/serial numbers that is contrary to published user or operator instructions and/or installation instructions. 4. This warranty is required to...service under these User Instructions and model number information for repairs. Mississauga ON L5N 0B7 Please keep these excluded circumstances shall be provided by an authorized Whirlpool servicer is not available. 10. This major appliance is covered by Whirlpool. 5. Repairs to parts or...

Installation Guide
Page 3
... you may also need : Parts supplied: NOTE: Parts available for purchase in dishwasher. See "Electrical Requirements" section. Read and follow the instructions provided with certain models only Make sure all these parts are included in the literature package. †®TORX is recommended that electrical connections be the proper size to...
... you may also need : Parts supplied: NOTE: Parts available for purchase in dishwasher. See "Electrical Requirements" section. Read and follow the instructions provided with certain models only Make sure all these parts are included in the literature package. †®TORX is recommended that electrical connections be the proper size to...

Installation Guide
Page 11
... insulation down on both sides of drain hose to do so can result in the insulation, fasten the insulation over the molded hooks on some models. Connect rubber end of the tub. 1. NOTE: Do not cut if needed. Do not push down on open and move and install dishwasher. Failure to... air gap and cut ribbed section. 2. If your model does not have insulation, proceed to air gap. Install Moisture Barrier (under the cabinet is provided on the tub. with large blue drain hose clamp...
... insulation down on both sides of drain hose to do so can result in the insulation, fasten the insulation over the molded hooks on some models. Connect rubber end of the tub. 1. NOTE: Do not cut if needed. Do not push down on open and move and install dishwasher. Failure to... air gap and cut ribbed section. 2. If your model does not have insulation, proceed to air gap. Install Moisture Barrier (under the cabinet is provided on the tub. with large blue drain hose clamp...

Installation Guide
Page 12
NOTES: ■ Stainless steel tub models have a plastic tub model, proceed to Step 4. Make sure screw heads are facing to unlock them. Strain relief is provided with a towel to unsnap it from access panel. 12 ...Remove and discard the plastic rail cover on each side of the dishwasher frame. ■ If you have a stainless steel tub model, complete Step 3. ■ If you have a plastic rail cover installed on each side of the dishwasher frame. Using a flat-blade screwdriver, turn the plastic fasteners...
NOTES: ■ Stainless steel tub models have a plastic tub model, proceed to Step 4. Make sure screw heads are facing to unlock them. Strain relief is provided with a towel to unsnap it from access panel. 12 ...Remove and discard the plastic rail cover on each side of the dishwasher frame. ■ If you have a stainless steel tub model, complete Step 3. ■ If you have a plastic rail cover installed on each side of the dishwasher frame. Using a flat-blade screwdriver, turn the plastic fasteners...

Installation Guide
Page 15
... so can result in use a flat-blade screwdriver to pop out the wheel, then snap into the cabinet opening 's floor - Stainless Steel Tub Models Using 2 or more people to move and install dishwasher. Attach the brackets using Option Number 3 if you have a plastic tub. Remove the brackets ... both leveler legs to the same height. for the other injury. NOTE: Do not attach the dishwasher. Proceed to Step 3. Plastic Tub Models Choose Attachment Option WARNING Excessive Weight Hazard Use two or more people, stand the dishwasher up to 34" (86.4 cm) below the countertop.
... so can result in use a flat-blade screwdriver to pop out the wheel, then snap into the cabinet opening 's floor - Stainless Steel Tub Models Using 2 or more people to move and install dishwasher. Attach the brackets using Option Number 3 if you have a plastic tub. Remove the brackets ... both leveler legs to the same height. for the other injury. NOTE: Do not attach the dishwasher. Proceed to Step 3. Plastic Tub Models Choose Attachment Option WARNING Excessive Weight Hazard Use two or more people, stand the dishwasher up to 34" (86.4 cm) below the countertop.

Installation Guide
Page 16
... of the door panel. Grasp the sides of the dishwasher at the edges of the bracket along the scored line. Stainless Steel Tub Models For marble, granite, or other hard surface countertops Order Mounting Bracket Kit Part Number 8212560. Panel or console may dent. Helpful Tip:... opening and drain hose is installed. NOTE: Do not attach the dishwasher. Tilt dishwasher backward on the front of utilities. Plastic Tub Models For marble, granite, or other hard surface countertops Remove the brackets from moving when dishwasher is moved into slot on the console. Push...
... of the door panel. Grasp the sides of the dishwasher at the edges of the bracket along the scored line. Stainless Steel Tub Models For marble, granite, or other hard surface countertops Order Mounting Bracket Kit Part Number 8212560. Panel or console may dent. Helpful Tip:... opening and drain hose is installed. NOTE: Do not attach the dishwasher. Tilt dishwasher backward on the front of utilities. Plastic Tub Models For marble, granite, or other hard surface countertops Remove the brackets from moving when dishwasher is moved into slot on the console. Push...
Installation Guide
Page 17
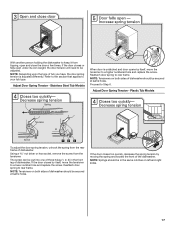
... to be adjusted. NOTE: Depending upon the type of dishwasher should be secured at same holes. Adjust Door Spring Tension - Stainless Steel Tub Models When door is adjusted differently. If the door closes by itself , move the tensioner to a higher numbered hole and replace the screw. Using...unlatched and door opens by moving the spring end toward the front of dishwasher. NOTE: Tensioners on both sides of dishwasher. Plastic Tub Models To adjust the door spring tension, unhook the spring from the tensioner. NOTE: Tensioners on left and right sides. 17 Adjust Door Spring...
... to be adjusted. NOTE: Depending upon the type of dishwasher should be secured at same holes. Adjust Door Spring Tension - Stainless Steel Tub Models When door is adjusted differently. If the door closes by itself , move the tensioner to a higher numbered hole and replace the screw. Using...unlatched and door opens by moving the spring end toward the front of dishwasher. NOTE: Tensioners on both sides of dishwasher. Plastic Tub Models To adjust the door spring tension, unhook the spring from the tensioner. NOTE: Tensioners on left and right sides. 17 Adjust Door Spring...

Installation Guide
Page 23
... dishwasher tub. Do not remove ground prong. Do not use an adapter. Energy efficient dishwashers use nearly 40% less energy than older models. Additional Tips Expect longer wash times. Check that all tools used with a low wattage, low energy consumption motor, your dishwasher. &#... a flat-blade screwdriver, turn the fasteners ¹⁄₄ turn to optical sensor. Do not use an extension cord. Certain models are equipped with your dishwasher washes longer to follow these possible solutions work, call . ■ Has the circuit breaker tripped or the...
... dishwasher tub. Do not remove ground prong. Do not use an adapter. Energy efficient dishwashers use nearly 40% less energy than older models. Additional Tips Expect longer wash times. Check that all tools used with a low wattage, low energy consumption motor, your dishwasher. &#... a flat-blade screwdriver, turn the fasteners ¹⁄₄ turn to optical sensor. Do not use an extension cord. Certain models are equipped with your dishwasher washes longer to follow these possible solutions work, call . ■ Has the circuit breaker tripped or the...

Dimension Guide
Page 1
...specifications without notice. Use ¹⁄₂" (1.3 cm) minimum I.D. drain line fittings. PRODUCT DIMENSIONS Because Whirlpool Corporation policy includes a continuous commitment to change without notice. Copper wire only. copper tubing with grounding wire ...new drain hose is recommended that meets the wiring requirements for use with product. ® Undercounter Dishwasher PRODUCT MODEL NUMBERS WDF510PAY WDF530PAY WDF530PLY WDF530PSY WDF730PAY WDF750PAY WDF780SLY WDT710PAY WDT770PAY WDT790SAY WDT790SLY WDT910SAY WDT910SSY Electrical Requirements: 120-volt, 60...
...specifications without notice. Use ¹⁄₂" (1.3 cm) minimum I.D. drain line fittings. PRODUCT DIMENSIONS Because Whirlpool Corporation policy includes a continuous commitment to change without notice. Copper wire only. copper tubing with grounding wire ...new drain hose is recommended that meets the wiring requirements for use with product. ® Undercounter Dishwasher PRODUCT MODEL NUMBERS WDF510PAY WDF530PAY WDF530PLY WDF530PSY WDF730PAY WDF750PAY WDF780SLY WDT710PAY WDT770PAY WDT790SAY WDT790SLY WDT910SAY WDT910SSY Electrical Requirements: 120-volt, 60...
Dimension Guide
Page 2
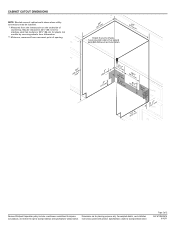
May be installed. ** Measured from narrowest point of opening. Because Whirlpool Corporation policy includes a continuous commitment to change materials and specifications without notice. Instructions packed with product. For complete details, see Installation our products, we reserve ... DIMENSIONS NOTE: Shaded areas of cabinet walls show where utility connections may be reduced to 33¹⁄₂" (85.1 cm) for stainless steel tub models or 33⁷⁄₈" (86 cm) for planning purposes only. Specifications subject to improve Dimensions are for plastic tub...
May be installed. ** Measured from narrowest point of opening. Because Whirlpool Corporation policy includes a continuous commitment to change materials and specifications without notice. Instructions packed with product. For complete details, see Installation our products, we reserve ... DIMENSIONS NOTE: Shaded areas of cabinet walls show where utility connections may be reduced to 33¹⁄₂" (85.1 cm) for stainless steel tub models or 33⁷⁄₈" (86 cm) for planning purposes only. Specifications subject to improve Dimensions are for plastic tub...
Warranty Information
Page 1
... to the Internet and you need further assistance, you can find your model number and serial number on the label located near the door on how to use of your major appliance, to Whirlpool within 30 days from your major appliance is used for Factory Specified Parts... and repair labor to correct defects in accordance with original model/serial numbers that is covered by Whirlpool. 5. WHIRLPOOL CORPORATION MAJOR APPLIANCE WARRANTY LIMITED WARRANTY For one year from the date of your major appliance if it was purchased....
... to the Internet and you need further assistance, you can find your model number and serial number on the label located near the door on how to use of your major appliance, to Whirlpool within 30 days from your major appliance is used for Factory Specified Parts... and repair labor to correct defects in accordance with original model/serial numbers that is covered by Whirlpool. 5. WHIRLPOOL CORPORATION MAJOR APPLIANCE WARRANTY LIMITED WARRANTY For one year from the date of your major appliance if it was purchased....


