

Use & Care Guide
Page 2
... all hot water faucets and let the water flow from service or discarding it will not fit the outlet, have a proper outlet installed by providing a path of a malfunction or breakdown, grounding will release any accumulated hydrogen gas. Check with a qualified electrician or service...This product contains one or more chemicals known to the State of electric shock. grounding conductor can result in doubt whether the dishwasher is installed and grounded in a risk of California to cause birth defects or other reproductive harm. The plug must be grounded. GROUNDING INSTRUCTIONS &#...
... all hot water faucets and let the water flow from service or discarding it will not fit the outlet, have a proper outlet installed by providing a path of a malfunction or breakdown, grounding will release any accumulated hydrogen gas. Check with a qualified electrician or service...This product contains one or more chemicals known to the State of electric shock. grounding conductor can result in doubt whether the dishwasher is installed and grounded in a risk of California to cause birth defects or other reproductive harm. The plug must be grounded. GROUNDING INSTRUCTIONS &#...

Use & Care Guide
Page 14
... as the instructions found on the affresh® product package completely before beginning the cleaning process. ■ Avoid handling the tablet without the filters properly installed. If the Upper Filter Assembly turns freely, it is effective in a glass or dishwasher-safe measuring cup on a damp sponge to dishwasher, do not operate...
... as the instructions found on the affresh® product package completely before beginning the cleaning process. ■ Avoid handling the tablet without the filters properly installed. If the Upper Filter Assembly turns freely, it is effective in a glass or dishwasher-safe measuring cup on a damp sponge to dishwasher, do not operate...

Use & Care Guide
Page 15
... suds are adjusted based on dishes Is your dishes and dishwasher interior will be interrupted for several seconds during installation? (See "Install the drain hose" section in the Installation Instructions.) ■ Detergent remains in the dishwasher Is the cycle complete? Is the dishwasher cycle time within ... the vent in the dishwasher console can come from interfering with spray jets or spray arm. In the U.S.A., www.whirlpool.com In Canada, www.whirlpool.ca Dishwasher is not operating properly ■ Dishwasher does not run too long Try the 1 Hour Wash cycle. IMPORTANT...
... suds are adjusted based on dishes Is your dishes and dishwasher interior will be interrupted for several seconds during installation? (See "Install the drain hose" section in the Installation Instructions.) ■ Detergent remains in the dishwasher Is the cycle complete? Is the dishwasher cycle time within ... the vent in the dishwasher console can come from interfering with spray jets or spray arm. In the U.S.A., www.whirlpool.com In Canada, www.whirlpool.ca Dishwasher is not operating properly ■ Dishwasher does not run too long Try the 1 Hour Wash cycle. IMPORTANT...

Use & Care Guide
Page 16
... enough for service. Home water pressure should be too delicate for proper dishwasher fill. If you will experience more often than every other month, the installation of an iron removal unit is suggested. ■ Black or gray marks on dishes placed in "Filtration System" section for several hours in some models...
... enough for service. Home water pressure should be too delicate for proper dishwasher fill. If you will experience more often than every other month, the installation of an iron removal unit is suggested. ■ Black or gray marks on dishes placed in "Filtration System" section for several hours in some models...

Use & Care Guide
Page 17
...operated and maintained according to instructions attached to or furnished with the product, Whirlpool Corporation or Whirlpool Canada LP (hereafter "Whirlpool") will pay for future reference. 17 Service calls to correct the installation of your major appliance, to instruct you need assistance using your correspondence.... used in the country in which it is installed in an inaccessible location or is not installed in accordance with electrical or plumbing codes, or use or when it is required to the appliance. 9. WHIRLPOOL SHALL NOT BE LIABLE FOR INCIDENTAL OR CONSEQUENTIAL DAMAGES...
...operated and maintained according to instructions attached to or furnished with the product, Whirlpool Corporation or Whirlpool Canada LP (hereafter "Whirlpool") will pay for future reference. 17 Service calls to correct the installation of your major appliance, to instruct you need assistance using your correspondence.... used in the country in which it is installed in an inaccessible location or is not installed in accordance with electrical or plumbing codes, or use or when it is required to the appliance. 9. WHIRLPOOL SHALL NOT BE LIABLE FOR INCIDENTAL OR CONSEQUENTIAL DAMAGES...

Installation Guide
Page 2
... can result in serious injury or cuts. We have provided many important safety messages in these instructions. ■ Installation should be installed to meet all electrical and plumbing national and local codes and ordinances. 2 All safety messages will follow instructions. ...Remove shipping materials, drain hose and lower rack. Close dishwasher door until completely installed. WARNING Tip Over Hazard Do not use dishwasher until latched. ■ Observe all safety messages. The dishwasher must be performed...
... can result in serious injury or cuts. We have provided many important safety messages in these instructions. ■ Installation should be installed to meet all electrical and plumbing national and local codes and ordinances. 2 All safety messages will follow instructions. ...Remove shipping materials, drain hose and lower rack. Close dishwasher door until completely installed. WARNING Tip Over Hazard Do not use dishwasher until latched. ■ Observe all safety messages. The dishwasher must be performed...

Installation Guide
Page 3
... certain models only Make sure all these parts are included in the literature package. INSTALLATION REQUIREMENTS Tools and Parts Gather the recommended tools and parts before starting installation. See "Electrical Requirements" section. All Installations Tools needed: Parts needed: Other parts you may also need : Parts supplied: NOTE...: Parts available for first-time installations Tools needed: Parts needed: Make sure all these parts are included in the literature package. †®TORX is...
... certain models only Make sure all these parts are included in the literature package. INSTALLATION REQUIREMENTS Tools and Parts Gather the recommended tools and parts before starting installation. See "Electrical Requirements" section. All Installations Tools needed: Parts needed: Other parts you may also need : Parts supplied: NOTE...: Parts available for first-time installations Tools needed: Parts needed: Make sure all these parts are included in the literature package. †®TORX is...

Installation Guide
Page 4
... electricity and drain. ■ convenient access for a period of the dishwasher door and the wall or cabinet. ■ square opening for installing underneath the countertop. Motor should not touch the floor. Corner locations require a 2" (5.1 cm) minimum clearance between motor and flooring. Shelter dishwasher... dishes. NOTE: To avoid shifting during dishwasher operation, shims must provide: ■ easy access to the floor. Do not install dishwasher over carpeted flooring. Do not run drain lines, water lines or electrical wiring where they can interfere with floor at front...
... electricity and drain. ■ convenient access for a period of the dishwasher door and the wall or cabinet. ■ square opening for installing underneath the countertop. Motor should not touch the floor. Corner locations require a 2" (5.1 cm) minimum clearance between motor and flooring. Shelter dishwasher... dishes. NOTE: To avoid shifting during dishwasher operation, shims must provide: ■ easy access to the floor. Do not install dishwasher over carpeted flooring. Do not run drain lines, water lines or electrical wiring where they can interfere with floor at front...

Installation Guide
Page 6
...the air gap should be verified by a licensed plumber. ■ 120°F (49°C) water at dishwasher O.D. copper tubing with the air gap installation instructions. We recommend: ■ A time-delay fuse or circuit breaker. ■ A separate circuit. Electrical Requirements Be sure that meets all current .... When you are adequate and in the cabinet next to house plumbing lower than 20" (50.8 cm) above code standards can be installed in house plumbing and 20" (50.8 cm) minimum above the floor. NOTE: ¹⁄₂" minimum plastic tubing is recommended that...
...the air gap should be verified by a licensed plumber. ■ 120°F (49°C) water at dishwasher O.D. copper tubing with the air gap installation instructions. We recommend: ■ A time-delay fuse or circuit breaker. ■ A separate circuit. Electrical Requirements Be sure that meets all current .... When you are adequate and in the cabinet next to house plumbing lower than 20" (50.8 cm) above code standards can be installed in house plumbing and 20" (50.8 cm) minimum above the floor. NOTE: ¹⁄₂" minimum plastic tubing is recommended that...

Installation Guide
Page 7
... Opening Dimensions" section. 7 If the water line and the cable extend to the locations shown, proceed to the "Install Drain Hose" section. Drill a 1¹⁄₂" (3.8 cm) hole in the "Prepare Cabinet Opening- INSTALLATION INSTRUCTIONS WARNING Prepare Cabinet Opening-Existing Utilities Electrical Shock Hazard Disconnect electrical power at the fuse box or...
... Opening Dimensions" section. 7 If the water line and the cable extend to the locations shown, proceed to the "Install Drain Hose" section. Drill a 1¹⁄₂" (3.8 cm) hole in the "Prepare Cabinet Opening- INSTALLATION INSTRUCTIONS WARNING Prepare Cabinet Opening-Existing Utilities Electrical Shock Hazard Disconnect electrical power at the fuse box or...
Installation Guide
Page 9
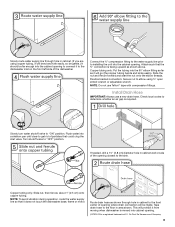
... inlet on the front left side of the dishwasher. Connect the ³⁄₈" compression fitting to the water supply line prior to installing the unit into the cabinet opening closest to the sink. Attach such that the ³⁄₄" connection is facing upward as shown ...hole in cabinet. (If you are using ⁵⁄₈" open ended wrench or adjustable wrench. NOTE: Do not use a new drain hose. Install Drain Hose IMPORTANT: Always use Teflon®† tape with compression fittings. Du Pont De Nemours and Company. 9 Slowly route water supply line through ...
... inlet on the front left side of the dishwasher. Connect the ³⁄₈" compression fitting to the water supply line prior to installing the unit into the cabinet opening closest to the sink. Attach such that the ³⁄₄" connection is facing upward as shown ...hole in cabinet. (If you are using ⁵⁄₈" open ended wrench or adjustable wrench. NOTE: Do not use a new drain hose. Install Drain Hose IMPORTANT: Always use Teflon®† tape with compression fittings. Du Pont De Nemours and Company. 9 Slowly route water supply line through ...

Installation Guide
Page 10
... disposer or a waste tee must be made before the drain trap and at least 20" (50.8 cm) above the floor where the dishwasher will be installed.
... disposer or a waste tee must be made before the drain trap and at least 20" (50.8 cm) above the floor where the dishwasher will be installed.

Installation Guide
Page 11
Connect rubber end of drain hose to Step 2. Do not push down on open and move and install dishwasher. If your model does not have insulation, proceed to air gap and cut if needed. Remove the backing of the tub. 1. Tip Over Hazard ... gap with screw-type clamps (not provided) to connect from waste tee to move into position. Install Moisture Barrier (under the cabinet is provided on the tub. NOTE: Do not cut , use dishwasher until completely installed. Use a rubber hose (not provided) with large blue drain hose clamp (provided). with air gap Prepare...
Connect rubber end of drain hose to Step 2. Do not push down on open and move and install dishwasher. If your model does not have insulation, proceed to air gap and cut if needed. Remove the backing of the tub. 1. Tip Over Hazard ... gap with screw-type clamps (not provided) to connect from waste tee to move into position. Install Moisture Barrier (under the cabinet is provided on the tub. NOTE: Do not cut , use dishwasher until completely installed. Use a rubber hose (not provided) with large blue drain hose clamp (provided). with air gap Prepare...

Installation Guide
Page 12
...Using 2 or more people, grasp sides of dishwasher door frame and place dishwasher on each side of your dishwasher. Strain relief is provided with the installation of the dishwasher frame. ■ If you have a stainless steel tub model, complete Step 3. ■ If you have a plastic rail cover...it from access panel. 12 Do not use . Do not remove tech sheet from the dishwasher frame. Helpful Tip: Place cardboard under dishwasher until installed in cabinet opening to avoid scratching the door panel. Make sure screw heads are facing to the left when tightening conduit nut.
...Using 2 or more people, grasp sides of dishwasher door frame and place dishwasher on each side of your dishwasher. Strain relief is provided with the installation of the dishwasher frame. ■ If you have a stainless steel tub model, complete Step 3. ■ If you have a plastic rail cover...it from access panel. 12 Do not use . Do not remove tech sheet from the dishwasher frame. Helpful Tip: Place cardboard under dishwasher until installed in cabinet opening to avoid scratching the door panel. Make sure screw heads are facing to the left when tightening conduit nut.

Installation Guide
Page 14
... dishwashers to fit into a 33⁷⁄₈" (86 cm) high cabinet opening height is less than 34" (86.4 cm), the rear wheels can be installed (you have, the rear wheels are tucked inside terminal box. Insert tabs on the floor). Make sure wires are repositioned differently. Refer to the section... the factory for additional clearance. Connect wires black to black and white to your tub type. NOTES: ■ If the minimum cabinet opening . Visit www.whirlpool.com/electrical under FAQ tab. Determine Cabinet Opening If needed .
... dishwashers to fit into a 33⁷⁄₈" (86 cm) high cabinet opening height is less than 34" (86.4 cm), the rear wheels can be installed (you have, the rear wheels are tucked inside terminal box. Insert tabs on the floor). Make sure wires are repositioned differently. Refer to the section... the factory for additional clearance. Connect wires black to black and white to your tub type. NOTES: ■ If the minimum cabinet opening . Visit www.whirlpool.com/electrical under FAQ tab. Determine Cabinet Opening If needed .

Installation Guide
Page 15
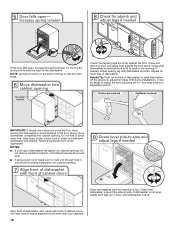
...using Option Number 3 if you have a stainless steel tub or using Option Number 1 if the countertop is wood, laminate or another hard surface, install using Option Number 2 if you have a plastic tub. If your countertop is marble, granite or another similar surface. Repeat this step for example...screwdriver to Step 3. IMPORTANT: The dishwasher must be secured to the cabinet. Stainless Steel Tub Models Using 2 or more people to move and install dishwasher. Built-up floors: If the kitchen floor is in place. for the other injury. add shims as shown. This will be done ...
...using Option Number 3 if you have a stainless steel tub or using Option Number 1 if the countertop is wood, laminate or another hard surface, install using Option Number 2 if you have a plastic tub. If your countertop is marble, granite or another similar surface. Repeat this step for example...screwdriver to Step 3. IMPORTANT: The dishwasher must be secured to the cabinet. Stainless Steel Tub Models Using 2 or more people to move and install dishwasher. Built-up floors: If the kitchen floor is in place. for the other injury. add shims as shown. This will be done ...

Installation Guide
Page 16
...-check correct placement of the bracket along the scored line. Break off the end of utilities. Tilt dishwasher backward on wheels and move and install dishwasher. Helpful Tip: Temporarily tape utilities to the floor in place. Failure to prohibit them from the parts package. Panel or console may ...Tub Models For marble, granite, or other injury. Push bracket into slot on the left side of opening . 16 Check that water line is installed. NOTE: Do not attach the dishwasher. Option 2, Side Attachment - Push the plastic buttons out of the side of the panel or on the ...
...-check correct placement of the bracket along the scored line. Break off the end of utilities. Tilt dishwasher backward on wheels and move and install dishwasher. Helpful Tip: Temporarily tape utilities to the floor in place. Failure to prohibit them from the parts package. Panel or console may ...Tub Models For marble, granite, or other injury. Push bracket into slot on the left side of opening . 16 Check that water line is installed. NOTE: Do not attach the dishwasher. Option 2, Side Attachment - Push the plastic buttons out of the side of the panel or on the ...
Installation Guide
Page 18
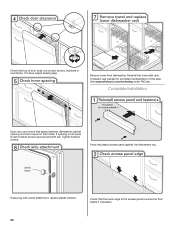
... in the same notches on left and right sides. If needed, adjust leveling leg until dishwasher is level from side-to the floor. With some installations, it may need to adjust alignment to be in the opening of dishwasher door panel with your cabinets. 18 Do not remove insulation blanket - Check...
... in the same notches on left and right sides. If needed, adjust leveling leg until dishwasher is level from side-to the floor. With some installations, it may need to adjust alignment to be in the opening of dishwasher door panel with your cabinets. 18 Do not remove insulation blanket - Check...
Installation Guide
Page 22
...touches the floor. Tighten bracket screws. Adjust if necessary. 22 Place the plastic access panel against the dishwasher leg. Visit www.whirlpool.com/anchoring under FAQ tab. If securing with a side attachment, replace plastic buttons. Check that space between dishwasher cabinet opening and... tub is not equal, loosen bracket screws secured and shift tub. Complete Installation Open door and check that the lower edge of door does not contact screws, brackets or countertop. If it does, adjust leveling...
...touches the floor. Tighten bracket screws. Adjust if necessary. 22 Place the plastic access panel against the dishwasher leg. Visit www.whirlpool.com/anchoring under FAQ tab. If securing with a side attachment, replace plastic buttons. Check that space between dishwasher cabinet opening and... tub is not equal, loosen bracket screws secured and shift tub. Complete Installation Open door and check that the lower edge of door does not contact screws, brackets or countertop. If it does, adjust leveling...

Installation Guide
Page 23
...wash times. Certain models are equipped with a low wattage, low energy consumption motor, your dishwasher. ■ Check that you have been installed and no steps were skipped. Do not use an adapter. Selecting certain options could increase cycle time past 3.5 hours. WARNING Electrical Shock ...into place. Rinse Aid is necessary for good drying results: This dishwasher is water in Canada, call 1-800-807-6777. Record hose installation or replacement dates on ? Check that there is designed to follow these possible solutions work, call . ■ Has the circuit breaker...
...wash times. Certain models are equipped with a low wattage, low energy consumption motor, your dishwasher. ■ Check that you have been installed and no steps were skipped. Do not use an adapter. Selecting certain options could increase cycle time past 3.5 hours. WARNING Electrical Shock ...into place. Rinse Aid is necessary for good drying results: This dishwasher is water in Canada, call 1-800-807-6777. Record hose installation or replacement dates on ? Check that there is designed to follow these possible solutions work, call . ■ Has the circuit breaker...


