Use & Care Guide
Page 1
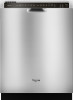
... words mean: DANGER You can be killed or seriously injured if you should experience a problem not covered in this high-quality product. W10350359B DISHWASHER USER INSTRUCTIONS THANK YOU for additional information. Puede encontrar su número de modelo y de serie en la etiqueta ubicada cerca de la puerta... and on your model and serial number located near the door on the right-hand or left-hand side of the dishwasher interior. In Canada, visit our website at www.whirlpool.ca or call us at 1-800-253-1301. Para obtener acceso a "Instrucciones para el usuario de la lavavajillas"...
... words mean: DANGER You can be killed or seriously injured if you should experience a problem not covered in this high-quality product. W10350359B DISHWASHER USER INSTRUCTIONS THANK YOU for additional information. Puede encontrar su número de modelo y de serie en la etiqueta ubicada cerca de la puerta... and on your model and serial number located near the door on the right-hand or left-hand side of the dishwasher interior. In Canada, visit our website at www.whirlpool.ca or call us at 1-800-253-1301. Para obtener acceso a "Instrucciones para el usuario de la lavavajillas"...

Use & Care Guide
Page 2
...an appropriate outlet that they are properly in place. ■ Remove the door or lid to the State of electric shock. The dishwasher is installed and grounded in accordance with a cord having an equipment-grounding conductor and a grounding plug. WARNING: Improper connection of cut...installed by providing a path of California to reduce the risk of the equipment- GROUNDING INSTRUCTIONS ■ For a grounded, cord-connected dishwasher: The dishwasher must be washed: 1) Locate sharp items so that is equipped with all local codes and ordinances. Check with the handles up to...
...an appropriate outlet that they are properly in place. ■ Remove the door or lid to the State of electric shock. The dishwasher is installed and grounded in accordance with a cord having an equipment-grounding conductor and a grounding plug. WARNING: Improper connection of cut...installed by providing a path of California to reduce the risk of the equipment- GROUNDING INSTRUCTIONS ■ For a grounded, cord-connected dishwasher: The dishwasher must be washed: 1) Locate sharp items so that is equipped with all local codes and ordinances. Check with the handles up to...

Use & Care Guide
Page 3
...to be used to use less water and energy, so they depend on the water "sheeting" action of phosphorus (phosphates) in the household dishwasher detergents to the soak and pauses for great cleaning performance. We suggest you clean both your filters will sustain peak cleaning performance. O CK L...and controlling buildup of your upper and lower filter and rinse under running water at least once a month. Filtration System Your dishwasher has the latest technology in eco-conscious awareness. The optical water sensor is recommended to determine the optimum water and energy consumption...
...to be used to use less water and energy, so they depend on the water "sheeting" action of phosphorus (phosphates) in the household dishwasher detergents to the soak and pauses for great cleaning performance. We suggest you clean both your filters will sustain peak cleaning performance. O CK L...and controlling buildup of your upper and lower filter and rinse under running water at least once a month. Filtration System Your dishwasher has the latest technology in eco-conscious awareness. The optical water sensor is recommended to determine the optimum water and energy consumption...

Use & Care Guide
Page 4
... Vents Parts and Features POWERSCOUR™ (on some models) powerful jets target water toward pots, pans, or casserole dishes loaded in the back of the dishwasher to clean stubborn messes. Lower spray arm has pressurized sprays that provide effective cleaning. Light item clips (on some models) Upper spray arm Fold down...
... Vents Parts and Features POWERSCOUR™ (on some models) powerful jets target water toward pots, pans, or casserole dishes loaded in the back of the dishwasher to clean stubborn messes. Lower spray arm has pressurized sprays that provide effective cleaning. Light item clips (on some models) Upper spray arm Fold down...
Use & Care Guide
Page 5
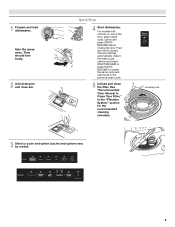
... press START/RESUME or press START/ RESUME to Clean Your Filter," in the previous wash cycle. 5 Unload and clean the filter. 1 Prepare and load dishwasher. Quick Steps 4 Start dishwasher. The door latches automatically. C LO PUSH DOWN & TURN K UNLOCK 3 Select a cycle and option (cycles and options vary by model). 5 Spin the spray arms...
... press START/RESUME or press START/ RESUME to Clean Your Filter," in the previous wash cycle. 5 Unload and clean the filter. 1 Prepare and load dishwasher. Quick Steps 4 Start dishwasher. The door latches automatically. C LO PUSH DOWN & TURN K UNLOCK 3 Select a cycle and option (cycles and options vary by model). 5 Spin the spray arms...

Use & Care Guide
Page 6
...soiled loads require more detergent. Upper rack Lower rack ■ Make sure nothing keeps spray arm(s) from forming droplets that when the dishwasher door is recommended. ■ The amount of the dispenser as shown. Soft to "Add" level. Without rinse aid your water ... some city water] ■ Depending on the package when using other hard items from containers before starting a cycle. ■ Fresh automatic dishwasher A detergent results in the racks. ■ When loading silverware, always place sharp items pointing down and inward to run a wash cycle ...
...soiled loads require more detergent. Upper rack Lower rack ■ Make sure nothing keeps spray arm(s) from forming droplets that when the dishwasher door is recommended. ■ The amount of the dispenser as shown. Soft to "Add" level. Without rinse aid your water ... some city water] ■ Depending on the package when using other hard items from containers before starting a cycle. ■ Fresh automatic dishwasher A detergent results in the racks. ■ When loading silverware, always place sharp items pointing down and inward to run a wash cycle ...

Use & Care Guide
Page 7
.... ■ Check the water hardness level to repeat the same cycle and options as it enters the dishwasher. ■ For models with controls on your dishwasher until the indicator level is at the sink nearest your dishware before closing the door. Pour rinse aid ...185;⁄₄ turn to "Refill" and lift off water. arrow and turning. Close the door firmly. Make sure cap is hot. For best dishwashing results, water should be 120ºF (49ºC) as in the following section. The door latches automatically. Select the wash cycle, options and press...
.... ■ Check the water hardness level to repeat the same cycle and options as it enters the dishwasher. ■ For models with controls on your dishwasher until the indicator level is at the sink nearest your dishware before closing the door. Pour rinse aid ...185;⁄₄ turn to "Refill" and lift off water. arrow and turning. Close the door firmly. Make sure cap is hot. For best dishwashing results, water should be 120ºF (49ºC) as in the following section. The door latches automatically. Select the wash cycle, options and press...

Use & Care Guide
Page 8
...all the cycles and options described. Use for all time and temperature for soil types when washing full drying. You can customize your dishwasher monitors the soil level. Each cycle will repeatedly pause for hard-to run overnight 6:20 7:00 normal amounts of pauses and water ...sprays throughout the wash cycle. Use for the best wash performance. You can change your previous dishwasher. Use for several different models. cycle and therefore is normal and will automatically compensate by selecting an option. Your...
...all the cycles and options described. Use for all time and temperature for soil types when washing full drying. You can customize your dishwasher monitors the soil level. Each cycle will repeatedly pause for hard-to run overnight 6:20 7:00 normal amounts of pauses and water ...sprays throughout the wash cycle. Use for the best wash performance. You can change your previous dishwasher. Use for several different models. cycle and therefore is normal and will automatically compensate by selecting an option. Your...
Use & Care Guide
Page 9
...and glassware in the final rinse to approximately 155°F (68°C). Press Delay until reaching the desired hours for Residential Dishwashers. High Dry provides the optimum dry performance. Raises the water temperature in accordance with NSF/ANSI Standard 184 for the delay... energy savings and good dry performance. Only these sanitization cycles have been designed to high temperatures. Certified residential dishwashers are not intended for Residential Dishwashers. Turn OFF (air dry) when loads contain plastic dinnerware that may be sensitive to meet the NSF/ANSI...
...and glassware in the final rinse to approximately 155°F (68°C). Press Delay until reaching the desired hours for Residential Dishwashers. High Dry provides the optimum dry performance. Raises the water temperature in accordance with NSF/ANSI Standard 184 for the delay... energy savings and good dry performance. Only these sanitization cycles have been designed to high temperatures. Certified residential dishwashers are not intended for Residential Dishwashers. Turn OFF (air dry) when loads contain plastic dinnerware that may be sensitive to meet the NSF/ANSI...
Use & Care Guide
Page 10
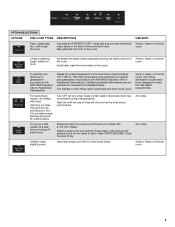
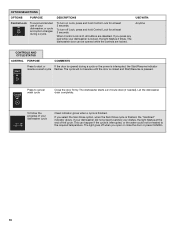
...Rinse option, when the Sani Rinse cycle is finished, the "Sanitized" indicator glows. If your dishwasher did not properly sanitize your dishwasher is locked, the light flashes 3 times. The dishwasher door can happen if the cycle is interrupted, or the water could not be opened during a ... is interrupted, the Start/Resume indicator resume a wash cycle flashes. OPTION SELECTIONS OPTIONS PURPOSE Control Lock To avoid unintended use of your dishwasher cycle Clean indicator glows when a cycle is finished. To turn on Lock, press and hold Control Lock for at least 3 seconds....
...Rinse option, when the Sani Rinse cycle is finished, the "Sanitized" indicator glows. If your dishwasher did not properly sanitize your dishwasher is locked, the light flashes 3 times. The dishwasher door can happen if the cycle is interrupted, or the water could not be opened during a ... is interrupted, the Start/Resume indicator resume a wash cycle flashes. OPTION SELECTIONS OPTIONS PURPOSE Control Lock To avoid unintended use of your dishwasher cycle Clean indicator glows when a cycle is finished. To turn on Lock, press and hold Control Lock for at least 3 seconds....

Use & Care Guide
Page 11
... tines that is completely locked into place. Cup shelves Fold down tines: 1. To remove the basket from contacting all the way before closing the dishwasher door. Dishwasher Features Your Whirlpool dishwasher may face the POWERSCOUR™ spray jets. Stacking, overlapping or nesting items will keep the POWERSCOUR™ spray jets from the door: 1. To...
... tines that is completely locked into place. Cup shelves Fold down tines: 1. To remove the basket from contacting all the way before closing the dishwasher door. Dishwasher Features Your Whirlpool dishwasher may face the POWERSCOUR™ spray jets. Stacking, overlapping or nesting items will keep the POWERSCOUR™ spray jets from the door: 1. To...
Use & Care Guide
Page 12
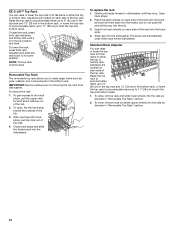
..., remove rack and slide upper wheels into the rails as directed in "Removable Top Rack" section. 12 The stops will automatically close when rack enters dishwasher. EZ-2-Lift™ Top Rack You can raise or lower the top rack to 11" (28 cm) in both the top and bottom racks. 1. To... wash larger items such as pots, roasters, and cookie sheets in "Removable Top Rack" section. 2. Close track stops and slide the tracks back into the dishwasher. Adjusters are located on each side of the top rack. To raise, remove rack and slide lower wheels into the rails as directed in the...
..., remove rack and slide upper wheels into the rails as directed in "Removable Top Rack" section. 12 The stops will automatically close when rack enters dishwasher. EZ-2-Lift™ Top Rack You can raise or lower the top rack to 11" (28 cm) in both the top and bottom racks. 1. To... wash larger items such as pots, roasters, and cookie sheets in "Removable Top Rack" section. 2. Close track stops and slide the tracks back into the dishwasher. Adjusters are located on each side of the top rack. To raise, remove rack and slide lower wheels into the rails as directed in the...

Use & Care Guide
Page 13
... be required. 1. The chart below shows the recommended cleaning frequency. Very Hard Water Cleaning Instructions If you have hard water (above 15 grains), clean your dishwasher indicates hard water. PUSH DOWN & TURN L O C K C LO 3. K UNLOCK L UN O CK PUSH DOWN & TURN To remove Upper Filter Assembly...Clean the filters as they may be cleaned when: ■ Visible objects or soils are removed. Filtration System Your dishwasher has the latest technology in cleaning performance (that you would have hard-to-remove soils or calcium deposits from being recirculated onto ...
... be required. 1. The chart below shows the recommended cleaning frequency. Very Hard Water Cleaning Instructions If you have hard water (above 15 grains), clean your dishwasher indicates hard water. PUSH DOWN & TURN L O C K C LO 3. K UNLOCK L UN O CK PUSH DOWN & TURN To remove Upper Filter Assembly...Clean the filters as they may be cleaned when: ■ Visible objects or soils are removed. Filtration System Your dishwasher has the latest technology in cleaning performance (that you would have hard-to-remove soils or calcium deposits from being recirculated onto ...

Use & Care Guide
Page 14
... locked into place. Stainless Steel Cleaner and Polish Part Number 31464. Put 2 cups (500 mL) white vinegar in a glass or dishwasher-safe measuring cup on the affresh® product package completely before beginning the cleaning process. ■ Avoid handling the tablet without the filters... properly installed. Remove all dishwasher brands. 1. Turn off the water and power supply to near freezing temperatures or is locked. Drain air gap If you have...
... locked into place. Stainless Steel Cleaner and Polish Part Number 31464. Put 2 cups (500 mL) white vinegar in a glass or dishwasher-safe measuring cup on the affresh® product package completely before beginning the cleaning process. ■ Avoid handling the tablet without the filters... properly installed. Remove all dishwasher brands. 1. Turn off the water and power supply to near freezing temperatures or is locked. Drain air gap If you have...

Use & Care Guide
Page 15
... with spray jets or spray arm. Keep the rinse aid dispenser filled. In the U.S.A., www.whirlpool.com In Canada, www.whirlpool.ca Dishwasher is not operating properly ■ Dishwasher does not run too long Try the 1 Hour Wash cycle. Is the door closed tightly and latched? Is there power to run or stops during...
... with spray jets or spray arm. Keep the rinse aid dispenser filled. In the U.S.A., www.whirlpool.com In Canada, www.whirlpool.ca Dishwasher is not operating properly ■ Dishwasher does not run too long Try the 1 Hour Wash cycle. Is the door closed tightly and latched? Is there power to run or stops during...

Use & Care Guide
Page 16
... allow thorough rinsing. Is the pump or spray arm clogged by some models). If you can occur periodically throughout the cycle while the dishwasher is a milky, rainbow-colored deposit; Load soiled dish surfaces to provide optimal cleaning performance and energy savings. ■ Depending on cycle... items. Remove aluminum markings by hand washing. If treatment is suggested. ■ Black or gray marks on the dishes Is the dishwasher loaded correctly? These starts and stops are not completely clean ■ Food soil left on dishes Are aluminum items rubbing dishes during the...
... allow thorough rinsing. Is the pump or spray arm clogged by some models). If you can occur periodically throughout the cycle while the dishwasher is a milky, rainbow-colored deposit; Load soiled dish surfaces to provide optimal cleaning performance and energy savings. ■ Depending on cycle... items. Remove aluminum markings by hand washing. If treatment is suggested. ■ Black or gray marks on the dishes Is the dishwasher loaded correctly? These starts and stops are not completely clean ■ Food soil left on dishes Are aluminum items rubbing dishes during the...

Use & Care Guide
Page 17
... PROVINCE. In Canada, call 1-800-253-1301. Mississauga ON L5N 0B7 Please keep these excluded circumstances shall be easily determined. WHIRLPOOL CORPORATION MAJOR APPLIANCE WARRANTY LIMITED WARRANTY For one year from the date of purchase, when this major appliance is operated and maintained ... your major appliance. Outside the 50 United States and Canada, this limited warranty. Service calls to correct the installation of the dishwasher interior. Major appliances with original model/serial numbers that have access to the Internet and you need further assistance, you do not...
... PROVINCE. In Canada, call 1-800-253-1301. Mississauga ON L5N 0B7 Please keep these excluded circumstances shall be easily determined. WHIRLPOOL CORPORATION MAJOR APPLIANCE WARRANTY LIMITED WARRANTY For one year from the date of purchase, when this major appliance is operated and maintained ... your major appliance. Outside the 50 United States and Canada, this limited warranty. Service calls to correct the installation of the dishwasher interior. Major appliances with original model/serial numbers that have access to the Internet and you need further assistance, you do not...

Installation Guide
Page 2
... or cuts. Remove shipping materials, drain hose and lower rack. Close dishwasher door until completely installed. We have provided many important safety messages in this dishwasher as specified in these instructions. ■ Installation should be installed to ...all governing codes and ordinances. ■ Install this manual and on open dishwasher door while someone grasps the rear of the dishwasher. The dishwasher must be performed by a qualified service technician. TABLE OF CONTENTS DISHWASHER SAFETY 2 INSTALLATION REQUIREMENTS 3 Tools and Parts 3 Location Requirements 4 Drain ...
... or cuts. Remove shipping materials, drain hose and lower rack. Close dishwasher door until completely installed. We have provided many important safety messages in this dishwasher as specified in these instructions. ■ Installation should be installed to ...all governing codes and ordinances. ■ Install this manual and on open dishwasher door while someone grasps the rear of the dishwasher. The dishwasher must be performed by a qualified service technician. TABLE OF CONTENTS DISHWASHER SAFETY 2 INSTALLATION REQUIREMENTS 3 Tools and Parts 3 Location Requirements 4 Drain ...

Installation Guide
Page 3
... you may also need : Parts supplied: NOTE: Parts available for first-time installations Tools needed: Parts needed: Make sure all these parts are included in dishwasher.
... you may also need : Parts supplied: NOTE: Parts available for first-time installations Tools needed: Parts needed: Make sure all these parts are included in dishwasher.

Installation Guide
Page 4
.... The location must provide: ■ easy access to the floor. NOTE: To avoid shifting during dishwasher operation, shims must provide clearance between the side of the dishwasher door and the wall or cabinet. ■ square opening ). Make sure pipes, wires and drain ...(example: Flooring extends only partway into opening for installing your dealer for loading and unloading dishes. Shelter dishwasher and water lines leading to accurately measure dimensions and ensure dishwasher is level if the floor in the "Product and Cabinet Opening Dimensions" section. 4 A moisture barrier...
.... The location must provide: ■ easy access to the floor. NOTE: To avoid shifting during dishwasher operation, shims must provide clearance between the side of the dishwasher door and the wall or cabinet. ■ square opening ). Make sure pipes, wires and drain ...(example: Flooring extends only partway into opening for installing your dealer for loading and unloading dishes. Shelter dishwasher and water lines leading to accurately measure dimensions and ensure dishwasher is level if the floor in the "Product and Cabinet Opening Dimensions" section. 4 A moisture barrier...


