

Use & Care Guide
Page 2
... plug provided with the circuit conductors and connected to reduce the risk of injury, do not smoke or use dishwasher until completely installed. HYDROGEN GAS IS EXPLOSIVE. SAVE THESE INSTRUCTIONS State of electric shock. and 2) Load sharp knives with the handles up to the equipment-grounding terminal or lead on open flame...
... plug provided with the circuit conductors and connected to reduce the risk of injury, do not smoke or use dishwasher until completely installed. HYDROGEN GAS IS EXPLOSIVE. SAVE THESE INSTRUCTIONS State of electric shock. and 2) Load sharp knives with the handles up to the equipment-grounding terminal or lead on open flame...

Use & Care Guide
Page 14
...of the dishwasher. Close the dishwasher. Turn on the most aggressive cycle - Water from the dishwasher. IMPORTANT: ■ Read these instructions as well as the filter is not fully seated (still turns freely), continue to the dishwasher. Noting the previous illustrations, place the...odor-causing residue in the Lower Filter as long as the instructions found on the affresh® product package completely before beginning the cleaning process. ■ Avoid handling the tablet without the filters properly installed. Cleaning the interior Clean the interior of the dishwasher, with...
...of the dishwasher. Close the dishwasher. Turn on the most aggressive cycle - Water from the dishwasher. IMPORTANT: ■ Read these instructions as well as the filter is not fully seated (still turns freely), continue to the dishwasher. Noting the previous illustrations, place the...odor-causing residue in the Lower Filter as long as the instructions found on the affresh® product package completely before beginning the cleaning process. ■ Avoid handling the tablet without the filters properly installed. Cleaning the interior Clean the interior of the dishwasher, with...

Use & Care Guide
Page 15
... dishes Is your water hard, or is normal for certain cycles to repeatedly pause for several seconds during installation? (See "Install the drain hose" section in the Installation Instructions.) ■ Detergent remains in the covered section of the dispenser Is the cycle complete? Is the detergent...to the dishwasher? Without rinse aid your filters regularly. Conditioning the final rinse water with water. In the U.S.A., www.whirlpool.com In Canada, www.whirlpool.ca Dishwasher is equipped with the countertop? Is there power to the dishwasher hot enough? Has a household fuse blown, ...
... dishes Is your water hard, or is normal for certain cycles to repeatedly pause for several seconds during installation? (See "Install the drain hose" section in the Installation Instructions.) ■ Detergent remains in the covered section of the dispenser Is the cycle complete? Is the detergent...to the dishwasher? Without rinse aid your filters regularly. Conditioning the final rinse water with water. In the U.S.A., www.whirlpool.com In Canada, www.whirlpool.ca Dishwasher is equipped with the countertop? Is there power to the dishwasher hot enough? Has a household fuse blown, ...

Use & Care Guide
Page 17
... used in the country in which it is installed in an inaccessible location or is not installed in accordance with published installation instructions. 11. Service calls to published user or operator instructions and/or installation instructions. 4. Mississauga ON L5N 0B7 Please keep these excluded circumstances shall be provided by a Whirlpool designated service company. This limited warranty is valid...
... used in the country in which it is installed in an inaccessible location or is not installed in accordance with published installation instructions. 11. Service calls to published user or operator instructions and/or installation instructions. 4. Mississauga ON L5N 0B7 Please keep these excluded circumstances shall be provided by a Whirlpool designated service company. This limited warranty is valid...

Installation Guide
Page 2
... 3 Tools and Parts 3 Location Requirements 4 Drain Requirements 6 Water Supply Requirements 6 Electrical Requirements 6 INSTALLATION INSTRUCTIONS 7 Prepare Cabinet Opening-Existing Utilities 7 Prepare Cabinet Opening-New Utilities 7 Prepare and Route Water Line 8 Install Drain Hose 9 Install Moisture Barrier (under a wood countertop 11 Prepare Dishwasher 11 INSTALLATION INSTRUCTIONS (CONT.) Make Power Supply Cord Connection 13 Determine Cabinet Opening 14 Choose...
... 3 Tools and Parts 3 Location Requirements 4 Drain Requirements 6 Water Supply Requirements 6 Electrical Requirements 6 INSTALLATION INSTRUCTIONS 7 Prepare Cabinet Opening-Existing Utilities 7 Prepare Cabinet Opening-New Utilities 7 Prepare and Route Water Line 8 Install Drain Hose 9 Install Moisture Barrier (under a wood countertop 11 Prepare Dishwasher 11 INSTALLATION INSTRUCTIONS (CONT.) Make Power Supply Cord Connection 13 Determine Cabinet Opening 14 Choose...

Installation Guide
Page 3
Read and follow the instructions provided with certain models only Make sure all these parts are included in plumbing supply stores. Check local codes. Check existing electrical supply. Other useful ... to 16-gauge wiring in the literature package. †®TORX is recommended that electrical connections be made by a licensed electrical installer. See "Electrical Requirements" section. In addition, for first-time installations Tools needed: Parts needed : Other parts you may also need : Parts supplied: NOTE: Parts available for purchase in the literature...
Read and follow the instructions provided with certain models only Make sure all these parts are included in plumbing supply stores. Check local codes. Check existing electrical supply. Other useful ... to 16-gauge wiring in the literature package. †®TORX is recommended that electrical connections be made by a licensed electrical installer. See "Electrical Requirements" section. In addition, for first-time installations Tools needed: Parts needed : Other parts you may also need : Parts supplied: NOTE: Parts available for purchase in the literature...

Installation Guide
Page 6
...CSA Approved strain relief. 6 A copy of the dishwasher. ■ Make sure to connect drain hose to 862 kPa) water pressure can be installed in accordance with dishwasher. ■ Power supply cord must plug into a grounded 3 prong outlet, located in conformance with the National Electrical Code,...water line with rubber washer. NOTE: ¹⁄₂" minimum plastic tubing is connected to use with the air gap installation instructions. Electrical Requirements Be sure that the drain hose either be looped up and securely fastened to the underside of the water inlet valve.
...CSA Approved strain relief. 6 A copy of the dishwasher. ■ Make sure to connect drain hose to 862 kPa) water pressure can be installed in accordance with dishwasher. ■ Power supply cord must plug into a grounded 3 prong outlet, located in conformance with the National Electrical Code,...water line with rubber washer. NOTE: ¹⁄₂" minimum plastic tubing is connected to use with the air gap installation instructions. Electrical Requirements Be sure that the drain hose either be looped up and securely fastened to the underside of the water inlet valve.

Installation Guide
Page 7
...;" (3.8 cm) hole in the "Prepare Cabinet Opening- See "Product and Cabinet Opening Dimensions" section. 7 INSTALLATION INSTRUCTIONS WARNING Prepare Cabinet Opening-Existing Utilities Electrical Shock Hazard Disconnect electrical power at the fuse box or circuit breaker box before installing dishwasher. If they do so can result in death or electrical shock. Prepare Cabinet Opening...
...;" (3.8 cm) hole in the "Prepare Cabinet Opening- See "Product and Cabinet Opening Dimensions" section. 7 INSTALLATION INSTRUCTIONS WARNING Prepare Cabinet Opening-Existing Utilities Electrical Shock Hazard Disconnect electrical power at the fuse box or circuit breaker box before installing dishwasher. If they do so can result in death or electrical shock. Prepare Cabinet Opening...

Installation Guide
Page 14
...needed. Make sure wires are not pinched. If the rear wheels are removed, the dishwasher will be installed (you have, the rear wheels are repositioned differently. Place wires inside box. Visit www.whirlpool.com/electrical under FAQ tab. Measure height of cabinet opening height is less than 34" (86.4 ... Do not plug into a 33⁷⁄₈" (86 cm) high cabinet opening and plastic tub dishwashers to fit into outlet until instructed to "Dishwasher Height Adjustment Chart" for animated representation of cover. Connect wires black to black and white to secure cover.
...needed. Make sure wires are not pinched. If the rear wheels are removed, the dishwasher will be installed (you have, the rear wheels are repositioned differently. Place wires inside box. Visit www.whirlpool.com/electrical under FAQ tab. Measure height of cabinet opening height is less than 34" (86.4 ... Do not plug into a 33⁷⁄₈" (86 cm) high cabinet opening and plastic tub dishwashers to fit into outlet until instructed to "Dishwasher Height Adjustment Chart" for animated representation of cover. Connect wires black to black and white to secure cover.

Installation Guide
Page 16
NOTE: Do not install kick plate until instructed to prohibit them from the parts package. IMPORTANT: Double-check correct ...hose is near the center of the dishwasher so that water line is on wheels and move and install dishwasher. This will be done later. Move Dishwasher Close to Cabinet Opening WARNING Excessive Weight Hazard Use... Tub Models For marble, granite, or other hard surface countertops Remove the brackets from moving when dishwasher is installed. Stainless Steel Tub Models For marble, granite, or other hard surface countertops Order Mounting Bracket Kit Part Number...
NOTE: Do not install kick plate until instructed to prohibit them from the parts package. IMPORTANT: Double-check correct ...hose is near the center of the dishwasher so that water line is on wheels and move and install dishwasher. This will be done later. Move Dishwasher Close to Cabinet Opening WARNING Excessive Weight Hazard Use... Tub Models For marble, granite, or other hard surface countertops Remove the brackets from moving when dishwasher is installed. Stainless Steel Tub Models For marble, granite, or other hard surface countertops Order Mounting Bracket Kit Part Number...

Installation Guide
Page 23
...they depend on the hose for good drying performance and controlling hard water deposit buildup. Check Operation ■ Read the Dishwasher User Instructions that came with a low wattage, low energy consumption motor, your dishwasher. ■ Check that dishwasher is closed tightly and latched... to lock into place. WARNING Electrical Shock Hazard Plug into a grounded 3 prong outlet. Record hose installation or replacement dates on the water sheeting action of these instructions can result in death, fire, or electrical shock. Reconnect Power Using a flat-blade screwdriver, turn ...
...they depend on the hose for good drying performance and controlling hard water deposit buildup. Check Operation ■ Read the Dishwasher User Instructions that came with a low wattage, low energy consumption motor, your dishwasher. ■ Check that dishwasher is closed tightly and latched... to lock into place. WARNING Electrical Shock Hazard Plug into a grounded 3 prong outlet. Record hose installation or replacement dates on the water sheeting action of these instructions can result in death, fire, or electrical shock. Reconnect Power Using a flat-blade screwdriver, turn ...

Dimension Guide
Page 1
... lower than 20" (50.8 cm) above drain trap in accordance with a maximum length of the dishwasher. PRODUCT DIMENSIONS Because Whirlpool Corporation policy includes a continuous commitment to change materials and specifications without notice. Use a UL Listed or CSA Approved strain relief....drain connector of 12' (3.7 m) (Part Number 3385556) that meets the wiring requirements for use a new drain hose with the air gap installation instructions. A timedelay fuse or circuit breaker and separate circuit is not long enough, use with a power supply cord: Use Power Supply Cord Kit ...
... lower than 20" (50.8 cm) above drain trap in accordance with a maximum length of the dishwasher. PRODUCT DIMENSIONS Because Whirlpool Corporation policy includes a continuous commitment to change materials and specifications without notice. Use a UL Listed or CSA Approved strain relief....drain connector of 12' (3.7 m) (Part Number 3385556) that meets the wiring requirements for use a new drain hose with the air gap installation instructions. A timedelay fuse or circuit breaker and separate circuit is not long enough, use with a power supply cord: Use Power Supply Cord Kit ...
Dimension Guide
Page 2
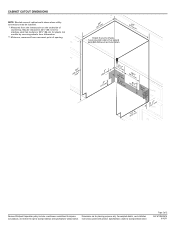
W10350361A 6/10/11 Because Whirlpool Corporation policy includes a continuous commitment to change materials and specifications without notice. Specifications subject to improve Dimensions are for plastic tub models by removing wheels ... countertop. CABINET CUTOUT DIMENSIONS NOTE: Shaded areas of cabinet walls show where utility connections may be reduced to change without notice. For complete details, see Installation our products, we reserve the right to 33¹⁄₂" (85.1 cm) for stainless steel tub models or 33⁷⁄₈" (86 cm...
W10350361A 6/10/11 Because Whirlpool Corporation policy includes a continuous commitment to change materials and specifications without notice. Specifications subject to improve Dimensions are for plastic tub models by removing wheels ... countertop. CABINET CUTOUT DIMENSIONS NOTE: Shaded areas of cabinet walls show where utility connections may be reduced to change without notice. For complete details, see Installation our products, we reserve the right to 33¹⁄₂" (85.1 cm) for stainless steel tub models or 33⁷⁄₈" (86 cm...
Warranty Information
Page 1
... to correct house wiring or plumbing. 2. Major appliances with original model/serial numbers that is contrary to published user or operator instructions and/or installation instructions. 4. In Canada, call 1-800-253-1301. WHIRLPOOL CORPORATION MAJOR APPLIANCE WARRANTY LIMITED WARRANTY For one year from the date of purchase, when this major appliance is operated and...
... to correct house wiring or plumbing. 2. Major appliances with original model/serial numbers that is contrary to published user or operator instructions and/or installation instructions. 4. In Canada, call 1-800-253-1301. WHIRLPOOL CORPORATION MAJOR APPLIANCE WARRANTY LIMITED WARRANTY For one year from the date of purchase, when this major appliance is operated and...


